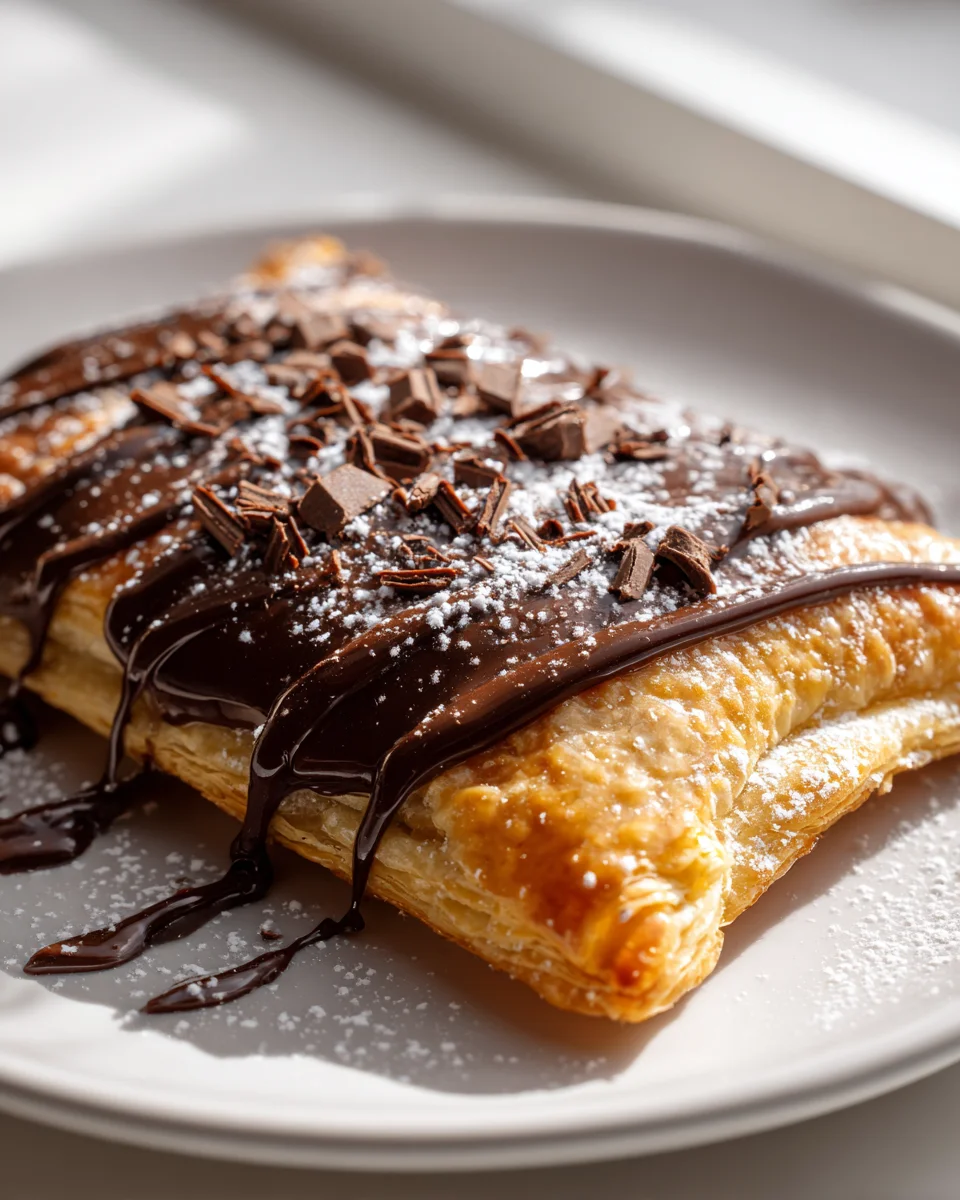
Chocolate Fudge Pop Tarts
Oh, prepare yourselves, my friends, because today we’re diving headfirst into a world of pure, unadulterated chocolate bliss with my recipe for Chocolate Fudge Pop Tarts! Forget everything you thought you knew about those foil-wrapped breakfast pastries, because we’re about to make something infinitely better, more decadent, and utterly irresistible right in your own kitchen. This isn’t just any dessert; it’s a nostalgic trip to your childhood, but with a serious gourmet upgrade.
What makes these homemade Chocolate Fudge Pop Tarts so incredibly special? Well, for starters, we’re talking about a buttery, flaky pastry that shatters perfectly with every bite, encapsulating a truly rich and gooey chocolate fudge filling that warms up to pure molten perfection. We’re not using flimsy, overly sweet spreads here – this is a proper, deeply chocolatey fudge that will make your eyes roll back in your head. Plus, there’s a lovely chocolate drizzle on top for that extra touch of sweetness and visual appeal. You’re going to love them because they’re the ultimate comfort food, a delightful marriage of convenience and gourmet quality that will satisfy even your most intense chocolate cravings. Whether you enjoy them warm from the oven, straight from the toaster, or as a delightful snack any time of day, these pop tarts are guaranteed to bring a huge smile to your face. Get ready to experience the homemade version of a beloved classic, elevated to an art form!

Ingredient Notes
Crafting delicious Chocolate Fudge Pop Tarts starts with choosing the right ingredients. I’ve found that a combination of quality components makes all the difference in achieving that perfect balance of flaky pastry and gooey, rich chocolate fudge. Here are the stars of our show and some helpful substitutions:
For the Pastry:
- Store-Bought Pie Crust or Puff Pastry: This is my go-to for convenience! Two sheets are usually enough for 6-8 pop tarts. Look for brands with good reviews for flakiness. If you’re using puff pastry, ensure it’s fully thawed but still cold.
- Homemade Pastry: If you’re feeling ambitious, a classic shortcrust pastry made with all-purpose flour, cold unsalted butter, a pinch of salt, and a little ice water works wonderfully. The key is to keep everything very cold for a tender, flaky result.
- Egg Wash (Optional): A lightly beaten egg mixed with a tablespoon of water or milk for brushing the pastry edges before sealing helps create a strong bond and gives a lovely golden sheen.
Substitutions: For a gluten-free option, you can find excellent store-bought gluten-free pie crusts, or use a gluten-free all-purpose flour blend if making your pastry from scratch. Just be mindful that GF pastries can sometimes be a little more delicate to work with.
For the Chocolate Fudge Filling:
- Unsweetened Cocoa Powder: This is where the rich chocolate flavor comes from. I prefer Dutch-processed cocoa for its darker color and smoother, less bitter taste, but natural unsweetened cocoa works too.
- Granulated Sugar: For sweetness, of course!
- Milk: Any kind of milk works here – whole milk for richness, or a lower-fat option if you prefer.
- Unsalted Butter: Adds richness and helps create that smooth, fudgy texture.
- Vanilla Extract: A crucial flavor enhancer for chocolate. Don’t skip it!
- Pinch of Salt: Balances the sweetness and deepens the chocolate flavor.
- Cornstarch or All-Purpose Flour: A small amount acts as a thickener, ensuring your fudge filling sets up nicely and doesn’t run out during baking.
- Mini Chocolate Chips (Optional): For an extra burst of molten chocolate! Stir them in after the fudge is cooked.
Substitutions: For a dairy-free fudge, substitute plant-based milk (like almond or oat) and a dairy-free butter alternative. The texture might be slightly different but still delicious. You can adjust the amount of sugar to your personal preference, especially if using a different type of cocoa.
For the Glaze:
- Powdered Sugar (Confectioners’ Sugar): The base for our quick and easy glaze.
- Milk or Cream: Just a tiny bit to get the right consistency. Cream will make it richer.
- Vanilla Extract: For flavor.
- Cocoa Powder (Optional): If you want to make a chocolate glaze, add a spoonful or two of cocoa powder.
- Sprinkles: Because it’s not a Pop Tart without sprinkles!
Substitutions: Use plant-based milk for a dairy-free glaze. For a richer, slightly thicker chocolate glaze, you could melt a small amount of chocolate with the milk before whisking in the powdered sugar.
Step-by-Step Instructions
Here’s how I bring these Chocolate Fudge Pop Tarts to life. Follow these steps for flaky pastry and a rich, gooey chocolate center!
Step 1: Prepare the Chocolate Fudge Filling
- In a medium saucepan, combine the unsweetened cocoa powder, granulated sugar, milk, unsalted butter, and a pinch of salt.
- Whisk everything together until well combined.
- Heat the mixture over medium heat, stirring constantly, until the butter is melted and the mixture comes to a gentle simmer. Continue to cook for another 2-3 minutes, stirring, until it thickens slightly.
- Remove the saucepan from the heat. Stir in the vanilla extract and, if using, the mini chocolate chips until they’re melted and fully incorporated.
- CRITICAL STEP: Transfer the fudge filling to a bowl and let it cool completely to room temperature. You can speed this up by placing it in the refrigerator for about 30-60 minutes, stirring occasionally. A cool, thick filling is essential for easy assembly and preventing soggy pastry.
Step 2: Prepare the Pastry
- Preheat your oven to 375°F (190°C). Line a large baking sheet with parchment paper.
- If using store-bought pie crusts, unroll one sheet onto a lightly floured surface. If using puff pastry, unroll and gently roll it out a bit thinner if needed. If making homemade pastry, roll it out to about 1/8-inch thickness.
- Using a sharp knife or a pastry wheel, trim the edges to create a large rectangle. Then, cut the pastry into smaller rectangles, approximately 3×4 inches (this is a good size, but you can adjust). You’ll need an even number of rectangles for tops and bottoms. Repeat with the second sheet of pastry.
Step 3: Assemble the Pop Tarts
- Place half of your pastry rectangles onto the prepared baking sheet. These will be the bottom halves.
- Spoon a generous tablespoon (or about 1.5 tablespoons) of the cooled chocolate fudge filling into the center of each bottom pastry rectangle. Be sure to leave about a 1/2-inch border all around the edges; don’t overfill!
- If using, lightly brush the pastry edges around the filling with a little water or egg wash. This acts as glue.
- Carefully place the remaining pastry rectangles over the top of the filled bottoms, lining up the edges as best you can.
- Gently press down around the edges of each pop tart to seal them. Then, use the tines of a fork to crimp all around the edges, firmly sealing the top and bottom pastries together and creating that classic Pop Tart look.
Step 4: Bake the Pop Tarts
- Using the tines of a fork, prick the tops of each assembled pop tart 3-4 times. This allows steam to escape during baking and prevents the pastry from puffing up excessively.
- Bake in the preheated oven for 15-20 minutes, or until the pastry is golden brown and looks flaky.
- Remove from the oven and carefully transfer the hot pop tarts to a wire rack to cool completely before glazing.
Step 5: Glaze and Serve
- While the pop tarts are cooling, prepare the glaze. In a small bowl, whisk together the powdered sugar, 1-2 tablespoons of milk or cream, and vanilla extract until smooth. If you want a chocolate glaze, whisk in 1-2 tablespoons of cocoa powder as well. Add more milk a tiny bit at a time if it’s too thick, or more powdered sugar if it’s too thin.
- Once the pop tarts are completely cool, drizzle or spread the glaze evenly over the tops.
- If using sprinkles, add them immediately before the glaze sets.
- Let the glaze set for about 10-15 minutes, then your Chocolate Fudge Pop Tarts are ready to enjoy!
Tips & Suggestions
I’ve made my fair share of these Chocolate Fudge Pop Tarts, and along the way, I’ve picked up a few tricks that I think will really help you get the best results. Here are my top tips and some ideas for making them truly your own:
- Chill Your Pastry: Keeping your pastry cold is crucial for flakiness. If your kitchen is warm or you’re taking your time with assembly, pop the cut pastry rectangles and even the assembled pop tarts into the fridge for 10-15 minutes before baking. This helps prevent them from spreading too much and ensures a beautiful texture.
- Don’t Overfill: It’s tempting to load them up with fudge, but trust me, less is more here. Too much filling will inevitably bubble out during baking, making a sticky mess and potentially leaving you with an empty pocket inside. Stick to a generous tablespoon or just enough to cover the center leaving a good border.
- Seal Them Well: The fork crimp isn’t just for looks! Press firmly around the edges to ensure a good seal. This is your main defense against the delicious fudge escaping. You can also brush the edges of the bottom pastry with a little water or egg wash before placing the top pastry on; it acts like edible glue.
- Even Thickness for Pastry: When rolling out your pastry, try to get an even thickness. This ensures consistent baking and that satisfying crunch in every bite.
- Cool the Fudge Completely: I cannot stress this enough! Warm or even slightly warm fudge will make your pastry soggy and incredibly difficult to work with. Plan ahead and give your fudge ample time to cool to room temperature, or even chill it in the fridge until it’s thick and spreadable.
- Personalize Your Fudge: Feel free to experiment with the fudge filling! A tiny splash of strong coffee or espresso, or a pinch of cinnamon, can really enhance the chocolate flavor. You could even stir in a tablespoon of peanut butter for a chocolate-peanut butter fudge surprise.
- Glaze Variations: While a classic vanilla or chocolate glaze is fantastic, consider melting a few squares of good quality chocolate with a touch of cream for a richer ganache-style topping. Or, add a hint of almond extract to your vanilla glaze for a different flavor profile.
- Serve Warm: While they are delicious at room temperature, a freshly baked (or gently reheated) Chocolate Fudge Pop Tart with a slightly gooey center is truly heavenly.
Storage
Once you’ve gone to the effort of making these delightful Chocolate Fudge Pop Tarts, you’ll want to make sure they stay fresh and delicious for as long as possible. Here’s how I store mine:
- At Room Temperature (Unglazed): If your pop tarts are unglazed, they can be stored in an airtight container at room temperature for up to 2-3 days. This is great if you plan to glaze them just before serving.
- At Room Temperature (Glazed): Glazed pop tarts can also be stored in an airtight container at room temperature. However, the glaze might become a little sticky over time, especially if the weather is humid. They’re usually best eaten within 1-2 days if glazed. To prevent sticking, you can place a piece of parchment paper between layers if stacking.
- In the Refrigerator: For longer storage, or if your kitchen is particularly warm, place your Chocolate Fudge Pop Tarts in an airtight container in the refrigerator. They will keep well for up to a week. The pastry might lose a little of its crispness, but the fudge filling will remain perfect.
- Freezing (Baked and Unglazed): These pop tarts freeze beautifully! Once completely cooled and unglazed, wrap each pop tart individually in plastic wrap, then place them in a freezer-safe bag or airtight container. They can be frozen for up to 2-3 months.
- Freezing (Unbaked): You can also freeze them unbaked! After assembling and crimping (but before pricking with a fork), arrange them on a baking sheet and freeze until solid. Then, transfer the frozen pop tarts to a freezer-safe bag or container. When you’re ready to bake, you can bake them from frozen; just add about 5-10 minutes to the baking time and prick them with a fork before they go into the oven.
- Reheating:
- From Room Temperature: Pop them in a toaster oven at 300°F (150°C) for a few minutes until warmed through, or microwave for 10-15 seconds for a soft center. Avoid a regular toaster if glazed, as the glaze can melt and make a mess.
- From Refrigerator: Reheat similarly to room temperature, but they might need an extra minute or two.
- From Freezer: Thaw them overnight in the refrigerator first, then reheat as above. If baking from frozen, just add extra time to the oven.
Final Thoughts
I truly hope you give these Chocolate Fudge Pop Tarts a try! There’s something incredibly special about a warm, homemade treat that perfectly captures the essence of a classic comfort food. Forget the store-bought versions; these elevate the experience with their rich, gooey chocolate fudge filling and tender, golden pastry. They are an absolute game-changer for breakfast or an anytime snack, promising a delightful burst of chocolatey goodness in every single bite. Trust me, once you taste these homemade Chocolate Fudge Pop Tarts, you’ll understand why they’re destined to become a new favorite in your kitchen!

Chocolate Fudge Pop Tarts: Easy Homemade Recipe!
- Total Time: 50 minutes
- Yield: 6-8 pop tarts
Description
Dive into a world of chocolate bliss with these homemade Chocolate Fudge Pop Tarts! Enjoy a flaky pastry filled with rich, gooey chocolate fudge, perfect for any time of day.
Ingredients
- Store-Bought Pie Crust or Puff Pastry (2 sheets)
- Homemade Pastry (made with all-purpose flour, cold unsalted butter, a pinch of salt, and a little ice water)
- Egg Wash (Optional: 1 lightly beaten egg mixed with a tablespoon of water or milk)
- Unsweetened Cocoa Powder
- Granulated Sugar
- Milk (any kind)
- Unsalted Butter
- Vanilla Extract
- Pinch of Salt
- Cornstarch or All-Purpose Flour
- Mini Chocolate Chips (Optional)
- Powdered Sugar (Confectioners' Sugar)
- Milk or Cream (a tiny bit)
- Cocoa Powder (Optional)
- Sprinkles
Instructions
- Step 1: Prepare the Chocolate Fudge Filling – In a medium saucepan, combine the unsweetened cocoa powder, granulated sugar, milk, unsalted butter, and a pinch of salt. Whisk everything together until well combined. Heat the mixture over medium heat, stirring constantly, until the butter is melted and the mixture comes to a gentle simmer. Continue to cook for another 2-3 minutes, stirring, until it thickens slightly. Remove the saucepan from the heat. Stir in the vanilla extract and, if using, the mini chocolate chips until they're melted and fully incorporated. Transfer the fudge filling to a bowl and let it cool completely to room temperature.
- Step 2: Prepare the Pastry – Preheat your oven to 375°F (190°C). Line a large baking sheet with parchment paper. If using store-bought pie crusts, unroll one sheet onto a lightly floured surface. If using puff pastry, unroll and gently roll it out a bit thinner if needed. If making homemade pastry, roll it out to about 1/8-inch thickness. Using a sharp knife or a pastry wheel, trim the edges to create a large rectangle. Then, cut the pastry into smaller rectangles, approximately 3×4 inches. You'll need an even number of rectangles for tops and bottoms. Repeat with the second sheet of pastry.
- Step 3: Assemble the Pop Tarts – Place half of your pastry rectangles onto the prepared baking sheet. Spoon a generous tablespoon (or about 1.5 tablespoons) of the cooled chocolate fudge filling into the center of each bottom pastry rectangle, leaving about a 1/2-inch border all around the edges. If using, lightly brush the pastry edges around the filling with a little water or egg wash. Carefully place the remaining pastry rectangles over the top of the filled bottoms, lining up the edges as best you can. Gently press down around the edges of each pop tart to seal them. Use the tines of a fork to crimp all around the edges.
- Step 4: Bake the Pop Tarts – Using the tines of a fork, prick the tops of each assembled pop tart 3-4 times. Bake in the preheated oven for 15-20 minutes, or until the pastry is golden brown and looks flaky. Remove from the oven and carefully transfer the hot pop tarts to a wire rack to cool completely before glazing.
- Step 5: Glaze and Serve – While the pop tarts are cooling, prepare the glaze. In a small bowl, whisk together the powdered sugar, 1-2 tablespoons of milk or cream, and vanilla extract until smooth. If you want a chocolate glaze, whisk in 1-2 tablespoons of cocoa powder as well. Once the pop tarts are completely cool, drizzle or spread the glaze evenly over the tops. If using sprinkles, add them immediately before the glaze sets. Let the glaze set for about 10-15 minutes, then your Chocolate Fudge Pop Tarts are ready to enjoy!
- Prep Time: 30 mins
- Cook Time: 20 mins
- Category: Dessert
- Method: Baking
- Cuisine: American
Nutrition
- Serving Size: 1 pop tart
- Calories: 250
- Sugar: 20 g
- Sodium: 150 mg
- Fat: 10 g
- Saturated Fat: 5 g
- Unsaturated Fat: 3 g
- Trans Fat: 0 g
- Carbohydrates: 35 g
- Fiber: 1 g
- Protein: 3 g
- Cholesterol: 30 mg
Keywords: Chill your pastry for flakiness, don't overfill the pop tarts, and ensure the fudge is completely cool before assembly. Personalize your fudge filling with flavors like coffee or cinnamon, and try different glaze variations for a unique touch.