Homemade Sour Patch Kids
Oh my goodness, you guys! If you’re anything like me, you’ve probably got a serious soft spot (or maybe a super sour spot!) for those iconic candies that are first sour, then wonderfully sweet. Well, get ready to take that love to a whole new level because today, we’re diving into the absolutely delightful world of making our very own Homemade Sour Patch Kids!
What makes this recipe so incredibly special, you ask? It’s simple: you get to be the absolute master of your own candy universe! Forget store-bought packets; with this recipe, you’re in complete control of the flavors, the intensity of that signature sour kick, and even the vibrant colors. Imagine fresh, real fruit flavors bursting through that classic pucker-inducing coating, all made with ingredients you choose. You’ll love knowing exactly what goes into each chewy, delightful bite, making them a fantastic and customizable treat for everyone.
This isn’t just a recipe; it’s a super fun experience! Readers are going to adore this because it’s not only incredibly satisfying and enjoyable to create these little guys from scratch, but the result is a truly elevated, fresher version of a beloved classic. Whether you’re planning a fun afternoon activity with the kids, looking for a unique and impressive party favor, or simply want to satisfy that specific sour-sweet craving with something truly homemade, these are absolutely perfect. Essentially, we’ll be combining a few simple ingredients like gelatin, sugar, and your favorite fruit juice or puree, molding them into those cute kid shapes, and then giving them their legendary sour sugar coating. Prepare for your taste buds to do a happy dance – first perfectly sour, then wonderfully sweet!

Ingredient Notes
Making homemade Sour Patch Kids is such a fun and rewarding project, and the key to getting that perfect chewy, sour, and sweet bite really starts with understanding your ingredients. I’ve refined this recipe over time, and these are the core components you’ll need to capture that nostalgic candy experience.
- Unflavored Gelatin: This is the backbone of our gummy candy, providing that quintessential chewiness and bounce. I typically use powdered unflavored gelatin, like Knox brand, which is readily available. You’ll need several packets. While sheet gelatin can be used, powdered is easier for beginners and gives consistent results for this recipe. If you’re looking for a vegan alternative, agar-agar can sometimes be substituted, but it will yield a different texture – more jelly-like than gummy – and the quantity conversion isn’t always straightforward, so I highly recommend sticking with traditional gelatin for the true Sour Patch Kid experience.
- Granulated Sugar: You’ll need this for both the candy itself and the iconic sour coating. It provides sweetness and structure to the gummy.
- Light Corn Syrup: This is a critical ingredient! Corn syrup isn’t just for sweetness; its primary role here is to prevent sugar crystallization, which keeps our gummies smooth, clear, and perfectly chewy rather than grainy. Don’t skip it if you want that classic gummy texture. There isn’t a direct substitute that provides the same anti-crystallization properties without altering the texture significantly.
- Cold Water: Used to bloom the gelatin and dissolve the sugar. Temperature is important here – always use cold water for blooming gelatin to ensure it hydrates properly without clumping.
- Flavor Extracts: This is where the fun really begins! You can choose any flavor you like to mimic your favorite Sour Patch Kids. Lemon, lime, cherry, blue raspberry, or orange extracts work wonderfully. I prefer using high-quality concentrated flavorings for a more intense taste. Avoid oil-based extracts as they can interfere with the gelatin setting.
- Food Coloring: To make them look like the real deal, food coloring is a must. Gel food coloring provides vibrant colors without adding much liquid, which is my preference. A little goes a long way!
- Citric Acid: Ah, the magic ingredient for the “sour” in Sour Patch Kids! This is what gives them that signature puckering punch. You can find food-grade citric acid in the baking aisle of many grocery stores, specialty spice shops, or online. Don’t confuse it with ascorbic acid (Vitamin C), as they are different in terms of sourness and application.
Step-by-Step Instructions
Ready to make some magic? Follow these steps closely, and you’ll have a batch of incredibly delicious homemade Sour Patch Kids in no time!
- Prepare Your Molds: First things first, get your silicone candy molds ready. I find that lightly greasing them with a flavorless oil (like coconut or vegetable oil) using a paper towel helps immensely with unmolding later. Set them aside on a baking sheet for easy transfer to the fridge.
- Bloom the Gelatin: In a small bowl, combine your unflavored gelatin powder with 1/2 cup of the cold water. Stir it briefly, then let it sit undisturbed for about 5-10 minutes. This process, called “blooming,” allows the gelatin granules to absorb water and swell, ensuring a smooth mixture later. It will turn into a thick, jello-like mass.
- Create the Sugar Syrup: In a medium saucepan, combine the remaining 1/2 cup cold water, granulated sugar, and light corn syrup. Place the saucepan over medium heat, stirring constantly until the sugar completely dissolves. Once the sugar is dissolved, stop stirring and bring the mixture to a gentle boil. Let it boil for about 1 minute. The goal here is just to dissolve the sugar, not to cook it to a specific temperature.
- Combine and Dissolve: Remove the saucepan from the heat. Immediately add the bloomed gelatin to the hot sugar syrup. Stir continuously until the gelatin is completely dissolved and no lumps remain. This should only take a minute or two.
- Flavor and Color: Now for the fun part! Stir in your chosen flavor extract(s) and a few drops of food coloring. Start with a small amount of coloring and add more until you reach your desired vibrancy. Make sure to mix thoroughly to distribute the flavor and color evenly throughout the mixture.
- Pour into Molds: Carefully pour the warm liquid gummy mixture into your prepared silicone molds. I find using a liquid measuring cup with a spout or a dropper makes this task much cleaner. Fill each cavity to the top.
- Chill to Set: Transfer the baking sheet with the filled molds to the refrigerator. Allow the gummies to chill for at least 2-3 hours, or until they are completely firm and easily release from the molds. Patience is key here – don’t rush this step!
- Unmold the Gummies: Once fully set, gently pop the gummies out of their molds. They should release easily. If they feel a bit sticky, that’s okay, the next step will fix that.
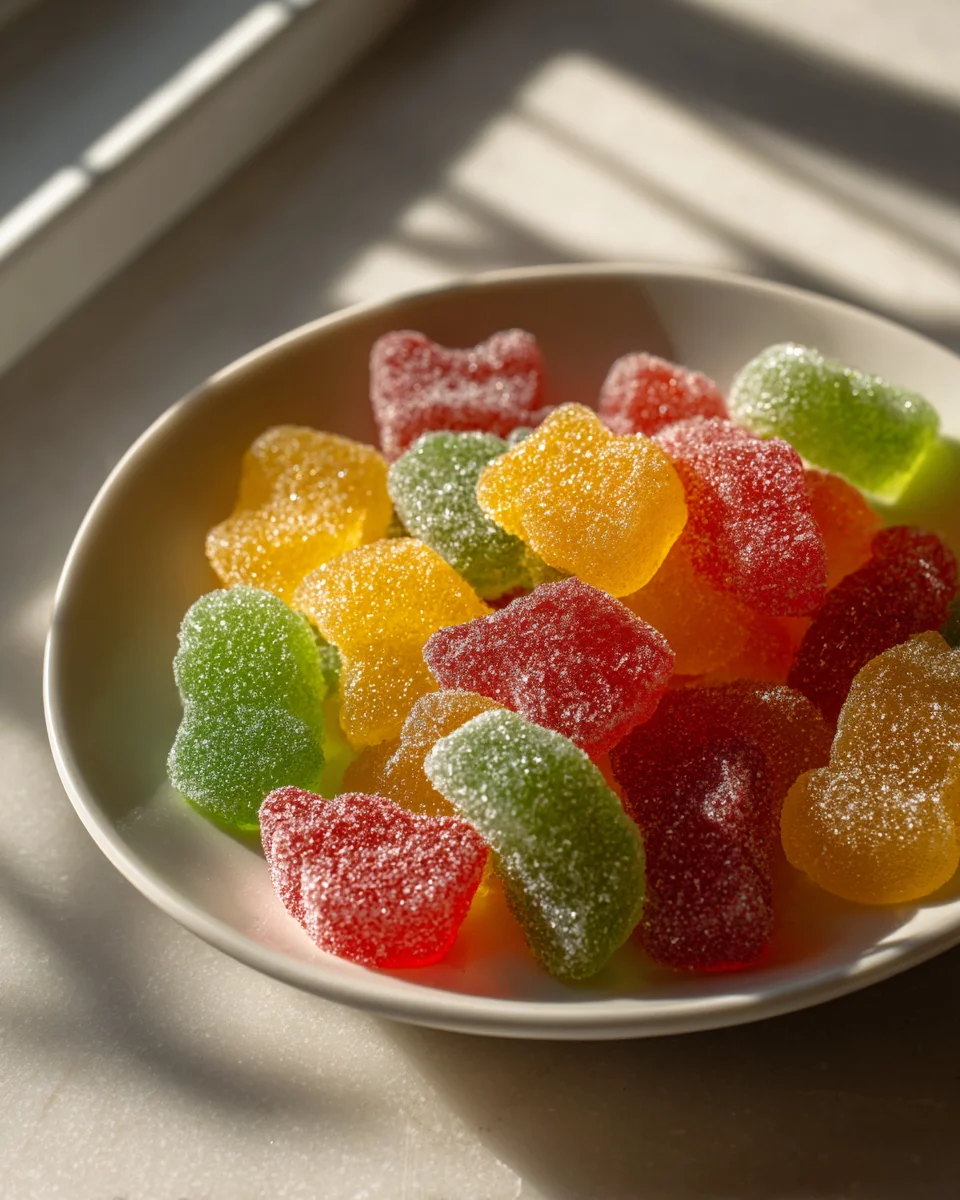
- Prepare the Sour Coating: In a shallow dish or a Ziploc bag, combine the remaining granulated sugar with the citric acid. The ratio is usually 1:1 or 2:1 sugar to citric acid, depending on how sour you like them. I often do 2 tablespoons sugar to 1 tablespoon citric acid for a good punch.
- Coat the Gummies: Add a few of the unmolded gummies to the sour coating mixture. Gently toss them around until they are evenly coated. Repeat with the remaining gummies.
- Air Dry (Optional but Recommended): For the best texture and to prevent stickiness, I like to spread the coated gummies out on a parchment-lined baking sheet and let them air dry at room temperature for another 1-2 hours. This helps the coating adhere better and gives them that classic Sour Patch texture.
Tips & Suggestions
Making homemade candy can be a delicate art, but with a few pointers specific to Sour Patch Kids, you’ll master it in no time!
- Precision with Gelatin: The ratio of gelatin to liquid is crucial for the perfect gummy texture. Always measure your gelatin precisely. Too little, and they’ll be too soft; too much, and they’ll be too rubbery.
- Don’t Boil After Gelatin: Once you’ve added the bloomed gelatin to the hot sugar syrup, do NOT bring it back to a boil. High heat can weaken the gelatin’s gelling properties, resulting in gummies that don’t set properly.
- Controlling Sourness: The amount of citric acid in your coating is entirely up to your preference. If you love an extreme pucker, increase the citric acid. For a milder sour, use a bit less or more sugar in the coating. You can even add a tiny pinch of citric acid directly into the gummy mixture itself (before pouring into molds) for an internal sour kick, but be careful not to add too much as it can affect the set.
- Experiment with Flavors and Colors: Don’t be afraid to get creative! Mix and match flavor extracts and food colorings to create your own unique Sour Patch Kid varieties. Think tropical mixes or even savory-sweet combinations.
- Ensure Molds are Clean & Dry: Before pouring, make sure your silicone molds are completely clean and dry (or lightly oiled as instructed). Any water residue can affect the setting or cause stickiness.
- Patience is a Virtue: The chilling time is essential. Resist the urge to pop them out too early, or they might lose their shape or be overly sticky. A fully set gummy will release cleanly from the mold.
- Uniform Coating: When coating with the sour sugar mixture, work in small batches. This ensures each gummy gets an even layer of that wonderful sour goodness. Shake off any excess.
- Air Dry for Best Results: The air-drying step truly makes a difference. It helps the outer coating crystallize slightly, preventing stickiness and giving them that characteristic slightly textured exterior.
Storage
Once you’ve made these delightful homemade Sour Patch Kids, proper storage is key to keeping them fresh, chewy, and perfectly sour. I always follow these guidelines to ensure they last as long as possible.
- Airtight Container: Always store your homemade Sour Patch Kids in an airtight container at room temperature. This is crucial for preventing them from drying out, hardening, or becoming overly sticky by absorbing moisture from the air.
- Prevent Stickiness: If you find your gummies are still a bit sticky after coating and air-drying, you can add a small amount of cornstarch or even a tiny amount of additional sugar to the bottom of your storage container before adding the candies. Shake gently to coat. This provides an extra barrier against sticking together. However, a good citric acid coating and air dry usually prevent this.
- Room Temperature is Best: While you might be tempted to refrigerate them, I actually find that storing them at room temperature (in a cool, dry place away from direct sunlight) maintains their ideal chewy texture. Refrigeration can sometimes make them too firm or cause the sugar coating to weep.
- Shelf Life: When stored properly in an airtight container at room temperature, your homemade Sour Patch Kids will typically last for about 1-2 weeks. Beyond that, they might start to lose their optimal texture or freshness, though they might still be safe to eat. They are usually eaten much faster than that in my house, though!
Final Thoughts
There’s something truly magical about bringing your favorite candies to life in your own kitchen. And with these Homemade Sour Patch Kids, you’re not just making a treat; you’re crafting an experience! I absolutely love how these chewy, tangy delights burst with flavor, perfectly mimicking the store-bought version but with that special touch only homemade can offer.
This recipe for Homemade Sour Patch Kids is a definite must-try because it’s incredibly fun, surprisingly simple, and delivers on every front. Imagine the joy of customizing the colors and flavors, creating a batch that’s uniquely yours. The look on people’s faces when they discover these are homemade? Priceless! So go ahead, embrace your inner candy maker, and get ready to enjoy the most satisfyingly sour and sweet treat you’ve ever created. You won’t regret diving into the delightful world of Homemade Sour Patch Kids!

Homemade Sour Patch Kids Recipe – Sweet & Sour Fun!
- Total Time: 45 minutes
- Yield: 4 servings
Description
Create your own delightful and chewy Homemade Sour Patch Kids with this fun and customizable recipe. Experience the joy of crafting these iconic candies with fresh flavors and a perfect sour coating!
Ingredients
- Unflavored Gelatin
- Granulated Sugar
- Light Corn Syrup
- Cold Water
- Flavor Extracts (Lemon, lime, cherry, blue raspberry, or orange)
- Food Coloring
- Citric Acid
Instructions
- Prepare Your Molds: First things first, get your silicone candy molds ready. Lightly grease them with a flavorless oil (like coconut or vegetable oil) using a paper towel and set them aside on a baking sheet for easy transfer to the fridge.
- Bloom the Gelatin: In a small bowl, combine your unflavored gelatin powder with 1/2 cup of the cold water. Stir it briefly, then let it sit undisturbed for about 5-10 minutes.
- Create the Sugar Syrup: In a medium saucepan, combine the remaining 1/2 cup cold water, granulated sugar, and light corn syrup. Place the saucepan over medium heat, stirring constantly until the sugar completely dissolves. Once the sugar is dissolved, stop stirring and bring the mixture to a gentle boil for about 1 minute.
- Combine and Dissolve: Remove the saucepan from the heat. Immediately add the bloomed gelatin to the hot sugar syrup. Stir continuously until the gelatin is completely dissolved and no lumps remain.
- Flavor and Color: Stir in your chosen flavor extract(s) and a few drops of food coloring. Mix thoroughly to distribute the flavor and color evenly throughout the mixture.
- Pour into Molds: Carefully pour the warm liquid gummy mixture into your prepared silicone molds. Fill each cavity to the top.
- Chill to Set: Transfer the baking sheet with the filled molds to the refrigerator. Allow the gummies to chill for at least 2-3 hours, or until they are completely firm.
- Unmold the Gummies: Once fully set, gently pop the gummies out of their molds.
- Prepare the Sour Coating: In a shallow dish or a Ziploc bag, combine the remaining granulated sugar with the citric acid.
- Coat the Gummies: Add a few of the unmolded gummies to the sour coating mixture and gently toss them around until they are evenly coated.
- Air Dry (Optional but Recommended): Spread the coated gummies out on a parchment-lined baking sheet and let them air dry at room temperature for another 1-2 hours.
- Prep Time: 15 mins
- Cook Time: 30 mins
- Category: Candy
- Method: No-Bake
- Cuisine: American
Nutrition
- Serving Size: 1 gummy
- Calories: 50
- Sugar: 10 g
- Sodium: 0 mg
- Fat: 0 g
- Saturated Fat: 0 g
- Unsaturated Fat: 0 g
- Trans Fat: 0 g
- Carbohydrates: 12 g
- Fiber: 0 g
- Protein: 0 g
- Cholesterol: 0 mg
Keywords: Precision with gelatin is crucial for the perfect gummy texture. Don't boil after adding gelatin to the syrup, and control the sourness by adjusting the citric acid in the coating.