Witches Brew Halloween Cake Jars are here to cast a spell of delight over your spooky season celebrations! Imagine a dessert so enchanting, so perfectly portioned, and bursting with vibrant, festive colors that it seems conjured straight from a sorcerer’s cauldron. I am absolutely thrilled to share with you a recipe that perfectly encapsulates the playful mystery and whimsical charm of Halloween in every single bite. These individual cake jars aren’t just desserts; they are miniature edible spectacles, promising a magical experience for guests of all ages.
The Allure of the Brew: A Modern Halloween Treat
While the concept of a “witch’s brew” harks back to ancient folklore and tales of bubbling cauldrons, our modern interpretation transforms this spooky idea into something utterly irresistible and entirely convenient. Gone are the days of messy slicing and serving; these cake jars offer a no-fuss, elegant, and perfectly portable solution for any Halloween gathering, from a casual family movie night to a grand costume party. People adore these whimsical creations not only for their striking visual appeal – layer upon layer of moist cake, creamy frosting, and vibrant sprinkles resembling a mystical potion – but also for their incredible taste and fantastic texture. Each spoonful delivers a harmonious blend of rich flavors, often chocolate or vanilla, infused with the spirit of the season.
We’ve crafted this recipe for Witches Brew Halloween Cake Jars with convenience and pure joy in mind. They make for fantastic party favors, delightful trick-or-treat alternatives, or simply a charming individual treat to enjoy with a cup of cider. Get ready to enchant your taste buds and impress your guests with these bewitching delights!

Ingredients:
-
For the Spooky Vanilla Cake Layers:
- 2 ½ cups (300g) all-purpose flour: I always use unbleached flour for a consistently tender crumb.
- 2 teaspoons baking powder: This is our main leavening agent for that lovely lift.
- ½ teaspoon baking soda: Works in tandem with the acidity in the buttermilk for extra tenderness.
- ½ teaspoon salt: Don’t skip this! It balances the sweetness beautifully.
- 1 cup (226g) unsalted butter, softened: Make sure it’s truly soft, not melted, for a light and fluffy cake.
- 2 cups (400g) granulated sugar: For sweetness and structure.
- 4 large eggs, at room temperature: Room temperature eggs emulsify better, creating a smoother batter.
- 1 cup (240ml) buttermilk, at room temperature: The secret to a moist and tender cake!
- 2 teaspoons pure vanilla extract: The soul of our vanilla cake.
- Gel food coloring: Purple, green, and black are my go-to “witches brew” colors. Gel colors are best for vibrant shades without thinning the batter.
-
For the Eerie Purpleberry “Brew” Compote:
- 2 cups (250g) mixed berries, fresh or frozen (I love a mix of blueberries, blackberries, and raspberries for that deep purple hue).
- ½ cup (100g) granulated sugar: Adjust to your sweetness preference based on your berries.
- 2 tablespoons fresh lemon juice: Brightens the flavor and helps the compote set a little.
- ¼ cup (60ml) water (optional, if berries aren’t very juicy).
- 1 teaspoon cornstarch mixed with 1 tablespoon cold water (optional, for a thicker compote).
-
For the Ghastly Green “Slime” Buttercream Frosting:
- 1 cup (226g) unsalted butter, softened to room temperature: Again, perfectly soft is key for smooth frosting.
- 4 cups (480g) powdered sugar, sifted: Sifting is crucial to avoid lumps in your buttercream.
- ¼ cup (60ml) heavy cream or whole milk: Adds richness and helps achieve the right consistency.
- 1 teaspoon pure vanilla extract: Enhances the butter and sugar flavors.
- Pinch of salt: Balances the sweetness.
- Green gel food coloring: For that vibrant, spooky slime effect.
-
For the Creepy Crushed Oreo “Dirt” Topping:
- 12-15 Oreo cookies, crushed (cream filling included!): This gives a wonderful “earthy” look and texture.
-
For the Wicked Web Decorations:
- Black edible food marker OR Black royal icing:
- If making royal icing:
- 1 large egg white (or 2 tablespoons meringue powder mixed with 4 tablespoons warm water)
- 2 cups (240g) powdered sugar, sifted
- ½ teaspoon vanilla extract
- Black gel food coloring
- If making royal icing:
- Black edible food marker OR Black royal icing:
-
Optional Halloween Embellishments:
- Edible googly eyes
- Halloween sprinkles (bats, ghosts, pumpkins)
- Small plastic spiders or gummy worms (placed on top of the jar or on the lid, not directly in the cake if non-edible)
- Miniature candy corn
-
Equipment:
- 6-8 (8oz) wide-mouth mason jars with lids
- Two 9×13 inch baking pans OR one large jelly roll pan
- Parchment paper
- Round cookie cutters (various sizes, to fit your jars)
- Piping bags and star tips (optional, but helpful for frosting)
Preparing the Spooky Vanilla Cake Layers
- Preheat and Prep: First things first, let’s get our oven ready. Preheat your oven to 350°F (175°C). While it’s heating, prepare two 9×13-inch baking pans (or one large jelly roll pan, about 10×15 inches) by greasing and flouring them, or lining them with parchment paper. I find parchment paper is the easiest way to ensure a clean release for uniform cake layers, especially when you’re cutting out circles.
- Whisk Dry Ingredients: In a medium bowl, whisk together the 2 ½ cups of all-purpose flour, 2 teaspoons of baking powder, ½ teaspoon of baking soda, and ½ teaspoon of salt. Give it a good whisk to ensure everything is evenly distributed. This dry mixture sets the stage for our cake’s structure.
- Cream Butter and Sugar: In the bowl of a stand mixer fitted with the paddle attachment (or using a hand mixer and a large bowl), cream together the 1 cup of softened unsalted butter and 2 cups of granulated sugar on medium-high speed until it’s light and fluffy. This usually takes about 3-5 minutes. You’ll see the mixture lighten in color and become airy, which is exactly what we want for a tender cake. Scrape down the sides of the bowl occasionally to ensure everything is incorporated.
- Add Eggs: Reduce the mixer speed to medium and add the 4 large eggs, one at a time, beating well after each addition. Make sure each egg is fully incorporated before adding the next. This step helps build a strong emulsion, preventing your cake from separating later on. Don’t rush this!
- Alternate Dry and Wet: With the mixer on low speed, begin to alternately add the dry ingredients and the buttermilk to the butter mixture, starting and ending with the dry ingredients. So, you’ll add about a third of the flour mixture, mix until just combined, then half of the buttermilk, mix, another third of the flour, mix, the remaining buttermilk, mix, and finally the last third of the flour. Mix until just combined after each addition. Be careful not to overmix! Overmixing develops gluten, which can lead to a tough cake. A few streaks of flour are fine; you’ll mix them out by hand.
- Fold in Vanilla: Remove the bowl from the mixer and, using a rubber spatula, gently fold in the 2 teaspoons of pure vanilla extract. Give it one final gentle stir to ensure no dry pockets remain.
- Divide and Color the Batter: Now for the fun, witchy part! Divide the cake batter evenly into three separate bowls. Add a few drops of purple gel food coloring to one bowl, green to another, and black to the third. Mix each bowl gently until the color is vibrant and uniform. Remember, gel colors are highly concentrated, so start with a little and add more if needed. We want really striking, distinct colors for our “Witches Brew” theme.
- Bake the Layers: Spread each colored batter evenly into a prepared baking pan. If you’re using a large jelly roll pan, you might need to bake them one at a time, or divide the pan with foil dividers to keep the colors separate (though spreading them thinly means they bake fast). Bake for 12-18 minutes, or until a wooden skewer inserted into the center comes out clean. The thin layers bake quickly, so keep an eye on them!
- Cool Completely: Once baked, remove the cake layers from the oven and let them cool in the pans for about 10 minutes before carefully inverting them onto wire racks to cool completely. It’s absolutely crucial that the cake is completely cool before you try to cut it or assemble the jars. Warm cake crumbles and melts frosting. I often bake these layers a day ahead and wrap them tightly in plastic wrap once cool, storing them at room temperature.
Crafting the Eerie Purpleberry “Brew” Compote
- Combine Ingredients: In a medium saucepan, combine the 2 cups of mixed berries, ½ cup of granulated sugar, and 2 tablespoons of fresh lemon juice. If your berries aren’t very juicy, you can add ¼ cup of water at this stage.
- Simmer and Thicken: Place the saucepan over medium heat. Bring the mixture to a gentle simmer, stirring occasionally. The berries will begin to break down and release their juices. Continue to simmer for about 8-10 minutes, or until the compote has thickened slightly and the berries are tender. If you prefer a thicker “brew,” now is the time to add the cornstarch slurry (1 teaspoon cornstarch mixed with 1 tablespoon cold water). Stir it in and simmer for another minute or two until it reaches your desired consistency.
- Cool Down: Remove the compote from the heat and let it cool completely. As it cools, it will thicken even more. For the best “brew” experience, I like to pop it in the refrigerator for at least an hour to get it nice and chilly. This also helps it set beautifully between the cake layers.
Whipping Up the Ghastly Green “Slime” Buttercream Frosting
- Beat the Butter: In the bowl of a stand mixer fitted with the paddle attachment (or using a hand mixer), beat the 1 cup of softened unsalted butter on medium-high speed for 3-5 minutes until it’s very light and fluffy. This incorporates air, making our buttercream airy and not dense.
- Add Powdered Sugar: Gradually add the 4 cups of sifted powdered sugar, about 1 cup at a time, mixing on low speed until combined, then increasing to medium-high. Scrape down the sides of the bowl frequently. If you add it too fast, you’ll have a powdered sugar cloud in your kitchen – trust me, I’ve been there!
- Add Liquids and Flavor: Once all the powdered sugar is incorporated, add the ¼ cup of heavy cream (or whole milk), 1 teaspoon of pure vanilla extract, and a pinch of salt. Beat on medium-high speed for another 2-3 minutes until the buttercream is smooth, light, and wonderfully fluffy.
- Color the Slime: Add a few drops of green gel food coloring to the buttercream. Start with a small amount, mix, and then add more until you achieve that perfect vibrant, ghastly green “slime” color. Mix until the color is completely uniform.
Preparing the Wicked Web Decorations (Optional Royal Icing)
- Mix Ingredients: If you’re using an edible food marker, you can skip this section! But if you’re making royal icing, in a clean, grease-free bowl (grease is royal icing’s nemesis!), combine the 1 large egg white (or reconstituted meringue powder) with 2 cups of sifted powdered sugar. Start mixing on low speed, then increase to medium-high.
- Achieve Consistency: Beat until the icing holds stiff peaks, about 5-7 minutes. If it’s too thick, add water a tiny drop at a time; if too thin, add a bit more powdered sugar. We’re looking for a consistency that’s easy to pipe but still holds its shape.
- Flavor and Color: Stir in ½ teaspoon of vanilla extract. Then, add black gel food coloring a few drops at a time until you achieve a deep, dark black color.
- Prepare for Piping: Transfer the black royal icing to a small piping bag fitted with a very fine round tip (like a PME #1 or #2). You can also just snip a tiny corner off a ziploc bag.
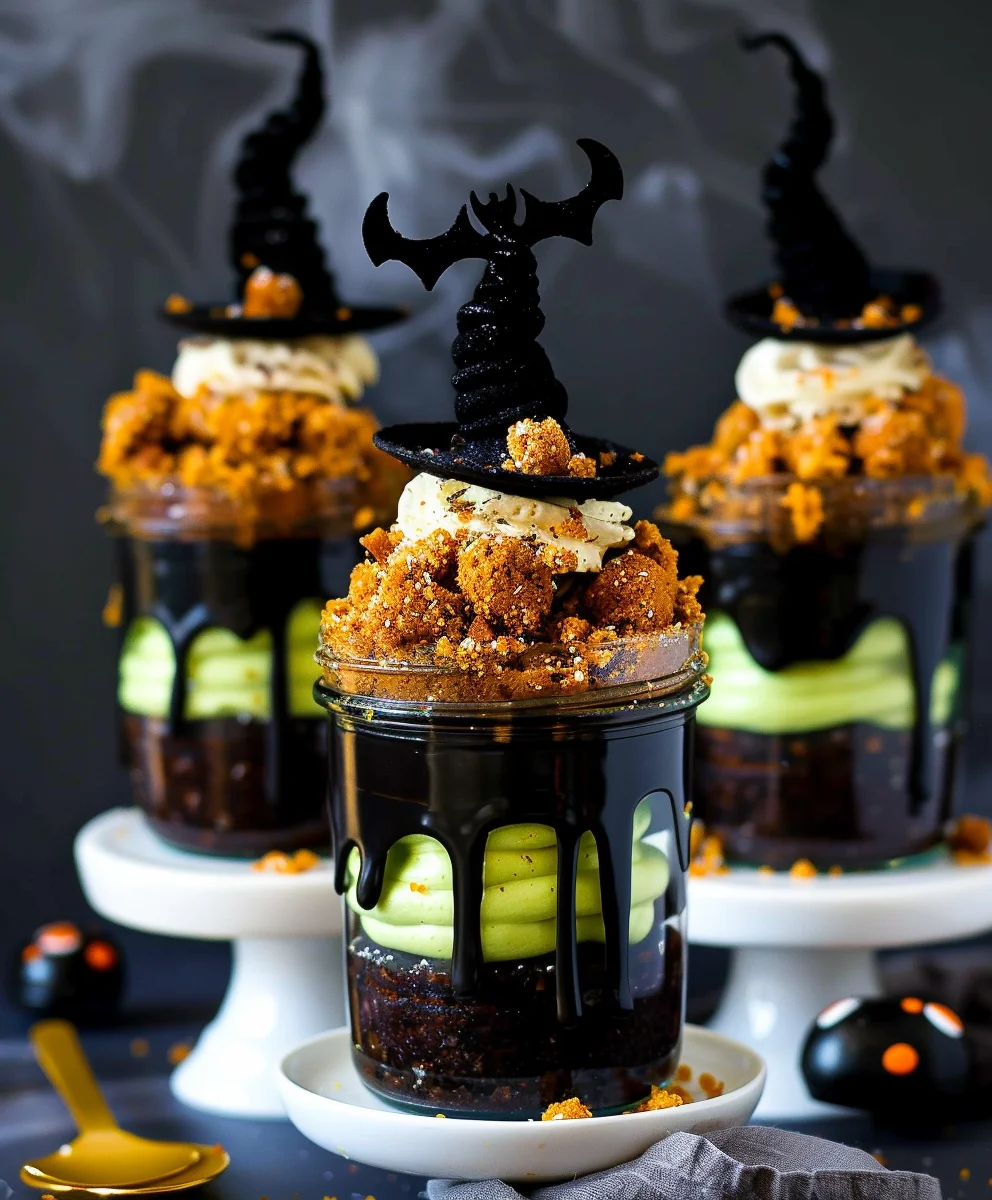
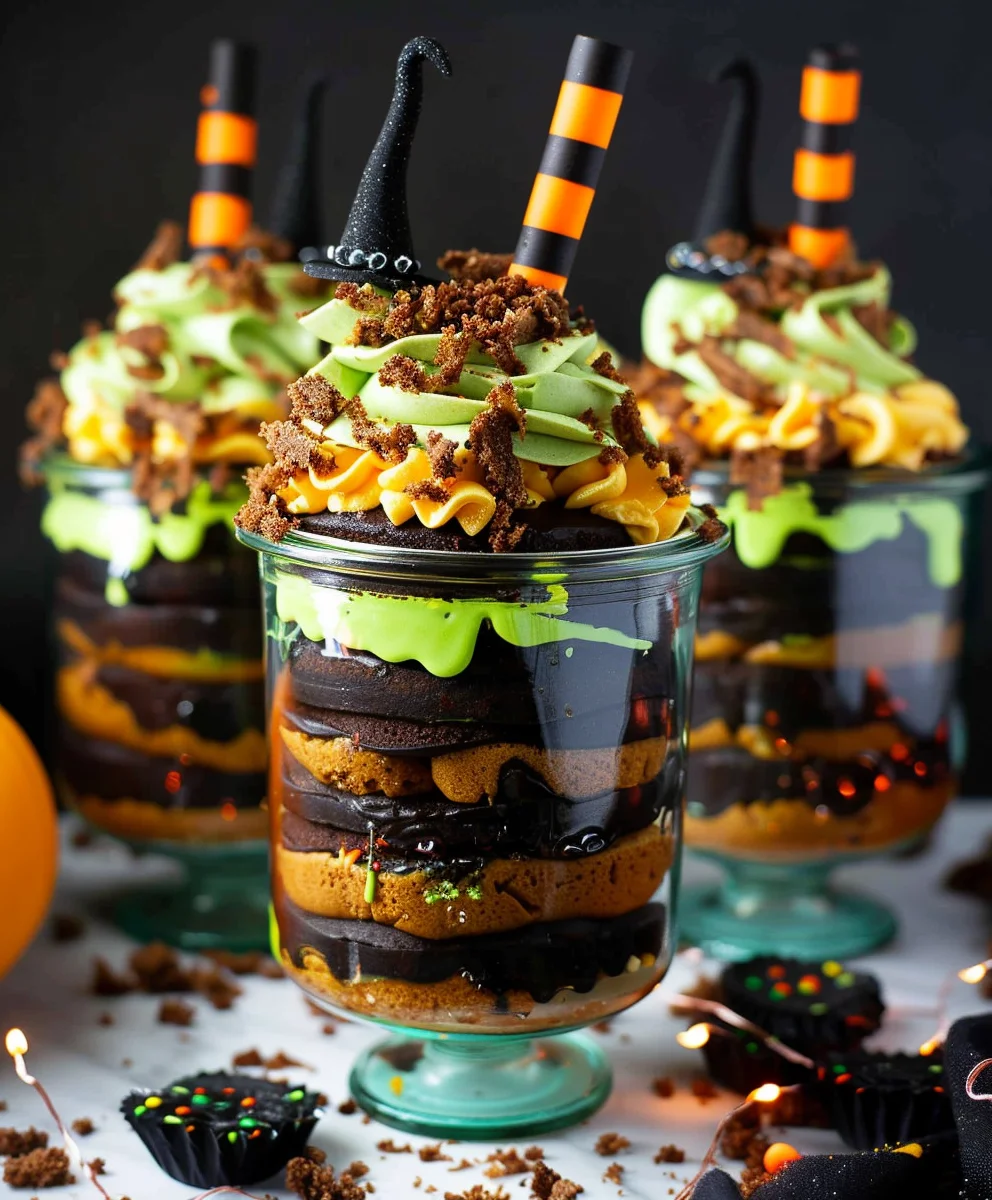
Assembling Your Witches Brew Halloween Cake Jars
- Crush the Oreos: Place the 12-15 Oreo cookies into a resealable plastic bag and crush them using a rolling pin until they resemble fine “dirt.” Set aside.
- Cut Cake Circles: This is where your cooled cake layers come into play. Using a round cookie cutter that is slightly smaller than the opening of your mason jars, cut out as many circles as possible from your purple, green, and black cake layers. I usually aim for at least 2-3 circles of each color per jar, if you want lots of layers. Don’t worry about the scraps; they make for delicious chef’s treats or can be crumbled and added as another layer!
-
Layering the Magic: Now for the creative assembly!
- Cake Base: Place one cake circle (I often start with black for a deep, mysterious base) at the very bottom of each clean mason jar. Gently press it down with the back of a spoon to ensure it’s level.
- “Brew” Layer: Spoon a generous layer of the cooled purpleberry “brew” compote over the cake. Spread it out evenly. This layer adds moisture and that fantastic fruity burst.
- “Slime” Layer: Pipe or spoon a layer of the ghastly green “slime” buttercream over the compote. If you’re piping, a star tip creates a lovely decorative edge. You can make a thick layer, or a thinner one, depending on your preference.
- Next Cake Layer: Place a different colored cake circle (maybe green or purple next) on top of the buttercream. Repeat the process: cake, compote, buttercream. I like to alternate the cake colors to create a beautiful, striking visual effect through the glass jar. Keep going until your jar is almost full, leaving about an inch from the top for the final decorations.
- “Dirt” Topping: For your very top layer, after the final buttercream, sprinkle a generous amount of the crushed Oreo “dirt.” This really enhances the spooky, graveyard feel.
-
Decorate the Jars:
- Wicked Webs: If you’re using the edible food marker, draw spiderwebs directly on the inside of the jar lids, or on small rounds of parchment paper to place on top. If you made royal icing, carefully pipe delicate spiderweb designs on the inside of the jar lids or onto small parchment paper circles. Let them dry completely if using royal icing before handling (this could take a few hours). Alternatively, you can pipe a tiny web directly on the top layer of frosting, just before adding sprinkles.
- Final Flourishes: Adorn the top of your cake jar creations with edible googly eyes, a sprinkle of Halloween-themed sprinkles, or a few miniature candy corn. For extra fun, you can carefully place a small, non-edible plastic spider on top of the lid or tie a little ribbon around the neck of the jar.
- Chill and Enjoy: Once assembled and decorated, place the lids on your Witches Brew Halloween Cake Jars. Store them in the refrigerator for at least an hour before serving to allow the flavors to meld and the cake to absorb some moisture from the compote and frosting, making them even more delicious. These jars are best enjoyed within 3-4 days when stored properly in the fridge.
My Pro-Tip for Perfect Portions:
When filling the jars, I like to use a piping bag for the buttercream to keep the sides of the jar clean. For the compote, a spoon works just fine. Don’t be afraid to press down gently on each cake layer as you go to ensure there are no air pockets and the layers are compact and sturdy. The beauty of these jars is that even if they’re a little messy, they still look charmingly rustic and homemade – perfect for a “witches brew”! You’ve just created a truly magical and delicious treat that’s sure to be the star of any Halloween gathering. Happy haunting and happy eating!
Conclusion:
As we reach the end of our culinary journey, I truly hope you’re feeling as excited as I am about this incredible recipe. What makes the Witches Brew Halloween Cake Jars an absolute must-try isn’t just their undeniable charm and festive appeal, but also the sheer joy and simplicity of bringing them to life in your own kitchen. I’ve poured my heart into perfecting these individual delights, and I can confidently say that they represent the pinnacle of fun, flavor, and visual spectacle for any autumn gathering or spooky celebration. Imagine biting into layers of moist, tender cake, perfectly complemented by rich, creamy frosting, all infused with just the right amount of delightful spookiness. It’s a dessert that transcends mere sweetness; it’s an experience, a conversation starter, and a true testament to the magic of homemade treats.
These aren’t just cakes; they’re miniature edible works of art, designed to captivate and delight every single person who encounters them. The vibrant colors, the playful toppings, and the convenient individual serving size make them ideal for parties where you want to avoid the fuss of slicing a large cake. Think of the gasps of delight when your guests discover their very own personal cake jar, ready to be enjoyed without any mess or extra plates. This recipe, my friends, delivers on all fronts: ease of preparation, stunning visual impact, and, most importantly, an absolutely unforgettable taste that will have everyone asking for the secret. It’s a recipe that promises to elevate your Halloween festivities from simply enjoyable to truly extraordinary, leaving a lasting impression long after the last spoonful has been savored.
Serving Suggestions & Creative Variations for Your Witches Brew Halloween Cake Jars:
Now that you’ve mastered the art of crafting these delightful Witches Brew Halloween Cake Jars, let’s talk about making them truly your own and presenting them in the most enchanting ways possible. For a start, while they are utterly delicious chilled, allowing them to come to room temperature for about 15-20 minutes before serving often enhances the softness of the cake and the creaminess of the frosting. Consider serving them alongside a warm mug of spiced apple cider or a rich hot chocolate for a comforting autumnal pairing that perfectly balances the sweetness. For the adults in the room, a splash of coffee liqueur or a hint of Irish cream in the cake layers (or even mixed into a separate batch of frosting) can transform them into a more sophisticated, boozy treat, perfect for an evening gathering.
But the fun doesn’t stop there! Think about customizing your jars to suit any occasion or dietary need. While our classic “Witches Brew” theme is fantastic for Halloween, the concept of cake in a jar is incredibly versatile. For different holidays, simply swap out the colors and toppings. Imagine festive red and green layers with peppermint frosting for Christmas, or pastel shades and floral sprinkles for an Easter brunch. The cake base itself can be easily varied: try a rich chocolate, a vibrant red velvet, or even a zesty lemon cake to change the flavor profile entirely. Experiment with different frosting flavors too – cream cheese, peanut butter, or even a hint of mint can introduce exciting new dimensions.
When it comes to toppings, let your imagination run wild! Beyond our spooky sprinkles and gummy worms, consider crushed Oreos for a “dirt” effect, mini chocolate chips, toasted coconut flakes, or even a drizzle of caramel or chocolate sauce. For those with dietary restrictions, this recipe is surprisingly adaptable. You can easily substitute with gluten-free cake mixes and dairy-free frostings to cater to various needs, ensuring everyone can partake in the joy of these delightful jars. Offering a selection of different flavored Witches Brew Halloween Cake Jars will undoubtedly impress your guests and provide a delightful array of choices, making your dessert table truly unforgettable.
Share Your Magical Creations!
My absolute favorite part of sharing recipes like this isn’t just teaching you how to make something delicious; it’s seeing your unique interpretations and hearing about your experiences. I genuinely urge you to roll up your sleeves, embrace the fun, and dive into making these incredible Witches Brew Halloween Cake Jars. Don’t be intimidated; the beauty of this recipe lies in its forgiving nature and the endless possibilities for personalization. Even if you’re new to baking, I promise you’ll find the process incredibly rewarding. The joy of layering, decorating, and then finally tasting your very own handcrafted cake jar is a feeling that truly can’t be beaten.
Once you’ve conjured up your batch of magical cake jars, I would absolutely love for you to share your culinary triumphs with me and our vibrant community! Did you come up with a brilliant new flavor combination? Did you use a particularly unique topping that made your jars stand out? Perhaps you even adapted the recipe to suit a specific dietary requirement. Whatever your experience, your insights and creativity are invaluable. Please, snap some photos of your masterpieces and share them! Your feedback, tips, and personal twists not only inspire me but also encourage other home bakers to embark on their own delicious adventures. Let’s create a cauldron of culinary inspiration together, celebrating every delicious success and learning from every playful experiment. Happy baking, my friends, and may your Witches Brew Halloween Cake Jars be utterly spellbinding!
Witches Brew Halloween Cake Jars: Magical Spooky Treat
Conjure a spell of delight this Halloween with these enchanting Witches Brew Cake Jars! Perfectly portioned and bursting with vibrant, festive layers of moist cake, creamy frosting, and vibrant berry compote, these individual treats are miniature edible spectacles, promising a magical experience for guests of all ages. Easy to serve, beautiful to behold, and utterly delicious!
Ingredients
-
330g self-raising flour
-
1½ tsp baking powder
-
½ tsp salt
-
360g unsalted butter, softened (for cake)
-
360g granulated sugar (for cake)
-
6 large eggs, at room temperature
-
90ml milk, at room temperature
-
2 tsp pure vanilla extract (for cake)
-
30g unsweetened black cocoa powder
-
Purple gel food coloring
-
Green gel food coloring (for cake layers)
-
Black gel food coloring (for cake layers)
-
250g mixed berries (fresh or frozen: blueberries, blackberries, raspberries)
-
100g granulated sugar (for compote)
-
2 tbsp fresh lemon juice
-
60ml water (optional, for compote)
-
1 tsp cornstarch mixed with 1 tbsp cold water (optional slurry)
-
400g salted butter, softened (for buttercream)
-
800g powdered sugar, sifted
-
2 tbsp heavy cream or whole milk (optional, for buttercream)
-
1¼ tsp pure vanilla extract (for buttercream)
-
Pinch of salt (for buttercream)
-
Electric green gel food coloring (for buttercream)
-
12-15 Oreo cookies, crushed
-
Black edible food marker OR Black royal icing (from 1 large egg white / 2 tbsp meringue powder, 240g powdered sugar, ½ tsp vanilla extract, black gel food coloring)
-
Edible googly eyes (optional)
-
Halloween sprinkles (bats, ghosts, pumpkins) (optional)
-
Small plastic spiders or gummy worms (optional)
-
Miniature candy corn (optional)
-
250g Orange fondant (optional)
Instructions
-
Step 1
Preheat oven to 350°F (175°C). Prep two 9×13-inch pans (grease/flour or parchment). Whisk self-raising flour, baking powder, and salt. In a mixer, cream 360g softened butter and 360g granulated sugar until light and fluffy (3-5 mins). Beat in 6 eggs one at a time. On low speed, alternately add dry ingredients and 90ml milk with 2 tsp vanilla extract, starting and ending with dry. Mix until just combined. Divide batter into three bowls. Mix 30g black cocoa powder and black gel into one portion, purple gel into another, and green gel into the third. Spread each colored batter thinly into prepared pans. Bake 12-18 minutes until a skewer comes out clean. Cool completely on wire racks. -
Step 2
In a saucepan, combine 250g mixed berries, 100g granulated sugar, and 2 tbsp lemon juice (add 60ml water if needed). Simmer over medium heat for 8-10 minutes, stirring occasionally, until berries soften and mixture thickens. For a thicker ‘brew,’ stir in 1 tsp cornstarch mixed with 1 tbsp cold water and simmer for 1-2 more minutes. Remove from heat and cool completely, then refrigerate for at least 1 hour. -
Step 3
In a stand mixer, beat 400g softened salted butter until very light and fluffy (3-5 mins). Gradually add 800g sifted powdered sugar on low speed, then increase to medium-high. Add 2 tbsp heavy cream/milk (if needed for consistency), 1¼ tsp vanilla extract, and a pinch of salt. Beat until smooth, light, and fluffy. Incorporate electric green gel food coloring until a vibrant, ghastly green ‘slime’ color is achieved. -
Step 4
Crush 12-15 Oreo cookies into fine ‘dirt’ and set aside. If making royal icing for webs: in a clean bowl, combine 1 large egg white (or 2 tbsp meringue powder + 4 tbsp warm water), 240g sifted powdered sugar, and ½ tsp vanilla extract. Beat until stiff peaks form (5-7 mins). Add black gel food coloring until deep black. Transfer to a piping bag with a fine tip, or use a black edible food marker directly on jar lids or parchment. -
Step 5
Using a round cookie cutter smaller than your 8oz mason jars, cut circles from the cooled purple, green, and black cake layers. Place one cake circle (e.g., black) at the bottom of each clean jar, gently pressing down. Spoon a generous layer of cooled purpleberry compote over the cake. Pipe or spoon a layer of ghastly green buttercream. Repeat with a different colored cake circle, compote, and buttercream, alternating cake colors for visual effect, until the jar is almost full (leave about 1 inch from top). Finish the top layer with buttercream, then sprinkle generously with crushed Oreo ‘dirt’. -
Step 6
Draw spiderweb designs on the inside of the jar lids (using marker or dried royal icing). Adorn the top of your cake jar creations with optional edible googly eyes, Halloween sprinkles, miniature candy corn, small plastic spiders/gummy worms, or pieces of orange fondant. Place lids on jars and refrigerate for at least 1 hour to allow flavors to meld. Enjoy chilled within 3-4 days.
Important Information
Nutrition Facts (Per Serving)
It is important to consider this information as approximate and not to use it as definitive health advice.
Allergy Information
Please check ingredients for potential allergens and consult a health professional if in doubt.