Vampire Fudge Recipe: Are you ready to sink your teeth into a truly irresistible treat that’s as mysterious as it is delicious? As an avid home baker, I’ve always been drawn to recipes that combine delightful flavors with a touch of playful intrigue, and this one certainly delivers. While perhaps not steeped in ancient lore, the concept of “Vampire Fudge” has become a beloved fixture in modern spooky season celebrations, perfectly capturing the spirit of Halloween parties and cozy autumn evenings. It’s a whimsical nod to classic gothic tales, reimagined as a decadent dessert that’s sure to enchant anyone who tries it.
What truly makes this dish a perennial favorite, beyond its captivating name, is its exquisite balance of rich, velvety chocolate and often a vibrant, unexpected swirl of color that hints at its mysterious origins. People adore it for its incredibly smooth, melt-in-your-mouth texture, its intense chocolatey flavor that satisfies even the most fervent sweet tooth, and its remarkable ease of preparation. It’s the kind of confection that looks incredibly impressive but is surprisingly simple to whip up, making it ideal for both seasoned dessert makers and eager beginners. Get ready to discover your new go-to Halloween delight with this fantastic Vampire Fudge Recipe.

Ingredients:
- For the Dark Chocolate Fudge Base:
- 3 cups (about 18 oz or 510g) high-quality dark chocolate chips or chopped dark chocolate (I highly recommend using a brand you love, preferably 60-70% cacao, for that deep, rich flavor that truly embodies the ‘Vampire’ essence of this recipe).
- 1 (14 oz or 397g) can sweetened condensed milk (not evaporated milk – this is crucial for the fudge’s creamy texture).
- ½ cup (1 stick or 113g) unsalted butter, cut into 1-inch pieces.
- 1 teaspoon pure vanilla extract (I always go for the good stuff; it makes a difference!).
- ¼ teaspoon sea salt (to help balance the sweetness and enhance the chocolate flavor).
- For the Blood-Red Raspberry Swirl:
- 1 ½ cups (about 6 oz or 170g) fresh or frozen raspberries (if using frozen, no need to thaw them first).
- ¼ cup granulated sugar (or more, to taste, depending on the sweetness of your raspberries and your preference).
- 1 tablespoon fresh lemon juice (this brightens the raspberry flavor and helps balance the sweetness).
- ½ teaspoon pure vanilla extract.
- Optional: 2-3 drops red food coloring gel (for an even more dramatic, vibrant ‘blood-red’ swirl, perfect for our Vampire Fudge).
Equipment You’ll Need:
- An 8×8-inch or 9×9-inch baking pan.
- Parchment paper or aluminum foil.
- Cooking spray or a little extra butter for greasing.
- A medium-sized heavy-bottomed saucepan.
- A whisk and a rubber spatula.
- A small saucepan for the raspberry swirl.
- A fine-mesh sieve (for the raspberry purée).
- A small bowl.
Phase 1: Preparing Your Luxurious Dark Chocolate Fudge Base
- Prepare Your Pan: First things first, let’s get our baking pan ready. Line your 8×8 or 9×9-inch baking pan with parchment paper or aluminum foil, making sure to leave an overhang on all sides. This handy trick will make it so much easier to lift the cooled fudge out of the pan later. Give the parchment or foil a light spray with cooking spray or a quick smear with a tiny bit of butter. This ensures absolutely no sticking, which is important for that perfect, clean cut of our Vampire Fudge.
- Melt the Chocolate Concoction: In a medium-sized, heavy-bottomed saucepan, combine your dark chocolate chips (or chopped chocolate), the entire can of sweetened condensed milk, and the ½ cup of butter pieces. I like using a heavy-bottomed pan because it distributes heat more evenly and helps prevent scorching, which is the last thing we want with our beautiful chocolate.
- Gentle Heat, Constant Stirring: Place the saucepan over low to medium-low heat. This part requires a bit of patience and attention. Stir the mixture continuously with a whisk or a rubber spatula. You’ll want to keep stirring until everything is completely melted and beautifully smooth. This usually takes about 5-8 minutes. Don’t rush it! Low and slow is the key here to prevent the chocolate from seizing or burning. The mixture will become thick, glossy, and wonderfully fragrant. Trust me, the aroma alone is divine!
- Remove and Infuse: Once the chocolate mixture is perfectly smooth and molten, immediately remove the saucepan from the heat. Now, stir in the 1 teaspoon of pure vanilla extract and the ¼ teaspoon of sea salt. The vanilla adds a lovely warmth and depth, complementing the dark chocolate, while the salt, though just a pinch, is a game-changer – it balances the sweetness and really makes the chocolate flavor pop. Stir until these additions are fully incorporated into the luscious fudge base.
Phase 2: Crafting the Blood-Red Raspberry Swirl
- Simmer the Raspberries: In a separate small saucepan, combine your fresh or frozen raspberries, the ¼ cup of granulated sugar, and the 1 tablespoon of fresh lemon juice. Place this over medium heat and bring it to a gentle simmer. As it heats, the raspberries will start to break down and release their juices. Stir occasionally to prevent sticking. Continue to simmer for about 5-7 minutes, until the raspberries are very soft and the mixture has thickened slightly. The goal here is a vibrant, fruity sauce.
- Strain for Silkiness: Once the raspberry mixture is cooked down, remove it from the heat. Now, we want to achieve a smooth, seedless purée for that elegant swirl. Carefully pour the hot raspberry mixture through a fine-mesh sieve set over a small bowl. Use the back of a spoon or a rubber spatula to press down on the solids, extracting as much of the beautiful crimson liquid as possible. Discard the seeds and any remaining pulp in the sieve. What you’re left with is a gorgeous, intensely flavored raspberry purée – our ‘blood-red’ swirl!
- Enhance the Swirl: To this smooth raspberry purée, stir in the ½ teaspoon of pure vanilla extract. At this point, if you really want to achieve that striking, deep ‘vampire’ red, now is the time to add 2-3 drops of red food coloring gel. Stir it in thoroughly until you’re happy with the intensity of the color. This step is entirely optional, but it certainly adds to the visual drama of our Vampire Fudge Recipe!
- Cool Slightly: Allow the raspberry purée to cool down for a few minutes while you prepare the fudge base for assembly. You don’t want it piping hot when it meets the chocolate.
Phase 3: Assembling and Setting Your Vampire Fudge
- Layer the Fudge Base: Pour about two-thirds of your warm dark chocolate fudge base into the prepared pan. Use your rubber spatula to spread it evenly across the bottom. Don’t worry about being absolutely perfect; a little rustic charm is wonderful!
- Add the Raspberry Swirl: Now, dollop half of your raspberry purée over the chocolate layer. You can place small spoonfuls randomly across the surface.
- More Chocolate, More Raspberry: Carefully pour the remaining one-third of the dark chocolate fudge base over the raspberry dollops. Try to spread it gently to cover most of the raspberry layer. It’s okay if some peeks through. Then, dollop the remaining raspberry purée on top of this second chocolate layer.
- Create the Hypnotic Swirl: This is where the magic happens and you truly transform it into a Vampire Fudge! Take a knife, a skewer, or even the tip of your spatula, and gently drag it through the fudge layers in a swirling motion. You can make figure-eights, zig-zags, or random swirls – just be careful not to over-mix, as you want distinct streaks of chocolate and raspberry, not a uniform pinkish-brown. Embrace the artistic process! The goal is to create beautiful, dramatic swirls that evoke a ‘blood-red’ effect against the dark chocolate.
- Chill to Perfection: Once you’re satisfied with your masterpiece of swirls, gently tap the pan on your counter a few times to release any air bubbles and help settle the fudge. Then, transfer the pan to the refrigerator. You’ll need to chill the fudge for at least 3-4 hours, or ideally, overnight, until it is completely firm and set. This chilling time is essential for the fudge to firm up properly, allowing for clean, beautiful cuts later. Patience is a virtue, especially with delicious fudge!
Phase 4: Serving and Storage Suggestions for Your Vampire Fudge
- Lift and Cut: Once your Vampire Fudge is completely chilled and firm, use the parchment paper or foil overhangs to carefully lift the entire slab of fudge out of the pan and onto a clean cutting board. This is where that initial pan preparation really pays off!
- Slice with Precision: For the neatest cuts, I recommend using a large, sharp knife. You can warm the knife slightly under hot water and wipe it dry between cuts if you wish; this helps achieve incredibly clean edges, especially important for showing off those dramatic swirls. Cut the fudge into 1-inch squares, or whatever size suits your fancy. I find that smaller squares are perfect for fudge, as it’s so rich and decadent! Each square will showcase a unique swirl of dark chocolate and vibrant raspberry, making every bite a visually appealing treat.
- Enjoy and Share (If You Can!): Your homemade Vampire Fudge is now ready to be devoured! This treat is perfect for parties, gifts, or simply indulging your own sweet tooth. The combination of rich, dark chocolate with the tart sweetness of raspberry is truly irresistible.
- Storage: Store any leftover Vampire Fudge in an airtight container at room temperature for up to one week, or in the refrigerator for up to two weeks. If you store it in the fridge, I recommend letting it sit at room temperature for about 15-20 minutes before serving to allow it to soften slightly and bring out its full flavor and creamy texture. For longer storage, you can even freeze individual pieces in an airtight container for up to 3 months. Just be sure to separate layers with parchment paper to prevent sticking. When ready to enjoy, simply thaw at room temperature.
Conclusion:
Well, my dear friends, we’ve reached the sweet end of our journey with this incredible treat, and I genuinely hope you’re feeling as inspired as I am to whip up a batch (or five!). This isn’t just any ordinary confectionery; this is the recipe that will undoubtedly become a staple in your dessert repertoire, especially when you’re looking to impress with minimal effort but maximum impact. The truth is, I’ve tried countless fudge recipes over the years, and none quite capture the perfect balance of creamy texture, rich flavor, and captivating appearance quite like this one. It’s a unique blend of ingredients that somehow magically comes together to create something truly extraordinary. You’ll find yourself wondering why you hadn’t discovered this gem sooner!
What makes this particular creation a true must-try? For starters, its undeniable ease of preparation. Forget about complex candy thermometers or endless stirring; this recipe is remarkably forgiving and designed for success, even for novice bakers. But beyond its simplicity, it’s the enchanting taste that truly sets it apart. The depth of flavor is simply unparalleled, offering a luxurious experience with every bite. It’s that perfect sweet treat that satisfies your cravings without being overwhelmingly sugary. Plus, let’s not forget its stunning visual appeal! Whether you’re making it for a special occasion or just a cozy night in, it consistently looks like it came straight from a gourmet bakery, making it an instant conversation starter. It’s a guaranteed crowd-pleaser, delivering on taste, texture, and presentation every single time. I promise you, once you taste this, you’ll understand exactly what I mean.
Now, while this fudge is absolutely divine enjoyed straight from the pan (I won’t judge, we’ve all been there!), let’s talk about some fantastic ways to serve and elevate your experience. For optimal enjoyment, I find it’s best when it’s been properly chilled, allowing it to firm up perfectly for clean, delightful squares. However, a few minutes at room temperature before serving can soften it just enough to achieve an even silkier texture that simply melts in your mouth. Consider pairing a square or two with a strong cup of freshly brewed coffee or a rich espresso; the slight bitterness beautifully complements the fudge’s sweetness. For a more indulgent experience, serve it alongside a scoop of vanilla bean ice cream, allowing the fudge to slightly warm and meld with the cold creaminess. A tall glass of cold milk is also a classic, comforting accompaniment, especially for the younger (or young-at-heart) crowd.
Creative Twists and Variations to Make It Your Own:
- Nutty Crunch: For those who love a bit of texture, gently fold in a half-cup of chopped toasted pecans, walnuts, or almonds right before spreading the fudge into the pan. The nutty crunch adds a wonderful contrast to the smooth fudge.
- Extract Experiments: While the core flavor is perfect as is, feel free to experiment with different extracts. A dash of almond extract could add a sophisticated, nutty aroma, or a hint of orange zest could brighten the whole profile. Just remember, a little goes a long way!
- Swirls of Delight: For an extra artistic touch, melt a quarter-cup of white chocolate chips and drizzle it over the fudge after it’s been spread into the pan. Use a toothpick or skewer to create beautiful swirls before it sets. This not only looks amazing but adds another layer of flavor.
- Sprinkle Fun: If you’re making this for a celebration or just want to add some festive cheer, scatter some colorful sprinkles over the top while the fudge is still warm and unset. It’s an instant mood booster!
- Sea Salt Finish: A sprinkle of flaky sea salt over the top before chilling can enhance all the flavors, offering a lovely sweet and salty contrast that gourmet palates adore.
The versatility of this treat truly knows no bounds, making it suitable for any season or reason. It’s perfect for holiday platters, thoughtful homemade gifts, or simply as a well-deserved indulgence after a long day. This Vampire Fudge Recipe?utm_source=pinzk is truly a game-changer, offering so much more than just a sweet bite; it offers an experience, a moment of pure, unadulterated joy.
So, what are you waiting for? I wholeheartedly encourage you to roll up your sleeves, gather your ingredients, and give this absolutely divine recipe a try this week. I am confident that you will be utterly delighted with the results. Once you’ve made it, I would be absolutely thrilled to hear about your experience! Did you stick to the original, or did you try one of the variations? What did your friends and family think? Please, don’t keep your delicious success a secret! Share your stories, your photos, and your tips in the comments section below. Connecting with fellow food lovers is one of my favorite parts of this culinary journey, and I can’t wait to see your wonderful creations. Happy baking, everyone!

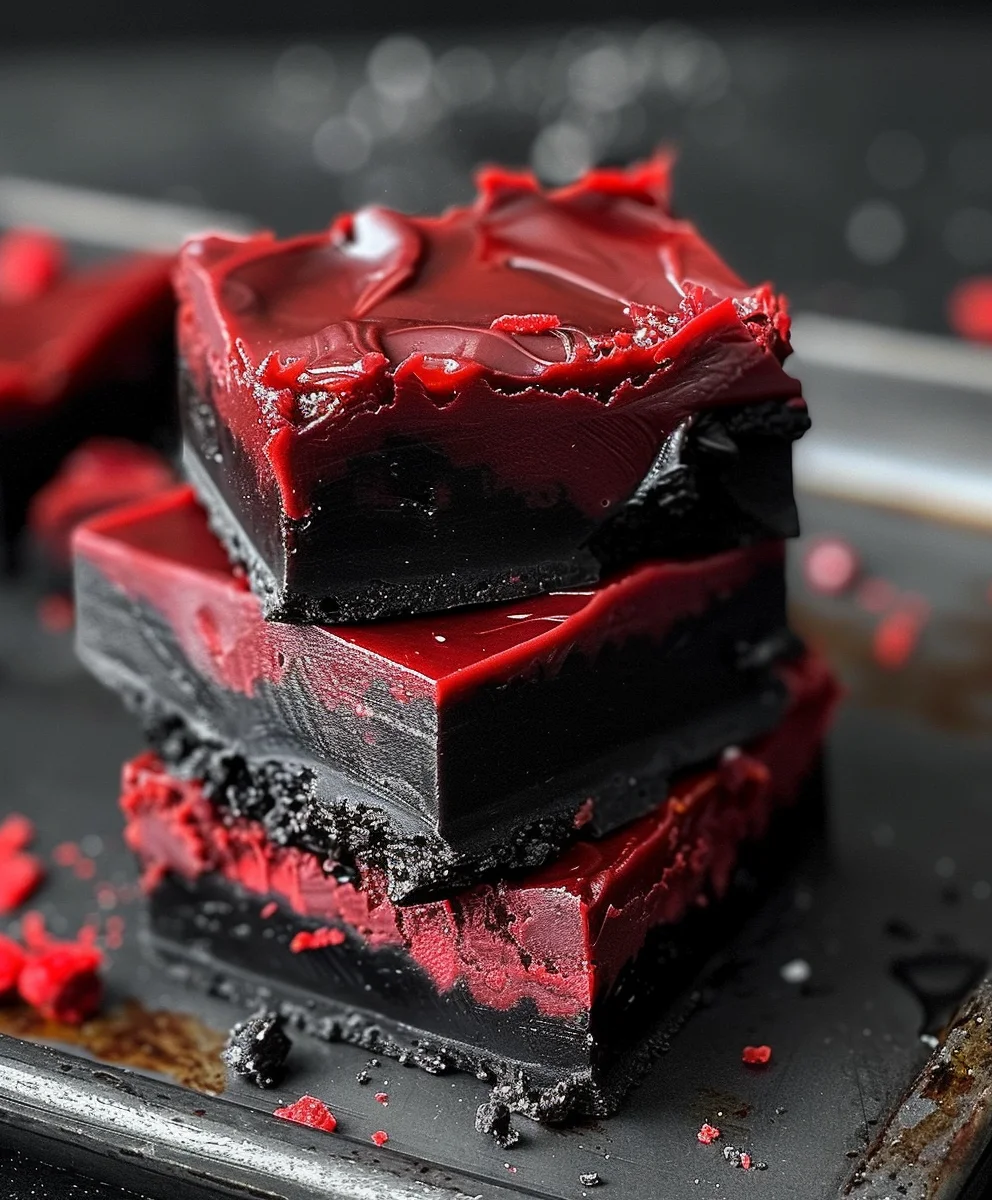
Vampire Fudge Recipe
This easy Vampire Fudge recipe combines rich, velvety dark chocolate with a vibrant, blood-red raspberry swirl. Perfect for Halloween parties, it’s a decadent, melt-in-your-mouth treat that looks impressive but is surprisingly simple to make.
Ingredients
-
3 cups (510g) dark chocolate chips
-
1 (14 oz) can sweetened condensed milk
-
½ cup (113g) unsalted butter, cut into 1-inch pieces
-
1 tsp pure vanilla extract (for fudge base)
-
¼ tsp sea salt
-
1 ½ cups (170g) fresh or frozen raspberries
-
¼ cup granulated sugar
-
1 tbsp fresh lemon juice
-
½ tsp pure vanilla extract (for raspberry swirl)
-
Optional: 2-3 drops red food coloring gel
Instructions
-
Step 1
Line an 8×8 or 9×9-inch baking pan with parchment paper, leaving an overhang on all sides. Lightly spray the parchment/foil with cooking spray or butter. -
Step 2
In a medium heavy-bottomed saucepan, combine 3 cups dark chocolate chips, 1 (14 oz) can sweetened condensed milk, and ½ cup unsalted butter pieces. Cook over low to medium-low heat, stirring constantly, until completely melted and smooth (5-8 minutes). Remove from heat and stir in 1 tsp pure vanilla extract and ¼ tsp sea salt until fully incorporated. -
Step 3
In a separate small saucepan, combine 1 ½ cups raspberries, ¼ cup granulated sugar, and 1 tbsp fresh lemon juice. Simmer over medium heat for 5-7 minutes, stirring occasionally, until raspberries are soft and mixture thickens slightly. Press the hot raspberry mixture through a fine-mesh sieve set over a small bowl; discard seeds and pulp. Stir ½ tsp pure vanilla extract into the smooth raspberry purée. Optionally, add 2-3 drops red food coloring gel for a more vibrant color. Allow to cool slightly. -
Step 4
Pour about two-thirds of the warm dark chocolate fudge base into the prepared pan and spread evenly. Dollop half of the raspberry purée over the chocolate layer. Carefully pour the remaining one-third of the dark chocolate fudge base over the raspberry dollops, then dollop the remaining raspberry purée on top of this second chocolate layer. -
Step 5
Take a knife or skewer and gently drag it through the fudge layers in a swirling motion to create a beautiful ‘blood-red’ effect. Tap the pan gently to release air bubbles. Transfer the pan to the refrigerator and chill for at least 3-4 hours, or ideally overnight, until completely firm and set. -
Step 6
Once chilled, use the parchment paper overhangs to lift the fudge from the pan onto a cutting board. Cut into 1-inch squares using a sharp knife. Store leftover Vampire Fudge in an airtight container at room temperature for up to 1 week, or in the refrigerator for up to 2 weeks. For best flavor and texture, let refrigerated fudge sit at room temperature for 15-20 minutes before serving.
Important Information
Nutrition Facts (Per Serving)
It is important to consider this information as approximate and not to use it as definitive health advice.
Allergy Information
Please check ingredients for potential allergens and consult a health professional if in doubt.