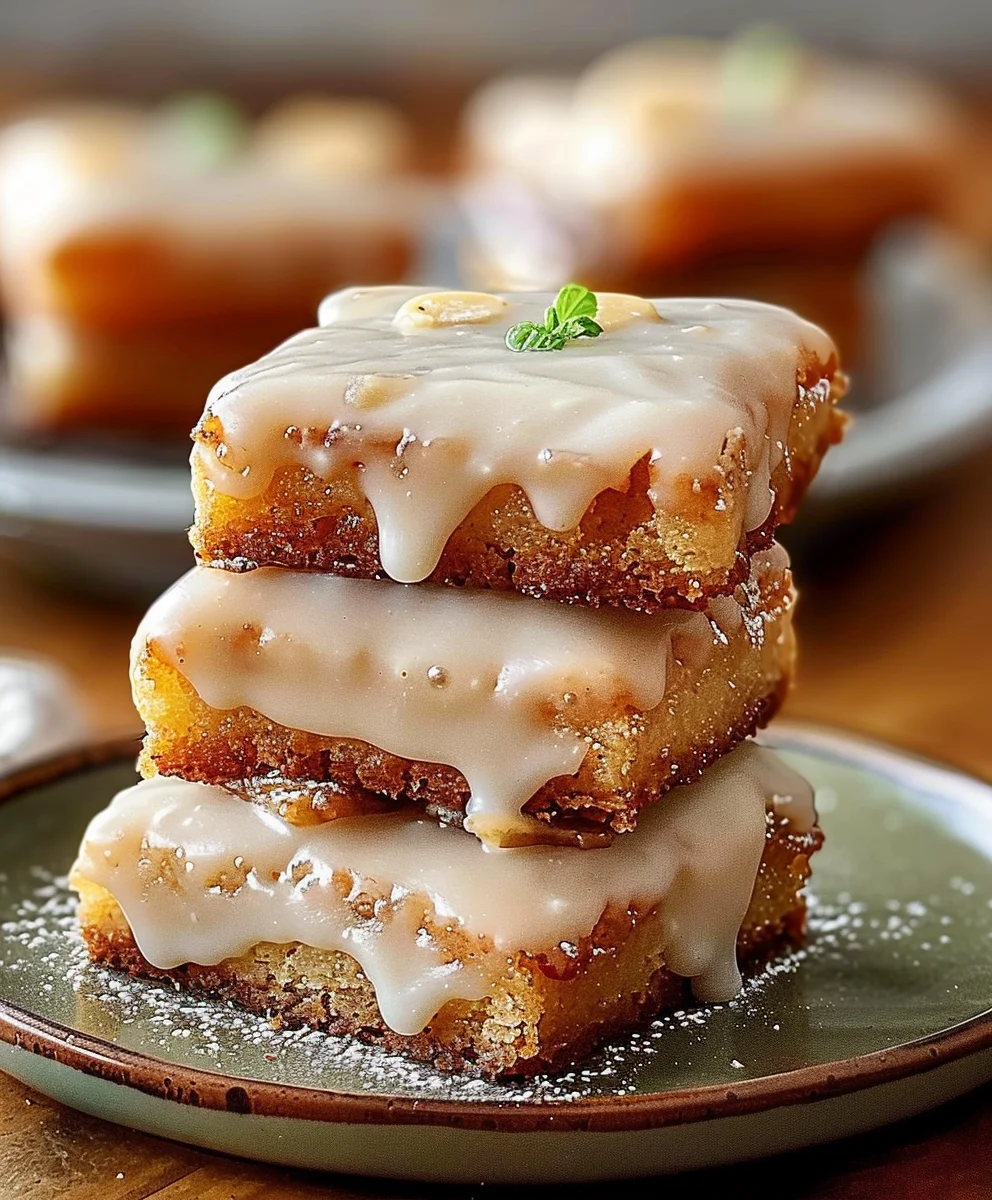
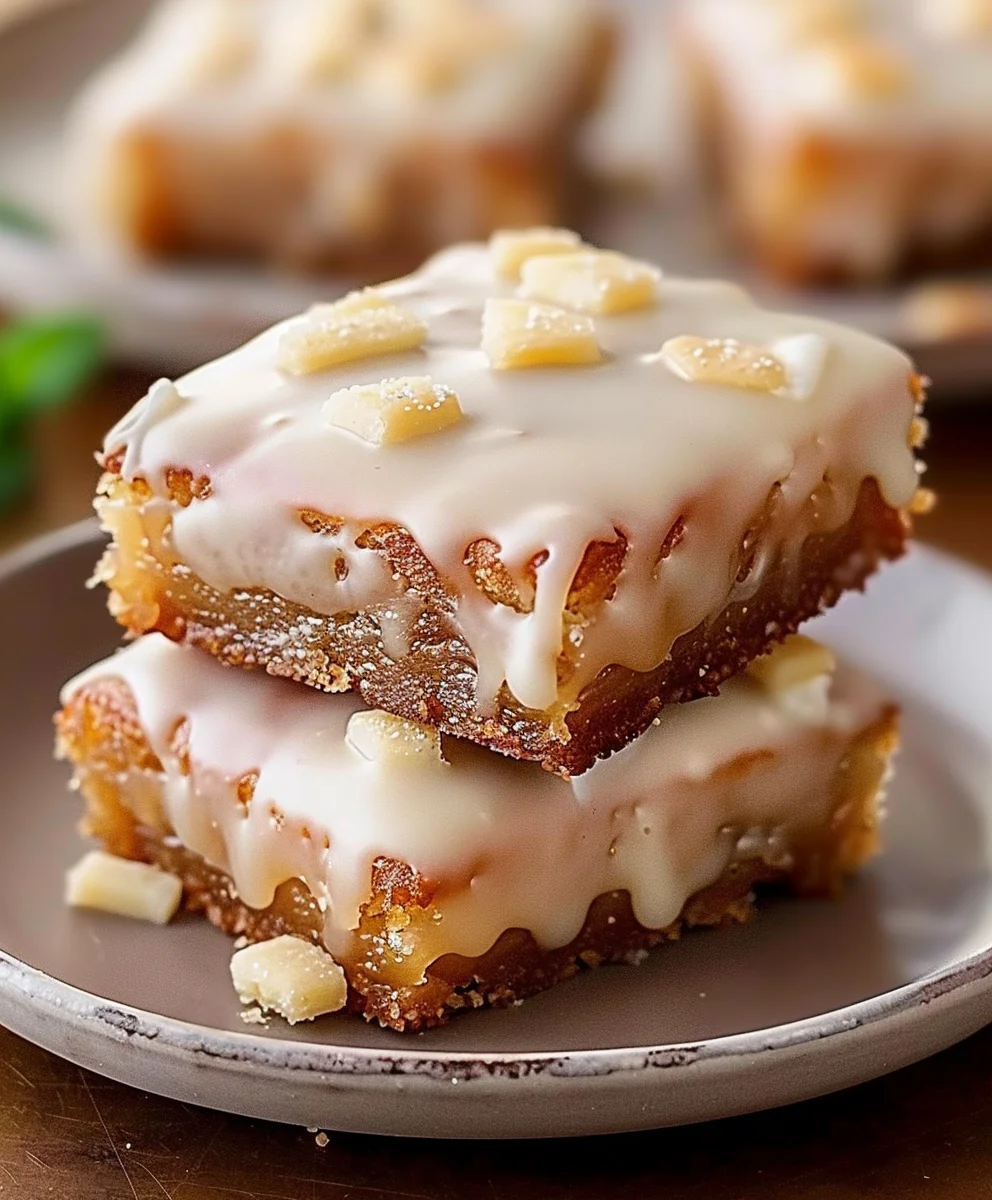
Maple Donut Bars The Ultimate Guide To Baking Delicious Treats begins our delightful journey today, and I couldn’t be more excited to share this incredible recipe with you. Imagine sinking your teeth into a tender, cake-like bar, generously coated in a shimmering, sweet maple glaze – all the irresistible flavor of a classic donut, but without the fuss of deep-frying. This isn’t just a dessert; it’s a nostalgic hug, a breakfast treat that feels special, and a perfect companion to your morning coffee. I’m confident you’ll find this a truly rewarding baking experience.
While traditional donuts boast a fascinating history tracing back to Dutch olykoeks and finding their quintessential ring shape in America, these bar adaptations offer a modern, convenient twist on a beloved classic. The pure, rich essence of maple, a flavor deeply rooted in North American culinary traditions, elevates this treat from a simple sweet to something truly memorable. People absolutely adore these maple donut bars because they deliver that coveted soft texture and comforting sweetness we crave, perfectly balanced by the distinct, warm notes of real maple syrup that evoke cozy mornings and festive gatherings.
What makes mastering Maple Donut Bars The Ultimate Guide To Baking Delicious Treats so rewarding is the sheer joy of creating something so utterly delicious with surprising ease. They are perfect for sharing at brunches, potlucks, or simply as a special weekend indulgence. Forget the hot oil and tricky shaping; these bars bake up beautifully in a single pan, making them an accessible baking project for everyone, regardless of their baking skill level. I promise, once you experience the delightful aroma filling your kitchen and taste the first bite, you’ll understand why they’ve become such a beloved staple in my own baking repertoire.

Ingredients:
- For the Fluffy Maple Donut Bars:
-
2 ½ cups (300g) all-purpose flour: I always reach for unbleached all-purpose flour for the best texture in my baked goods. It provides the perfect structure for these delightful bars.
-
1 ½ cups (300g) granulated sugar: This is the ideal amount to ensure our donut bars are perfectly sweet without being cloying. It contributes to both flavor and a lovely golden-brown crust.
-
2 teaspoons baking powder: Our leavening agent! This ensures our bars rise beautifully and achieve that soft, cake-like donut texture we’re aiming for.
-
½ teaspoon baking soda: Working in conjunction with the baking powder and the slight acidity from the buttermilk, baking soda helps achieve an even more tender crumb and a perfect rise.
-
½ teaspoon salt: A crucial ingredient that enhances all the other flavors, balancing the sweetness and bringing out the rich notes of the maple. Don’t skip it!
-
1 teaspoon ground nutmeg: This is the secret ingredient that truly gives these bars that classic donut aroma and taste. Its warm, comforting spice is utterly essential.
-
¼ teaspoon ground cinnamon (optional, but highly recommended): While nutmeg is key, a touch of cinnamon adds another layer of warm spice that complements the maple beautifully. If you love warm spices, definitely include this!
-
2 large eggs: At room temperature, please! Room temperature eggs incorporate more easily into the batter, leading to a smoother, more uniform consistency and a better rise. They act as a binder and add richness.
-
1 cup (240ml) buttermilk: This provides an incredible tenderness and subtle tang to the donut bars, reacting with the baking soda for a superior crumb. If you don’t have buttermilk, you can make your own by adding 1 tablespoon of white vinegar or lemon juice to a measuring cup, then filling the rest with whole milk and letting it sit for 5-10 minutes until it slightly curdles.
-
½ cup (113g) unsalted butter: Melted and then slightly cooled. Using unsalted butter allows us to control the salt content in the recipe, and melting it ensures easy incorporation and a moist final product.
-
2 teaspoons pure vanilla extract: I always recommend pure vanilla extract over imitation. Its rich, aromatic flavor elevates the entire dish and pairs wonderfully with the maple and spices.
-
- For the Decadent Maple Glaze:
-
3 cups (360g) powdered sugar (confectioners’ sugar): Sifted, if possible, to avoid any lumps in your smooth, dreamy glaze. This forms the base of our sweet topping.
-
½ cup (120ml) pure maple syrup: The star of the glaze! Make sure to use good quality, pure maple syrup for the best flavor. Grade A amber or dark are fantastic choices here for their robust maple notes.
-
¼ cup (60ml) whole milk or heavy cream: Starting with this amount, you might need a little more or less to achieve your desired glaze consistency. Milk provides a lighter glaze, while cream makes it richer and more opaque.
-
1 teaspoon pure vanilla extract: Just like in the bars, vanilla enhances the maple flavor in the glaze, adding depth and warmth.
-
Pinch of salt: A tiny bit of salt in the glaze cuts through the sweetness and truly makes the maple flavor sing. It’s a game-changer!
-
- Optional Toppings (for extra flair):
-
Chopped toasted pecans or walnuts
-
Crispy bacon bits (for a sweet and savory twist!)
-
Rainbow sprinkles (always a fun choice!)
-
Phase 1: Preparing Your Maple Donut Bar Batter
Get ready to create the foundation for our incredible Maple Donut Bars! This phase is all about combining our ingredients carefully to achieve that perfect, tender crumb.
-
Preheat Your Oven and Prepare Your Pan: First things first, let’s get the oven ready. Preheat your oven to 350°F (175°C). While it’s heating up, prepare a 9×13 inch baking pan. You have a couple of options here: you can grease it generously with butter or baking spray and then dust lightly with flour, tapping out any excess. Or, and this is my preferred method for easy removal, line the bottom of the pan with parchment paper, leaving an overhang on the longer sides to create “handles.” Then, lightly grease the parchment paper and the exposed sides of the pan. This ensures your beautiful bars won’t stick and can be lifted out easily for cutting.
-
Whisk Together the Dry Ingredients: In a large mixing bowl, whisk together the all-purpose flour, granulated sugar, baking powder, baking soda, salt, ground nutmeg, and optional ground cinnamon. It’s important to whisk these really well to ensure all the leavening agents and spices are evenly distributed throughout the flour. This prevents pockets of unmixed ingredients and guarantees a consistent rise and flavor in every bite. I typically whisk for about 30 seconds to a minute, ensuring there are no visible clumps.
-
Combine the Wet Ingredients: In a separate, medium-sized bowl, whisk together the room temperature large eggs until they are lightly beaten. Then, add the buttermilk, melted and slightly cooled unsalted butter, and pure vanilla extract. Whisk these wet ingredients together until they are well combined and uniform in color. Ensure your melted butter isn’t too hot, as it could scramble the eggs if added directly, so let it cool for a few minutes after melting.
-
Gently Combine Wet and Dry Mixtures: Now for the magic! Pour the wet ingredient mixture into the dry ingredient mixture. Using a rubber spatula or a wooden spoon, gently fold the ingredients together until just combined. This is a critical step where less is more. Do not overmix! Overmixing develops the gluten in the flour too much, which can lead to tough, dry donut bars instead of the light, tender ones we’re aiming for. A few streaks of flour are perfectly fine; they will disappear during baking. The batter should be relatively thick but pourable.
-
Pour into Prepared Pan: Carefully pour the batter into your prepared 9×13 inch baking pan. Use your spatula to spread the batter evenly across the bottom of the pan. Gently tap the pan on your counter a couple of times to release any large air bubbles and ensure the batter settles uniformly. This helps achieve an even bake and a flat top for our glaze.
Phase 2: Baking Your Donut Bars to Golden Perfection
This is where our batter transforms into delightful, cake-like bars, ready for their glorious maple glaze. Patience is key here!
-
Bake the Donut Bars: Place the baking pan into your preheated 350°F (175°C) oven. Bake for approximately 25-30 minutes. The exact baking time can vary depending on your oven, so it’s always good to keep an eye on them. You’re looking for a beautiful golden-brown color on top and edges that are just beginning to pull away slightly from the sides of the pan. The scent of warm nutmeg and butter will also start to fill your kitchen – a sure sign of deliciousness to come!
-
Check for Doneness: To confirm the bars are perfectly baked, insert a wooden skewer or a toothpick into the center of the pan. If it comes out clean or with only a few moist crumbs attached (no wet batter!), your donut bars are ready. If there’s still wet batter, return them to the oven for another 3-5 minutes and check again. Don’t underbake, as you want a fully cooked, stable base for our glaze.
-
Cool Completely: Once baked, remove the pan from the oven and place it on a wire rack to cool. Let the bars cool in the pan for about 15-20 minutes. Then, using the parchment paper overhang as handles (if you used them), carefully lift the partially cooled bars out of the pan and transfer them directly onto the wire rack to cool completely. This step is non-negotiable! The bars must be completely cool before glazing. Glazing warm bars will result in a runny, melted glaze that will simply absorb into the cake rather than setting into a beautiful, opaque coating. This cooling process can take anywhere from 1 to 2 hours, so plan accordingly.
Phase 3: Crafting the Irresistible Maple Glaze
While your donut bars are cooling, let’s turn our attention to the star of the show: the rich, smooth, and utterly delicious maple glaze. This simple step brings all the flavors together.
-
Combine Glaze Ingredients: In a medium-sized bowl, add the sifted powdered sugar, pure maple syrup, 1/4 cup of whole milk (or heavy cream), pure vanilla extract, and that tiny pinch of salt. Sifting the powdered sugar beforehand is highly recommended; it prevents lumps and ensures a super smooth glaze, which is exactly what we want for an elegant finish.
-
Whisk Until Smooth: Using a whisk, gently combine all the glaze ingredients. Start slowly to avoid a cloud of powdered sugar, then increase your speed. Whisk until the mixture is completely smooth and free of any lumps. You’re looking for a beautiful, thick, yet pourable consistency. It should be thick enough to coat the back of a spoon but still flow easily. This is your moment to adjust consistency!
-
Adjust Consistency (if needed): If your glaze appears too thick (more like a paste), add additional milk or cream, one teaspoon at a time, whisking thoroughly after each addition until you reach the desired consistency. Conversely, if your glaze seems too thin and watery, you can whisk in another tablespoon or two of sifted powdered sugar until it thickens up. Remember, it’s easier to add liquid than to remove it, so go slowly when adjusting. I find that a consistency that slowly drips off the whisk, rather than pouring like water, is ideal for a good coating that will set nicely.
Phase 4: Glazing and Finishing Your Maple Donut Bars
The grand finale! This is where our baked bars get their iconic maple glaze, transforming them into truly irresistible treats. Get ready for some delicious anticipation!
-
Glaze the Cooled Bars: Once your Maple Donut Bars are completely cool to the touch (I cannot stress this enough!), it’s time to glaze them. You can either pour the entire batch of glaze over the center of the cooled bars and then use an offset spatula or the back of a spoon to spread it evenly to the edges, or you can use a pastry brush for a thinner, more controlled layer. I personally love the generous, slightly thick layer that spreading provides. Ensure the glaze covers the entire top surface, creating a beautiful, uniform coating. The goal is a smooth, glossy, and inviting finish.
-
Add Optional Toppings: If you’re using any optional toppings like chopped pecans, crispy bacon bits, or sprinkles, this is the time to add them! Sprinkle them over the wet glaze immediately after applying it. This ensures they adhere nicely to the glaze before it begins to set. Be creative and have fun with this step – a little crunch or an extra layer of flavor can make these bars even more special. For a true bakery-style look, apply the toppings evenly and generously.
-
Allow Glaze to Set: Let the glazed bars sit at room temperature, undisturbed, for at least 30 minutes to 1 hour, or until the glaze has fully set and is no longer tacky to the touch. This waiting period is important, as it prevents messy cutting and ensures the glaze holds its beautiful shape. If your kitchen is particularly humid, it might take a little longer, or you can pop them in the fridge for about 15-20 minutes to speed up the setting process.
-
Cut and Serve: Once the glaze is firm, use a sharp knife (I often run mine under hot water and wipe it clean between cuts for the cleanest slices) to cut the large bar into individual servings. You can cut them into squares, rectangles, or even smaller bite-sized pieces, depending on your preference. I typically go for 12-15 bars from a 9×13 inch pan. Arrange them on a platter and serve immediately. Congratulations, you’ve just baked the ultimate Maple Donut Bars!
Tips for Maple Donut Bar Success: Elevating Your Baking Game
Here are some of my favorite tips and tricks to ensure your Maple Donut Bars turn out perfectly every single time, making you a baking superstar!
-
Room Temperature Ingredients are Key:
I mentioned this earlier, but it truly bears repeating. For the best emulsion and a smooth, lump-free batter, ensure your eggs and buttermilk are at room temperature. This allows them to incorporate more effectively with the other ingredients, leading to a more uniform batter and a lighter, airier texture in your finished bars. Cold ingredients can cause the batter to seize up and result in a less tender crumb. If you forget to take them out in advance, you can quickly bring eggs to room temperature by placing them in a bowl of warm water for 5-10 minutes, and for buttermilk, you can gently warm it slightly in the microwave for 15-20 seconds.
-
Do Not Overmix the Batter:
This is perhaps the most crucial rule in baking tender cakes and bars. Once you’ve combined the wet and dry ingredients, mix only until the flour streaks have just disappeared. Overmixing develops the gluten in the flour, making your donut bars tough and chewy, rather than soft and cake-like. A few small lumps are perfectly acceptable and often indicate that you haven’t overmixed. Trust me, less is more here!
-
Achieving the Perfect Glaze Consistency:
The consistency of your maple glaze is paramount for a beautiful finish. It should be thick enough to generously coat the back of a spoon but still pourable, allowing it to spread smoothly across the bars. If it’s too thick, it will be clumpy and hard to spread; if it’s too thin, it will run off the sides and be absorbed into the cake. Always add milk or powdered sugar in very small increments (half a teaspoon or a tablespoon at a time) when adjusting the consistency, whisking well after each addition until you hit that sweet spot. Remember, you can always add more, but you can’t take it away!
-
Cooling is Non-Negotiable:
I can’t emphasize this enough: your donut bars absolutely must be completely cool before you apply the glaze. If the bars are even slightly warm, the glaze will melt, become runny, and seep into the cake, rather than forming a beautiful, set layer on top. This results in a sticky mess instead of a pristine, appealing treat. Plan your baking so you have ample cooling time, typically 1 to 2 hours, before moving on to glazing.
-
High-Quality Maple Syrup Makes a Difference:
Since maple is the star flavor of both the bars and especially the glaze, investing in good quality, pure maple syrup is truly worth it. Avoid imitation maple syrups; they often contain high fructose corn syrup and artificial flavors that don’t deliver the rich, nuanced taste of real maple. Look for Grade A amber or dark varieties for a more robust maple flavor that will shine through in your bars. This single ingredient choice can elevate your entire recipe.
-
Storage and Freshness:
These Maple Donut Bars are best enjoyed the day they are baked, when the glaze is perfectly set and the bars are at their freshest and most tender. However, if you have leftovers, store them in an airtight container at room temperature for up to 2-3 days. For longer storage, you can refrigerate them for up to 5 days, though the bars might dry out slightly. If refrigerating, allow them to come closer to room temperature before serving for the best flavor and texture. Freezing is also an option for the unglazed bars; wrap them tightly in plastic wrap and then foil, and freeze for up to 1 month. Thaw at room temperature before glazing.
-
Experiment with Toppings:
While the classic maple glaze is divine on its own, feel free to get creative with your toppings! Toasted nuts like pecans or walnuts add a lovely crunch and earthy flavor. Crispy bacon bits offer an incredible sweet and savory contrast that is surprisingly addictive. A dusting of powdered sugar over the glaze, or even a drizzle of white chocolate, can add another layer of visual appeal and taste. Don’t be afraid to make these treats truly your own!
-
Parchment Paper for Easy Removal:
Using parchment paper to line your baking pan, creating a slight overhang on the sides, is a game-changer for easy removal. Once the bars have slightly cooled in the pan, you can simply lift them out using the parchment paper handles, transfer them to a wire rack, and glaze without any fuss or fear of sticking. This ensures your beautiful creation remains intact and picture-perfect.
Conclusion:
There’s a special kind of magic that happens when you bake something truly delicious from scratch, and these maple donut bars are, without a doubt, one of those magical creations. I honestly believe that once you try them, you’ll understand why they’ve quickly become a staple in my kitchen, and I’m sure they’ll find a cherished spot in yours too. We’ve gone through every step to ensure you feel confident and excited about tackling this recipe, transforming simple ingredients into an extraordinary treat. It’s more than just a recipe; it’s an invitation to experience the pure joy of homemade goodness.
Why These Maple Donut Bars Are an Absolute Must-Try
What makes these maple donut bars an absolute showstopper? For starters, it’s the incredible, unmistakable flavor of real maple that permeates every single bite – from the tender, cake-like bar itself to the luscious, sweet glaze that crowns it. Unlike traditional fried donuts, which can sometimes be intimidating to prepare at home, these bars offer all the satisfying texture and indulgent taste without any of the fuss of deep-frying. They are baked to perfection, resulting in a soft, airy crumb that just melts in your mouth, enveloped by that irresistible maple glaze. It’s convenience meeting pure culinary delight! They strike that perfect balance between being delightfully sweet and comforting, making them incredibly versatile for any occasion.
I’ve personally witnessed the smiles and heard the exclamations of delight when friends and family take their first bite. They’re impressive enough for a special brunch, yet comforting enough for a quiet morning coffee. The simplicity of the baking process, coupled with the profound satisfaction of the end result, truly makes this a must-try. This truly is your comprehensive guide to baking delicious treats, especially with these irresistible maple donut bars. Consider this recipe your Maple Donut Bars The Ultimate Guide To Baking Delicious Treats, designed to give you consistent, phenomenal results every time. No more settling for store-bought mediocrity when you can create something so spectacular right in your own kitchen.
Serving Suggestions & Delightful Variations
Now that you’ve mastered the art of baking these glorious bars, let’s talk about how to best enjoy them and how you can unleash your creativity! While they are absolutely divine enjoyed warm, straight from the oven with a fresh cup of coffee or a tall glass of milk, don’t hesitate to serve them at room temperature for an equally delightful experience. They make an excellent addition to any breakfast or brunch spread, instantly elevating the entire meal. Imagine them alongside fresh fruit, yogurt, and perhaps some crispy bacon – a symphony of flavors!
But why stop there? These bars are incredibly adaptable. Here are a few ideas to get your creative juices flowing:
-
Glaze Alternatives:
While the maple glaze is iconic, feel free to experiment. A simple vanilla bean glaze, a decadent chocolate ganache, or even a tangy cream cheese frosting could offer exciting new dimensions. For autumn, a pumpkin spice glaze would be absolutely divine!
-
Topping Extravaganza:
Sprinkle on some toasted pecans or walnuts for a nutty crunch. A dusting of cinnamon sugar after glazing can add an extra layer of warmth. For a touch of whimsy, colorful rainbow sprinkles are always a hit, especially with younger eaters. And for the truly adventurous, a sprinkle of finely chopped, crispy candied bacon bits creates an unforgettable sweet and savory fusion that will have everyone talking!
-
Dough Enhancements:
Stir a teaspoon of cinnamon or nutmeg into the dry ingredients for an even deeper, spicier flavor profile. A tiny pinch of cardamom can add an exotic, fragrant twist. You could even fold in some finely chopped apples or pears for a fruity dimension, transforming them into a more cake-like dessert.
-
Shape Shifting:
If you prefer individual servings, the batter can easily be baked in a muffin tin to create delightful donut muffins, adjusting the baking time accordingly. Mini loaf pans could also work beautifully for a more rustic presentation.
Your Turn: Bake, Share, and Inspire!
I genuinely hope you feel inspired and ready to dive into your kitchen to bake a batch of these extraordinary maple donut bars. There’s an immense satisfaction in creating something so wonderful with your own hands, and I promise you, the aroma alone will be enough to brighten your day. Don’t just read about it; experience it! I am so excited for you to discover the deliciousness. Once you’ve made them, I would absolutely love to hear about your experience. Did you stick to the classic recipe, or did you try one of the variations? What was your favorite part?
Please, don’t keep this deliciousness to yourself! Share your creations with your friends, family, and even your neighbors. These bars are truly meant to be shared, spreading joy one maple-infused bite at a time. And if you’re comfortable, I’d be thrilled if you shared your baking journey and photos with me! There’s nothing more rewarding than seeing our community of home bakers creating and enjoying these recipes. Your feedback and personal touches inspire me and countless others. Happy baking, my friends, and get ready to indulge in pure maple bliss!
Maple Donut Bars The Ultimate Guide To Baking Delicious Treats
Tender, cake-like donut bars generously coated in a shimmering, sweet maple glaze. This recipe offers all the irresistible flavor of a classic donut without deep-frying, perfect for sharing or a special treat.
Ingredients
-
3 cups all-purpose flour
-
2 teaspoons baking powder
-
1 teaspoon baking soda
-
1/2 teaspoon salt
-
1/2 teaspoon ground nutmeg
-
1 cup granulated sugar
-
1/2 cup unsalted butter, melted and slightly cooled (for donut bars)
-
2 large eggs
-
1 cup buttermilk
-
1 teaspoon vanilla extract (for donut bars)
-
4 cups powdered sugar
-
1/2 cup pure maple syrup
-
1/4 cup milk (or more, as needed)
-
2 tablespoons unsalted butter, melted (for glaze)
-
1 teaspoon vanilla extract (for glaze)
Instructions
-
Step 1
Preheat oven to 350°F (175°C). Line a 9×13 inch baking pan with parchment paper and lightly grease. -
Step 2
In a large bowl, whisk together the flour, granulated sugar, baking powder, baking soda, salt, and ground nutmeg. -
Step 3
In a separate medium bowl, whisk together the eggs, buttermilk, 1/2 cup melted and slightly cooled unsalted butter, and 1 teaspoon vanilla extract (for bars). -
Step 4
Pour the wet mixture into the dry ingredients. Gently fold until just combined; do not overmix. -
Step 5
Pour the batter into the prepared pan, spread evenly, and bake for 25-30 minutes, or until a toothpick inserted into the center comes out clean. -
Step 6
Cool the bars in the pan for 15-20 minutes, then carefully lift onto a wire rack to cool completely (1-2 hours). -
Step 7
For the glaze, combine the 4 cups powdered sugar, 1/2 cup pure maple syrup, 1/4 cup milk, 2 tablespoons melted unsalted butter, and 1 teaspoon vanilla extract (for glaze) in a medium bowl. Whisk until smooth, adjusting consistency with more milk or powdered sugar if needed. -
Step 8
Once the donut bars are completely cool, pour the glaze over them and spread evenly. Add optional toppings immediately if desired. -
Step 9
Allow the glaze to set at room temperature for 30 minutes to 1 hour before cutting into individual servings and serving.
Important Information
Nutrition Facts (Per Serving)
It is important to consider this information as approximate and not to use it as definitive health advice.
Allergy Information
Please check ingredients for potential allergens and consult a health professional if in doubt.