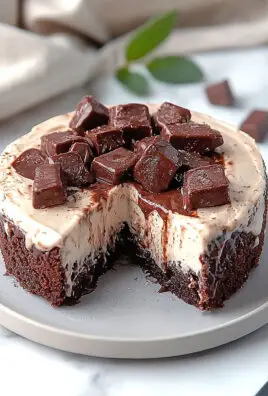
Loaded Reeses Peanut Butter Cup Bark is more than just a dessert; it’s an irresistible symphony of flavors and textures waiting to captivate your taste buds. Imagine the perfect marriage of rich, velvety chocolate and the unmistakable, creamy sweetness of peanut butter, elevated by the iconic indulgence of Reese’s Peanut Butter Cups, all effortlessly crafted into a beautiful, breakable confection.
While the concept of chocolate bark dates back centuries, serving as a simple yet elegant treat, this modern rendition truly embraces innovation and flavor. It taps into the universally adored combination of chocolate and peanut butter, a duo celebrated worldwide for its unparalleled balance of sweet and savory notes, making it a comforting classic reimagined for today’s dessert enthusiasts. This particular bark is a testament to how simple ingredients can create extraordinary joy.
People absolutely adore this dish not only for its incredible, melt-in-your-mouth taste and satisfying crunch from the chopped Reese’s pieces, but also for its remarkable ease of preparation. It’s a delightful, no-bake wonder that promises to satisfy even the most intense sweet cravings without demanding hours in the kitchen. Its vibrant, appealing look makes it a standout addition to any party platter, a thoughtful homemade gift, or simply a well-deserved treat for yourself. Every decadent square of this Loaded Reeses Peanut Butter Cup Bark offers a moment of pure, unadulterated bliss.

Ingredients:
- For the Chocolate Base:
- 24 ounces (approximately 680g) good quality milk chocolate chips or chopped milk chocolate bars
- 12 ounces (approximately 340g) good quality semi-sweet chocolate chips or chopped semi-sweet chocolate bars
- 1 tablespoon coconut oil or vegetable shortening (optional, helps with shine and smoother texture)
- For the Reese’s Peanut Butter Cup Goodness:
- 30-40 mini Reese’s Peanut Butter Cups, unwrapped
- 15-20 regular-sized Reese’s Peanut Butter Cups, unwrapped and roughly chopped
- 1 cup Reese’s Peanut Butter Baking Chips (optional, for extra peanut butter flavor and texture)
- For the Extra Crunch and Flavor (Optional, but highly recommended for a truly “Loaded” bark):
- ½ cup roasted salted peanuts, roughly chopped
- ½ cup peanut butter, melted slightly (for a swirl, choose a creamy variety)
Gathering Your Supplies and Prepping:
Alright, let’s get started on creating some truly epic Loaded Reeses Peanut Butter Cup Bark! Before we even think about melting chocolate, a little preparation goes a long way to ensure a smooth and enjoyable process. Trust me, you don’t want to be scrambling for ingredients or tools when the chocolate is perfectly melted and ready to go.
First things first, gather all your ingredients. Having everything measured out and unwrapped makes the assembly phase a breeze. Unwrap all those lovely mini and regular Reese’s Peanut Butter Cups. This can be a fun, albeit slightly sticky, task! For the regular-sized Reese’s, I like to give them a rough chop. You don’t want them too uniform; a mix of bigger chunks and smaller pieces adds wonderful texture and ensures every bite of your Loaded Reeses Peanut Butter Cup Bark has that iconic peanut butter cup goodness.
Next, prepare your baking sheet. I usually grab a large, rimmed baking sheet, about 13×18 inches, which is perfect for a generous batch of bark. Line it meticulously with parchment paper. This step is absolutely crucial. Parchment paper ensures your bark won’t stick, making it incredibly easy to lift and break once it’s set. I often go an extra step and use a tiny dab of butter or a spray of cooking oil under the corners of the parchment to keep it from sliding around on the pan while I’m spreading the chocolate. This little trick prevents any frustration later on!
If you’re using chopped peanuts, go ahead and chop them now. A rough chop is best here too; we’re aiming for varied textures in this delightful bark. And if you plan to add a peanut butter swirl, set aside about half a cup of creamy peanut butter. You’ll want to melt this just before you add it to the bark, so it’s smooth and drizzle-able.
Finally, set up your melting station. You’ll need either a double boiler or a microwave-safe bowl. A sturdy rubber spatula or two, a whisk, and possibly a small offset spatula for spreading the chocolate will also be invaluable. Having everything at your fingertips will make this a truly enjoyable baking adventure!
Melting the Chocolate Base:
Now for the heart of our Loaded Reeses Peanut Butter Cup Bark – melting that luscious chocolate! Achieving perfectly melted, smooth chocolate is key to a beautiful and delicious bark. We’ll be using a combination of milk and semi-sweet chocolate to get that ideal balance of sweetness and depth, which truly complements the peanut butter. I find this blend to be absolutely divine.
Method 1: The Double Boiler (My Preferred Method for Best Results)
This method offers gentle, even heat, which greatly reduces the risk of scorching your chocolate. Grab a saucepan and fill it with about an inch or two of water. Bring the water to a gentle simmer over medium-low heat. You don’t want a rolling boil; just a nice, steady simmer. Place a heat-safe bowl (preferably glass or stainless steel) over the saucepan. It’s super important that the bottom of the bowl does not touch the simmering water. We want the steam to do the melting, not direct heat.
Combine your milk chocolate chips (or chopped milk chocolate) and semi-sweet chocolate chips (or chopped semi-sweet chocolate) into the bowl. If you’re using it, add your tablespoon of coconut oil or vegetable shortening now. The shortening or coconut oil is optional, but I highly recommend it, especially if you want a slightly shinier, smoother bark that breaks cleanly. It also helps with the flow of the chocolate, making it easier to spread thinly.
Stir the chocolate mixture frequently with a rubber spatula as it melts. Be patient! This process takes a little time, but it’s worth it. You’ll see the chocolate slowly transform from solid chips into a glossy, liquid pool. Make sure no water or steam gets into your chocolate, as even a tiny drop can cause it to seize and become grainy – a baker’s nightmare! Continue stirring until the chocolate is completely smooth, with no lumps remaining. Once it’s fully melted and wonderfully glossy, immediately remove the bowl from the heat. Don’t let it sit over the steam for too long after it’s melted, as residual heat can cause it to overheat.
Method 2: The Microwave (A Quicker Alternative)
If you’re short on time, the microwave can certainly work, but you need to be very careful to avoid burning the chocolate. Place your combined milk and semi-sweet chocolate chips (and coconut oil/shortening, if using) into a large, microwave-safe bowl. Heat the chocolate in 30-second intervals on medium power. After each interval, remove the bowl and stir the chocolate thoroughly, even if it doesn’t look like much has melted. This helps to distribute the heat evenly and prevents hot spots.
Continue to heat and stir in 15-20 second intervals as the chocolate starts to melt. It’s crucial to stop heating when there are still a few small lumps remaining. The residual heat in the bowl and the already melted chocolate will continue to melt these last few pieces as you stir. Overheating chocolate in the microwave is very easy to do, and once it’s burnt, there’s no going back! Stir until it’s perfectly smooth and velvety. This method requires a bit more vigilance, but it’s effective.
Whichever method you choose, you should end up with a beautiful, glossy, pourable chocolate base. This is the canvas for your incredible Loaded Reeses Peanut Butter Cup Bark!
Assembling the Loaded Reeses Peanut Butter Cup Bark:
This is where the magic truly happens and where our Loaded Reeses Peanut Butter Cup Bark gets its incredible personality! With your perfectly melted chocolate base ready and your parchment-lined baking sheet prepped, we’re ready to bring this masterpiece to life. Work relatively quickly here, as the chocolate will start to set once it’s off the heat.
Carefully pour the entire melted chocolate mixture onto the center of your prepared parchment-lined baking sheet. Now, using your rubber spatula or an offset spatula, gently but quickly spread the chocolate evenly across the parchment paper. You want to aim for a relatively thin, uniform layer, usually about ¼ to ⅓ inch thick. Try not to spread it too thin, or it might become too brittle, but also don’t make it too thick, as it will be harder to break and might feel overly rich. Work your way to the edges of the parchment paper, creating an even rectangle or square, depending on your pan.
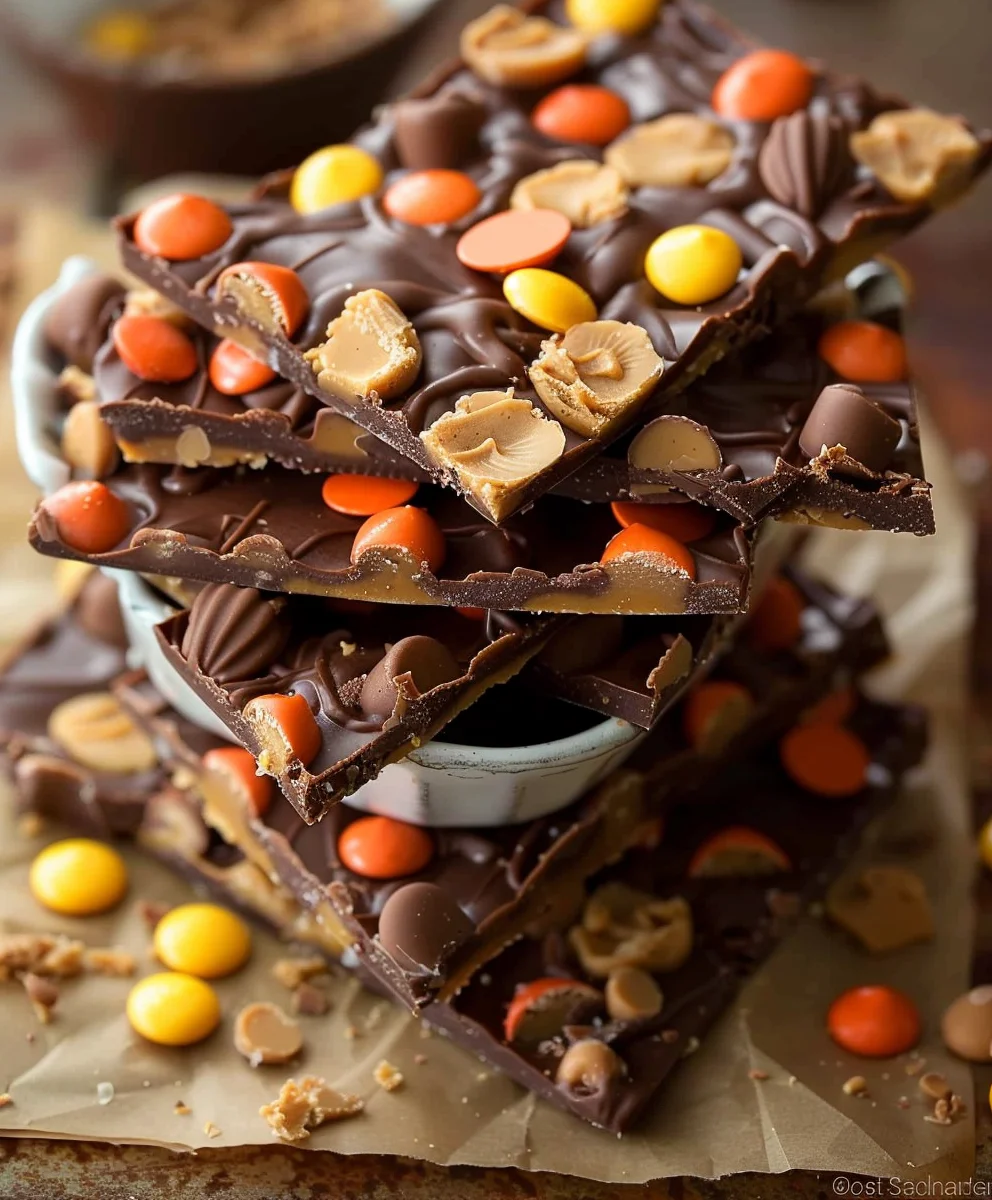
Now for the fun part – loading it up with Reese’s! While the chocolate is still wet and warm, immediately start scattering your toppings. Begin with the regular-sized Reese’s Peanut Butter Cup chunks. Distribute them generously over the entire surface of the chocolate. Don’t be shy! We want every piece of this bark to have a good amount of peanut butter cup in it. Gently press them into the chocolate just enough so they adhere but don’t sink completely. You still want them to be visible and proud on top.
Next, grab those adorable mini Reese’s Peanut Butter Cups. Place them thoughtfully across the bark, filling in some of the gaps between the larger chunks. I love the visual appeal of both sizes, and they offer a delightful variety in texture. Again, press them in ever so slightly.
If you’re adding the optional Reese’s Peanut Butter Baking Chips, sprinkle those on top as well, making sure to cover the surface fairly evenly. These little gems melt slightly into the chocolate as it sets, adding bursts of concentrated peanut butter flavor. And if you’re using the chopped roasted peanuts, now is the time to scatter them generously over everything. The saltiness and crunch of the peanuts provide a fantastic contrast to the sweet chocolate and creamy peanut butter cups, elevating this bark to another level of deliciousness.
Finally, for that extra artistic touch and even more peanut butter goodness, let’s add a peanut butter swirl. Take your ½ cup of peanut butter and microwave it in a small bowl for about 15-30 seconds, or until it’s just warm and drippy enough to easily drizzle. You can use a spoon to drizzle it randomly over the chocolate bark, creating thin lines and swirls. For a more controlled drizzle, you can transfer the melted peanut butter into a small Ziploc bag, snip off a tiny corner, and pipe it over the bark. Once drizzled, you can take a toothpick or a skewer and gently swirl through the chocolate and peanut butter, creating beautiful marble patterns. Don’t overdo the swirling, or your colors might blend too much.
Take a moment to admire your creation. This is truly a Loaded Reeses Peanut Butter Cup Bark, packed with all the flavors and textures we adore. It’s truly a sight to behold before it even sets!
Setting and Breaking the Bark:
With all your delicious toppings artfully arranged, the hardest part is now waiting for our incredible Loaded Reeses Peanut Butter Cup Bark to set. Patience is key here, but trust me, the reward is absolutely worth it!
Once your bark is fully assembled with all its glorious toppings and swirls, gently transfer the baking sheet to your refrigerator. I prefer the refrigerator over the freezer for setting bark, as it allows for a more gradual cooling process, which can sometimes result in a shinier, snappier bark. Plus, it reduces the risk of condensation forming on the chocolate when you take it out, which can make it look dull or streaky.
Allow the bark to chill in the refrigerator for at least 1 to 2 hours. The exact time will depend on the thickness of your bark and the temperature of your refrigerator. You’ll know it’s ready when the chocolate is completely firm and solid to the touch. It should feel hard and snap easily when you try to gently lift a corner. If it still feels soft or flexible, pop it back in for a bit longer. Don’t rush this stage; a well-set bark is much more satisfying to break and eat!
Once your Loaded Reeses Peanut Butter Cup Bark is perfectly firm, carefully remove the baking sheet from the refrigerator. Now comes the incredibly satisfying part – breaking it into pieces! Slide the entire sheet of parchment paper with the set bark off the baking sheet and onto a clean, flat surface, such as a large cutting board or your countertop.
I find the best way to break bark is simply with your hands. Start by gently peeling off the parchment paper from the back of the bark. It should come off quite easily. Then, use your hands to snap the bark into irregular pieces. I love the rustic look of uneven bark pieces; it adds to the homemade charm. You can break it into larger shards, smaller bite-sized chunks, or a mix of both. If you prefer more uniform pieces, you can carefully use a sharp, heavy knife to cut through the bark, but be prepared for a bit of a challenge, especially with all those lovely peanut butter cups embedded within.
The sound of the chocolate snapping is so gratifying! Each piece will reveal a beautiful cross-section of chocolate, peanut butter cups, and any other additions you chose. This truly is a delightful and indulgent treat.
Storage Tips for Your Delicious Bark:
Congratulations, you’ve created an incredible batch of Loaded Reeses Peanut Butter Cup Bark! Now that you have these delectable shards of chocolatey, peanut buttery goodness, you’ll want to ensure they stay fresh and delicious for as long as possible. Proper storage is key to maintaining that perfect texture and flavor.
Once you’ve broken your bark into pieces, your primary goal is to protect it from moisture, strong odors, and extreme temperature fluctuations. The enemy of good bark is usually humidity, which can make it sticky or dull, and fluctuating temperatures, which can cause “sugar bloom” (a white, powdery film) or “fat bloom” (a grayish, streaky film) on the chocolate. While these are harmless, they can affect the appearance.
I always recommend storing your bark in an airtight container. This is the single most important step. A good quality, airtight container will protect the bark from air exposure, which can lead to staleness or absorption of other food odors in your pantry or refrigerator. Line the bottom of your container with parchment paper to prevent sticking, and then arrange your bark pieces in a single layer if possible. If you have a lot of bark, you can layer the pieces, but I always suggest placing a piece of parchment paper between each layer to prevent them from sticking together. This also makes it easier to grab a single piece without disturbing the rest.
For most situations, especially if you plan to enjoy it within a week or two, I find that storing your Loaded Reeses Peanut Butter Cup Bark at cool room temperature (around 65-70°F or 18-21°C) in a dry place is ideal. A pantry, a cupboard away from heat sources like ovens or windows, or a cool basement often works perfectly. Storing it at room temperature allows the chocolate to be at its best eating temperature, offering that delightful melt-in-your-mouth quality without being too hard.
If your kitchen tends to be warmer, or if you want to extend the shelf life for longer, you can store the bark in the refrigerator. However, if you do refrigerate it, be sure to let it come to room temperature for about 10-15 minutes before serving. This allows the chocolate to soften slightly and release its full flavor and aroma. When taking it out of the fridge, leave it in its airtight container until it warms up a bit to minimize condensation.
The bark should remain fresh for about 2-3 weeks when stored properly at room temperature, and even longer, up to a month, in the refrigerator. However, in my experience, a batch of this delicious Loaded Reeses Peanut Butter Cup Bark rarely lasts that long! It’s such an irresistible treat that it tends to disappear quickly. It also makes a fantastic homemade gift, beautifully packaged in cello bags or decorative tins. Enjoy every single bite of your amazing creation!

Conclusion:
Well, my friends, we’ve reached the sweet finale of our journey into pure dessert bliss. If there’s one recipe I truly believe deserves a permanent spot in your culinary repertoire, it’s this one. The sheer joy of crafting something so utterly decadent, yet surprisingly simple, is an experience I want everyone to have. This isn’t just another dessert; it’s a celebration of two of the most beloved flavors in the universe: rich chocolate and creamy, salty peanut butter, amplified by the iconic bite of Reese’s Peanut Butter Cups. Every single piece is a symphony of textures and tastes – from the smooth, melt-in-your-mouth chocolate base to the delightful chewiness of the peanut butter cups and the unexpected crunch of the added peanuts. It’s an irresistible combination that perfectly balances sweet and savory, making it an absolute showstopper for any occasion, or simply a well-deserved treat for yourself after a long day.
What truly makes this recipe a must-try, in my humble opinion, is its unparalleled ability to satisfy even the most intense sweet cravings. It transcends the ordinary, transforming simple ingredients into something extraordinary. Imagine biting into a crisp piece of bark, where the robust flavor of good quality chocolate mingles with the nostalgic taste of a Reese’s cup. Then, just when you think it can’t get any better, you encounter the added depth of flavor and texture from extra peanut butter chips or chopped peanuts, elevating the entire experience. It’s comfort food redefined, a delightful escape, and a guaranteed crowd-pleaser that will have everyone asking for your secret. And the secret, as you now know, is delightfully straightforward! You’ll be amazed at how easily you can create something so impressive and incredibly delicious, proving that gourmet treats don’t always require hours of intricate work.
Serving Suggestions & Creative Variations:
Now that you’ve mastered the art of creating this incredible treat, let’s talk about how to enjoy it and how you can make it uniquely your own. Once your bark is perfectly set and broken into delightful, irregular pieces, the possibilities are truly endless. I love serving it alongside a steaming mug of coffee or a cold glass of milk for an afternoon pick-me-up. It also makes an exceptional after-dinner dessert, especially when paired with a scoop of vanilla bean ice cream – the contrasting temperatures and textures are simply divine! For special occasions, consider arranging the pieces artfully on a dessert platter, perhaps garnished with a sprinkle of flaky sea salt to really make those flavors pop. And let’s not forget the power of homemade gifts; a small cellophane bag filled with this exquisite bark, tied with a pretty ribbon, makes for a truly thoughtful and cherished present for friends, family, or even teachers. It’s a gift from the heart that truly speaks volumes.
But why stop there? The beauty of bark is its incredible versatility. Don’t be afraid to experiment and customize your batch to suit your personal preferences or to match a specific holiday theme. Here are a few ideas I’ve explored and loved:
- Chocolate Base Swaps: While I adore milk chocolate for this recipe, feel free to switch it up! A dark chocolate base provides a more intense, sophisticated flavor that beautifully complements the sweetness of the Reese’s. Or, for a truly unique twist, try a white chocolate base – just be sure to use high-quality white chocolate for the best results and perhaps add a touch of vanilla extract.
- Beyond Reese’s: While the Loaded Reeses Peanut Butter Cup Bark is undeniably spectacular, you can certainly mix in other delightful candies. Think chopped Butterfingers for an extra crunch and a different nutty flavor profile, M&M’s for a burst of color and a satisfying candy shell, or even mini pretzels for a salty-sweet crunch that takes it to another level of addictive deliciousness.
- Nutty Additions: Crushed peanuts are wonderful, but imagine the possibilities with other nuts! Chopped roasted almonds, cashews, or even pecans could add a different dimension of flavor and texture, offering a more gourmet feel. A sprinkle of toasted coconut flakes could also add an unexpected tropical twist.
- Festive Flair: For holidays, a simple sprinkle of colored sprinkles or edible glitter before the chocolate sets can transform your bark into a festive masterpiece. Red and green for Christmas, pastels for Easter, or orange and black for Halloween – let your creativity shine! You could even drizzle with contrasting colored melting wafers for an extra artistic touch.
- A Hint of Salt: A final dusting of flaky sea salt over the top before the chocolate hardens is a game-changer. It enhances all the flavors and provides a wonderful counterpoint to the sweetness, making each bite even more complex and satisfying.
Your Turn to Create and Share!
My greatest hope is that this recipe inspires you to step into your kitchen and create something truly special. I promise you, the minimal effort involved yields maximum deliciousness. There’s an immense satisfaction that comes from melting chocolate, scattering those glorious Reese’s pieces, and watching it all transform into a masterpiece right before your eyes. This is more than just a recipe; it’s an invitation to treat yourself, to share joy with others, and to unleash your inner dessert artist. Think of it as your passport to a world of effortless, extraordinary sweetness.
So, go ahead! Gather your ingredients, put on some good music, and let the magic happen. When you’ve made your batch of this incredibly delightful Loaded Reeses Peanut Butter Cup Bark, I would absolutely love to hear all about your experience! Did you stick to the original, or did you venture into your own creative variations? What was your favorite part? Please share your triumphs, your serving suggestions, and especially your photos! Tag me or drop a comment below; I genuinely can’t wait to see your amazing creations. Happy baking, and happy indulging!
Loaded Reese’s Peanut Butter Cup Bark Delight
An irresistible symphony of rich chocolate and creamy peanut butter, elevated by iconic Reese’s. This delightful, no-bake wonder satisfies sweet cravings with incredible taste and satisfying crunch, perfect for parties or a well-deserved treat.
Ingredients
-
3 1/2 cups milk chocolate chips, divided
-
1 1/2 cups creamy peanut butter
-
1 1/2 cups powdered sugar
-
3 tablespoons butter, softened
-
1 cup Reese’s Pieces
Instructions
-
Step 1
Line a large baking sheet with parchment paper. -
Step 2
Combine 1 1/2 cups peanut butter, 1 1/2 cups powdered sugar, and 3 tablespoons softened butter in a bowl; mix until smooth. Set aside. -
Step 3
Melt 1 3/4 cups chocolate chips. Spread evenly on the prepared baking sheet as the base layer. -
Step 4
Evenly spread the prepared peanut butter mixture over the melted chocolate base. -
Step 5
Melt the remaining 1 3/4 cups chocolate chips. Carefully spread this over the peanut butter layer. -
Step 6
Immediately sprinkle 1 cup Reese’s Pieces evenly over the wet top chocolate layer; gently press to adhere. -
Step 7
Refrigerate for 1-2 hours, or until the bark is completely firm and solid. -
Step 8
Remove from refrigerator, peel off parchment paper, and break the bark into irregular pieces. Serve and enjoy!
Important Information
Nutrition Facts (Per Serving)
It is important to consider this information as approximate and not to use it as definitive health advice.
Allergy Information
Please check ingredients for potential allergens and consult a health professional if in doubt.