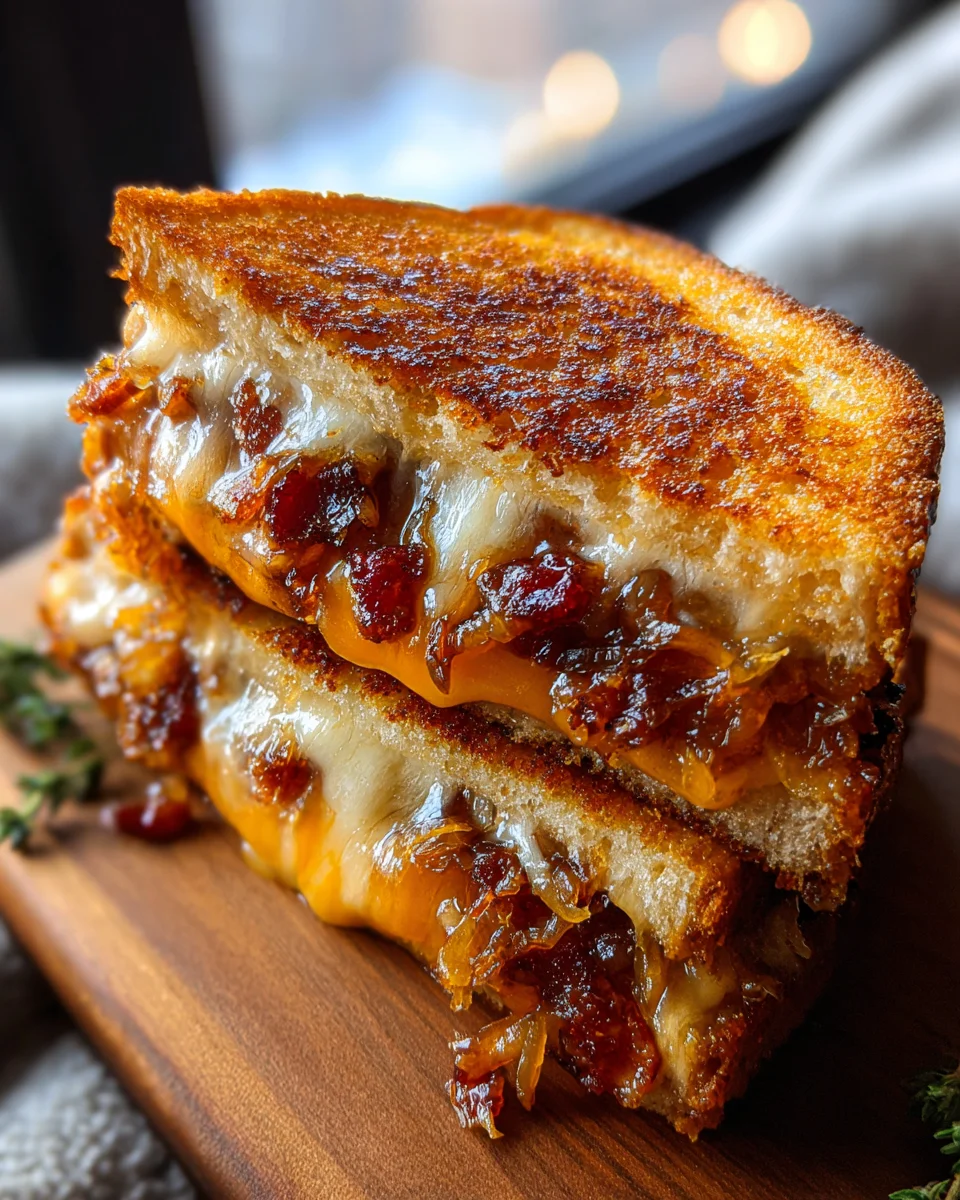
Beef Bacon And Carmelized Onion Grilled Cheese Sandwiches are not just a meal; they are an experience, a symphony of savory, sweet, and utterly satisfying flavors that will redefine your perception of comfort food. Prepare yourself for a culinary journey where humble ingredients transcend their everyday status to create something truly extraordinary. I still remember the first time I combined these incredible elements – the aroma alone was enough to make my stomach rumble with anticipation!
While the classic grilled cheese sandwich has been a beloved staple in kitchens worldwide for generations, evolving from simple cheese and bread to gourmet delights, the addition of beef bacon and slow-cooked caramelized onions elevates it to an entirely new level of sophistication. This particular rendition of grilled cheese isn’t steeped in ancient history, but rather in the modern desire to transform familiar favorites into unforgettable meals. It’s a testament to how simple yet quality ingredients can turn a quick lunch into a gourmet affair. The genius of the Beef Bacon And Carmelized Onion Grilled Cheese Sandwiches truly lies in its balanced complexity and comforting appeal.
People absolutely adore this dish because it masterfully combines the crispy, salty richness of beef bacon, the deep, earthy sweetness of perfectly caramelized onions, and the gooey, tangy warmth of melted cheese, all encased in buttery, golden-brown toasted bread. It’s a textural delight – a satisfying crunch yielding to a soft, flavorful interior that perfectly balances rich and sweet notes. Whether you’re seeking a hearty lunch, a comforting dinner, or an impressive snack, this recipe promises pure joy. Get ready to embark on a delicious adventure that will undoubtedly earn a permanent spot in your recipe rotation!

Ingredients:
- For the Caramelized Onions:
- 3 large sweet onions (such as Vidalia or Walla Walla), about 2-2.5 pounds total, thinly sliced
- 2 tablespoons unsalted butter
- 1 tablespoon olive oil
- 1 teaspoon granulated sugar (or brown sugar for a deeper molasses note)
- 1/4 teaspoon fine sea salt
- 2 tablespoons balsamic vinegar (optional, but highly recommended for depth and a touch of tang)
- For the Beef Bacon:
- 8 slices thick-cut beef bacon (approximately 1/2 pound)
- For the Cheese Blend:
- 4 ounces Gruyère cheese, freshly grated (for nutty, earthy notes and excellent melt)
- 4 ounces sharp white cheddar cheese, freshly grated (for a classic tangy bite)
- 2 ounces Fontina cheese, freshly grated (for superior meltiness and a mild, creamy texture)
- 2 ounces Provolone cheese, thinly sliced or freshly grated (for a stretchy, savory, and mild addition)
- For the Sandwiches:
- 8 slices high-quality bread (sourdough, brioche, or challah are fantastic choices, thick-cut is best)
- 4 tablespoons unsalted butter, softened (for grilling the sandwiches)
- 2 tablespoons good quality mayonnaise (Duke’s or Kewpie for that perfect golden crust)
- Freshly ground black pepper, to taste
Crafting the Perfect Beef Bacon And Caramelized Onion Grilled Cheese Sandwiches: Your Step-by-Step Guide
Get ready to elevate your grilled cheese game with this ultimate recipe for Beef Bacon And Caramelized Onion Grilled Cheese Sandwiches. This isn’t just any sandwich; it’s a symphony of savory, sweet, and tangy flavors, wrapped in a crispy, cheesy embrace. While it requires a bit of patience, especially for those beautiful caramelized onions, I promise you, every moment is worth it. We’re going to layer rich, crispy beef bacon with intensely sweet, slow-cooked onions and a multi-faceted cheese blend between perfectly grilled slices of bread. Let’s dive in!
Phase 1: The Art of Caramelizing Onions
This is arguably the most crucial step for achieving that signature sweet and savory depth in your Beef Bacon And Caramelized Onion Grilled Cheese Sandwiches. Don’t rush this process; true caramelization takes time and gentle heat, transforming pungent raw onions into wonderfully sweet, jammy goodness. This step lays the foundation for all the incredible flavors to come.
- Prepare Your Onions: Begin by carefully peeling and thinly slicing your three large sweet onions. Aim for consistent thickness, about 1/8 to 1/4 inch, to ensure they cook evenly. A mandoline can be a fantastic tool here for uniform slices, but a sharp chef’s knife works perfectly with a steady hand. The more uniform your slices, the better the end result will be, as they’ll caramelize at the same rate.
- Heat the Pan: In a large, heavy-bottomed pan or Dutch oven (I personally prefer a wide cast-iron skillet for its excellent heat retention and even distribution), melt 2 tablespoons of unsalted butter over medium-low heat. Add 1 tablespoon of olive oil. The combination of butter and oil helps prevent the butter from burning and adds a nice richness to the onions.
- Add the Onions: Once the butter has melted and the oil shimmers, add all the sliced onions to the pan. It will seem like a massive amount, overflowing your pan, but trust me, they will cook down significantly. Add 1/4 teaspoon of fine sea salt and 1 teaspoon of granulated sugar (or brown sugar if you prefer an even deeper, more complex, molasses-like flavor). The salt helps draw out moisture from the onions, and the sugar aids in the caramelization process, giving them a delightful head start.
- Sweat and Soften: Stir the onions frequently, ensuring they are evenly coated in the butter and oil. For the first 10-15 minutes, focus on “sweating” and softening the onions. They will release a lot of moisture, become translucent, and begin to reduce in volume. Keep the heat on medium-low; the goal is to gently soften and brown them, not to scorch them.
- Slow Caramelization: Now comes the patience. Reduce the heat to low, cover the pan, and cook for another 20 minutes, stirring occasionally. This initial covered cooking phase helps to steam the onions, breaking down their cell walls and softening them even further. After 20 minutes, remove the lid.
- Deepening the Flavor and Color: Continue cooking uncovered over low heat, stirring every 5-10 minutes. This phase is the longest and most critical, taking anywhere from 30 minutes to an hour, or even longer, depending on your stove, your pan, and the moisture content of the onions. You’ll notice the onions gradually changing color, from pale yellow to golden brown, then to a rich, deep amber. Don’t be afraid of the deep color – that’s where all the intense sweetness and umami come from. Make sure to scrape up any browned bits from the bottom of the pan with your spatula; these are packed with flavor and should be incorporated back into the onions.
- Deglazing (Optional but Recommended): Once the onions have reached a beautiful, deep caramel color and have a jam-like, luscious consistency, stir in 2 tablespoons of balsamic vinegar (if using). The vinegar will deglaze the pan, picking up any remaining flavorful fond (browned bits) from the bottom and adding a wonderful tang and brightness that cuts through the richness, enhancing the overall profile of your Beef Bacon And Caramelized Onion Grilled Cheese Sandwiches. Cook for another 2-3 minutes until the vinegar has evaporated and been absorbed by the onions, leaving them glossy and deeply flavored.
- Cool and Set Aside: Remove the caramelized onions from the heat and transfer them to a bowl. Let them cool slightly before using. These can be made a day or two in advance and stored in an airtight container in the refrigerator, making your sandwich assembly even quicker!
Phase 2: Achieving Crispy Beef Bacon Perfection
Crispy, savory beef bacon is the ideal textural and flavor counterpoint to the sweet onions and gooey cheese in our Beef Bacon And Caramelized Onion Grilled Cheese Sandwiches. Cooking it correctly is key to avoiding chewy or burnt results; we want that satisfying shatter with every bite.
- Prepare the Pan: While your onions are caramelizing, or after they’ve finished, you can cook the beef bacon. I highly recommend using a large skillet, preferably cast iron or a heavy-bottomed non-stick pan. Place your 8 slices of thick-cut beef bacon in the cold pan in a single layer. Starting with a cold pan allows the fat to render slowly and evenly as the pan heats up, which is absolutely crucial for achieving truly crispy bacon.
- Slow and Steady Cooking: Turn the heat to medium-low. This slow rendering process is paramount. As the pan heats up, the fat from the beef bacon will slowly melt and pool around the slices. Resist the urge to crank up the heat; high heat will cause the bacon to burn on the outside before it has a chance to crisp up internally, resulting in unevenly cooked, often chewy bacon.
- Flip and Render: Cook the bacon for about 8-12 minutes on the first side, or until it’s golden brown and starting to crisp. Then, using tongs, carefully flip each slice. Continue cooking on the second side for another 5-10 minutes, or until the bacon reaches your desired level of crispness. You’re looking for a beautiful mahogany color and a firm, brittle texture. Don’t be afraid to let it get deeply colored – that’s where the best flavor and crunch are.
- Drain the Bacon: Once perfectly crispy, remove the beef bacon slices from the pan and place them on a plate lined with several layers of paper towels. This will help absorb any excess grease, ensuring your bacon remains wonderfully crisp and doesn’t make your sandwich greasy. Reserve about 1 tablespoon of the rendered beef bacon fat in the pan if you wish to use it for grilling the sandwiches later for an extra layer of savory flavor (otherwise, use butter as directed).
- Crumble or Slice: Once the beef bacon has cooled slightly (it will crisp up even more as it cools), you can either crumble it into small pieces or chop it into bite-sized strips. I personally love crumbled bacon as it distributes more evenly throughout the sandwich, ensuring a meaty, salty, crunchy bite in every mouthful of your Beef Bacon And Caramelized Onion Grilled Cheese Sandwiches. Set aside until assembly.
Phase 3: Crafting the Perfect Cheese Blend
The magic of a truly exceptional grilled cheese, especially one as robust as our Beef Bacon And Caramelized Onion Grilled Cheese Sandwiches, lies in a thoughtfully selected cheese blend. Using a variety of cheeses provides layers of flavor, texture, and meltability that a single cheese simply can’t achieve, ensuring a complex and satisfying experience.
- Grate Your Cheeses: In a medium bowl, combine the freshly grated Gruyère, sharp white cheddar, and Fontina. If your provolone comes in slices, simply tear or roughly chop it into smaller pieces. Grating cheese yourself from a block is always preferred over pre-shredded varieties, as pre-shredded cheese often contains anti-caking agents (like cellulose) that can prevent it from melting smoothly and creamily. Freshly grated cheese melts like a dream!
- Understanding the Blend: I’ve chosen this specific combination for very good reasons:
- Gruyère: This classic Swiss cheese brings a nutty, earthy, and slightly sweet flavor profile. It melts beautifully and adds a sophisticated depth that complements the onions.
- Sharp White Cheddar: Provides a tangy, robust, and familiar cheese flavor that stands up well to the richness of the beef bacon and the sweetness of the caramelized onions. It gives that essential “cheesy” backbone.
- Fontina: The unsung hero for meltiness! Fontina is a semi-soft Italian cheese known for its incredibly smooth, elastic melt and mild, buttery flavor. It ensures that glorious, gooey, pull-apart cheese stretch that every grilled cheese connoisseur craves.
- Provolone: A classic Italian deli cheese, provolone offers a mild, slightly sharp taste and excellent melting qualities, contributing to the overall stretchiness and savoriness without overpowering the other flavors.
- Toss to Combine: Gently toss the cheeses together with your hands or a spoon to ensure an even distribution of all the varieties. You want a harmonious blend so that every bite offers a complex and multi-dimensional cheese experience. Set aside your glorious cheese blend until you’re ready to assemble your sandwiches.
Phase 4: Expert Sandwich Assembly for the Ultimate Experience
Now that all our components are ready – the sweet, jammy caramelized onions, the perfectly crispy beef bacon, and our exquisite cheese blend – it’s time to bring them all together into the magnificent Beef Bacon And Caramelized Onion Grilled Cheese Sandwiches. Proper assembly is key to a balanced, flavorful, and structurally sound sandwich, ensuring every bite is pure perfection.
- Prepare Your Workstation: Lay out your 8 slices of high-quality bread on a clean work surface. I highly recommend a sturdy, thick-cut bread like sourdough, brioche, or challah. Sourdough offers a nice tang to cut through the richness, while brioche or challah provide an unparalleled buttery, slightly sweet foundation that complements the caramelized onions beautifully. The thickness is important to hold all the delicious fillings.
- The Mayonnaise Secret (My Favorite Trick!): This is where we elevate the crust to legendary status. Instead of just buttering the outside of the bread, spread a thin, even layer of mayonnaise on one side of each of your 8 bread slices. Yes, mayonnaise! Don’t worry, you won’t taste it. Mayonnaise is mostly oil and eggs, which when heated, creates an incredibly golden, crispy, and evenly browned crust without burning, far superior to butter alone. It’s a complete game-changer for any grilled cheese and ensures that perfect, uniform crunch.
- Butter the Inside (Optional but Recommended): For an extra layer of flavor and richness, you can lightly spread a very thin layer of softened butter on the un-mayonnaised side of each bread slice, which will be the inside of your sandwich. This isn’t strictly necessary if you’re watching fat content, but it does contribute to the luxurious mouthfeel and can prevent the bread from getting soggy from the fillings.
- Building the Layers: Now, let’s construct these beauties!
- Take four slices of bread, with the mayonnaise side facing down. These will be your bottom slices.
- Distribute about half of your glorious cheese blend evenly over these four bottom slices. Starting with cheese on the bottom helps create a protective barrier for the bread, preventing it from getting soggy, and ensures a good, even melt throughout the sandwich.
- Next, spoon a generous helping of your slow-cooked caramelized onions over the cheese. Don’t be shy; these are a star of the show! Distribute them evenly across the cheese layer, but try to keep them contained within the bread’s perimeter to avoid excessive spillage during grilling.
- Evenly sprinkle the crumbled or chopped crispy beef bacon over the caramelized onions. Again, ensure a good spread so every bite gets some of that savory crunch and meaty flavor.
- Finish with the remaining half of the cheese blend on top of the bacon and onions. This top layer of cheese acts like a “glue,” helping to hold all the delicious fillings together as they melt, creating that cohesive, satisfying bite.
- Finally, place the remaining four slices of bread on top, mayonnaise-side facing up. Gently press down on each sandwich to slightly compress the layers and ensure good contact.
- Season with Pepper: If you enjoy a little kick and aromatic depth, now is a good time to lightly season the mayonnaise-coated exterior of the top bread slice with a tiny pinch of freshly ground black pepper. This adds a subtle, pleasant aroma as it grills and a slight edge to the flavor.
- Prepare for Grilling: You now have four perfectly assembled Beef Bacon And Caramelized Onion Grilled Cheese Sandwiches, brimming with flavor and ready for their transformation into golden, gooey masterpieces.
Phase 5: Grilling Your Beef Bacon And Caramelized Onion Grilled Cheese Sandwiches to Golden Perfection
This is where the magic truly happens: transforming your assembled sandwiches into that iconic golden-brown, crispy exterior with a molten, flavorful interior. The key here, much like caramelizing the onions, is patience and consistent, low-to-medium heat. Do not rush this step! Rushing will result in a burnt exterior and a cold, unmelted interior, which is a tragedy for any grilled cheese.
- Preheat Your Griddle or Skillet: Place a large non-stick skillet or a cast-iron griddle over medium-low heat. Let it preheat for a good 3-5 minutes. The pan should be hot enough to sizzle slightly when a drop of water is added but not smoking aggressively. Even heat is paramount.
- Add Butter to the Pan: Once the pan is preheated, add about 1 tablespoon of softened unsalted butter (or your reserved beef bacon fat, if using, for an extra layer of savory richness) to the pan for the first two sandwiches. Swirl it around to coat the bottom evenly. The butter will melt and sizzle gently.
- Place the Sandwiches: Carefully place two of your assembled Beef Bacon And Caramelized Onion Grilled Cheese Sandwiches into the hot pan, mayonnaise-side down. You want to hear a gentle sizzle as they hit the pan, not a frantic crackle. If it sizzles too aggressively, your heat is too high – remove the sandwiches, lower the heat, and let the pan cool slightly before trying again.
- Grill Slowly: Cook the sandwiches for a solid 4-7 minutes per side. I cannot stress enough the importance of maintaining a consistent medium-low heat throughout this process. This slower cooking time allows two critical things to happen:
- The cheese has ample time to melt completely and become beautifully gooey and stretchy throughout the entire sandwich, reaching that perfect molten state without becoming greasy.
- The bread can slowly toast to a deep golden-brown and develop a supremely crispy, satisfying crust, building flavor and texture without burning.
- Check for Doneness: After about 4-5 minutes, carefully lift one corner of a sandwich with a spatula to check the color. You’re looking for a rich, even, golden-brown hue. If it’s too pale, continue cooking for another minute or two. If it’s getting too dark too quickly, reduce the heat immediately.
- Flip and Finish: Once the first side is perfectly golden and toasted, carefully flip the sandwiches using your spatula. Add another tablespoon of butter (or beef bacon fat) to the pan if needed for the second side, especially if the pan seems dry. Cook on the second side for another 4-7 minutes, again checking for that ideal golden-brown color and ensuring the cheese is fully melted and perhaps even oozing slightly from the sides – that’s a good sign!
- The Press (Optional but Recommended): For an even melt, a flatter sandwich, and maximum crust contact, you can gently press down on the sandwiches with a spatula or even place a second, smaller pan or a foil-wrapped brick on top of them while they grill. Be careful not to press too hard, or you’ll squeeze out all the delicious, molten fillings!
- Remove and Rest: Once both sides are beautifully golden, crisp, and the cheese is gloriously molten and bubbling, carefully remove the Beef Bacon And Caramelized Onion Grilled Cheese Sandwiches from the pan and place them on a cutting board.
- Repeat for Remaining Sandwiches: Wipe out any burnt bits from the pan with a paper towel (carefully!) and repeat the process for the remaining two sandwiches, adding more butter or bacon fat as needed to ensure each sandwich gets a fresh, buttery grilling surface.
Phase 6: Serving Your Masterpiece & Pro Tips for Enjoying Beef Bacon And Caramelized Onion Grilled Cheese Sandwiches
Congratulations! You’ve successfully crafted truly exceptional Beef Bacon And Caramelized Onion Grilled Cheese Sandwiches. Now for the best part – enjoying your culinary creation! This is more than just a meal; it’s an experience.
- The Perfect Slice: Once your grilled cheese sandwiches are off the heat, allow them to rest on the cutting board for 1-2 minutes. This brief resting period helps the cheese set slightly, making it less likely to ooze excessively when you cut into it, and prevents you from scalding your mouth with super hot molten cheese (though a little delicious ooze is always welcome!). Using a sharp serrated knife, slice each sandwich diagonally in half. The diagonal cut isn’t just for aesthetics; it provides a larger surface area for dipping and makes the sandwich easier and more elegant to handle.
- Immediate Gratification: Serve your Beef Bacon And Caramelized Onion Grilled Cheese Sandwiches immediately. Grilled cheese is, without a doubt, best enjoyed hot and fresh, when the cheese is at its absolute peak of gooeyness, the bread is perfectly crisp, and all the flavors are singing in harmony. Don’t let these beauties sit!
- Serving Suggestions: While these sandwiches are a meal unto themselves, they pair wonderfully with a few classic accompaniments:
- Classic Tomato Soup: There’s no more iconic pairing than a rich, creamy tomato soup. The bright acidity of the soup is a perfect foil to the richness of the sandwich, creating a truly comforting meal.
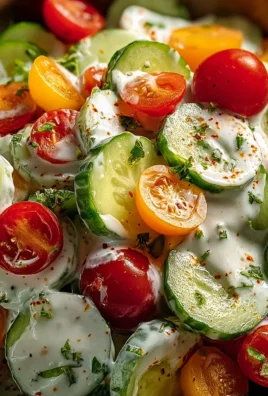
- Green Salad: A simple side salad with a light vinaigrette (like a lemon-herb dressing) can provide a refreshing contrast, a welcome crunch, and a touch of lightness to balance the indulgence.
- Pickles: Dill pickles or bread and butter pickles offer a tangy, briny counterpoint that cuts through the richness beautifully and provides a satisfying crunch.
- Coleslaw: A creamy, slightly tangy coleslaw can also be a delightful accompaniment, adding another layer of texture and freshness.
- Chips: Sometimes, a simple side of crispy potato chips is all you need for that extra crunch.
- Make Ahead Components: As mentioned throughout the recipe, both the caramelized onions and the cooked beef bacon can be prepared a day or two in advance. Store the cooled caramelized onions in an airtight container in the refrigerator. Store the crispy bacon in an airtight container at room temperature (it might lose a little crispness but will regain some when grilled in the sandwich). This significantly cuts down on assembly time when you’re ready for your ultimate grilled cheese fix.
- Cheese Variations: Feel free to experiment with your cheese blend! While my suggested combination offers an incredible balance, you could try adding a touch of smoked gouda for a smoky note, some aged white cheddar for extra sharpness, a bit of provolone piccante for more kick, or even a hint of blue cheese for a bold flavor profile. Just ensure you have a good mix of meltable and flavorful cheeses for the best results.
- Bread Choices: Don’t limit yourself to sourdough or brioche, although they are excellent. A hearty whole grain bread can add a rustic touch and nutty flavor, while a classic white bread can evoke nostalgic comfort (though I’d still recommend thick-cut for structural integrity and a better crust). Rye bread can also offer a wonderful, tangy complexity. The key is a sturdy bread that can hold up to the delicious and abundant fillings without falling apart.
- The Ultimate Comfort Food: Remember, making Beef Bacon And Caramelized Onion Grilled Cheese Sandwiches is not just about following steps; it’s about creating a moment of pure comfort and culinary joy. Take your time, savor the aromas, and enjoy the process of crafting something truly delicious. There’s nothing quite like a perfectly executed grilled cheese to warm the soul and satisfy the deepest cravings!
Conclusion:
Well, my friends, we’ve reached the end of our culinary journey, and I truly hope you’re feeling inspired to dive headfirst into creating what I honestly believe is one of the most delightful and sophisticated comfort food experiences you can imagine. This isn’t just any grilled cheese; it’s an elevated masterpiece that transcends expectations. The marriage of savory beef bacon, slowly rendered and perfectly crisp, with the sweet, deep umami of caramelized onions, all nestled between layers of melty, gooey cheese and perfectly toasted bread, is nothing short of transcendent. Every single bite delivers a symphony of flavors and textures – the crunch of the bread giving way to the creamy cheese, the smoky richness of the beef bacon playing against the sweet earthiness of the onions. It’s a perfect balance that will tantalize your taste buds and leave you utterly satisfied. Trust me when I say, once you try these Beef Bacon And Carmelized Onion Grilled Cheese Sandwiches, your perception of a simple sandwich will be forever changed. It’s comforting, yet gourmet; familiar, yet excitingly new. This recipe isn’t just about making a sandwich; it’s about crafting an experience, a moment of pure, unadulterated culinary bliss that speaks to the soul, promising a memorable meal every single time.
Now, while these sandwiches are absolutely glorious on their own – a complete meal in themselves, if you ask me – they also play wonderfully with others. For a classic pairing, a warm bowl of creamy tomato soup is a no-brainer. The tangy sweetness of the soup perfectly cuts through the richness of the sandwich, creating that quintessential comfort food duo we all adore. But don’t stop there! Imagine them alongside a fresh, crisp green salad dressed with a light vinaigrette; the brightness of the greens would offer a lovely counterpoint and add a refreshing element to your plate. Or perhaps a side of homemade coleslaw for an added crunch and tang, offering another layer of textural interest. If you’re looking to elevate the experience even further, consider serving them with a small ramekin of dill pickles or pickled jalapeños on the side. The acidity and brine would be fantastic for cleansing the palate between decadent bites, making each mouthful as exciting as the first. For a heartier meal, a cup of roasted red pepper soup or even a simple cup of richly flavored broth could be a wonderful companion. They are also incredibly versatile for different times of day; perfect for a luxurious lunch, a quick and satisfying dinner, or even a late-night indulgence after a long day.
Think about a cozy Sunday brunch or a laid-back weeknight dinner where this sandwich takes center stage, effortlessly impressing with its sophisticated yet comforting profile.
But the beauty of a great recipe, in my opinion, lies in its adaptability and the freedom it offers for personal expression. This foundation, as strong and delicious as it is, is also a canvas for your culinary creativity. Feel free to experiment with different cheeses; while cheddar and provolone are fantastic, imagine the nutty complexity of Gruyère, the sharp bite of a good aged white cheddar, or the creamy melt of Fontina. A blend of cheeses can also add incredible depth and character! For the bread, sourdough offers a wonderful tang that complements the savory fillings beautifully, rye brings a hearty flavor, and a rich brioche or challah would provide an almost dessert-like sweetness that beautifully complements the savory fillings. Want a little kick? A thin spread of spicy mustard or a few finely chopped pickled jalapeños inside the sandwich would be phenomenal, adding a delightful warmth. A drizzle of balsamic glaze over the caramelized onions before adding the cheese can also introduce another layer of sophisticated sweetness and acidity, enhancing the overall flavor profile. You could even introduce a whisper of fresh thyme or rosemary into the butter for toasting the bread, adding an aromatic dimension that elevates the experience even further. Don’t be afraid to make this recipe truly your own; it’s robust enough to handle a few personal touches and will only become more special because of them.
Let your imagination guide you – the possibilities for customization are endless, ensuring every creation is uniquely yours!
So, there you have it. My humble plea to you is this: please, please give these incredible sandwiches a try. I promise you won’t regret it. The effort, which is surprisingly minimal for such a gourmet result, is repaid tenfold with every single bite. Gather your ingredients, take your time caramelizing those onions to perfection, and savor the process of creating something truly special. This isn’t just about filling your stomach; it’s about delighting your senses, sharing joy with loved ones, and perhaps even rediscovering the simple pleasure of a perfectly crafted sandwich that feels both indulgent and satisfying. And once you’ve experienced the sheer deliciousness of this creation, I would absolutely love to hear about it! Did you try a new cheese? Did you find the perfect soup pairing? Did your family rave about them? Please share your experiences, your photos, and your brilliant variations in the comments below. Your feedback and creativity inspire me and our entire community of food lovers. Go forth, cook, and enjoy the blissful journey of making, and devouring, your very own unforgettable creation. Happy cooking, and I can’t wait to hear how your sandwich adventure unfolds!
Ultimate Beef Bacon Caramelized Onion Grilled Cheese
Experience a symphony of savory, sweet, and satisfying flavors with this ultimate Beef Bacon and Caramelized Onion Grilled Cheese. Crispy beef bacon, sweet caramelized onions, and gooey melted cheese are encased in buttery, golden-brown toasted bread for an unforgettable comfort meal.
Ingredients
Instructions
Important Information
Nutrition Facts (Per Serving)
It is important to consider this information as approximate and not to use it as definitive health advice.
Allergy Information
Please check ingredients for potential allergens and consult a health professional if in doubt.