Beef Bacon And Caramelized Onion Grilled Cheese Sandwiches are not just a meal; they are an extraordinary culinary adventure waiting to unfold. Prepare to rediscover the simple, profound joy of a grilled cheese sandwich, but with a luxurious, unforgettable twist that elevates it from comforting classic to gourmet masterpiece.
While the traditional grilled cheese has been a beloved staple for generations, a true testament to comfort and simplicity, our recipe introduces a sophisticated evolution. We take the humble origins of this iconic dish and infuse it with rich, savory beef bacon and the deep, sweet complexities of slow-caramelized onions. This harmonious blend creates a flavor profile that is both familiar and excitingly new.
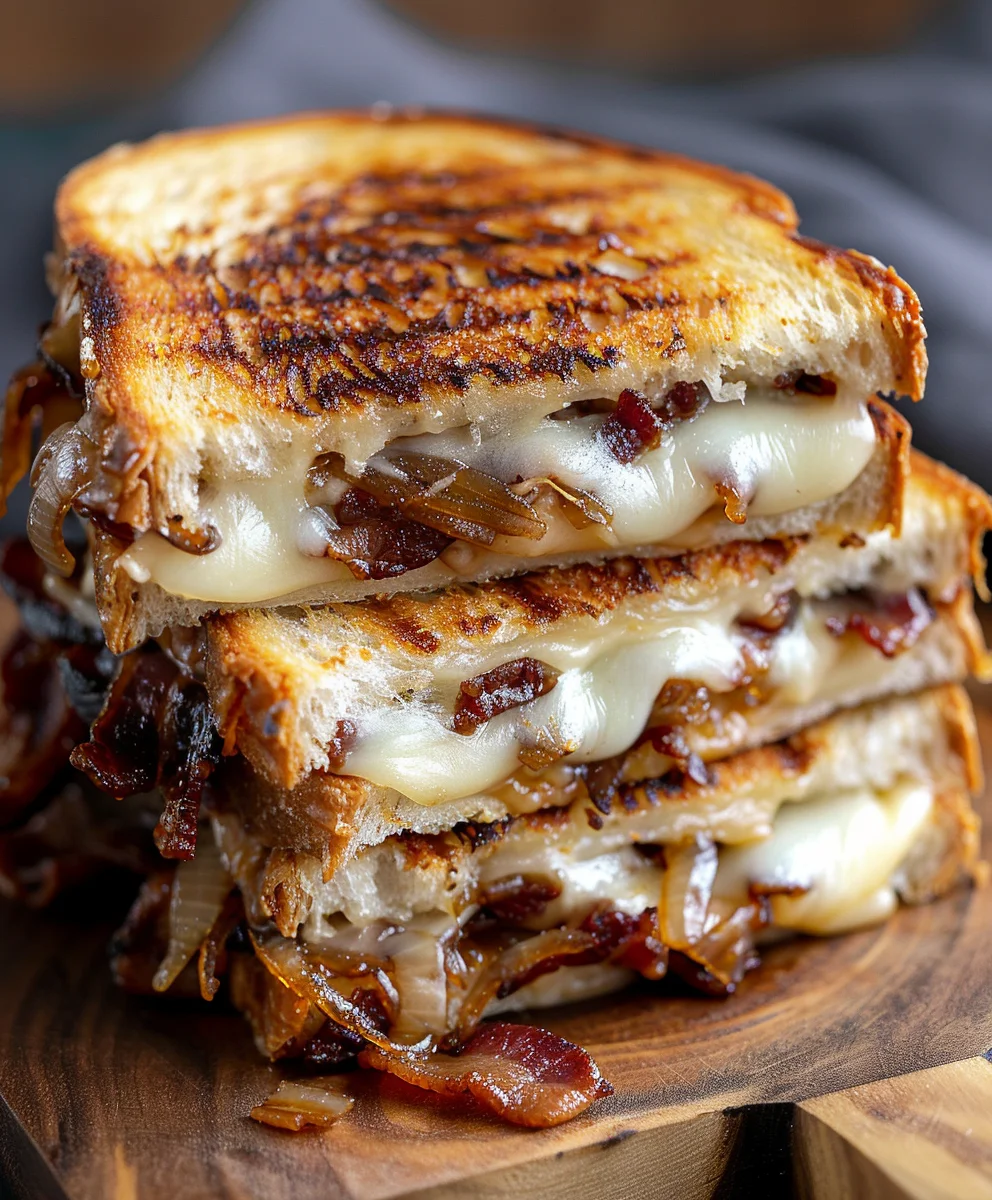
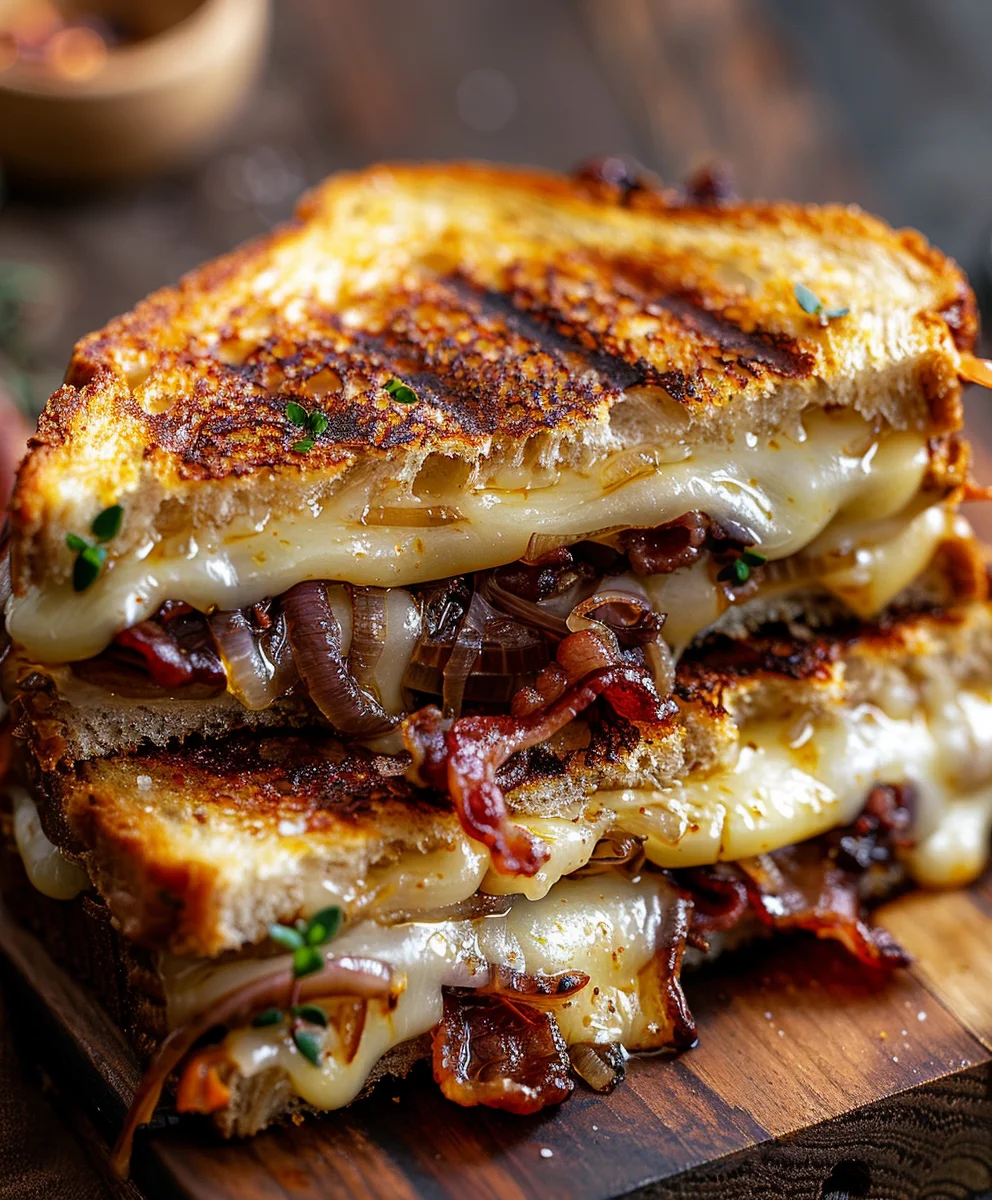
People adore this dish because it masterfully balances contrasting elements: the irresistible crunch of buttery, toasted bread, the gooey delight of perfectly melted cheese, the smoky depth of premium beef bacon, and the exquisite sweetness that only perfectly caramelized onions can provide. Every single bite of these Beef Bacon And Caramelized Onion Grilled Cheese Sandwiches is a testament to flavor and texture, offering a comforting yet utterly decadent experience. It’s the perfect way to turn an ordinary lunch or dinner into a truly special occasion, proving that sometimes, the greatest culinary innovations come from reimagining the classics.

Ingredients:
- For the Caramelized Onions:
- 3 large yellow onions (about 2-2.5 lbs), thinly sliced
- 2 tablespoons unsalted butter
- 1 tablespoon olive oil
- 1/2 teaspoon granulated sugar (optional, helps with caramelization)
- 1/4 teaspoon sea salt, plus more to taste
- Pinch of black pepper
- 1 tablespoon balsamic vinegar (optional, for depth)
- For the Crispy Beef Bacon:
- 8 slices thick-cut beef bacon (or more, depending on your love for bacon!)
- For the Sandwiches:
- 8 slices artisanal bread, such as sourdough, brioche, or a good country white loaf (about 1/2 to 3/4 inch thick)
- 4 tablespoons unsalted butter, softened, plus 2 tablespoons for the pan
- 1 tablespoon Dijon mustard (optional, but highly recommended for a tangy kick)
- 6 ounces Gruyère cheese, grated
- 6 ounces sharp white cheddar cheese, grated
- 4 ounces Fontina or Provolone cheese, grated (for ultimate meltiness)
- Freshly ground black pepper to taste
Preparing the Glorious Components
Before we dive into assembling our masterpiece, we need to dedicate a little time and love to each of its individual components. This preparation phase is crucial for building the complex layers of flavor that will make these Beef Bacon And Carmelized Onion Grilled Cheese Sandwiches truly unforgettable. Trust me, every minute spent here is an investment in pure culinary bliss.
Caramelizing the Onions: The Heart of the Sandwich
- Slice the Onions with Care: Begin by peeling your three large yellow onions. Then, using a sharp knife or a mandoline (be careful!), slice them as thinly and uniformly as possible. We’re aiming for crescent moon shapes, not rings, so slice them from pole to pole rather than across the equator. Uniformity is key here for even cooking. Don’t rush this step; thin, even slices are essential for the best caramelization.
- Heat the Pan Properly: In a large, heavy-bottomed skillet or Dutch oven, melt 2 tablespoons of unsalted butter with 1 tablespoon of olive oil over medium-low heat. The combination of butter and oil provides flavor and prevents the butter from burning too quickly. Make sure your pan is large enough to hold all the onions without overcrowding; if it’s too small, they’ll steam instead of caramelize.
- Introduce the Onions and Begin the Slow Cook: Add all the thinly sliced onions to the pan. It might look like an enormous mountain of onions, but they will cook down significantly. Stir them well to coat evenly with the butter and oil. Sprinkle in the 1/4 teaspoon of sea salt and the optional 1/2 teaspoon of granulated sugar. The salt helps draw out moisture, and the sugar, while optional, gives a little boost to the browning process.
- Patience is a Virtue: This is where the magic happens, and it requires patience. Lower the heat to low. We’re not trying to brown them quickly; we’re coaxing out their natural sugars. Stir the onions every 5-10 minutes initially, and then more frequently (every 2-3 minutes) as they begin to soften and turn golden. The goal is a deep, rich, golden-brown color, which takes anywhere from 45 minutes to 1 hour and 15 minutes. Resist the urge to crank up the heat; low and slow is the undeniable secret to truly sweet, deeply caramelized onions.
- Develop the Flavor: As the onions cook down, they’ll release their liquid, then soften, and eventually begin to stick to the bottom of the pan, forming a delicious brown fond. When this happens, add a tablespoon or two of water, vegetable broth, or the optional balsamic vinegar to deglaze the pan, scraping up all those flavorful bits. Continue cooking, stirring, and deglazing as needed until they are a beautiful, sticky, mahogany brown. Stir in a pinch of black pepper and the optional tablespoon of balsamic vinegar at the very end for an extra layer of complex flavor. Taste and adjust seasoning if necessary. Remove from heat and set aside.
Crisping the Beef Bacon: The Savory Crunch
- Choose Your Method: You have a couple of excellent options for achieving perfectly crispy beef bacon, and the right method often depends on how many slices you’re making and your personal preference.
- Pan-Frying Method: If you’re only making a few slices, a skillet works wonderfully. Place the 8 slices of beef bacon in a large, cold skillet (preferably cast iron or a heavy-bottomed non-stick pan) in a single layer. Do not overlap them.
- Slow and Steady for Crispness: Turn the heat to medium-low. This allows the fat to render slowly, resulting in crispier bacon. Cook, flipping occasionally, until the bacon is beautifully golden brown and crispy to your liking. This can take about 10-15 minutes. Be attentive, as bacon can go from perfectly crispy to burnt very quickly.
- Oven Baking Method (My Preferred for Evenness): For larger batches or for more even crisping with less splattering, oven baking is fantastic. Preheat your oven to 400°F (200°C). Arrange the beef bacon slices in a single layer on a baking sheet lined with parchment paper or foil (for easy cleanup).
- Bake to Perfection: Bake for 15-20 minutes, or until desired crispness is achieved. Baking time will vary depending on the thickness of your bacon and your oven. Keep an eye on it, especially towards the end. The bacon will continue to crisp up slightly as it cools.
- Drain and Reserve: Once crispy, remove the beef bacon from the pan and place it on a plate lined with paper towels to drain any excess fat. Once cooled slightly, you can break it into smaller pieces for easier eating within the sandwich. Don’t discard all the rendered beef bacon fat! A little bit of that smoky goodness can be mixed with the butter for spreading on the bread, adding another layer of flavor.
Prepping the Cheese and Bread: The Foundation
- Grate the Cheeses: Grate all your cheeses (Gruyère, sharp white cheddar, and Fontina/Provolone) using the large holes of a box grater. Pre-grating ensures they melt quickly and evenly inside the sandwich. Combining different types of cheese adds depth of flavor and varying melt points, creating that desirable gooey pull.
- Prepare the Bread Spread: In a small bowl, combine the 4 tablespoons of softened unsalted butter with the optional 1 tablespoon of Dijon mustard. Stir them together until well combined. The Dijon adds a wonderful, subtle tang that cuts through the richness of the cheese and bacon, elevating the entire experience. If you like, you can also mix in about a teaspoon of the reserved beef bacon fat for an extra layer of savory flavor.
- Butter the Bread Generously: Take your 8 slices of artisanal bread. Spread an even, generous layer of the butter-Dijon mixture onto one side of each slice. This buttered side will be the exterior of your sandwich, ensuring a beautiful golden-brown crust and incredible flavor. Make sure to go all the way to the edges.
Assembling and Grilling Your Masterpiece
Now that all our incredible components are ready, it’s time for the moment we’ve all been waiting for: assembling and grilling these magnificent Beef Bacon And Carmelized Onion Grilled Cheese Sandwiches. This is where all those individual flavors come together in a symphony of deliciousness.
- Heat the Grilling Surface: Place a large non-stick skillet, cast iron pan, or a griddle over medium-low heat. Add the remaining 2 tablespoons of unsalted butter to the pan and allow it to melt and coat the bottom evenly. You want a moderate, consistent heat. Too high, and your bread will burn before the cheese has a chance to fully melt; too low, and you won’t get that coveted golden crust.
- The Art of Layering: Take four slices of bread, butter-side down, and place them into the preheated pan. These are the bottom halves of your sandwiches.
- First Cheese Layer: Immediately sprinkle about 1/4 of your grated cheese mixture (a blend of all three cheeses) over each of the four bread slices in the pan. The warmth of the pan will already start to encourage melting from below.
- Add the Star Fillings:
- Caramelized Onions: Evenly distribute a generous spoonful of your beautifully caramelized onions over the first layer of cheese on each sandwich. Don’t be shy; these are a key flavor component!
- Crispy Beef Bacon: Next, layer the broken pieces of crispy beef bacon over the onions. We’re building flavor and texture with every layer.
- Second Cheese Layer: Sprinkle another 1/4 of your remaining grated cheese mixture over the beef bacon and onions on each sandwich. This layer acts as a delicious “glue” to hold everything together and ensures maximum gooeyness. A little freshly ground black pepper over this layer is also highly recommended.
- Top it Off: Place the remaining four slices of bread on top, butter-side up. Gently press down on each sandwich with a spatula to ensure good contact between the bread and the fillings.
- The Grilling Process:
- First Side: Cook the sandwiches for about 4-6 minutes on the first side. This time will allow the bread to turn a deep, golden brown and the cheese on the bottom to start melting beautifully. Peek underneath with a spatula to check for that perfect color.
- The Flip: Carefully, using a wide spatula (or two, if needed for larger sandwiches), flip each sandwich over to cook the second side.
- Second Side and Melting Magic: Cook for another 4-6 minutes, or until the second side is also golden brown and the cheese is completely melted and oozing out the sides. To encourage thorough melting, you can lightly press down on the sandwiches with your spatula occasionally. For an even gooier result, you can cover the pan with a lid during the last few minutes of cooking on the second side. The trapped steam will help melt the cheese beautifully without burning the bread.
- Don’t Rush the Melt: Remember, the key to a truly great grilled cheese is perfectly melted cheese. If your bread is browning too quickly, lower the heat slightly.
- Rest and Serve: Once the sandwiches are golden brown and the cheese is gloriously melted, transfer them to a cutting board. Let them rest for just 1-2 minutes. This brief resting period allows the cheese to set slightly, preventing it from all oozing out when you cut into it.
- Slice and Enjoy: Using a sharp, serrated knife, carefully slice each sandwich in half, either straight down the middle or diagonally (my personal preference!). Serve immediately. The rich, savory beef bacon, the sweet and tangy caramelized onions, and the gooey, cheesy goodness all come together in one spectacular bite. These Beef Bacon And Carmelized Onion Grilled Cheese Sandwiches are best enjoyed hot and fresh, perhaps with a side of tomato soup for dipping, or a simple green salad to balance the richness.
Conclusion:
So, there you have it – my full guide to creating what I genuinely believe is one of the most incredible sandwiches you will ever sink your teeth into. These aren’t just any grilled cheese sandwiches; they are an experience, a symphony of flavors that elevate a simple comfort food into something truly gourmet. We’re talking about the rich, smoky depth of perfectly rendered beef bacon, the incredible sweetness of slowly caramelized onions, and the gooey, irresistible embrace of perfectly melted cheese, all hugged by golden, buttery-crisp bread. It’s the kind of dish that sounds fancy but is surprisingly approachable, delivering an unparalleled taste sensation that will have you coming back for more, time and time again. Trust me when I say that the effort, no matter how minimal, is absolutely worth the breathtaking reward of these magnificent Beef Bacon And Carmelized Onion Grilled Cheese Sandwiches. They truly represent the pinnacle of comfort food, reimagined and perfected for your ultimate enjoyment.
What truly sets this recipe apart is the harmony of contrasting textures and complementary tastes. Imagine the satisfying crunch of that toasted bread giving way to the molten core. Then, the distinct, robust flavor of the beef bacon, which offers a lean yet intensely savory counterpoint to the often-salty pork variety, creating a unique smoky foundation that’s both familiar and exciting. This isn’t just a background note; it’s a star player in every single bite. And those caramelized onions? They transform from pungent, humble bulbs into glistening strands of pure, sweet umami, adding a depth and complexity that’s simply unmatched. They provide that essential layer of sweetness that cuts through the richness of the cheese and the saltiness of the bacon, creating a perfectly balanced bite. Each mouthful is a delightful journey – a little salty, a little sweet, a lot savory, and utterly comforting. It’s the ultimate expression of comfort food taken to an artisanal level without losing its heart and soul. I always find myself closing my eyes for a moment after that first bite, just to savor every aspect of it, from the crispy edges to the luxuriously gooey center. It’s truly a moment of pure bliss.
Now, let’s talk about how to truly complete this culinary masterpiece. While these sandwiches are undeniably stellar on their own, pairing them with the right accompaniments can truly elevate the entire meal. My personal go-to is always a classic, creamy tomato soup. The bright acidity and warmth of the soup are the perfect foil to the rich, savory sandwich, creating a match made in comfort food heaven that’s both nostalgic and incredibly satisfying. A chunky tomato bisque works beautifully too, adding another layer of texture and a more robust flavor profile. If you’re leaning towards something lighter, a simple side salad with a zesty vinaigrette, perhaps featuring peppery arugula or mixed greens, offers a refreshing contrast. The crispness and tang will cut through the richness of the cheese and bacon, leaving your palate refreshed and ready for another bite. For those who enjoy a little extra crunch and tang, a handful of crispy potato chips or some sharp dill pickles on the side can be a fantastic addition, providing that delightful snap and acidic kick that many crave alongside a hearty sandwich. Don’t hesitate to get creative with your side dishes; think about what textures and flavors would complement the richness and sweetness of the sandwich best – perhaps even a crisp, dry cider or a light pilsner for a grown-up pairing!
Beyond the perfect pairing, there’s also a wonderful world of variations to explore once you’ve mastered the base recipe. Don’t be afraid to experiment with your cheese choice! While sharp cheddar is a phenomenal classic, consider branching out to Gruyère for a nutty, complex flavor, or perhaps a smoky Gouda for an extra layer of depth that truly complements the beef bacon. Provolone or even a blend of Monterey Jack and Colby can offer different melt characteristics and mildness, allowing other flavors to shine through even more. For the onions, a tiny splash of balsamic vinegar added in the last few minutes of caramelization can introduce a lovely tang that brightens the sweetness, or a pinch of fresh thyme could add an herbaceous note, giving it an even more sophisticated twist. As for the bread, while a sturdy white or sourdough works wonders, a rich brioche can make for an even more luxurious, almost dessert-like experience, thanks to its buttery crumb. Feeling adventurous? A thin slice of crisp apple tucked inside, or even a smear of fig jam, can introduce a surprising burst of sweetness and fruitiness that plays beautifully with the savory elements, creating an unexpected but delightful complexity. You could even add a very thin slice of roasted bell pepper for another layer of smoky sweetness and a touch of color. The beauty of a grilled cheese is its adaptability, and this gourmet version is no exception; feel free to make it truly your own!
So, I implore you, don’t let another day pass without experiencing the pure joy of these incredible sandwiches. This isn’t just a meal; it’s an event, a declaration of deliciousness that you truly deserve. Gather your ingredients, crank up that pan, and prepare to be amazed by what you can create in your own kitchen. The process, as I’ve outlined, is straightforward, and the reward is absolutely immeasurable. Once you’ve taken that first glorious bite, I guarantee you’ll understand exactly why I’m so enthusiastic about this recipe. It’s comfort food redefined, elevated to new heights, and it’s waiting for you to discover its magic. I absolutely cannot wait for you to try this! And once you do, please, please come back and share your experience with me. What cheese did you use? Did you add any exciting variations? Did you pair it with soup or a salad? Your feedback and culinary adventures truly make my day and inspire me to keep sharing my favorite recipes. Let’s make some magic in the kitchen together! Happy cooking, and even happier eating!
Ultimate Beef Bacon & Caramelized Onion Grilled Cheese
An extraordinary culinary adventure, this grilled cheese sandwich elevates a comforting classic to a gourmet masterpiece with rich, savory beef bacon and sweet, slow-caramelized onions.
Ingredients
-
8 slices bread (preferably sourdough or whole grain)
-
8 slices beef bacon
-
2 medium onions, thinly sliced
-
2 tablespoons olive oil
-
8 slices cheese (such as cheddar or Gruyère)
-
4 tablespoons unsalted butter (for spreading)
-
Salt, to taste
-
Pepper, to taste
Instructions
-
Step 1
Thinly slice 2 onions. In a large skillet, heat 2 tablespoons olive oil over medium-low heat. Add onions and a pinch of salt. Cook slowly, stirring frequently, for 45-75 minutes until deep golden-brown and sticky. Set aside. -
Step 2
Cook 8 slices beef bacon until crispy. Pan-fry over medium-low heat (10-15 minutes) or bake at 400°F (200°C) on a lined sheet (15-20 minutes). Drain and break into pieces. -
Step 3
Grate 8 slices cheese. Soften 4 tablespoons unsalted butter. Spread some butter generously on one side of each of the 8 bread slices. -
Step 4
Heat a large non-stick skillet or griddle over medium-low heat. Add a small amount of the remaining unsalted butter to the pan. Place 4 buttered bread slices (butter-side down) in the pan. -
Step 5
On each of the bread slices in the pan, layer cheese, then caramelized onions, then beef bacon, and finish with more cheese. Top with the remaining 4 bread slices (butter-side up). -
Step 6
Grill for about 4-6 minutes per side until golden brown and the cheese is completely melted and gooey. Gently press down on the sandwiches with a spatula, or cover the pan with a lid for a few minutes to encourage thorough melting. -
Step 7
Transfer grilled sandwiches to a cutting board. Let rest for 1-2 minutes, then slice in half and serve immediately.
Important Information
Nutrition Facts (Per Serving)
It is important to consider this information as approximate and not to use it as definitive health advice.
Allergy Information
Please check ingredients for potential allergens and consult a health professional if in doubt.