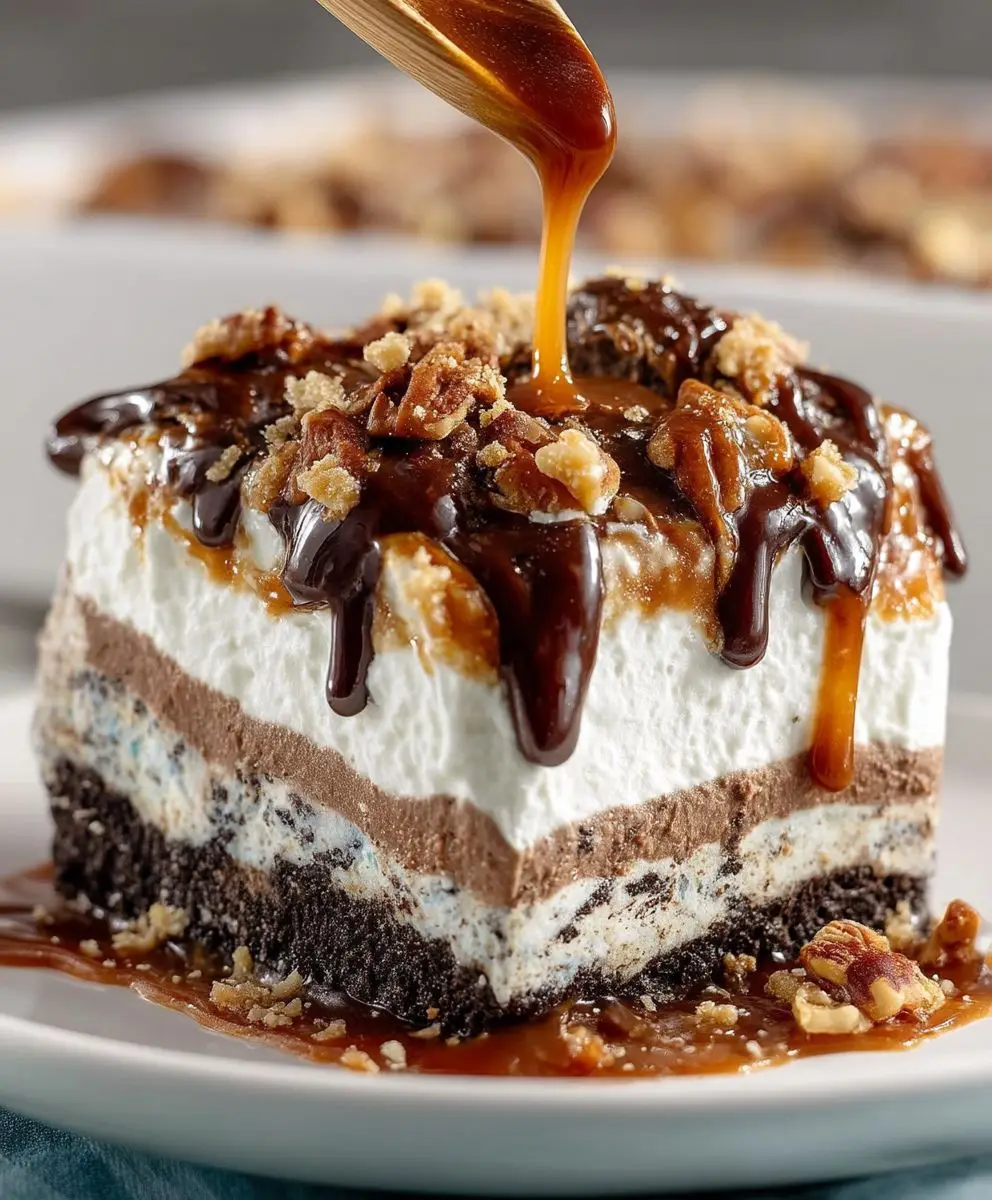
Turtle Lush Dessert: just the name conjures images of decadent layers and irresistible flavors, doesn’t it? Get ready to dive into a dessert experience that’s as easy to make as it is delightful to devour. This isn’t just another layered dessert; it’s a symphony of textures and tastes that will have everyone begging for seconds.
While the exact origins of the Turtle Lush Dessert are shrouded in mystery, its inspiration is clear: the iconic Turtle candies themselves! Those pecan-studded, caramel-drizzled chocolate treats have captivated taste buds for generations. This dessert cleverly captures that same magic in an easy-to-assemble, no-bake format. It’s a modern twist on a classic flavor combination.
What makes this Turtle Lush Dessert so universally loved? It’s the perfect balance of creamy, crunchy, and chocolatey. The smooth cream cheese layer melts in your mouth, while the pecan and graham cracker crust provides a satisfying crunch. The rich chocolate pudding and caramel drizzle tie it all together in a sweet, unforgettable harmony. Plus, its no-bake nature makes it an ideal choice for potlucks, holidays, or any occasion when you need a show-stopping dessert without spending hours in the kitchen. Trust me, this is one recipe you’ll want to keep in your back pocket!

Ingredients:
- For the Crust:
- 1 ½ cups all-purpose flour
- ½ cup (1 stick) unsalted butter, cold and cubed
- ¼ cup granulated sugar
- ¼ teaspoon salt
- 3-5 tablespoons ice water
- For the Cream Cheese Layer:
- 8 ounces cream cheese, softened
- 1 cup powdered sugar
- 1 teaspoon vanilla extract
- 8 ounces whipped topping, thawed (like Cool Whip)
- For the Chocolate Pudding Layer:
- 1 (3.9 ounce) package instant chocolate pudding mix
- 2 cups cold milk
- For the Caramel Layer:
- 1 cup caramel sauce (store-bought or homemade)
- For the Pecan Topping:
- 1 cup chopped pecans
- Optional Garnish:
- Chocolate shavings
- Additional chopped pecans
Preparing the Crust:
- Combine Dry Ingredients: In a large bowl, whisk together the flour, sugar, and salt. This ensures the salt and sugar are evenly distributed throughout the flour, which is important for both flavor and texture.
- Cut in the Butter: Add the cold, cubed butter to the flour mixture. Using a pastry blender or your fingertips, cut the butter into the flour until the mixture resembles coarse crumbs. The key here is to work quickly so the butter stays cold. Cold butter is crucial for creating a flaky crust. If you’re using your fingertips, gently rub the butter between your fingers and the flour, avoiding overworking the dough.
- Add Ice Water: Gradually add the ice water, one tablespoon at a time, mixing gently after each addition. The amount of water you need will vary depending on the humidity and the type of flour you’re using. Add just enough water so the dough comes together into a ball. Be careful not to overmix, as this will develop the gluten in the flour and result in a tough crust.
- Form the Dough: Once the dough comes together, gently flatten it into a disc. Wrap the disc in plastic wrap and refrigerate for at least 30 minutes. This allows the gluten to relax and the butter to firm up, which will make the dough easier to roll out.
- Roll Out the Dough: Preheat your oven to 350°F (175°C). On a lightly floured surface, roll out the dough to a 12-inch circle. If the dough is sticking, add a little more flour to the surface.
- Transfer to Baking Dish: Carefully transfer the dough to a 9×13 inch baking dish. Gently press the dough into the bottom and up the sides of the dish.
- Pre-Bake the Crust: Prick the bottom of the crust with a fork to prevent it from puffing up during baking. You can also line the crust with parchment paper and fill it with pie weights or dried beans to help it maintain its shape. Bake for 15-20 minutes, or until lightly golden brown. If you’re using pie weights, remove them during the last 5 minutes of baking to allow the bottom of the crust to brown. Let the crust cool completely before adding the fillings.
Preparing the Cream Cheese Layer:
- Beat Cream Cheese: In a large bowl, beat the softened cream cheese with an electric mixer until smooth and creamy. Make sure your cream cheese is truly softened, or you’ll end up with lumps in your filling.
- Add Powdered Sugar and Vanilla: Gradually add the powdered sugar, beating until smooth. Then, stir in the vanilla extract. The powdered sugar adds sweetness and helps to stabilize the cream cheese layer.
- Fold in Whipped Topping: Gently fold in the thawed whipped topping until well combined. Be careful not to overmix, as this will deflate the whipped topping and result in a less airy filling.
Preparing the Chocolate Pudding Layer:
- Whisk Pudding and Milk: In a medium bowl, whisk together the instant chocolate pudding mix and cold milk until smooth and thickened. This usually takes about 2-3 minutes. Make sure you’re using cold milk, as this will help the pudding set up properly.
- Let Set: Let the pudding stand for 5 minutes to allow it to thicken completely.
Assembling the Turtle Lush Dessert:
- Spread Cream Cheese Layer: Once the crust has cooled completely, spread the cream cheese layer evenly over the bottom. Make sure to spread it all the way to the edges of the crust.
- Spread Chocolate Pudding Layer: Carefully spread the chocolate pudding layer over the cream cheese layer. Again, spread it evenly to ensure each bite has the perfect balance of flavors.
- Drizzle with Caramel Sauce: Drizzle the caramel sauce evenly over the chocolate pudding layer. You can use a spoon or a squeeze bottle to make this easier. If your caramel sauce is too thick, you can warm it slightly in the microwave to make it easier to drizzle.
- Sprinkle with Pecans: Sprinkle the chopped pecans evenly over the caramel sauce.
- Chill: Cover the baking dish with plastic wrap and refrigerate for at least 4 hours, or preferably overnight. This allows the layers to set and the flavors to meld together.
- Garnish (Optional): Before serving, garnish with chocolate shavings and additional chopped pecans, if desired. This adds a nice visual appeal and enhances the flavor of the dessert.
Tips for Success:
- Use Cold Ingredients: For the crust, using cold butter and ice water is essential for creating a flaky texture.
- Don’t Overmix: Overmixing the crust dough will develop the gluten and result in a tough crust. Mix just until the dough comes together.
- Soften Cream Cheese: Make sure your cream cheese is completely softened before beating it, or you’ll end up with lumps in your filling.
- Chill Thoroughly: Chilling the dessert for at least 4 hours, or preferably overnight, allows the layers to set and the flavors to meld together.
- Customize Your Toppings: Feel free to get creative with your toppings! You can use different types of nuts, chocolate chips, or even a sprinkle of sea salt.
Variations:
- Peanut Butter Turtle Lush: Add a layer of peanut butter chips or a peanut butter swirl to the chocolate pudding layer.
- Salted Caramel Turtle Lush: Use salted caramel sauce for an extra burst of flavor.
- Chocolate Lover’s Turtle Lush: Add chocolate shavings to each layer for an extra dose of chocolate.
- Individual Turtle Lush Cups: Assemble the dessert in individual cups or glasses for a fun and easy presentation.
Storage Instructions:
Store any leftover Turtle Lush Dessert in the refrigerator, covered, for up to 3 days. The crust may soften slightly over time, but the dessert will still taste delicious.
Make Ahead Tips:
The crust can be made ahead of time and stored in the refrigerator for up to 2 days or in the freezer for up to 1 month. The cream cheese layer and chocolate pudding layer can also be made ahead of time and stored in the refrigerator for up to 24 hours. Assemble the dessert just before serving for the best results.
Conclusion:
This Turtle Lush Dessert isn’t just another recipe; it’s a guaranteed crowd-pleaser, a symphony of textures and flavors that will have everyone begging for seconds. From the crunchy pecan crust to the creamy layers of cheesecake and chocolate pudding, culminating in that decadent caramel and pecan topping, every bite is an experience. It’s the perfect dessert for potlucks, holiday gatherings, or simply a special treat for yourself and your loved ones. Trust me, once you make this, it will become a staple in your dessert repertoire.
But what truly makes this Turtle Lush Dessert a must-try? It’s the ease of preparation combined with the impressive results. You don’t need to be a seasoned baker to whip this up. The layers are simple to assemble, and the chilling time allows the flavors to meld together beautifully, creating a dessert that tastes like it took hours to prepare, even though it doesn’t! Plus, the visual appeal is undeniable. The distinct layers create a stunning presentation that will impress your guests before they even take a bite.
Serving Suggestions and Variations:
The beauty of this Turtle Lush Dessert lies in its versatility. While the classic recipe is divine, there are plenty of ways to customize it to your liking.
* For a richer chocolate experience: Use dark chocolate pudding instead of milk chocolate. You can also add chocolate shavings to the top for an extra touch of elegance.
* Nutty variations: Experiment with different nuts in the crust and topping. Walnuts, almonds, or even macadamia nuts would be delicious alternatives to pecans. Toasting the nuts before adding them will enhance their flavor.
* Seasonal twists: During the fall, add a sprinkle of cinnamon or pumpkin spice to the cheesecake layer for a warm and cozy flavor. In the summer, consider adding fresh berries to the top for a burst of freshness.
* Individual servings: For a more elegant presentation, assemble the dessert in individual glasses or ramekins. This is perfect for dinner parties or special occasions.
* Ice Cream Topping: A scoop of vanilla ice cream on top of a slice of this Turtle Lush Dessert is a match made in heaven!
I encourage you to get creative and experiment with different variations to find your perfect Turtle Lush Dessert. Don’t be afraid to put your own spin on it and make it your own.
Now, it’s your turn! I’m confident that you’ll love this recipe as much as I do. It’s a guaranteed hit, and I can’t wait to hear about your experience. So, gather your ingredients, follow the simple steps, and prepare to be amazed.
Once you’ve made this incredible Turtle Lush Dessert, please share your photos and stories with me! Let me know what variations you tried and how your family and friends enjoyed it. You can tag me on social media or leave a comment below. I’m always excited to see your creations and hear your feedback. Happy baking, and enjoy every delicious bite! I know you’ll find this Turtle Lush Dessert to be a new family favorite.
Turtle Lush Dessert: A Decadent Recipe You'll Love
A decadent layered dessert with a buttery crust, creamy cream cheese, rich chocolate pudding, sweet caramel, and crunchy pecans. Perfect for any occasion!
Ingredients
Instructions
Recipe Notes
- Use Cold Ingredients: For the crust, using cold butter and ice water is essential for creating a flaky texture.
- Don’t Overmix: Overmixing the crust dough will develop the gluten and result in a tough crust. Mix just until the dough comes together.
- Soften Cream Cheese: Make sure your cream cheese is completely softened before beating it, or you’ll end up with lumps in your filling.
- Chill Thoroughly: Chilling the dessert for at least 4 hours, or preferably overnight, allows the layers to set and the flavors to meld together.
- Customize Your Toppings: Feel free to get creative with your toppings! You can use different types of nuts, chocolate chips, or even a sprinkle of sea salt.
- Storage Instructions: Store any leftover Turtle Lush Dessert in the refrigerator, covered, for up to 3 days. The crust may soften slightly over time, but the dessert will still taste delicious.
- Make Ahead Tips: The crust can be made ahead of time and stored in the refrigerator for up to 2 days or in the freezer for up to 1 month. The cream cheese layer and chocolate pudding layer can also be made ahead of time and stored in the refrigerator for up to 24 hours. Assemble the dessert just before serving for the best results.