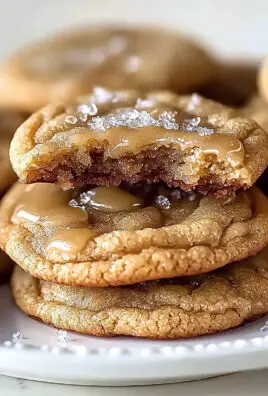
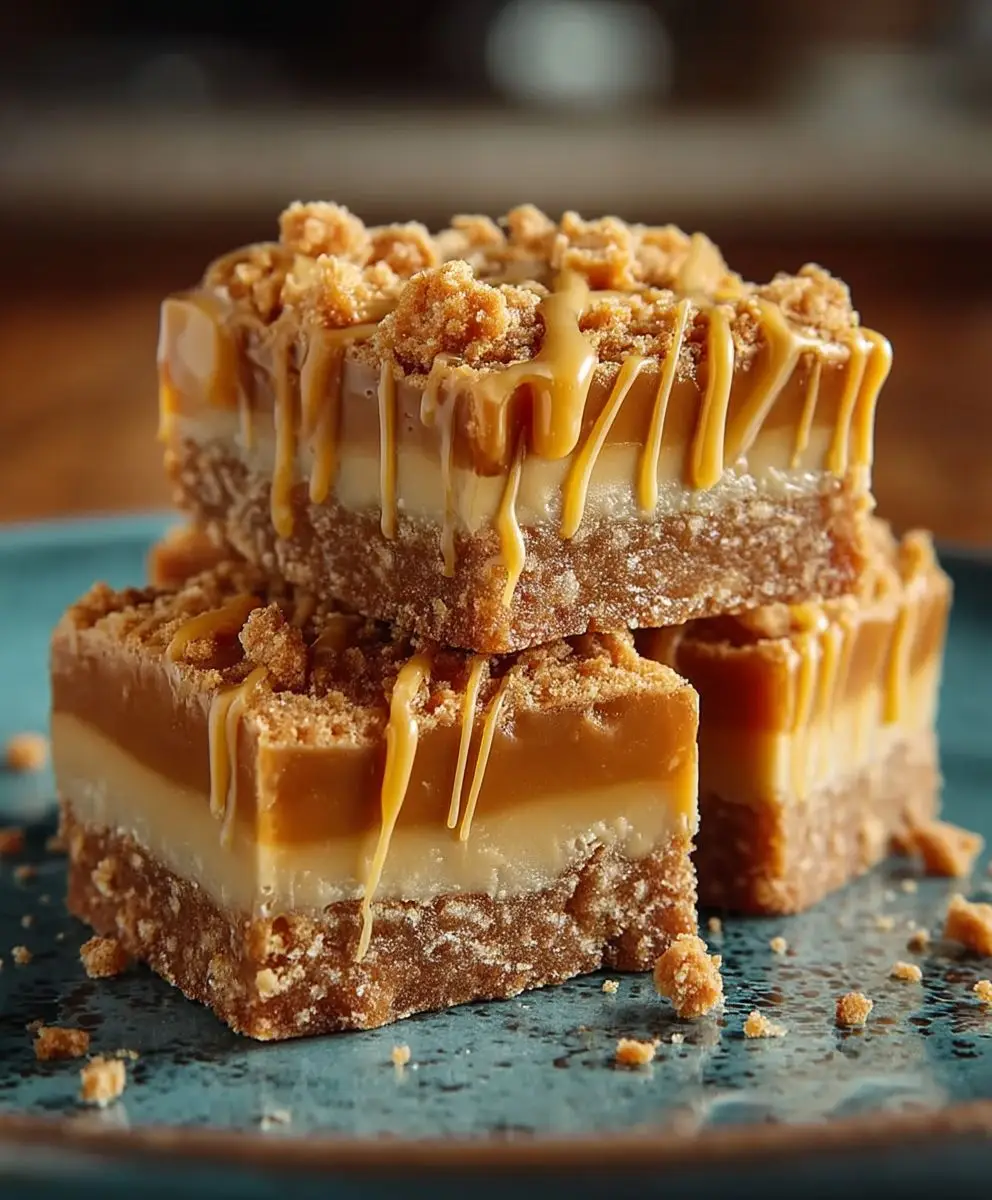
Trisha Yearwood Butterscotch Bars: Prepare to be transported back to your childhood with a single bite! These aren’t just any butterscotch bars; they’re a warm, gooey hug in dessert form, perfected by the queen of Southern comfort food herself, Trisha Yearwood. I remember the first time I tasted these bars – it was at a potluck, and I instantly needed the recipe. The rich, buttery flavor, combined with that perfect chewy texture, had me hooked.
Butterscotch, with its deep, caramelized sugar notes, has been a beloved flavor for generations. While its exact origins are debated, many believe it emerged in 19th-century England, quickly becoming a staple in candies and desserts. What makes Trisha Yearwood Butterscotch Bars so irresistible? It’s the simplicity, the nostalgia, and the sheer deliciousness. They’re incredibly easy to make, requiring minimal ingredients and effort, making them perfect for busy weeknights or impromptu gatherings.
People adore these bars because they offer a comforting blend of sweet and buttery flavors, a delightful chewiness, and a satisfying richness that isn’t overly heavy. They’re the kind of treat that evokes memories of home-baked goodness and shared moments with loved ones. So, get ready to experience a taste of Southern charm with this incredible recipe!

Ingredients:
- 1 cup (2 sticks) unsalted butter, softened
- 1 cup packed light brown sugar
- 1/2 cup granulated sugar
- 2 large eggs
- 1 teaspoon vanilla extract
- 2 1/4 cups all-purpose flour
- 1 teaspoon baking soda
- 1/2 teaspoon salt
- 1 cup butterscotch chips
Preparing the Dough:
- First things first, let’s cream together the butter and sugars. In a large bowl (or the bowl of your stand mixer), combine the softened butter, light brown sugar, and granulated sugar. Beat them together until the mixture is light and fluffy. This usually takes about 3-5 minutes on medium speed. Don’t rush this step; it’s crucial for getting that perfect, tender texture in your bars.
- Now, let’s add the eggs one at a time, beating well after each addition. Make sure each egg is fully incorporated before adding the next. This helps to emulsify the mixture and create a smooth batter.
- Stir in the vanilla extract. Vanilla is a flavor enhancer, and it really brings out the butterscotch notes in these bars.
- In a separate bowl, whisk together the flour, baking soda, and salt. Whisking ensures that the baking soda and salt are evenly distributed throughout the flour, which is important for proper leavening and flavor.
- Gradually add the dry ingredients to the wet ingredients, mixing on low speed until just combined. Be careful not to overmix the dough. Overmixing can develop the gluten in the flour, resulting in tough bars.
- Finally, stir in the butterscotch chips. I like to use a spatula for this step to avoid overmixing. Make sure the chips are evenly distributed throughout the dough.
Baking the Butterscotch Bars:
- Preheat your oven to 350°F (175°C). While the oven is preheating, prepare your baking pan.
- Grease and flour a 9×13 inch baking pan. You can also line the pan with parchment paper, leaving an overhang on the sides. This makes it super easy to lift the bars out of the pan after they’ve cooled.
- Press the dough evenly into the prepared baking pan. I find it helpful to use my fingers or the back of a spoon to spread the dough evenly.
- Bake for 20-25 minutes, or until the edges are golden brown and a toothpick inserted into the center comes out with just a few moist crumbs attached. Keep a close eye on them, as baking times can vary depending on your oven.
- Let the bars cool completely in the pan before cutting into squares. This is important because the bars will continue to set as they cool. If you try to cut them while they’re still warm, they’ll be too soft and crumbly.
Tips and Variations:
- Don’t overbake! Overbaked butterscotch bars will be dry and hard. You want them to be slightly soft in the center.
- Use good quality butterscotch chips. The quality of the butterscotch chips will affect the flavor of the bars. I recommend using a brand that you trust and enjoy.
- Add nuts. If you like nuts, you can add 1/2 cup of chopped walnuts or pecans to the dough along with the butterscotch chips.
- Make them chocolate chip butterscotch bars. Substitute half of the butterscotch chips with chocolate chips for a delicious twist.
- Drizzle with chocolate. Once the bars have cooled, you can drizzle them with melted chocolate for an extra touch of decadence.
- Salted Butterscotch Bars: Use salted butter instead of unsalted, or sprinkle a pinch of sea salt on top of the bars before baking for a delightful salty-sweet flavor.
- Espresso Butterscotch Bars: Add 1 teaspoon of instant espresso powder to the dry ingredients for a subtle coffee flavor that complements the butterscotch.
- Spiced Butterscotch Bars: Incorporate 1/2 teaspoon of ground cinnamon or nutmeg into the dry ingredients for a warm, spiced flavor.
Storage Instructions:
Store the cooled butterscotch bars in an airtight container at room temperature for up to 3-4 days. They can also be frozen for longer storage. To freeze, wrap the bars individually in plastic wrap and then place them in a freezer-safe bag or container. They can be frozen for up to 2-3 months. Thaw the bars at room temperature before serving.
Troubleshooting:
- Bars are too dry: Make sure you’re not overbaking the bars. Also, ensure that you’re measuring the flour correctly. Spoon the flour into the measuring cup and level it off with a knife, rather than scooping it directly from the bag.
- Bars are too crumbly: This could be due to overmixing the dough or not using enough butter. Make sure you’re creaming the butter and sugars together properly and that you’re not overmixing the dough after adding the dry ingredients.
- Bars are too hard: This is usually caused by overbaking. Reduce the baking time by a few minutes and check the bars frequently.
- Bars are sinking in the middle: This could be due to using too much baking soda or not creaming the butter and sugars together properly. Make sure you’re measuring the baking soda accurately and that you’re creaming the butter and sugars until the mixture is light and fluffy.
Serving Suggestions:
These butterscotch bars are delicious on their own, but they’re also great served with a scoop of vanilla ice cream or a dollop of whipped cream. They’re perfect for parties, potlucks, or just a simple weeknight dessert. Enjoy!
Why This Recipe Works:
This recipe is a classic for a reason! The combination of butter, brown sugar, and butterscotch chips creates a rich, chewy, and irresistible treat. The baking soda helps to give the bars a slightly soft and tender texture, while the salt balances out the sweetness. The key to success with this recipe is to not overbake the bars and to use good quality ingredients. By following these simple tips, you’ll be able to bake perfect butterscotch bars every time.
Butterscotch vs. Caramel: What’s the Difference?
While butterscotch and caramel share some similarities in flavor, they are distinct confections with different ingredients and cooking processes. Butterscotch is traditionally made with brown sugar and butter, while caramel is made with granulated sugar. The brown sugar in butterscotch gives it a deeper, molasses-like flavor, while caramel has a more straightforward, sweet taste. The cooking process also differs; butterscotch is typically cooked to a lower temperature than caramel, resulting in a softer, chewier texture.
The History of Butterscotch:
The exact origins of butterscotch are somewhat murky, but it is believed to have originated in Doncaster, England, in the early 19th century. Several confectioners in Doncaster claimed to have invented the treat, and it quickly became a popular confection throughout the United Kingdom and beyond. The name “butterscotch” is thought to be a combination of “butter” and “scotch,” referring to the Scottish origin of the brown sugar used in the recipe.
Butterscotch in Popular Culture:
Butterscotch has made its way into popular culture in various forms. From butterscotch candies and desserts to butterscotch-flavored beverages, the sweet and buttery flavor is widely enjoyed. It has also been featured in literature, film, and television, often as a nostalgic treat or a symbol of comfort and warmth.
Nutritional Information (Approximate per bar):
Please note that the following nutritional information is an estimate and can vary depending on the specific ingredients and portion sizes used.
- Calories: 250-300
- Fat: 12-15g
- Saturated Fat: 8-10g
- Cholesterol: 50-60mg
- Sodium: 150-200mg
- Carbohydrates: 30-35g
- Sugar: 20-25g
- Protein: 2-3g
Enjoy Your Homemade Butterscotch Bars!
I hope you enjoy baking and eating these delicious butterscotch bars as much as I do! They’re a perfect treat for any occasion and are sure to be a crowd-pleaser. Happy baking!
Conclusion:
These Trisha Yearwood Butterscotch Bars are truly something special, and I wholeheartedly believe they deserve a spot in your regular baking rotation. They’re not just another dessert; they’re a nostalgic trip back to simpler times, a warm hug in every bite, and a guaranteed crowd-pleaser. The rich, buttery flavor, combined with that irresistible chewy texture, makes them utterly addictive. Seriously, try to eat just one – I dare you!
But beyond the incredible taste, what makes these bars a must-try is their sheer simplicity. You don’t need to be a seasoned baker with fancy equipment to whip up a batch of these beauties. The recipe is straightforward, uses readily available ingredients, and comes together in a flash. This makes them perfect for those moments when you need a quick and easy treat for a last-minute gathering, a school bake sale, or simply a comforting dessert for yourself after a long day.
And the versatility! Oh, the possibilities are endless! While the original recipe is divine as is, feel free to get creative and put your own spin on these butterscotch bars. For a richer, more decadent experience, try adding a handful of chopped pecans or walnuts to the batter. The nuts will add a delightful crunch and complement the butterscotch flavor beautifully. If you’re a chocolate lover (and who isn’t?), consider drizzling melted dark or milk chocolate over the cooled bars. The combination of butterscotch and chocolate is a match made in dessert heaven.
Serving Suggestions and Variations:
* Serve them warm with a scoop of vanilla ice cream for an extra indulgent treat.
* Cut them into smaller squares and serve them as part of a dessert platter.
* Add a sprinkle of sea salt on top for a sweet and salty flavor explosion.
* For a festive twist, add some chopped dried cranberries and orange zest during the holiday season.
* If you’re feeling adventurous, try using different types of nuts, such as macadamia nuts or pistachios.
* Make them gluten-free by using a gluten-free all-purpose flour blend.
I’m confident that once you try this recipe, you’ll be hooked. These Trisha Yearwood Butterscotch Bars are more than just a dessert; they’re a memory in the making. They’re the kind of treat that brings people together, sparks conversations, and leaves everyone wanting more.
So, what are you waiting for? Preheat your oven, gather your ingredients, and get ready to experience the magic of these incredible bars. I promise you won’t be disappointed. And when you do make them, please, please, please share your experience with me! I’d love to hear what you think, what variations you tried, and how much everyone enjoyed them. Tag me in your photos on social media, leave a comment below, or send me an email. I can’t wait to see your creations and hear your stories. Happy baking! I hope you love these butterscotch bars as much as I do!
Trisha Yearwood Butterscotch Bars: The Ultimate Recipe
Chewy butterscotch bars with rich flavor. Easy to make, perfect for a quick dessert or sweet treat.
Ingredients
Instructions
Recipe Notes
- Don’t Overbake: Overbaked bars will be dry. Aim for slightly soft in the center.
- Quality Chips: Use good quality butterscotch chips for the best flavor.
- Variations:
- Add 1/2 cup chopped walnuts or pecans.
- Substitute half the butterscotch chips with chocolate chips.
- Drizzle with melted chocolate after cooling.
- Use salted butter or sprinkle sea salt on top before baking.
- Add 1 teaspoon of instant espresso powder to the dry ingredients.
- Incorporate 1/2 teaspoon of ground cinnamon or nutmeg into the dry ingredients.
- Storage: Store cooled bars in an airtight container at room temperature for up to 3-4 days. Freeze for longer storage (up to 2-3 months) by wrapping individually and placing in a freezer-safe bag. Thaw at room temperature before serving.
- Troubleshooting:
- Dry Bars: Avoid overbaking and measure flour correctly (spoon and level).
- Crumbly Bars: Avoid overmixing and ensure enough butter is used.
- Hard Bars: Reduce baking time.
- Sinking Bars: Measure baking soda accurately and cream butter and sugars properly.
- Serving Suggestions: Serve plain, with vanilla ice cream, or whipped cream.