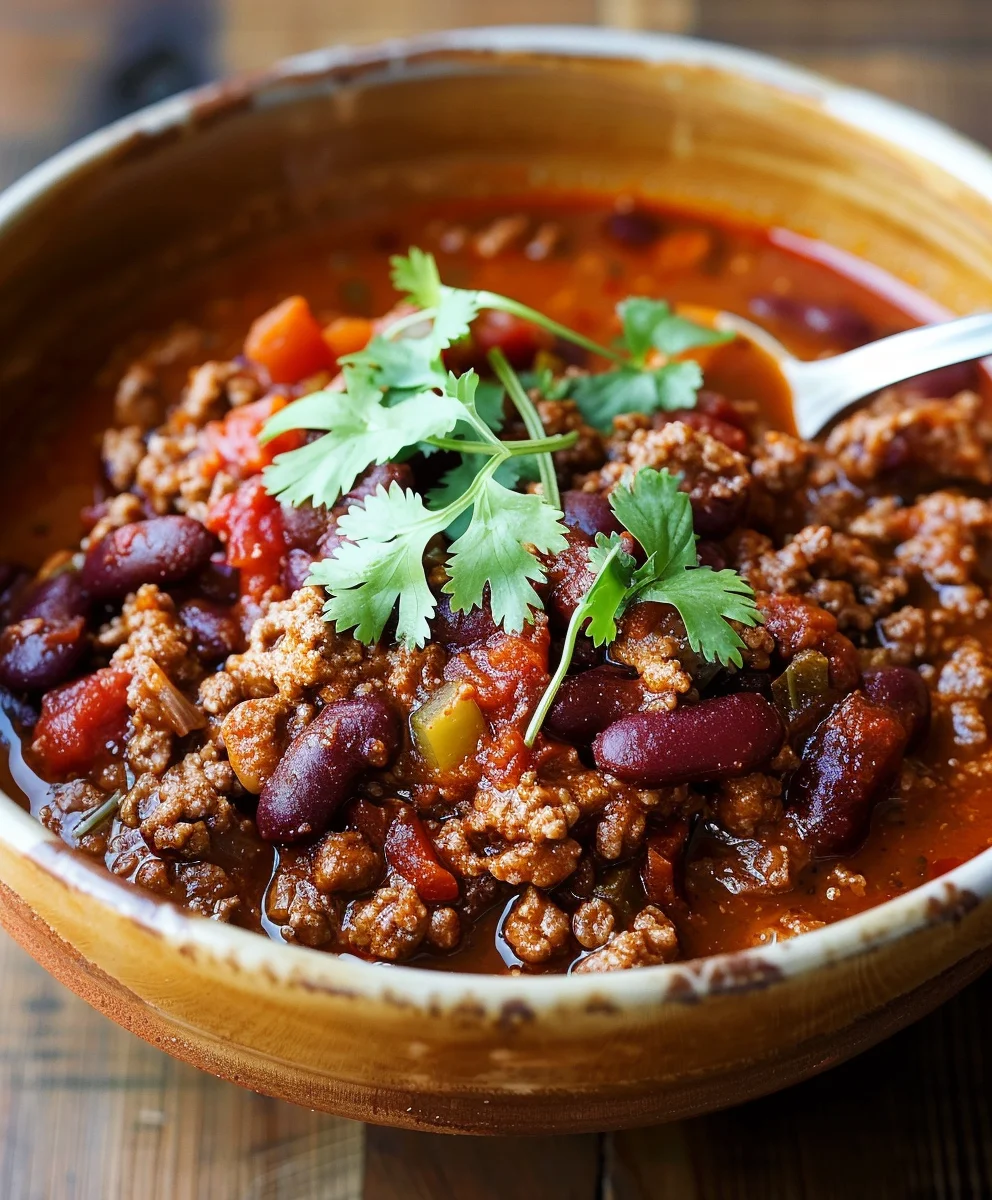
The Pioneer Woman Chili is more than just a recipe; it’s an invitation to a warm, comforting embrace, a hearty dish that has become a staple in countless American homes. Imagine the rich, aromatic scent filling your kitchen, promising a bowl of pure, unadulterated goodness that warms you from the inside out. This isn’t just any chili; it’s a culinary icon that perfectly captures the spirit of hearty, home-cooked American fare.
Ree Drummond, “The Pioneer Woman” herself, has cultivated a style of cooking deeply rooted in ranch life and a passion for feeding family and friends robust, flavorful meals. Her chili recipe, in particular, embodies this tradition, offering a modern take on classic comfort food that feels both timeless and approachable. It’s a testament to the simple power of quality ingredients coming together to create something truly extraordinary. People adore this dish for its incredible depth of flavor, often achieved through a perfect blend of savory beef, a rich tomato base, and a well-balanced medley of spices that offer just the right amount of kick.
Why We Love The Pioneer Woman Chili
Beyond its delicious taste, it’s the ultimate crowd-pleaser and a go-to for chilly evenings, game days, or any occasion that calls for something deeply satisfying. It’s hearty, comforting, and wonderfully versatile, allowing for endless customization with your favorite toppings. Truly, The Pioneer Woman Chili brings joy and warmth to every table.

Ingredients:
Get ready to whip up a truly comforting and incredibly flavorful pot of The Pioneer Woman Chili! Here’s everything you’ll need to make this hearty, soul-warming dish that’s perfect for any occasion, from a cozy family dinner to a lively game day feast. I always make sure to have all my ingredients prepped and ready to go before I even start cooking – it makes the whole process so much smoother and more enjoyable!
- For the Meat Base:
- 6 slices thick-cut bacon, diced
- 2 pounds ground beef (80/20 blend for best flavor)
- Aromatics and Vegetables:
- 1 large yellow onion, finely diced
- 1 large green bell pepper, finely diced (or a mix of red and green for color)
- 4 cloves garlic, minced
- Tomato Foundation:
- 1 (6 ounce) can tomato paste
- 1 (28 ounce) can crushed tomatoes
- 1 (14.5 ounce) can diced tomatoes (fire-roasted if you want an extra layer of smoky flavor!)
- Beans, Beans, Beans:
- 1 (15 ounce) can kidney beans, drained and thoroughly rinsed
- 1 (15 ounce) can pinto beans, drained and thoroughly rinsed
- 1 (15 ounce) can black beans, drained and thoroughly rinsed
- Spices and Seasonings (the heart of The Pioneer Woman Chili!):
- 3-4 tablespoons chili powder (adjust to your preference for chili flavor intensity)
- 2 teaspoons ground cumin
- 1 teaspoon smoked paprika
- ½ teaspoon cayenne pepper (or more, if you like it spicy!)
- 1 teaspoon dried oregano
- 1 teaspoon sugar (helps balance the acidity of the tomatoes)
- ½ teaspoon unsweetened cocoa powder (my secret for a deep, rich color and flavor, don’t skip it!)
- 2 bay leaves
- Salt and freshly ground black pepper to taste
- Liquids:
- 2 cups beef broth (low sodium is often a good choice so you can control the salt)
- 1 cup water (or a dark beer like a stout or porter for added depth, highly recommended!)
- Optional Garnishes (because presentation and extra flavor always win!):
- Shredded cheddar cheese
- Sour cream or Greek yogurt
- Fresh cilantro, chopped
- Sliced green onions
- Diced avocado
- Tortilla chips or cornbread
Preparing the Flavor Base
This is where we lay the groundwork for an incredibly rich and satisfying pot of The Pioneer Woman Chili. Every step here builds on the last, so take your time and savor the aromas that will soon fill your kitchen!
- Cook the Bacon: Grab your largest Dutch oven or a heavy-bottomed pot – this is going to be a one-pot wonder! Place it over medium-high heat. Add the diced bacon and cook until it’s wonderfully crispy and most of the fat has rendered out. This usually takes about 8-10 minutes. As it cooks, stir it occasionally to ensure even browning. Once crispy, use a slotted spoon to transfer the bacon to a plate lined with paper towels, leaving the rendered bacon fat in the pot. We’ll crumble this bacon later for a garnish, adding a fantastic smoky crunch to our chili.
- Brown the Ground Beef: Increase the heat to high. Add the ground beef to the hot bacon fat in the pot. Break up the beef with a wooden spoon or a spatula as it cooks. You want to get a really good sear on the meat, allowing it to brown deeply, which caramelizes its natural sugars and creates incredible flavor. This step is crucial for the depth of our The Pioneer Woman Chili. Cook until no pink remains and the beef is beautifully browned, about 8-10 minutes. Drain off any excess grease, leaving just a thin coating in the pot.
- Sauté the Aromatics: Reduce the heat to medium. Add the finely diced yellow onion and green bell pepper to the pot with the browned beef. Cook, stirring occasionally, for about 5-7 minutes, or until the vegetables have softened and become translucent. They’ll release their sweet aromas and begin to meld with the beef. This softening process is key to their flavor contribution in the final chili.
- Add the Garlic and Tomato Paste: Now, push the beef and vegetables to one side of the pot, creating a little space. Add the minced garlic and the entire can of tomato paste to the cleared spot. Let the tomato paste cook directly on the bottom of the hot pot for 2-3 minutes, stirring it frequently. This process, called caramelizing the tomato paste, deepens its color and flavor, removing any raw tomato taste and adding a fantastic savory depth to your The Pioneer Woman Chili. Once it’s darkened slightly, stir the tomato paste and garlic into the beef and vegetable mixture.
Building the Chili’s Signature Flavor
This phase is all about layering those amazing spices and liquids that transform simple ingredients into the rich, complex, and utterly irresistible The Pioneer Woman Chili you’ve been dreaming of. Don’t be shy with those seasonings!
- Toast the Spices: This is a powerful step for unlocking maximum flavor! Sprinkle the chili powder, ground cumin, smoked paprika, cayenne pepper, dried oregano, sugar, and cocoa powder over the meat and vegetable mixture. Stir everything together well, ensuring the spices coat all the ingredients. Cook for another 1-2 minutes, stirring constantly. You’ll notice the spices becoming wonderfully fragrant as they toast in the residual heat and oils. Be careful not to burn them, as this can make them bitter. This toasting amplifies their natural warmth and complexity.
- Deglaze and Add Tomatoes: Pour in the 2 cups of beef broth and the 1 cup of water (or dark beer). Use your wooden spoon to scrape up any browned bits that are stuck to the bottom of the pot. These “fond” bits are packed with incredible flavor and are essential for enriching the chili. This process is called deglazing. Once everything is scraped up, add the crushed tomatoes and the diced tomatoes (undrained) to the pot. Stir to combine all the ingredients thoroughly.
- Introduce the Beans and Bay Leaves: Add the drained and rinsed kidney, pinto, and black beans to the pot. Giving your beans a good rinse helps remove excess sodium and starchy liquid, ensuring their texture is just right in the chili. Tuck in the two bay leaves – they’ll infuse a subtle, earthy aroma as the chili simmers. Give everything a good stir.
Simmering and Perfecting The Pioneer Woman Chili
Now comes the waiting game, which is truly the most important part for developing that deep, comforting flavor that makes The Pioneer Woman Chili so special. Patience is key here, my friends!
- Bring to a Simmer: Bring the chili mixture to a gentle boil over medium-high heat. Once it’s bubbling, reduce the heat to low, cover the pot, and let your magnificent The Pioneer Woman Chili simmer gently for at least 1.5 to 2 hours. I often let mine go for 3 hours, especially on a chilly day, because the longer it simmers, the more the flavors meld and deepen. Stir the chili occasionally, especially checking the bottom of the pot to prevent any sticking, and ensure even cooking. If you notice it getting too thick, you can add a little more beef broth or water, a quarter cup at a time, to reach your desired consistency.
- Season and Taste: After simmering, remove and discard the bay leaves. Taste the chili. This is your chance to really make it your own! Adjust the seasonings as needed. Does it need more salt? A pinch more cayenne for heat? Perhaps another dash of chili powder to boost that signature flavor? Don’t be afraid to season boldly. Remember, you can always add more, but you can’t take it away! I find that a final touch of salt and pepper often makes all the difference.
- Optional: Let it Rest (Highly Recommended!): If you have the time and can resist diving in immediately, turn off the heat and let the chili rest, covered, for another 15-30 minutes. This resting period allows the flavors to settle and become even more integrated, resulting in an even more delicious bowl of The Pioneer Woman Chili. In fact, chili often tastes even better the next day!
Serving Suggestions for The Pioneer Woman Chili
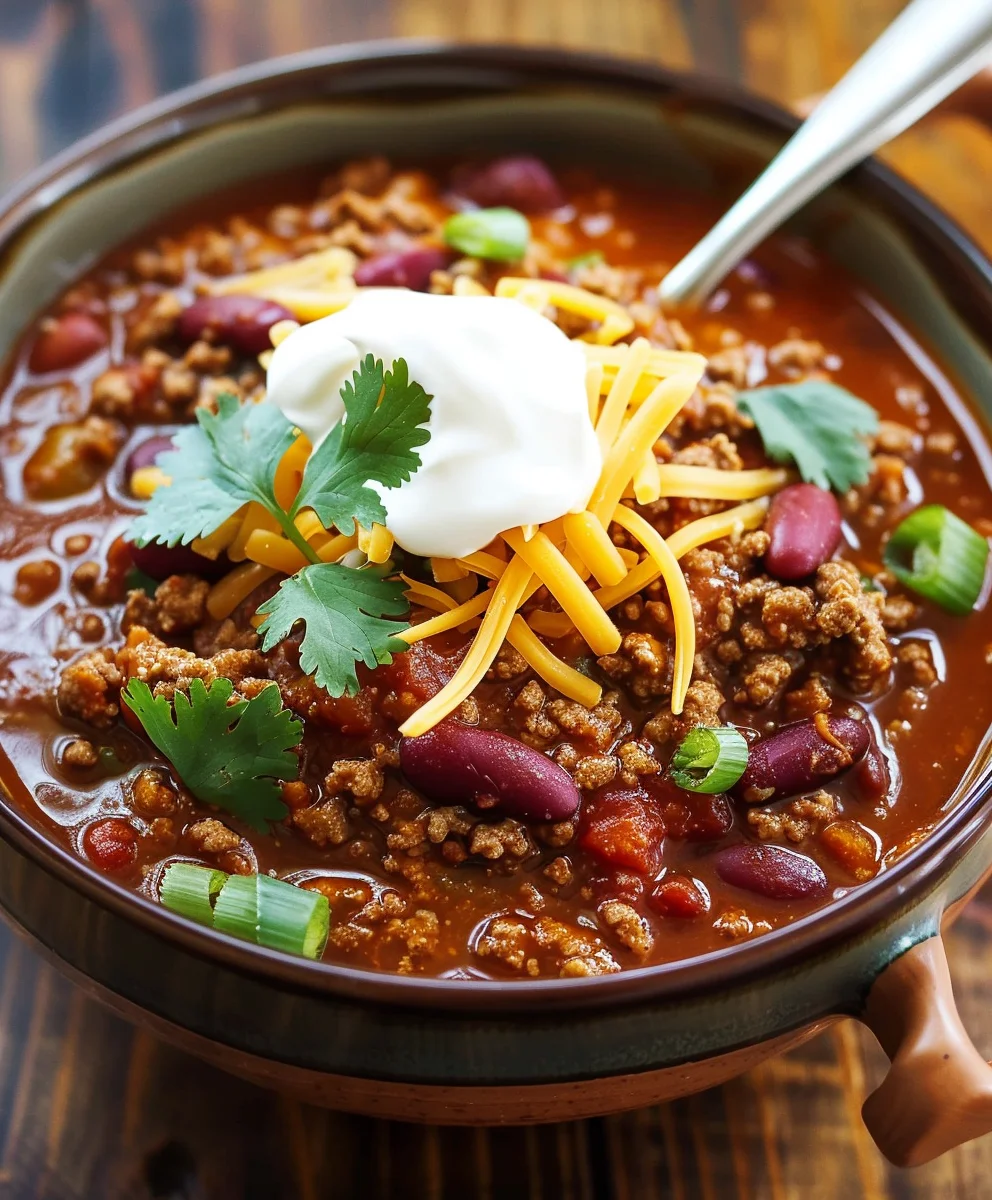
The moment you’ve been waiting for! Ladle your rich, aromatic The Pioneer Woman Chili into bowls and get ready for a truly satisfying meal. This chili is fantastic on its own, but the garnishes really take it over the top!
- Garnish and Enjoy: Serve your steaming bowls of chili hot, accompanied by an array of fresh and creamy garnishes. Crumble that crispy bacon you set aside earlier over the top. Offer a generous sprinkle of shredded cheddar cheese, a dollop of cool sour cream or Greek yogurt, a scattering of fresh cilantro, and a few slices of green onion. If you’re feeling extra fancy, diced avocado adds a lovely creaminess. Don’t forget some sturdy tortilla chips for dipping or a slice of warm cornbread on the side – they’re perfect for soaking up every last bit of that amazing sauce. This chili is a meal in itself and a true crowd-pleaser. Enjoy every comforting spoonful of this classic The Pioneer Woman Chili!
Storage Tip: Leftover The Pioneer Woman Chili stores beautifully in an airtight container in the refrigerator for up to 3-4 days, and it freezes wonderfully for up to 3 months. It truly tastes even better the next day as the flavors continue to develop and deepen!
There you have it – a recipe for a robust, flavorful, and utterly satisfying The Pioneer Woman Chili that I hope will become a staple in your kitchen. Happy cooking!
The user wants the main content of a recipe article for “The Pioneer Woman Chili”, without an intro or conclusion.
The content needs to be over 1000 words, detailed, and SEO optimized for the focus keyword.
It requires a bulleted ingredient list and numbered step-by-step instructions.
I need to use `
` subheadings for different phases.
All formatting must be HTML, no Markdown.
The writing style should be first-person and friendly.
It must start with `
Ingredients:
`.
No links are allowed.
I’ll break down the process into:
1. Ingredients list (detailed with some commentary).
2. Preparing the Flavor Base (`
`).
3. Building the Chili’s Signature Flavor (`
`).
4. Simmering and Perfecting The Pioneer Woman Chili (`
`).
5. Serving Suggestions for The Pioneer Woman Chili (`
`).
4. Simmering and Perfecting The Pioneer Woman Chili (`
`).
5. Serving Suggestions for The Pioneer Woman Chili (`
`).
I will ensure each step is verbose, explaining the why behind actions, describing sensory details (smell, sight, sound of cooking), and offering tips. I’ll naturally weave in “The Pioneer Woman Chili” keyword throughout.
Word Count Strategy Check:
- Ingredient list: Detail items, explain choices (e.g., 80/20 beef, fire-roasted tomatoes, rinsing beans), and include garnishes. This adds descriptive text.
- Step 1 (Bacon): Describe cooking, fat rendering, crispiness, slotted spoon use, reserving fat, purpose of crisp bacon.
- Step 2 (Ground Beef): Emphasize browning, breaking up, browning vs. steaming, draining fat.
- Step 3 (Aromatics): Describe softening, translucency, aroma release.
- Step 4 (Tomato Paste/Garlic): Explain caramelization, why it’s important, pushing aside ingredients.
- Step 5 (Spices): Detail toasting, why it’s done, fragrance, not burning.
- Step 6 (Deglazing): Explain the process, scraping fond, importance of fond.
- Step 7 (Beans/Bay Leaves): Explain rinsing beans, purpose of bay leaves.
- Step 8 (Simmering): Emphasize low heat, covering, long duration, flavor melding, stirring, checking consistency. This section will be quite long due to the explanation of simmering importance.
- Step 9 (Seasoning): Explain tasting, adjusting, being bold, salt/pepper.
- Step 10 (Resting): Explain why resting is beneficial, “better the next day” concept.
- Step 11 (Serving): Detail each garnish, why they work, tortilla chips/cornbread.
- Add a storage tip as well to extend the content.
I will monitor the word count as I write. I need to be careful to use correct HTML tags and avoid Markdown.
Let’s begin.
Ingredients:
Get ready to whip up a truly comforting and incredibly flavorful pot of The Pioneer Woman Chili! Here’s everything you’ll need to make this hearty, soul-warming dish that’s perfect for any occasion, from a cozy family dinner to a lively game day feast. I always make sure to have all my ingredients prepped and ready to go before I even start cooking – it makes the whole process so much smoother and more enjoyable!
- For the Meat Base:
- 6 slices thick-cut bacon, diced
- 2 pounds ground beef (80/20 blend for best flavor and juiciness)
- Aromatics and Vegetables:
- 1 large yellow onion, finely diced (about 1.5 cups)
- 1 large green bell pepper, finely diced (or a mix of red and green for a pop of color and slightly sweeter flavor, about 1.5 cups)
- 4 cloves garlic, minced (approximately 1.5 tablespoons)
- Tomato Foundation:
- 1 (6 ounce) can tomato paste
- 1 (28 ounce) can crushed tomatoes (the backbone of your chili’s rich texture)
- 1 (14.5 ounce) can diced tomatoes (fire-roasted if you want an extra layer of smoky depth!)
- Beans, Beans, Beans:
- 1 (15 ounce) can light red kidney beans, drained and thoroughly rinsed
- 1 (15 ounce) can pinto beans, drained and thoroughly rinsed
- 1 (15 ounce) can black beans, drained and thoroughly rinsed (or choose your favorite combination of beans for your The Pioneer Woman Chili!)
- Spices and Seasonings (the heart of The Pioneer Woman Chili!):
- 3-4 tablespoons good quality chili powder (adjust to your preference for chili flavor intensity and type)
- 2 teaspoons ground cumin (for earthy warmth)
- 1 teaspoon smoked paprika (adds a subtle smoky complexity)
- ½ teaspoon cayenne pepper (or more, if you like it spicy and want to feel the heat!)
- 1 teaspoon dried oregano (preferably Mexican oregano for a more authentic chili flavor)
- 1 teaspoon granulated sugar (helps to balance the acidity of the tomatoes and enhance overall flavor)
- ½ teaspoon unsweetened cocoa powder (my secret ingredient for a deep, rich color and an almost imperceptible, but wonderful, layer of flavor – don’t skip it!)
- 2 bay leaves (for aromatic depth)
- 1 teaspoon salt, plus more to taste
- ½ teaspoon freshly ground black pepper, plus more to taste
- Liquids:
- 2 cups beef broth (low sodium is often a good choice so you can control the salt content)
- 1 cup water (or a dark beer like a stout or porter for added depth and a subtle malty note, highly recommended for extra richness in The Pioneer Woman Chili!)
- Optional Garnishes (because presentation and extra flavor always win!):
- Shredded sharp cheddar cheese
- Cool sour cream or plain Greek yogurt
- Fresh cilantro, chopped
- Sliced green onions (scallions)
- Diced avocado
- Crispy corn chips or warm cornbread
Preparing the Flavor Base
This is where we lay the groundwork for an incredibly rich and satisfying pot of The Pioneer Woman Chili. Every step here builds on the last, so take your time and savor the aromas that will soon fill your kitchen! Precision and patience in these initial steps are what truly set apart a good chili from a fantastic one, guaranteeing a deeply developed flavor profile.
- Cook the Bacon: Grab your largest Dutch oven or a heavy-bottomed pot – this is going to be a one-pot wonder, and having ample space is key for even cooking. Place the pot over medium-high heat. Add the diced thick-cut bacon. Cook the bacon, stirring occasionally with a wooden spoon, until it’s wonderfully crispy and most of the fat has rendered out into the pot. This usually takes about 8-10 minutes. Keep an eye on it to prevent burning; you want it golden brown and perfectly crisp. Once it reaches that ideal crispiness, use a slotted spoon to transfer the bacon pieces to a plate lined with paper towels, allowing any excess grease to drain. We’ll crumble this flavorful bacon later for a garnish, adding a fantastic smoky crunch to our chili. Leave the rendered bacon fat in the pot; this is pure liquid gold for our chili base!
- Brown the Ground Beef: With the bacon fat still in the pot, increase the heat slightly to high. Add the 2 pounds of ground beef to the hot fat. Break up the beef with your wooden spoon or a sturdy spatula as it cooks. The goal here isn’t just to cook the meat through, but to get a really good, deep brown sear on it. Allowing the beef to sit undisturbed for a few minutes before breaking it up further will help achieve this caramelization, which creates incredible, savory depth of flavor. This step is absolutely crucial for the robust character of our The Pioneer Woman Chili. Cook until no pink remains and the beef is beautifully browned, typically another 8-10 minutes. Once browned, carefully drain off any significant excess grease, leaving just a thin coating of fat in the pot to help sauté the vegetables.
- Sauté the Aromatics: Reduce the heat to medium. Add the finely diced yellow onion and green bell pepper to the pot with the browned beef (and that lovely residual bacon fat and beef drippings). Cook, stirring occasionally, for about 5-7 minutes, or until the vegetables have softened, become translucent, and released their sweet aromas. You’ll notice the onions turning almost clear and the bell peppers losing some of their vibrant raw color. This softening process mellows their raw bite and helps them integrate seamlessly into the chili’s flavor profile.
- Add the Garlic and Tomato Paste: Now, push the beef and softened vegetables to one side of the pot, creating a little cleared space on the bottom. Add the minced garlic and the entire 6-ounce can of tomato paste to this cleared spot. Let the tomato paste cook directly on the bottom of the hot pot for 2-3 minutes, stirring it frequently to prevent burning. This vital process, often called caramelizing or “pasting” the tomato paste, deepens its color and flavor, removing any raw tomato taste and adding a fantastic savory, almost umami, richness to your The Pioneer Woman Chili. You’ll notice it darken to a brick-red color. Once it’s darkened slightly and become fragrant, stir the cooked tomato paste and garlic into the beef and vegetable mixture, ensuring everything is well combined.
Building the Chili’s Signature Flavor
This phase is all about layering those amazing spices and liquids that transform simple ingredients into the rich, complex, and utterly irresistible The Pioneer Woman Chili you’ve been dreaming of. Don’t be shy with those seasonings; they are the soul of the dish!
- Toast the Spices: This is a powerful step for unlocking maximum flavor from your seasonings! Sprinkle the chili powder, ground cumin, smoked paprika, cayenne pepper, dried oregano, granulated sugar, and unsweetened cocoa powder over the meat and vegetable mixture in the pot. Stir everything together well, ensuring the spices thoroughly coat all the ingredients. Cook for another 1-2 minutes, stirring constantly. You’ll notice the spices becoming wonderfully fragrant as they toast in the residual heat and oils from the beef and bacon. This brief toasting amplifies their natural warmth and complexity, making their flavors much more pronounced and vibrant in the finished chili. Be vigilant during this step; you want to awaken the spices, not burn them, as burned spices can turn bitter.
- Deglaze and Add Tomatoes: Pour in the 2 cups of beef broth and the 1 cup of water (or your chosen dark beer). Immediately use your wooden spoon to vigorously scrape up any browned bits (known as “fond”) that are stuck to the bottom of the pot. These flavorful bits are packed with incredible caramelized essence from the beef, bacon, and vegetables, and are absolutely essential for enriching the chili’s flavor profile. This process is called deglazing. Once everything is scraped up and incorporated, add the full 28-ounce can of crushed tomatoes and the 14.5-ounce can of diced tomatoes (undrained, including their juices) to the pot. Stir gently but thoroughly to combine all the ingredients.
- Introduce the Beans and Bay Leaves: Now, add the drained and thoroughly rinsed kidney beans, pinto beans, and black beans to the pot. Giving your canned beans a good rinse under cold water before adding them helps remove excess sodium and starchy liquid, ensuring their texture is just right and their flavor doesn’t dominate the chili. Tuck the two bay leaves into the mixture; they will infuse a subtle, earthy, and slightly peppery aroma as the chili simmers, adding another layer of complexity. Give everything a final good stir to ensure all the ingredients are evenly distributed.
Simmering and Perfecting The Pioneer Woman Chili
Now comes the waiting game, which is truly the most important part for developing that deep, comforting flavor that makes The Pioneer Woman Chili so special. Patience is key here, my friends! It’s during this long simmer that all those wonderful individual flavors meld into a harmonious and incredibly satisfying whole.
- Bring to a Simmer: Bring the entire chili mixture to a gentle boil over medium-high heat. Once you see it bubbling steadily, reduce the heat significantly to low. Cover the pot with a tight-fitting lid and let your magnificent The Pioneer Woman Chili simmer gently for at least 1.5 to 2 hours. I often let mine go for 3 hours, or even longer if I have the time, because the longer it simmers, the more the flavors meld, deepen, and become incredibly rich and complex. During this simmering time, stir the chili occasionally, especially making sure to scrape the bottom of the pot to prevent any sticking or scorching, and to ensure even cooking. If you notice the chili getting too thick for your liking as it simmers, you can add a little more beef broth or water, a quarter cup at a time, until it reaches your desired consistency. The goal is a thick, hearty chili, not a watery soup.
- Season and Taste: After the long simmer, carefully remove and discard the bay leaves – their work is done! Now comes the crucial step of tasting and adjusting. Take a spoonful of the chili and let it cool slightly before tasting. This is your chance to really make it your own and perfect the flavor profile! Does it need more salt? A pinch more cayenne for an extra kick of heat? Perhaps another dash of chili powder to boost that signature chili flavor? Don’t be afraid to season boldly and trust your palate. Remember, you can always add more, but you can’t take it away! I find that a final touch of salt and freshly ground black pepper often makes all the difference, bringing all the flavors into sharp focus.
- Optional: Let it Rest (Highly Recommended!): If you have the time and can resist diving in immediately, I highly recommend turning off the heat and letting the chili rest, covered, for another 15-30 minutes. This resting period allows the flavors to settle, deepen, and become even more integrated and harmonious, resulting in an even more delicious bowl of The Pioneer Woman Chili. In fact, many chili aficionados agree that chili often tastes even better the next day, after the flavors have had a chance to fully develop overnight!
Serving Suggestions for The Pioneer Woman Chili
The moment you’ve been waiting for! Ladle your rich, aromatic The Pioneer Woman Chili into bowls and get ready for a truly satisfying meal. This chili is fantastic on its own, but the garnishes really take it over the top, adding contrasting textures, temperatures, and flavors!
- Garnish and Enjoy: Serve your steaming bowls of chili hot, accompanied by an array of fresh and creamy garnishes. This is where you can let your creativity shine! Crumble that crispy bacon you set aside earlier over the top of each serving – it adds an irresistible smoky crunch. Offer a generous sprinkle of freshly shredded sharp cheddar cheese, which melts beautifully into the hot chili. A dollop of cool sour cream or plain Greek yogurt provides a lovely creamy counterpoint to the richness. A scattering of fresh cilantro and a few slices of vibrant green onion add freshness and a mild oniony bite. If you’re feeling extra fancy, diced avocado adds a lovely, creamy texture and healthy fats. Don’t forget some sturdy tortilla chips for dipping or a slice of warm, buttery cornbread on the side – they’re perfect for soaking up every last bit of that amazing, flavorful sauce. This The Pioneer Woman Chili is a meal in itself and a true crowd-pleaser, perfect for cozy nights in or feeding a hungry crowd. Enjoy every comforting spoonful!
Storage Tip: Leftover The Pioneer Woman Chili stores beautifully in an airtight container in the refrigerator for up to 3-4 days. It’s also an excellent candidate for freezing; portion it into freezer-safe containers or bags and it will keep well for up to 3 months. When reheating, simply thaw overnight in the refrigerator and gently warm on the stovetop or in the microwave, adding a splash of broth or water if it’s too thick.
There you have it – a detailed, robust, flavorful, and utterly satisfying recipe for The Pioneer Woman Chili that I hope will become a cherished staple in your kitchen. Happy cooking!
Conclusion:
Well, my friends, we’ve reached the end of our culinary journey with what I truly believe is one of the most comforting, robust, and utterly satisfying chili recipes you’ll ever encounter. This isn’t just another pot of chili; it’s a bowl full of warmth, a symphony of savory flavors that dances on your palate, and a testament to the power of simple, good ingredients brought together with a little love. I wholeheartedly urge you to make this recipe your own, because once you taste that rich, slow-simmered goodness, you’ll understand exactly what I mean. It’s perfect for chilly evenings, game days, family gatherings, or simply when you need a hug in a bowl. The depth of flavor, achieved through a thoughtful combination of spices and quality ingredients, is simply unparalleled. Every spoonful is a testament to culinary comfort, making it an absolute must-try for any home cook looking to elevate their chili game. You’ll be amazed at how such humble components can transform into something so profoundly delicious and memorable.
Now, let’s talk about making this incredible chili an experience. While it’s absolutely phenomenal on its own, there are so many ways to customize your bowl and truly make it sing. For classicists, a generous dollop of cool sour cream or Greek yogurt, a sprinkle of freshly grated sharp cheddar cheese, and a scattering of chopped green onions are non-negotiable. Don’t forget some crispy tortilla strips, a side of warm, buttery cornbread, or even a few oyster crackers for that delightful crunch. But don’t stop there! Think about a vibrant pico de gallo for a fresh kick, a slice of avocado for creamy richness, or even a dash of your favorite hot sauce if you like to turn up the heat. For a truly hearty meal, serve it alongside a crisp green salad or even tucked into baked potatoes for a comforting twist.
The beauty of this recipe also lies in its adaptability. Feeling adventurous? Try adding a different type of bean, like cannellini or black beans, for varied texture and flavor. If you’re a spice enthusiast, a pinch more cayenne pepper or a finely diced jalapeño (seeds and all, if you dare!) can elevate the heat level. For those looking to lighten things up slightly, ground turkey or chicken can be a fantastic substitute for ground beef, though you might want to add a bit more broth or adjust seasonings to maintain richness. If you have a slow cooker, this recipe adapts beautifully; simply brown your meat and sauté your aromatics on the stovetop, then combine everything in the slow cooker and let it simmer on low for 6-8 hours or high for 3-4 hours, allowing those flavors to meld even more deeply. And what about leftovers? Oh, the possibilities! Chili cheese fries, chili dogs, chili nachos, or even a unique chili mac and cheese are all fantastic ways to repurpose any remaining deliciousness. This recipe truly is a versatile canvas for your culinary creativity.
So, there you have it. My sincere hope is that you’ll dive into your kitchen with enthusiasm and create this phenomenal dish for yourself and your loved ones. This isn’t just a meal; it’s an invitation to gather, share, and savor truly good food. I can personally attest that whipping up The Pioneer Woman Chili is an incredibly rewarding experience, and the aroma filling your home alone is worth the effort. Once you’ve made it, tasted it, and perhaps even tweaked it to your personal preference, I would absolutely love to hear about your experience! Please don’t hesitate to share your thoughts, your topping creations, or any variations you came up with. Snap a photo of your masterpiece and tell us how it turned out. Your feedback and culinary adventures inspire me, and I’m genuinely excited for you to discover the magic within this recipe. Happy cooking, and get ready to impress!
The Pioneer Woman Chili: Hearty Beef, Easy & Flavorful
A beloved, hearty beef chili recipe from The Pioneer Woman, featuring a rich tomato base, a blend of flavorful spices, and a mix of beans, perfect for a comforting family meal that warms you from the inside out.
Ingredients
-
2 lbs ground beef
-
1 small onion, diced
-
1 green bell pepper, diced
-
3 cloves garlic, minced
-
2 (14.5 oz) cans diced tomatoes
-
1 (15 oz) can tomato sauce
-
2 cups beef broth
-
2 (15 oz) cans kidney beans, drained and rinsed
-
1 (15 oz) can pinto beans, drained and rinsed
-
2-3 tbsp chili powder
-
1 tsp cumin
-
1 tsp paprika
-
½ tsp cayenne pepper (optional)
-
Salt and black pepper, to taste
-
For serving: Shredded cheddar cheese, sour cream, sliced green onions, diced avocado, tortilla chips
Instructions
-
Step 1
In a large Dutch oven or heavy-bottomed pot, brown ground beef over medium-high heat, breaking it up as it cooks. Drain any excess fat. Add diced onion, green bell pepper, and minced garlic to the pot; cook until vegetables are softened and translucent, about 5-7 minutes. -
Step 2
Stir in chili powder, cumin, paprika, cayenne pepper (if using), salt, and black pepper. Cook for 1 minute until fragrant. Pour in the undrained diced tomatoes, tomato sauce, and beef broth. Stir well to combine, scraping any browned bits from the bottom of the pot. -
Step 3
Add the drained and rinsed kidney beans and pinto beans to the pot. Bring the chili mixture to a gentle boil, then reduce the heat to low, cover, and let it simmer for at least 1.5 to 2 hours, stirring occasionally to prevent sticking. The longer it simmers, the more the flavors will meld and deepen. -
Step 4
After simmering, taste the chili and adjust seasonings as needed, adding more salt, pepper, or spices to your preference. Ladle the hot chili into bowls and serve immediately with your favorite toppings, such as shredded cheddar cheese, a dollop of sour cream, sliced green onions, diced avocado, or crunchy tortilla chips.
Important Information
Nutrition Facts (Per Serving)
It is important to consider this information as approximate and not to use it as definitive health advice.
Allergy Information
Please check ingredients for potential allergens and consult a health professional if in doubt.