Teriyaki Chicken Wrap Recipe A Quick Flavor Adventure is precisely what you need when cravings strike for something both satisfying and incredibly simple. Have you ever found yourself yearning for a meal that offers a delightful explosion of sweet and savory notes, yet can be prepared in a flash? I certainly have! This dish isn’t just a meal; it’s an invitation to a vibrant culinary journey, proving that gourmet flavors don’t always require hours in the kitchen.
While the concept of a wrap is a universal nod to convenience, the star of this show, teriyaki, boasts a storied history in Japanese cuisine. Traditionally, “teriyaki” referred to a cooking method where food is broiled or grilled with a glaze of soy sauce, mirin, sugar, and sake. This blend creates that distinctive, glistening finish and unforgettable taste that we’ve all come to adore, a flavor profile that genuinely transports you with every bite.
What makes this particular Teriyaki Chicken Wrap Recipe A Quick Flavor Adventure so beloved? It’s the perfect harmony of textures – tender, juicy chicken coated in that irresistible sticky-sweet teriyaki glaze, crisp fresh vegetables, all nestled within a soft tortilla. It’s incredibly versatile, making it ideal for a speedy lunch, a fuss-free dinner, or even a delightful snack on the go.
The balance of flavors is simply unmatched, providing a burst of umami with just the right touch of sweetness, making every bite a truly memorable experience.

Ingredients:
-
For the Teriyaki Chicken:
- 1 ½ pounds (approximately 680g) Boneless, Skinless Chicken Thighs or Breasts: I often prefer thighs for their juiciness, but breasts work beautifully if you’re mindful of not overcooking them.
- 2 tablespoons Olive Oil or Avocado Oil: For searing the chicken to a beautiful golden-brown.
- Salt and Freshly Ground Black Pepper: To season the chicken before and after cooking, enhancing all those wonderful flavors.
-
For the Quick Homemade Teriyaki Sauce:
- ½ cup (120ml) Soy Sauce: I always opt for a good quality, low-sodium soy sauce to control the saltiness in my dishes.
- ½ cup (120ml) Water or Chicken Broth: This helps to thin the sauce to the perfect consistency and adds depth of flavor.
- ¼ cup (60ml) Mirin: This sweet Japanese rice wine is a cornerstone of authentic teriyaki flavor. It adds a subtle sweetness and a beautiful glaze.
- 2 tablespoons Rice Vinegar: A touch of acidity brightens the entire sauce and balances the sweetness.
- ¼ cup (50g) Packed Light Brown Sugar: For that classic sweet and savory balance that teriyaki is known for. You can adjust this to your preference.
- 2 cloves Garlic, minced: Fresh garlic provides an aromatic foundation that is simply irreplaceable.
- 1 tablespoon Fresh Ginger, grated: The zingy, warm notes of fresh ginger elevate the sauce immensely.
- 1 tablespoon Cornstarch (or Arrowroot Powder): Our secret weapon for thickening the sauce to that perfect, luscious texture that clings to the chicken.
- 2 tablespoons Cold Water: To create a cornstarch slurry for thickening.
- Optional: ¼ teaspoon Red Pepper Flakes: If you, like me, enjoy a little subtle kick to your teriyaki.
-
For the Wraps & Assembly:
- 8-10 Large Flour Tortillas (10-inch or larger): Choose soft, pliable tortillas that can hold all your delicious fillings without tearing. Whole wheat or spinach tortillas are also great options!
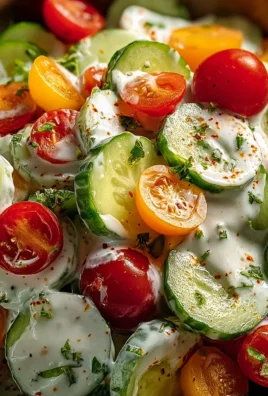
- 2 cups Shredded Green Cabbage: Adds a fantastic crunch and freshness. You can also use pre-shredded coleslaw mix for convenience.
- 1 cup Shredded Carrots: For a pop of color and natural sweetness, plus more delightful crunch.
- 1 Red Bell Pepper, thinly sliced or julienned: Offers a vibrant color, sweet flavor, and a pleasant crisp texture.
- ½ English Cucumber, julienned or thinly sliced: Cool, refreshing, and adds another layer of texture.
- ½ cup Fresh Cilantro, chopped: Its bright, herbaceous notes perfectly complement the teriyaki. If you’re not a fan, fresh parsley or even mint could be interesting alternatives.
- 2-3 Scallions (Green Onions), thinly sliced: For a mild oniony bite and visual appeal.
- Optional: Toasted Sesame Seeds: For garnish and an extra layer of nutty flavor and visual appeal.
- Optional: Sriracha or Chili Garlic Sauce: For those who crave extra heat in their “Teriyaki Chicken Wrap Recipe A Quick Flavor Adventure”.
Homemade Teriyaki Sauce: The Flavor Foundation
- Gather Your Sauce Ingredients: Before you even think about the chicken, let’s create our incredible homemade teriyaki sauce. Trust me, making it from scratch takes mere minutes and tastes infinitely better than store-bought. In a medium bowl, combine the soy sauce, ½ cup water (or chicken broth for richer flavor), mirin, rice vinegar, brown sugar, minced garlic, grated fresh ginger, and red pepper flakes (if using). Whisk everything together until the brown sugar has completely dissolved. This ensures all those beautiful flavors are evenly distributed right from the start.
- Prepare the Cornstarch Slurry: In a small separate bowl, whisk together the 1 tablespoon of cornstarch with 2 tablespoons of cold water until a smooth, lump-free slurry forms. This slurry is what will thicken our sauce to that perfect, glossy consistency. It’s crucial to use cold water for the slurry to prevent lumps from forming when you add it to the hot sauce.
- Simmer the Sauce Base: Pour the soy sauce mixture into a small saucepan. Place it over medium heat and bring it to a gentle simmer, stirring occasionally. Allow it to simmer for about 2-3 minutes. This simmering time is important because it allows the flavors to meld and deepen beautifully. You’ll notice the aroma filling your kitchen – that’s the magic happening!
- Thicken the Sauce: Once the sauce base is simmering, give your cornstarch slurry another quick whisk to ensure it hasn’t settled. Slowly pour the slurry into the simmering sauce in a thin stream, whisking constantly. Continue to whisk as the sauce comes back to a simmer. You’ll observe it thickening almost immediately, transforming into a beautiful, glossy, and cohesive sauce. Cook for another 1-2 minutes, continuing to whisk, until it reaches your desired thickness. I prefer a sauce that’s thick enough to coat the back of a spoon but still pourable. Remove it from the heat and set it aside. This teriyaki sauce is the heart of our “Teriyaki Chicken Wrap Recipe A Quick Flavor Adventure.”
Preparing the Star: Teriyaki Chicken
- Prep the Chicken: Lay your chicken thighs or breasts on a clean cutting board. Pat them thoroughly dry with paper towels. This step is often overlooked but is incredibly important for achieving a good sear and preventing the chicken from steaming instead of browning. Once dry, slice the chicken into bite-sized pieces or thin strips, roughly 1-inch thick. Aim for uniform pieces so they cook evenly. Season the chicken generously with salt and freshly ground black pepper.
- Sear the Chicken: Heat the olive oil or avocado oil in a large non-stick skillet or cast-iron pan over medium-high heat. You want the oil to be shimmering, but not smoking, indicating it’s hot enough to get a good sear. Add the seasoned chicken pieces to the hot pan in a single layer, being careful not to overcrowd the pan. If necessary, cook the chicken in batches. Overcrowding can lower the pan temperature and prevent proper browning.
- Cook Until Golden and Cooked Through: Cook the chicken for 4-6 minutes per side, or until it’s beautifully golden brown and cooked through. The internal temperature should reach 165°F (74°C). If you’re using chicken breasts, be mindful not to overcook them, as they can dry out quickly. Thighs are a bit more forgiving. Once cooked, remove the chicken from the pan and set it aside on a plate.
- Combine Chicken with Teriyaki Sauce: Now, for the grand finale of the chicken prep! Pour about ¾ of your freshly made teriyaki sauce over the cooked chicken. Toss gently to ensure every piece is beautifully coated in that sweet, savory, and glossy goodness. You can add more sauce if you like, but remember we’ll also be drizzling some when assembling the wraps. The remaining sauce can be saved for extra drizzle later or for another dish. This step infuses the chicken deeply with flavor, making it truly the star of our “Teriyaki Chicken Wrap Recipe A Quick Flavor Adventure.”
Assembling Your Flavorful Wraps
- Prepare Your Vegetables: While the chicken is cooking, this is the perfect time to get all your colorful vegetables ready. Create a vibrant spread of shredded cabbage, shredded carrots, thinly sliced red bell pepper, julienned cucumber, chopped cilantro, and sliced scallions. Having everything prepped and within reach (this is often called “mise en place”) makes the assembly process incredibly smooth and enjoyable. The variety of textures and colors here is key for a truly satisfying wrap.
- Warm the Tortillas: Gently warm your large flour tortillas. There are several ways to do this:
- Microwave: Stack a few tortillas on a plate, cover with a damp paper towel, and microwave for 15-30 seconds until warm and pliable.
- Skillet: Heat a dry skillet over medium heat. Place a tortilla in the skillet for 15-20 seconds per side, until soft and lightly browned in spots. This method often yields the best flavor and texture.
- Oven: Wrap a stack of tortillas in foil and bake at 300°F (150°C) for 10-15 minutes.
Warming the tortillas is important because it makes them more flexible and less prone to tearing when you roll them up, ensuring your “Teriyaki Chicken Wrap Recipe A Quick Flavor Adventure” stays intact.
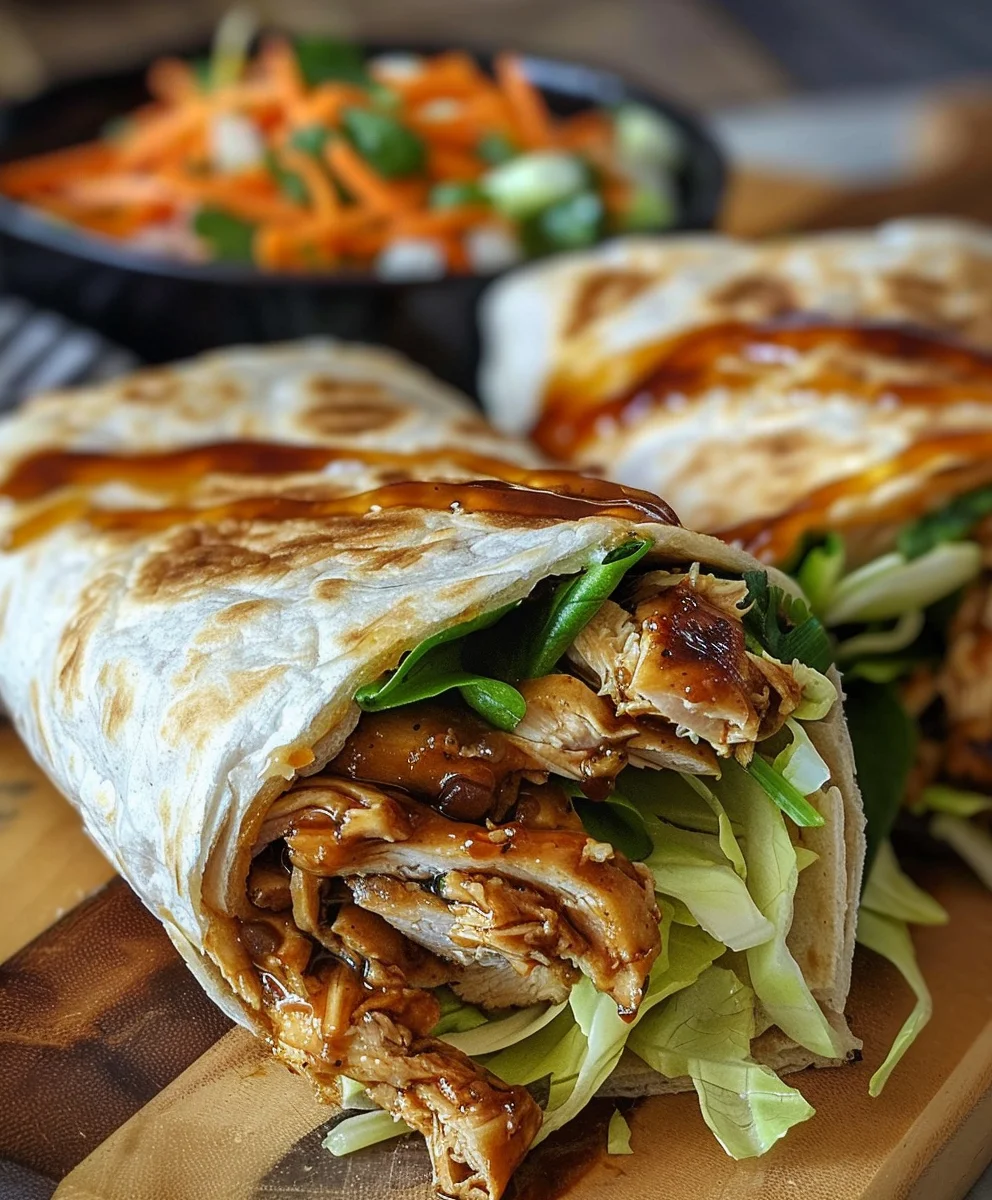
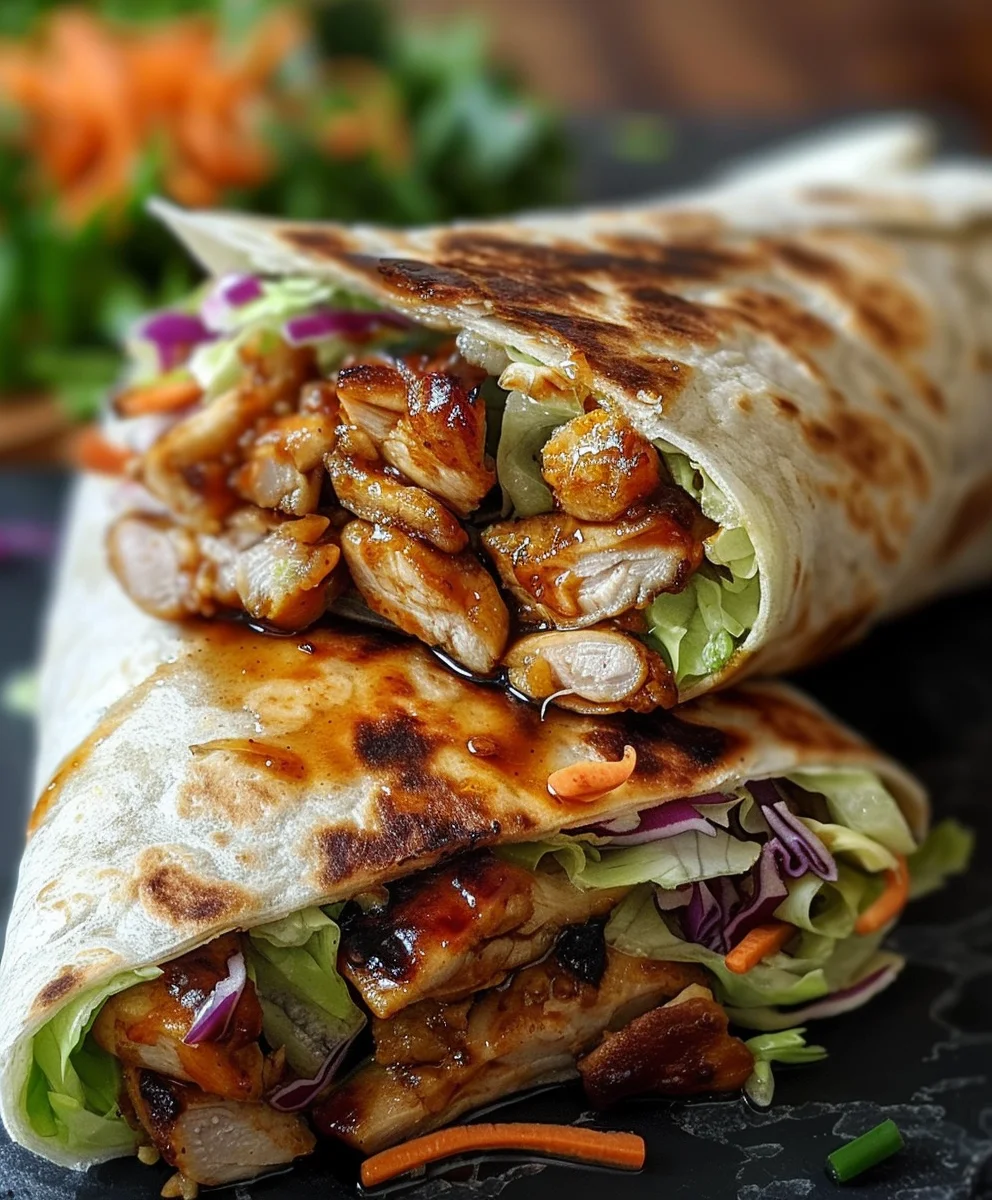
- Assemble Your Wraps: Now for the fun part – building your masterpieces! Lay a warm tortilla flat on a clean surface.
- First Layer: Spoon a generous portion of the teriyaki chicken down the center of the tortilla, leaving about 1-2 inches clear on the sides and bottom.
- Second Layer: Pile on your fresh vegetables – a good handful of shredded cabbage, carrots, bell pepper, and cucumber directly over the chicken. Don’t be shy with the veggies; they add wonderful crunch and freshness.
- Third Layer: Sprinkle with chopped cilantro and sliced scallions for their aromatic burst.
- Final Touch: Drizzle with a little extra teriyaki sauce, if desired, and a sprinkle of toasted sesame seeds for an added nutty crunch. If you’re a fan of heat, a tiny zig-zag of Sriracha can be a fantastic addition here!
- Fold and Roll: To fold the wrap like a pro:
- Fold the bottom edge of the tortilla up and over the filling, tucking it in snugly.
- Then, fold in the left and right sides of the tortilla over the filling, meeting in the middle.
- Finally, roll the wrap tightly from the bottom upwards, ensuring all the fillings are securely enclosed. You want it firm but not so tight that it bursts.
Repeat this process with the remaining tortillas and fillings.
Serving Your Teriyaki Chicken Wraps
- Serve Immediately: These Teriyaki Chicken Wraps are truly at their best when served fresh, allowing you to enjoy the warm chicken against the crisp, cool vegetables. The contrast in temperatures and textures is delightful. I often like to serve them with the remaining teriyaki sauce on the side for dipping, or even a little extra Sriracha for those who want an additional kick.
- Slice and Share (Optional): For easier handling and presentation, especially if serving to a group, you can slice each wrap in half diagonally. This also beautifully showcases all the colorful fillings inside, making them even more appealing. Arrange them artfully on a platter, perhaps with a garnish of extra fresh cilantro or scallions.
- Pairing Suggestions: While these wraps are incredibly satisfying on their own, they also pair wonderfully with a simple side salad, a light miso soup, or even some steamed edamame. For a refreshing beverage, consider a sparkling water with lime or a crisp iced green tea. This “Teriyaki Chicken Wrap Recipe A Quick Flavor Adventure” is designed to be a complete meal in itself, offering a perfect balance of protein, carbs, and fresh vegetables.
- Make-Ahead Tips (Partial): While assembling the wraps fresh is ideal, you can absolutely prep the components in advance. The teriyaki sauce can be made up to 3-4 days ahead and stored in an airtight container in the refrigerator. The chicken can be cooked and stored separately from the sauce for 2-3 days, then reheated and coated just before assembling. All the vegetables can be pre-chopped and stored in separate airtight containers in the fridge for a couple of days. This makes assembly on a busy weeknight incredibly fast and convenient, turning your dinner into a true “quick flavor adventure.”
- Storage for Leftovers: If you happen to have any fully assembled wraps left over (which is rare in my house!), they are best stored individually wrapped in plastic wrap or foil in the refrigerator for up to 1 day. The tortillas can sometimes get a little soft from the moisture of the filling, so eating them fresh is always recommended. If storing individual components, they will last longer as mentioned above.
Conclusion:
Well, my friends, we’ve journeyed through the steps of crafting something truly special, and I genuinely hope you’re as excited about it as I am. This isn’t just another meal; it’s a testament to how incredible flavors can come together with minimal fuss. I’ve poured my heart into perfecting this particular combination, and I promise you, the results are nothing short of spectacular. This recipe stands out because it masterfully balances the savory sweetness of authentic teriyaki with the fresh crispness of vibrant vegetables, all nestled in a convenient, handheld package. It’s the kind of dish that makes you feel like you’ve ordered takeout from your favorite spot, but with the added satisfaction and pride of having created it yourself. The ease of preparation means it slots seamlessly into even the busiest of schedules, offering a gourmet escape without demanding hours in the kitchen.
Why is this a definite must-try? Because it’s a revelation for your taste buds, transforming everyday ingredients into an extraordinary culinary experience. It’s quick, it’s packed with flavor, and it’s incredibly versatile, making it the ideal solution for a weeknight dinner, a quick lunch, or even an impressive, yet effortless, offering for casual gatherings. Forget the bland, the boring, and the time-consuming; this dish is here to revolutionize your mealtime routine. You’ll find yourself craving that perfect blend of umami and freshness, and the best part is, you’re only a few simple steps away from enjoying it whenever the mood strikes.
Unleash Your Creativity: Serving Suggestions & Variations
But the adventure doesn’t stop once you’ve made the basic recipe! One of the things I love most about this particular dish is its incredible adaptability. Let’s talk about how you can make this recipe uniquely yours. For a lighter touch, you could swap out the flour tortillas for large lettuce cups – crisp romaine or butter lettuce works wonderfully – transforming it into a vibrant, low-carb option. This also adds a delightful crunch that contrasts beautifully with the tender chicken and soft rice.
Feeling adventurous with your proteins? While chicken is fantastic, imagine cubed firm tofu, pan-fried until golden, or even succulent shrimp, quickly sautéed in the teriyaki sauce. These alternatives offer fantastic texture and flavor profiles that are just as captivating. And when it comes to vegetables, don’t feel limited to what I’ve suggested. Thinly sliced bell peppers (red, yellow, or orange for a pop of color), shredded carrots, crisp cucumber sticks, or even a handful of peppery arugula can elevate the fresh factor. A sprinkle of toasted sesame seeds on top not only adds a lovely nutty aroma but also provides a delightful textural contrast. For those who enjoy a little heat, a drizzle of sriracha mayo or a few slivers of fresh jalapeño can introduce a fiery kick that complements the sweet teriyaki beautifully.
Consider serving these alongside a simple side salad dressed with a ginger-sesame vinaigrette, or a small bowl of edamame for an added touch of Asian-inspired deliciousness. And if you’re looking for a deconstructed approach, turn it into a bowl! Layer the teriyaki chicken and vegetables over a bed of fluffy jasmine rice or quinoa, perhaps with a creamy avocado fan and a squeeze of fresh lime, for a hearty and satisfying meal that still captures all the essence of the wrap. This versatility truly makes it a star in your recipe collection, adaptable to almost any preference or occasion.
Your Culinary Journey Begins Now!
So, what are you waiting for? This is your invitation to dive into the truly satisfying experience of making this exceptional dish. I wholeheartedly encourage you to roll up your sleeves, gather your ingredients, and embark on what I confidently call the Teriyaki Chicken Wrap Recipe A Quick Flavor Adventure. Trust me, your taste buds will thank you.
Once you’ve experienced the magic, I would absolutely love to hear from you. Your feedback, your unique twists, your triumphant photos – they all inspire me and our wonderful community of home cooks. Did you add a secret ingredient that made it even better? Did you serve it in an unexpected way? Share your experience in the comments below! Your culinary journey is just beginning, and this recipe is a fantastic starting point for countless delicious meals to come. Go forth, cook, and savor every single bite!
Teriyaki Chicken Wrap Recipe: Your Quick Flavor Adventure
Teriyaki Chicken Wrap Recipe A Quick Flavor Adventure is precisely what you need when cravings strike for something both satisfying and incredibly simple. Have you ever found yourself yearning for a meal that offers a delightful explosion of sweet and savory notes, yet can be prepared in a flash? I certainly have! This dish isn’t just a meal; it’s an invitation to a vibrant culinary journey, proving that gourmet flavors don’t always require hours in the kitchen.
Ingredients
-
1 ½ lbs Boneless, Skinless Chicken Thighs or Breasts
-
2 tbsp Olive Oil or Avocado Oil
-
Salt, to taste
-
Freshly Ground Black Pepper, to taste
-
½ cup Low-Sodium Soy Sauce
-
½ cup Water or Chicken Broth
-
¼ cup Non-alcoholic Mirin Substitute
-
2 tbsp Rice Vinegar
-
¼ cup Packed Light Brown Sugar
-
2 cloves Garlic, minced
-
1 tbsp Fresh Ginger, grated
-
1 tbsp Cornstarch
-
2 tbsp Cold Water (for slurry)
-
Optional: ¼ tsp Red Pepper Flakes
-
8-10 Large Flour Tortillas (10-inch or larger)
-
2 cups Shredded Green Cabbage
-
1 cup Shredded Carrots
-
1 Red Bell Pepper, thinly sliced or julienned
-
½ English Cucumber, julienned or thinly sliced
-
½ cup Fresh Cilantro, chopped
-
2-3 Scallions, thinly sliced
-
Optional: Toasted Sesame Seeds
-
Optional: Sriracha or Chili Garlic Sauce
Instructions
-
Step 1
In a medium bowl, whisk together soy sauce, ½ cup water/broth, non-alcoholic mirin substitute, rice vinegar, brown sugar, minced garlic, grated fresh ginger, and optional red pepper flakes until sugar dissolves. -
Step 2
In a small separate bowl, whisk 1 tablespoon cornstarch with 2 tablespoons cold water until smooth and lump-free. -
Step 3
Pour the soy sauce mixture into a small saucepan. Bring to a gentle simmer over medium heat for 2-3 minutes. Slowly pour in the cornstarch slurry, whisking constantly, until sauce thickens and becomes glossy (1-2 minutes). Remove from heat. -
Step 4
Pat chicken thighs or breasts dry and slice into 1-inch pieces or thin strips. Season generously with salt and freshly ground black pepper. -
Step 5
Heat olive oil in a large non-stick skillet over medium-high heat. Add chicken pieces in a single layer (cook in batches if needed) and sear for 4-6 minutes per side until golden brown and cooked through (internal temperature 165°F/74°C). Remove from pan. -
Step 6
Pour about ¾ of the prepared teriyaki sauce over the cooked chicken. Toss gently to ensure every piece is beautifully coated. -
Step 7
Shred cabbage and carrots. Thinly slice red bell pepper and julienne cucumber. Chop cilantro and slice scallions. -
Step 8
Gently warm flour tortillas using a microwave, dry skillet, or oven to make them pliable. -
Step 9
Lay a warm tortilla flat. Spoon a generous portion of teriyaki chicken down the center. Layer with shredded cabbage, carrots, bell pepper, cucumber, chopped cilantro, and sliced scallions. Drizzle with extra teriyaki sauce and sprinkle with optional sesame seeds or Sriracha. -
Step 10
Fold the bottom edge of the tortilla up and over the filling, tucking it snugly. Then, fold in the left and right sides. Roll the wrap tightly from the bottom upwards to enclose all fillings. Repeat for remaining wraps. -
Step 11
Serve immediately. Optionally, slice each wrap in half diagonally for easier handling and presentation. Serve with remaining teriyaki sauce for dipping.
Important Information
Nutrition Facts (Per Serving)
It is important to consider this information as approximate and not to use it as definitive health advice.
Allergy Information
Please check ingredients for potential allergens and consult a health professional if in doubt.