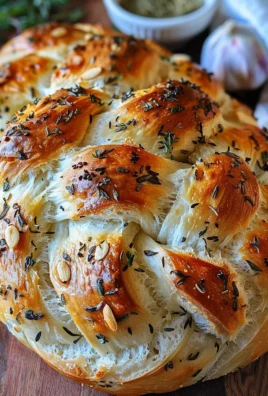
Swirled Garlic Herb And Cheese Bread is not merely a side dish; it is a culinary embrace, an aromatic showstopper that promises to elevate any meal from delightful to absolutely unforgettable. From the moment it emerges from the oven, filling your kitchen with an irresistible fragrance of toasted garlic, fresh herbs, and melting cheese, you’ll understand why this bread holds such a special place in the hearts of food lovers everywhere.
While the humble garlic bread has been a beloved companion to countless meals for generations, this elegant, swirled rendition represents a truly inspired evolution. It draws upon the timeless tradition of enriched doughs and savory fillings, reminiscent of treasured European baking techniques that transform simple ingredients into edible art, perfect for sharing and celebration. It’s a dish that perfectly marries rustic comfort with sophisticated presentation, making it both accessible and impressive.
Why this bread captivates us completely:
People absolutely adore this dish because it delivers on every front. Picture this: a tender, fluffy crumb, delicately crisp on the outside, generously infused with the piquant warmth of roasted garlic, the aromatic freshness of vibrant herbs, and tantalizing pockets of gooey, melted cheese. The signature swirl isn’t just visually stunning; it meticulously ensures that every single bite offers an explosion of these harmonious flavors and textures. It’s incredibly versatile, serving as the perfect accompaniment to pasta dishes, soups, or even as a standalone appetizer. Preparing your own Swirled Garlic Herb And Cheese Bread at home is a surprisingly rewarding experience, promising an end result that is far superior to any store-bought alternative, cementing its status as a true crowd-pleaser and a personal favorite.

Ingredients:
-
For the Dough:
- All-Purpose Flour: 3 ½ cups (approximately 420-450 grams), plus extra for dusting. I prefer unbleached for a slightly chewier texture.
- Warm Water: 1 cup (240 ml), ideally between 105-115°F (40-46°C). This is crucial for activating the yeast without killing it.
- Granulated Sugar: 2 tablespoons. Feeds the yeast and contributes to a beautiful golden crust.
- Active Dry Yeast: 2 ¼ teaspoons (one standard packet). Make sure it’s fresh!
- Unsalted Butter: ¼ cup (57 grams), melted and slightly cooled. Adds richness and tenderness to the dough.
- Salt: 1 teaspoon. Don’t skip this; it enhances flavor and controls yeast activity.
-
For the Garlic Herb Filling:
- Unsalted Butter: ½ cup (113 grams), softened at room temperature. This will be the base for our aromatic spread.
- Fresh Garlic: 4-6 cloves, minced very finely. The star of our show, so don’t be shy!
- Fresh Parsley: ¼ cup, finely chopped. Adds a vibrant green color and fresh, herbaceous note.
- Fresh Chives: 2 tablespoons, finely chopped. Provides a delicate oniony flavor without being overpowering.
- Dried Oregano: 1 teaspoon. Brings an earthy, aromatic depth that complements the fresh herbs.
- Red Pepper Flakes: ½ teaspoon (optional). For a subtle kick that really wakes up the flavors.
- Salt and Black Pepper: To taste. Essential for seasoning the filling perfectly.
-
For the Cheese Blend:
- Shredded Mozzarella Cheese: 1 cup (about 113 grams). Melts beautifully and creates those satisfying cheese pulls.
- Grated Parmesan Cheese: ½ cup (about 50 grams). Adds a salty, nutty depth of flavor.
-
For the Egg Wash (Optional, but recommended for shine):
- Large Egg: 1, beaten with 1 tablespoon of water or milk. Gives the bread a gorgeous golden-brown, glossy finish.
Preparing the Dough
Creating the perfect dough is the foundation for our amazing Swirled Garlic Herb And Cheese Bread. Trust me, a little patience here pays off immensely!
- Activate the Yeast: In a large mixing bowl, or the bowl of your stand mixer, combine the warm water and granulated sugar. Sprinkle the active dry yeast over the top. Give it a gentle stir and then let it sit undisturbed for about 5-10 minutes. You’ll know it’s alive and well when it becomes foamy and bubbly on the surface – it’s like magic! If it doesn’t foam, your water might have been too hot or too cold, or your yeast might be old. It’s best to start over if this happens.
- Add Wet Ingredients: Once your yeast is beautifully bubbly, pour in the melted and slightly cooled unsalted butter and the salt. Give everything a good whisk to combine these wet components evenly. It’s important that the butter isn’t too hot, as extreme heat can harm the yeast’s activity.
- Incorporate the Flour: Gradually add the all-purpose flour, about a cup at a time, to the wet mixture. If you’re using a stand mixer with a dough hook attachment, start on a low speed. If you’re mixing by hand, use a sturdy wooden spoon or a Danish dough whisk. Continue mixing until a shaggy dough forms and most of the flour has been incorporated.
-
Knead the Dough: Now for the fun part – kneading!
- By Hand: Turn the shaggy dough out onto a lightly floured surface. Knead for about 8-10 minutes. The technique involves pushing the dough away with the heels of your hands, folding it back over, and rotating it. You’re aiming for a smooth, elastic dough that springs back when gently poked. It might be a little sticky at first, but resist the urge to add too much extra flour, which can make the bread tough. Only add a tiny bit if absolutely necessary to prevent excessive sticking.
- With a Stand Mixer: Attach the dough hook and knead on medium-low speed for 6-8 minutes. The dough should gather around the hook and pull away cleanly from the sides of the bowl. It will become smooth, elastic, and pass the “windowpane test” – meaning you can stretch a small piece of dough thin enough to see light through it without tearing.
Why Knead? Kneading develops the gluten in the flour, which gives the bread its structure, chewiness, and ability to hold those wonderful swirls of garlic and cheese without falling apart.
- First Rise: Lightly grease a clean large bowl with a little oil. Transfer the kneaded dough to the bowl, turning it once to coat the entire surface with oil. This prevents it from drying out. Cover the bowl tightly with plastic wrap or a clean kitchen towel. Place it in a warm, draft-free spot. An ideal temperature is around 75-80°F (24-27°C). Let the dough rise for 1 to 1 ½ hours, or until it has doubled in size. This first rise is critical for flavor development and a light, airy texture. If your kitchen is cool, it might take a bit longer.
Crafting the Garlic Herb Filling
While our dough is leisurely rising, let’s get busy creating the incredibly fragrant garlic herb filling that will elevate our Swirled Garlic Herb And Cheese Bread to legendary status. This part smells divine!
- Soften the Butter: Ensure your ½ cup of unsalted butter is genuinely softened at room temperature. This is key for a smooth, spreadable filling. If it’s too cold, it’ll be lumpy; if it’s melted, it’ll be too runny.
- Prepare the Aromatics: Finely mince your 4-6 cloves of fresh garlic. I always say, the fresher the garlic, the better the flavor. Chop your fresh parsley and chives until they are very fine. The smaller the pieces, the better they’ll distribute throughout the filling and the bread.
- Combine the Filling Ingredients: In a small bowl, combine the softened butter, minced fresh garlic, chopped fresh parsley, chopped fresh chives, dried oregano, and the optional red pepper flakes. Season generously with salt and black pepper to taste.
- Mix Thoroughly: Using a spoon or a small spatula, mix everything together until all ingredients are well combined and the mixture is uniform. You want to make sure the garlic and herbs are evenly distributed throughout the butter, so every bite of your Swirled Garlic Herb And Cheese Bread gets a burst of flavor. This mixture should be wonderfully aromatic and vibrant green from the fresh herbs. Set this aside; it’s ready to go when the dough is.
Assembling the Swirled Garlic Herb And Cheese Bread
This is where our beautiful dough and the fragrant filling come together to form the iconic Swirled Garlic Herb And Cheese Bread. Get ready for some impressive shaping!
- Prepare Your Pan: Lightly grease a 9×5 inch loaf pan, or a similar sized baking dish, with butter or cooking spray. You can also line it with parchment paper, leaving an overhang on the longer sides, to make removal easier.
- Punch Down the Dough: Once the dough has doubled in size, gently punch it down to release the air. This is a satisfying step! Turn the dough out onto a lightly floured work surface.
- Roll Out the Dough: Using a rolling pin, roll the dough into a large rectangle. Aim for dimensions of approximately 16×12 inches (about 40×30 cm) and a thickness of about ¼ inch. Try to keep the edges as straight as possible, as this will help when rolling. Don’t worry if it’s not absolutely perfect; rustic charm is part of home baking!
- Spread the Garlic Herb Filling: Take your prepared garlic herb butter mixture and spread it evenly over the entire surface of the rolled-out dough, going right to the edges. Use an offset spatula or the back of a spoon to ensure a consistent layer. The aroma at this stage is absolutely intoxicating!
- Sprinkle with Cheese: Evenly sprinkle the shredded mozzarella cheese and grated Parmesan cheese over the garlic herb filling. Make sure the cheese covers the entire surface, leaving perhaps a small ½-inch border along one of the longer edges to help seal the roll.
- Roll Up the Dough: Starting from one of the longer sides (the 16-inch side), carefully and tightly roll the dough into a log. Be gentle but firm to ensure the filling stays inside and you get a nice tight spiral. As you roll, pinch the dough to yourself slightly to make sure it’s snug. Once rolled, pinch the seam closed along the bottom edge to seal it. Gently tuck the ends of the log under to create a neat finish.
-
Shape Your Bread (Two Popular Methods):
- For a Loaf Pan (Classic Swirl): If you want a classic Swirled Garlic Herb And Cheese Bread loaf, simply place the rolled log into your prepared 9×5 inch loaf pan, seam-side down.
- For a Pull-Apart Bread or Twisted Loaf (More Dramatic Swirls):
- Pull-Apart Buns: Slice the log into 1 ½ to 2-inch thick rounds, like cinnamon rolls. Arrange these rounds upright in your prepared baking dish, close together but not too tightly packed.
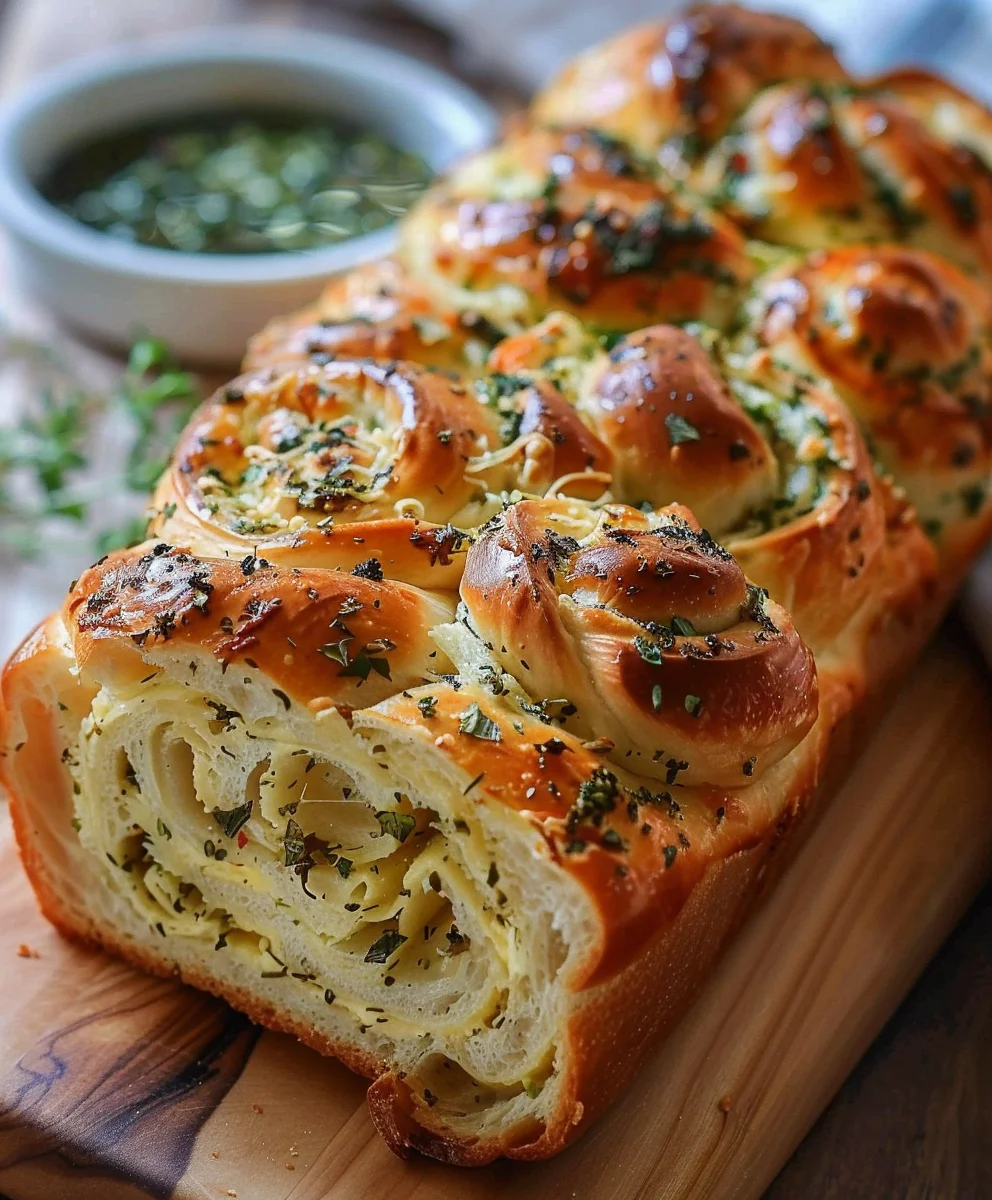
- Twisted Loaf: Using a sharp knife or bench scraper, carefully slice the log lengthwise down the center, creating two long halves with the cut sides exposing the beautiful swirls. Turn the two halves cut-side up and gently twist them around each other, forming a braid-like pattern. Pinch the ends together and carefully transfer this twisted dough into your prepared loaf pan. This method creates an incredibly dramatic and beautiful Swirled Garlic Herb And Cheese Bread.
- Second Rise: Cover the loaf pan or baking dish loosely with plastic wrap or a clean kitchen towel. Place it back in your warm, draft-free spot for another 30-45 minutes, or until the dough has puffed up noticeably and looks light and airy. It won’t double quite as much as the first rise, but you’ll see a definite expansion. This final rise is crucial for a light texture and tender crumb in your finished Swirled Garlic Herb And Cheese Bread.
Baking Your Swirled Garlic Herb And Cheese Bread
The moment of truth! Get ready for your kitchen to fill with the most incredible aromas as your Swirled Garlic Herb And Cheese Bread bakes to golden perfection.
- Preheat Oven: About 15 minutes before the end of the second rise, preheat your oven to 375°F (190°C). Make sure the oven rack is in the middle position for even baking.
- Prepare Egg Wash (if using): In a small bowl, whisk together the large egg with 1 tablespoon of water or milk.
- Apply Egg Wash: Once the dough has completed its second rise, gently brush the top surface of the bread with the egg wash. This step is optional, but I highly recommend it as it gives the Swirled Garlic Herb And Cheese Bread a beautiful golden-brown, glossy crust that is absolutely irresistible. Be gentle so you don’t deflate the risen dough.
- Bake the Bread: Carefully place the loaf pan into the preheated oven. Bake for 30-35 minutes, or until the Swirled Garlic Herb And Cheese Bread is deeply golden brown on top and cooked through. If you notice the top browning too quickly, you can loosely tent it with aluminum foil for the last 10-15 minutes of baking.
- Check for Doneness: The best way to tell if bread is fully cooked is to check its internal temperature with an instant-read thermometer; it should register between 200-210°F (93-99°C). Alternatively, you can tap the bottom of the loaf – if it sounds hollow, it’s usually done. The cheese should be bubbly and gorgeously melted, and the garlic herb aroma will be filling your entire home.
- Cooling: Once baked, remove the Swirled Garlic Herb And Cheese Bread from the oven. Let it cool in the loaf pan for about 5-10 minutes before carefully transferring it to a wire rack to cool completely. Cooling on a wire rack allows air to circulate around all sides, preventing the bottom from becoming soggy.
- Serve and Enjoy: While it’s tempting to slice into this glorious creation immediately (and a warm slice with melted butter is divine!), letting it cool for at least 30 minutes, or even an hour, allows the internal structure to set properly. This makes for cleaner slices and a better overall texture. However, for a truly decadent experience, a warm slice of Swirled Garlic Herb And Cheese Bread, fresh from the oven, is pure comfort. This bread is perfect served alongside a hearty Italian meal, a bowl of soup, or simply enjoyed on its own as an irresistible snack. Enjoy every delicious, garlicky, cheesy bite!
Conclusion:
As we wrap up our culinary journey with this incredible creation, I truly hope you’re feeling as inspired as I am to get baking. This isn’t just another bread recipe; it’s an experience, a symphony of aromas and flavors that promises to transform any meal into something truly special. From the moment the dough begins to rise, filling your kitchen with the comforting scent of yeast, to that first glorious bite, you’ll understand why I’m so passionate about this particular recipe. It’s the kind of bread that gathers people around the table, sparking conversations and smiles. The tender, fluffy interior, the golden-brown crust, and that mesmerizing swirl of savory garlic, fragrant herbs, and melted cheese – it all comes together in a way that simply has to be tasted to be believed. I genuinely believe that once you try making this, it will quickly become a cherished favorite in your own recipe repertoire.
What makes this particular bread a true standout is its perfect balance. The sharpness of the garlic is mellowed by the earthy depth of the herbs, all embraced by the rich, gooey comfort of cheese. Each slice offers a delightful texture contrast, from the slightly crisp edges to the incredibly soft, yielding crumb. It’s comforting yet sophisticated, rustic yet elegant, and always, always utterly delicious. This isn’t merely a side dish; it’s a centerpiece, an edible conversation starter that effortlessly elevates even the simplest of meals. The sheer joy of pulling apart a warm loaf, steam gently rising, is an unmatchable satisfaction that I want everyone to experience.
Elevate Your Table with This Incredible Bread
The beauty of the Swirled Garlic Herb And Cheese Bread lies not only in its exquisite taste but also in its remarkable versatility. Imagine it alongside a hearty bowl of tomato soup on a chilly evening, perfect for dipping and soaking up every last drop of warmth. Picture it served with a vibrant garden salad, turning a light lunch into a truly satisfying affair. It’s an absolute game-changer for pasta nights, providing that ideal accompaniment to a rich marinara or a creamy Alfredo sauce. I love serving it as an appetizer for gatherings; sliced thick, perhaps with a little extra sprinkle of parmesan, it disappears astonishingly fast. It’s robust enough to hold its own next to a juicy steak or roasted chicken, yet delicate enough not to overpower lighter dishes.
Serving Suggestions: More Ways to Enjoy Your Swirled Garlic Herb And Cheese Bread
Beyond the obvious, let’s explore some fantastic ways to enjoy your freshly baked loaf. For an instant party hit, slice it into thick pieces and arrange them on a platter with a small bowl of balsamic vinegar and olive oil for dipping. It’s also sensational when toasted lightly the next day and used for an exceptional sandwich, perhaps layered with some leftover roast beef or turkey. Consider using it as the base for a truly gourmet bruschetta – simply toast slices, rub with a fresh garlic clove, drizzle with olive oil, and top with diced tomatoes, basil, and a sprinkle of feta. The possibilities are truly endless, limited only by your imagination.
Creative Variations to Make It Your Own
One of the most exciting aspects of baking is the freedom to customize, and this recipe is incredibly forgiving when it comes to personal touches. Feel free to experiment with different cheeses – a sharp cheddar could add a lovely tang, or perhaps a smoky provolone for a different depth of flavor. If you’re an herb enthusiast, don’t hesitate to swap out the Italian blend for fresh rosemary and thyme for a more robust, earthy profile. For a little heat, I sometimes like to add a pinch of red pepper flakes to the garlic herb mixture. Sun-dried tomatoes, finely chopped, can introduce a burst of umami, or perhaps some Kalamata olives for a briny counterpoint. You can also make this into individual rolls instead of a loaf, perfect for dinner parties or packed lunches. Just adjust the baking time accordingly, keeping an eye on that beautiful golden crust.
Your Culinary Adventure Awaits!
So, what are you waiting for? I wholeheartedly encourage you to roll up your sleeves, gather your ingredients, and embark on the wonderfully rewarding journey of baking your very own Swirled Garlic Herb And Cheese Bread. The pride you’ll feel as you pull that golden-brown loaf from the oven, and the delighted smiles you’ll see around your table, are moments to truly cherish. Don’t be intimidated; homemade bread is incredibly satisfying, and this recipe is designed for success. Once you’ve created your masterpiece, I would absolutely love to hear about your experience! Share your photos, your variations, and your serving suggestions with me. Your culinary adventure with this delightful bread starts now!
Swirled Garlic Herb And Cheese Bread
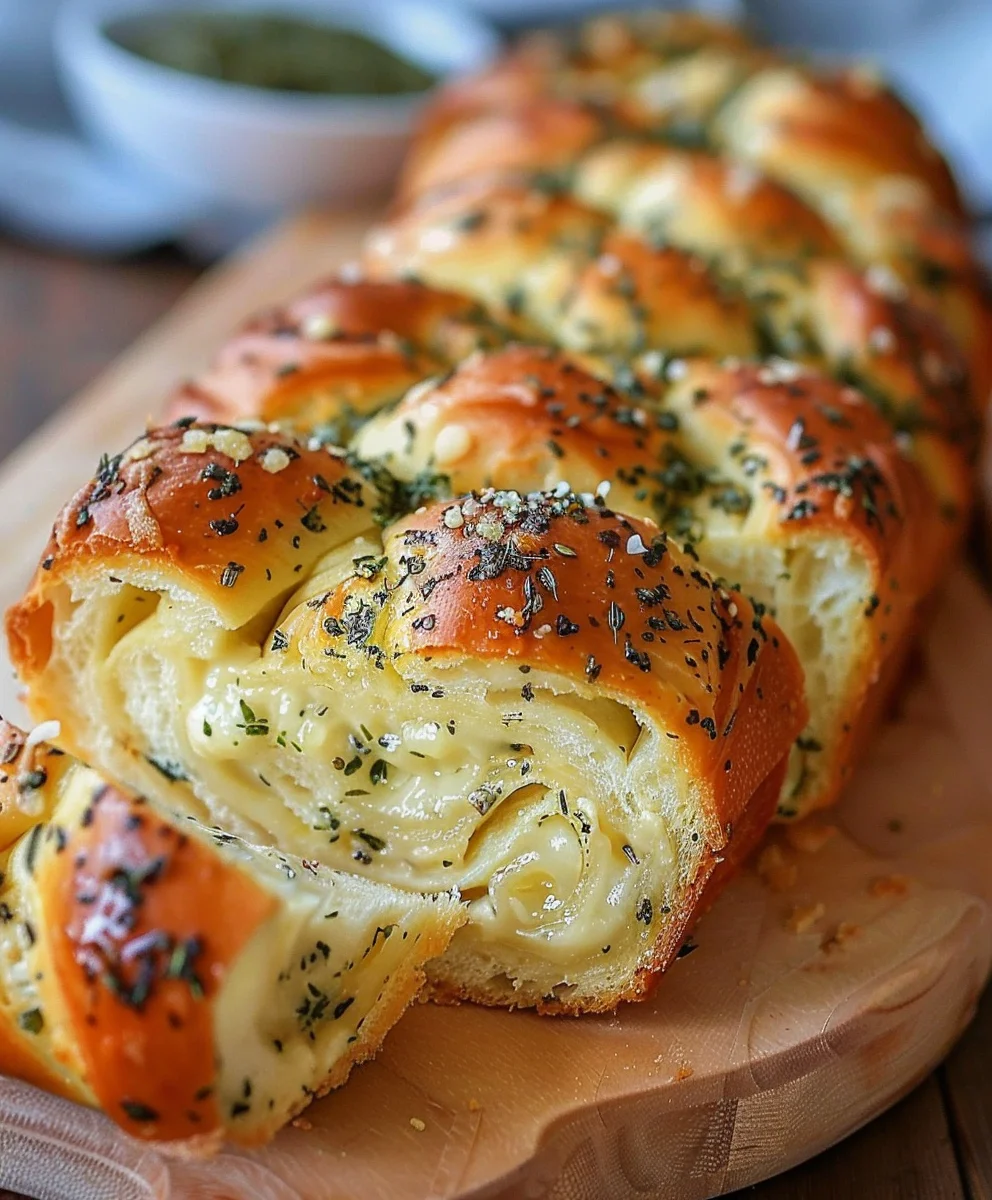
Golden, pillowy, and irresistibly aromatic, this Swirled Garlic Herb and Cheese Bread is everything your bread dreams are made of. Picture soft, buttery layers wrapped around gooey mozzarella and infused with the punch of fresh garlic and a sprinkle of herby goodness. Every slice unravels into cheesy, garlicky bliss—perfect on its own or next to a hearty pasta dish.
Ingredients
-
3 ½ cups (420-450 grams) All-Purpose Flour, plus extra for dusting
-
1 cup (240 ml) Warm Water (105-115°F / 40-46°C)
-
2 tablespoons Granulated Sugar
-
2 ¼ teaspoons (1 standard packet) Active Dry Yeast
-
¼ cup (57 grams) Unsalted Butter, melted and slightly cooled
-
1 teaspoon Salt (for dough)
-
½ cup (113 grams) Unsalted Butter, softened (for filling)
-
4-6 cloves Fresh Garlic, minced very finely
-
¼ cup Fresh Parsley, finely chopped
-
2 tablespoons Fresh Chives, finely chopped
-
1 teaspoon Dried Oregano
-
½ teaspoon Red Pepper Flakes (optional)
-
Salt and Black Pepper, to taste (for filling)
-
1 cup (about 113 grams) Shredded Mozzarella Cheese
-
½ cup (about 50 grams) Grated Parmesan Cheese
-
1 Large Egg, beaten (for egg wash, optional)
-
1 tablespoon Water or milk (for egg wash, optional)
Instructions
-
Step 1
In a large mixing bowl, combine warm water and granulated sugar. Sprinkle yeast over the top, stir gently, and let sit for 5-10 minutes until foamy. -
Step 2
Once yeast is bubbly, stir in the melted and cooled unsalted butter and 1 teaspoon salt. Gradually add all-purpose flour, about a cup at a time, until a shaggy dough forms. -
Step 3
Knead the dough on a lightly floured surface by hand for 8-10 minutes, or with a stand mixer fitted with a dough hook on medium-low speed for 6-8 minutes, until smooth and elastic. -
Step 4
Lightly grease a clean large bowl with oil. Transfer the kneaded dough, turning once to coat. Cover and let rise in a warm, draft-free spot for 1 to 1 ½ hours, or until doubled in size. -
Step 5
While the dough rises, combine the ½ cup softened unsalted butter, minced fresh garlic, chopped fresh parsley, chopped fresh chives, dried oregano, and optional red pepper flakes in a small bowl. Season generously with salt and black pepper, then mix thoroughly until uniform and aromatic. Set aside. -
Step 6
Lightly grease a 9×5 inch loaf pan (or line with parchment paper). Gently punch down the risen dough to release air and turn it out onto a lightly floured surface. Roll the dough into a large rectangle, approximately 16×12 inches (40×30 cm) and about ¼ inch thick. Spread the prepared garlic herb butter evenly over the entire surface of the rolled-out dough. -
Step 7
Evenly sprinkle the shredded mozzarella cheese and grated Parmesan cheese over the garlic herb filling, leaving a small ½-inch border along one of the longer edges. Starting from the opposite longer side, carefully and tightly roll the dough into a log. Pinch the seam closed along the bottom edge and gently tuck the ends under. -
Step 8
Choose your shaping method: 1. For a classic loaf, place the rolled log seam-side down into the prepared loaf pan. 2. For a twisted loaf, slice the log lengthwise, twist the two halves around each other, and carefully place into the pan. 3. For pull-apart buns, slice the log into 1 ½ to 2-inch thick rounds and arrange upright in the pan. Cover the pan loosely and let the dough rise again in a warm, draft-free spot for 30-45 minutes, or until noticeably puffed. -
Step 9
Preheat your oven to 375°F (190°C) about 15 minutes before the second rise ends. If using, whisk 1 large egg with 1 tablespoon of water or milk for an egg wash and gently brush it over the top of the risen bread. Carefully place the loaf pan into the preheated oven. -
Step 10
Bake for 30-35 minutes, or until the bread is deeply golden brown on top and cooked through (internal temperature 200-210°F / 93-99°C). If browning too quickly, loosely tent with aluminum foil for the last 10-15 minutes. Remove from oven and let cool in the pan for 5-10 minutes before carefully transferring to a wire rack to cool completely for at least 30 minutes before slicing and serving.
Important Information
Nutrition Facts (Per Serving)
It is important to consider this information as approximate and not to use it as definitive health advice.
Allergy Information
Please check ingredients for potential allergens and consult a health professional if in doubt.