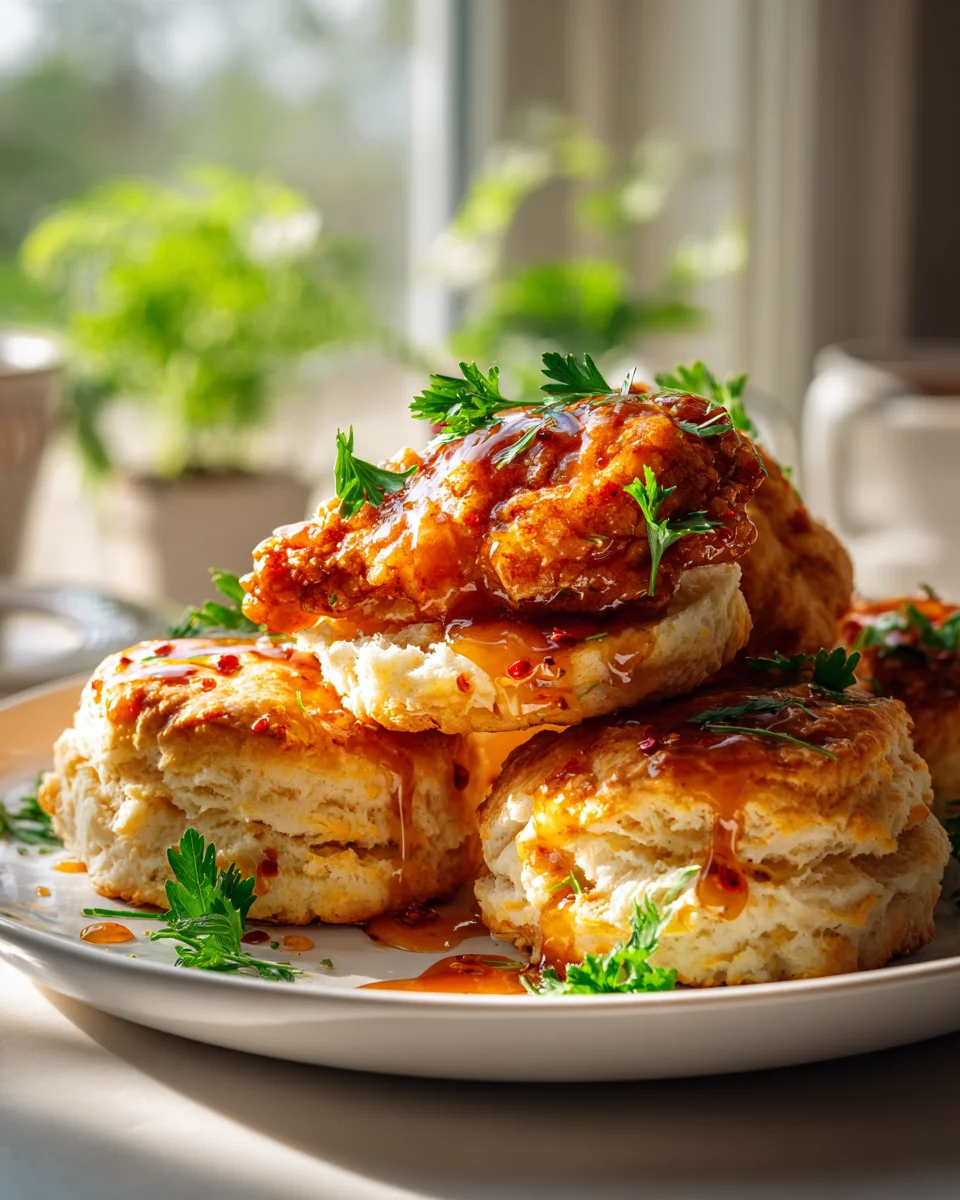
Hot Honey Chicken Biscuits
Oh my goodness, do I have a treat for you today! I’m absolutely bursting with excitement to share my recipe for these incredible Hot Honey Chicken Biscuits. This isn’t just any dish; it’s a culinary masterpiece that perfectly balances comfort with an exciting kick. If you’re anything like me, you live for those moments when sweet meets savory, and a little fiery spice ties it all together in perfect harmony. That’s exactly what makes this recipe so utterly irresistible and why I know you’re going to fall head over heels for it!
Imagine this: a perfectly golden, fluffy, and buttery biscuit, split open and generously filled with a piece of perfectly crispy, juicy chicken. But here’s the magic touch – it’s all drizzled with a glorious, sticky, sweet, and wonderfully spicy hot honey sauce. It’s the ultimate comfort food experience, elevated to a whole new level of deliciousness and excitement. Get ready to experience pure joy in every single bite; this dish is a true game-changer!

Ingredient Notes
Crafting the perfect Hot Honey Chicken Biscuit starts with understanding a few key ingredients. When I set out to make this dish, I always focus on quality and what will give us that ultimate comfort food experience. Here’s what I typically reach for:
The Chicken
- Boneless, Skinless Chicken Thighs: These are my absolute go-to for fried chicken. Thighs stay incredibly juicy and flavorful, even after deep frying, thanks to their slightly higher fat content. They tend to be more forgiving than breasts, so if you’re worried about dry chicken, thighs are your best friend.
- Substitution: If you prefer white meat, boneless, skinless chicken breasts or tenders work wonderfully too! Just be mindful that they cook a bit faster and can dry out if overcooked, so keep a close eye on them during frying.
The Biscuits
- Flaky Canned Biscuits: For ease and speed, I often grab a tube of good quality canned biscuits from the refrigerated section. They bake up golden, tender, and ready to soak up all that hot honey goodness. Look for “flaky layers” or “buttermilk” varieties for the best texture.
- Substitution: If you have the time and love to bake, homemade buttermilk biscuits are a fantastic choice and truly elevate the dish. Just ensure they are soft and fluffy enough to complement the chicken.
The Hot Honey
- Store-Bought Hot Honey: The star of the show! Many brands now offer delicious hot honey, making this component super convenient. I look for one with a good balance of sweetness and heat.
- Substitution: You can easily make your own! Simply warm about 1/2 cup of your favorite honey in a small saucepan over low heat. Stir in 1-2 teaspoons of red pepper flakes or a pinch of cayenne pepper, depending on your desired spice level. Let it steep for 5-10 minutes, then strain out the flakes for a smoother honey, or leave them in for extra texture and heat.
The Dredging Station
- All-Purpose Flour: The base for our crispy coating.
- Cornstarch: A crucial addition to the flour mixture. It helps create an extra-crispy exterior that stays crunchy longer.
- Seasonings: Salt, black pepper, paprika, garlic powder, and onion powder are my core spices for flavorful fried chicken. Feel free to adjust to your taste or add a pinch of dried oregano or thyme.
The Wet Brine/Dunk
- Buttermilk: Essential for tenderizing the chicken and helping the flour mixture adhere beautifully. The acidity in buttermilk works wonders on chicken.
- Substitution: If you don’t have buttermilk, you can make your own by adding 1 tablespoon of white vinegar or lemon juice to a measuring cup, then filling the rest with regular milk (dairy or non-dairy) to make 1 cup. Let it sit for 5-10 minutes until it slightly curdles.
For Frying
- Neutral Oil: Peanut, canola, or vegetable oil are ideal for deep frying because of their high smoke points and neutral flavor.
Optional Extras
- Pickle Slices: A few tangy pickle slices on your biscuit can cut through the richness of the chicken and honey, adding a delightful zesty crunch.
- Butter: A smear of butter on a warm biscuit before adding the chicken and hot honey is never a bad idea!
Step-by-Step Instructions
Making Hot Honey Chicken Biscuits is a surprisingly straightforward process, though it does involve a few distinct steps. I promise you, the effort is well worth the reward!
Step 1: Prep the Chicken
- First, I like to prepare my chicken. If you’re using boneless, skinless chicken thighs, I usually cut them into pieces roughly the size of your biscuit, about 2-3 inches. If using breasts or tenders, you can leave tenders whole or cut larger breasts into similar-sized pieces.
- In a medium bowl, I pour in enough buttermilk to completely submerge the chicken pieces. I add a pinch of salt and pepper to the buttermilk for extra flavor. Let the chicken soak in the buttermilk for at least 30 minutes in the refrigerator, or even better, overnight. This step is critical for tender, juicy chicken and helps the breading stick.
Step 2: Bake the Biscuits
- While the chicken is brining, I preheat my oven according to the instructions on my chosen canned biscuit package (usually around 350-375°F / 175-190°C).
- I arrange the biscuits on a baking sheet, leaving a little space between each, and bake them until they’re golden brown and fluffy, typically 12-15 minutes. Once done, I take them out and let them cool slightly while I prepare the chicken.
Step 3: Prepare the Dredging Station
- In a shallow dish or a large resealable bag, I combine the all-purpose flour, cornstarch, 1 teaspoon of salt, 1/2 teaspoon of black pepper, 1 teaspoon of paprika, 1 teaspoon of garlic powder, and 1/2 teaspoon of onion powder. I whisk or shake this mixture well to ensure all the seasonings are evenly distributed.
Step 4: Dredge the Chicken
- Working with one piece of chicken at a time, I remove it from the buttermilk, letting any excess drip off.
- Then, I place the chicken into the flour mixture, making sure to coat it completely. I press the flour onto the chicken firmly to create a good crust.
- I shake off any excess flour and place the dredged chicken on a wire rack set over a baking sheet. This allows the coating to set a bit while I finish the rest of the chicken, which helps it adhere better during frying.
Step 5: Fry the Chicken
- In a large, heavy-bottomed skillet or Dutch oven, I pour in enough neutral oil (peanut, canola, or vegetable) to reach a depth of about 1 to 1.5 inches. I heat the oil over medium-high heat until it reaches 350°F (175°C). If you don’t have a thermometer, you can test it by dropping a tiny pinch of flour into the oil; it should sizzle immediately.
- Carefully, I add the dredged chicken pieces to the hot oil, making sure not to overcrowd the pan. Fry the chicken in batches if necessary, as overcrowding can drop the oil temperature and lead to soggy chicken.
- Fry for about 4-6 minutes per side, or until the chicken is a beautiful golden brown and cooked through. The internal temperature should reach 165°F (74°C).
- Once cooked, I use tongs to transfer the fried chicken to a wire rack set over a paper towel-lined baking sheet to drain any excess oil.
Step 6: Assemble Your Biscuits
- While the chicken is still warm, I grab those fluffy biscuits. I carefully slice each biscuit in half horizontally.
- If desired, I’ll spread a thin layer of butter on the cut sides of the biscuits.
- On the bottom half of each biscuit, I place a piece of crispy fried chicken.
- Finally, I generously drizzle the hot honey over the chicken. For an extra touch, I might add a few pickle slices on top before placing the biscuit top on. Serve immediately and enjoy the magic!
Tips & Suggestions
Having made countless batches of these delicious Hot Honey Chicken Biscuits, I’ve picked up a few tricks that I love to share. These tips will help you achieve the best possible results and might even inspire some fun variations!
Biscuit Brilliance
- Fluffy Biscuits are Key: The foundation of this dish is the biscuit, so don’t skimp on quality. Whether homemade or store-bought, aim for a biscuit that is light, fluffy, and has a slightly crisp exterior, but a tender, moist interior. This texture contrast with the crispy chicken is what makes each bite heavenly. Warm biscuits are a must for melting the butter and truly enhancing the experience.
- A Touch of Butter: Don’t underestimate the power of a little butter! Spreading a thin layer of softened butter on the inside of your warm, split biscuit before adding the chicken can add another layer of richness and flavor that beautifully complements the hot honey.
Chicken Perfection
- Don’t Overcrowd the Pan: This is a golden rule for frying chicken. Overcrowding drops the oil temperature significantly, leading to chicken that absorbs too much oil and turns out greasy and soggy, not crispy. Fry in batches and maintain a consistent oil temperature of 350°F (175°C) for the crispiest results.
- Let the Coating Set: After dredging your chicken, let it rest on a wire rack for 10-15 minutes. This allows the flour mixture to absorb some moisture from the chicken and adhere better, resulting in a more robust and less crumbly crust when fried.
- Season Liberally: Don’t be shy with your seasonings in the flour mixture! Flavoring the dredge is crucial, as it’s a big part of the chicken’s taste. Taste your flour mixture (before adding chicken, of course!) and adjust salt and spices as needed.
Hot Honey Customization
- Adjust the Heat: The beauty of hot honey is its versatility. If you’re making your own, you can easily dial the spice up or down. For more heat, add extra red pepper flakes or a dash of cayenne. For a milder version, use fewer flakes. You can also infuse different types of chilies for unique flavor profiles.
- Beyond the Drizzle: While a generous drizzle is classic, you can also lightly brush the fried chicken with hot honey on both sides immediately after it comes out of the oil. This ensures every nook and cranny gets coated.
Serving Suggestions
- The Pickle Factor: A few thin slices of bread and butter pickles or dill pickles inside your biscuit are a game-changer! Their tangy, briny crunch cuts through the richness of the fried chicken and the sweetness of the honey, creating a perfectly balanced bite.
- A Side of Slaw: For a complete meal, I often serve these with a simple, creamy coleslaw. The crisp, cool slaw offers a refreshing counterpoint to the warm, spicy sandwich.
- A Touch of Green: A sprinkle of fresh chives or finely chopped cilantro on top can add a pop of color and a fresh herbal note.
Storage
While Hot Honey Chicken Biscuits are undeniably at their best when eaten fresh, sometimes you might have leftovers, or perhaps you want to get a head start on some components. Here’s how I approach storing and reheating this delicious dish.
Individual Component Storage (Recommended)
For the best quality, I always recommend storing the main components separately. This prevents sogginess and allows each part to be reheated optimally.
- Fried Chicken:
- Once the fried chicken has cooled completely to room temperature, place it in an airtight container.
- Store in the refrigerator for up to 3-4 days.
- Reheating: To restore crispiness, my preferred method is to reheat the chicken in an oven or air fryer. Preheat your oven to 375°F (190°C) or air fryer to 350°F (175°C). Place the chicken on a wire rack set over a baking sheet and heat for 10-15 minutes, or until heated through and crispy. A microwave can be used for speed, but the chicken won’t be as crispy.
- Biscuits:
- Store leftover biscuits in an airtight container or bag at room temperature for 1-2 days, or in the refrigerator for up to 3-4 days.
- Reheating: Warm biscuits in a preheated oven at 300°F (150°C) for about 5-7 minutes, or until soft and warm. A quick zap in the microwave (10-15 seconds) also works, but they won’t be as crisp.
- Hot Honey:
- Store homemade or opened store-bought hot honey in a sealed container at room temperature, away from direct sunlight. It should keep well for several weeks or even months. Honey is a natural preservative, but check for any changes in smell or appearance if storing for very long periods.
- No special reheating is typically needed for the honey; it’s usually served at room temperature.
Assembled Biscuits
If you’ve already assembled your Hot Honey Chicken Biscuits and have leftovers, they can be stored:
- Place the assembled biscuits in an airtight container.
- Refrigerate for up to 1-2 days.
- Reheating: Reheating an assembled biscuit can be tricky, as the biscuit might become a bit soggy from the chicken and honey, and the chicken won’t regain its full crispiness. However, you can try reheating in an oven at 300°F (150°C) for about 10-15 minutes, or until warmed through. The microwave is an option for speed but will result in a softer texture. I personally recommend disassembling and reheating components separately for the best experience!
Always ensure that any stored food is cooled completely before placing it in the refrigerator to prevent condensation and bacterial growth. Enjoy your delicious hot honey chicken biscuits!
Final Thoughts
And there you have it! I truly hope you’re as excited as I am about these incredible Hot Honey Chicken Biscuits. This isn’t just another meal; it’s a symphony of flavors and textures designed to delight. Imagine that perfectly crispy, tender chicken, coated in a sticky-sweet and fiery hot honey glaze, nestled between the warm, fluffy halves of a homemade biscuit. It’s the kind of dish that hits all the right notes – savory, sweet, and with that unforgettable kick of heat that makes you crave just one more bite.
I promise you, these Hot Honey Chicken Biscuits are a game-changer. Whether you’re looking for a show-stopping brunch item, a comforting dinner, or just an indulgent treat, this recipe delivers big on flavor and satisfaction. Don’t hesitate to give them a try; you’ll be so glad you did. Get ready to fall in love with your new favorite comfort food!

Sweet & Spicy Hot Honey Chicken Biscuits: A Must-Try!
- Total Time: 1 hour
- Yield: 4 servings
Description
Experience the perfect balance of sweet and savory with these Hot Honey Chicken Biscuits. Crispy chicken, fluffy biscuits, and a drizzle of spicy hot honey create a culinary masterpiece that you won’t forget!
Ingredients
- Boneless, Skinless Chicken Thighs
- Buttermilk
- Flaky Canned Biscuits
- Store-Bought Hot Honey
- All-Purpose Flour
- Cornstarch
- Salt
- Black Pepper
- Paprika
- Garlic Powder
- Onion Powder
- Neutral Oil (Peanut, Canola, or Vegetable)
- Pickle Slices (optional)
- Butter (optional)
Instructions
- Step 1: Prep the Chicken – Cut the chicken into pieces roughly the size of your biscuit. Soak the chicken in buttermilk with a pinch of salt and pepper for at least 30 minutes, or overnight.
- Step 2: Bake the Biscuits – Preheat the oven according to the biscuit package instructions. Arrange the biscuits on a baking sheet and bake until golden brown and fluffy, about 12-15 minutes.
- Step 3: Prepare the Dredging Station – In a shallow dish, combine all-purpose flour, cornstarch, salt, black pepper, paprika, garlic powder, and onion powder. Mix well.
- Step 4: Dredge the Chicken – Remove chicken from buttermilk, let excess drip off, and coat in the flour mixture. Place on a wire rack to set.
- Step 5: Fry the Chicken – Heat neutral oil in a skillet to 350°F (175°C). Fry chicken pieces in batches for 4-6 minutes per side until golden brown and cooked through. Drain on a wire rack.
- Step 6: Assemble Your Biscuits – Slice each biscuit in half, optionally spread butter on the cut sides, add a piece of chicken, and drizzle with hot honey. Optionally add pickle slices before placing the biscuit top on.
- Prep Time: 30 mins
- Cook Time: 30 mins
- Category: Dinner
- Method: Frying and Baking
- Cuisine: American
Nutrition
- Serving Size: 1 biscuit with chicken
- Calories: 450
- Sugar: 10 g
- Sodium: 800 mg
- Fat: 25 g
- Saturated Fat: 5 g
- Unsaturated Fat: 15 g
- Trans Fat: 0 g
- Carbohydrates: 35 g
- Fiber: 2 g
- Protein: 20 g
- Cholesterol: 70 mg
Keywords: For best results, use quality ingredients. Adjust seasonings to your taste, and consider making your own hot honey by adding red pepper flakes to warmed honey.