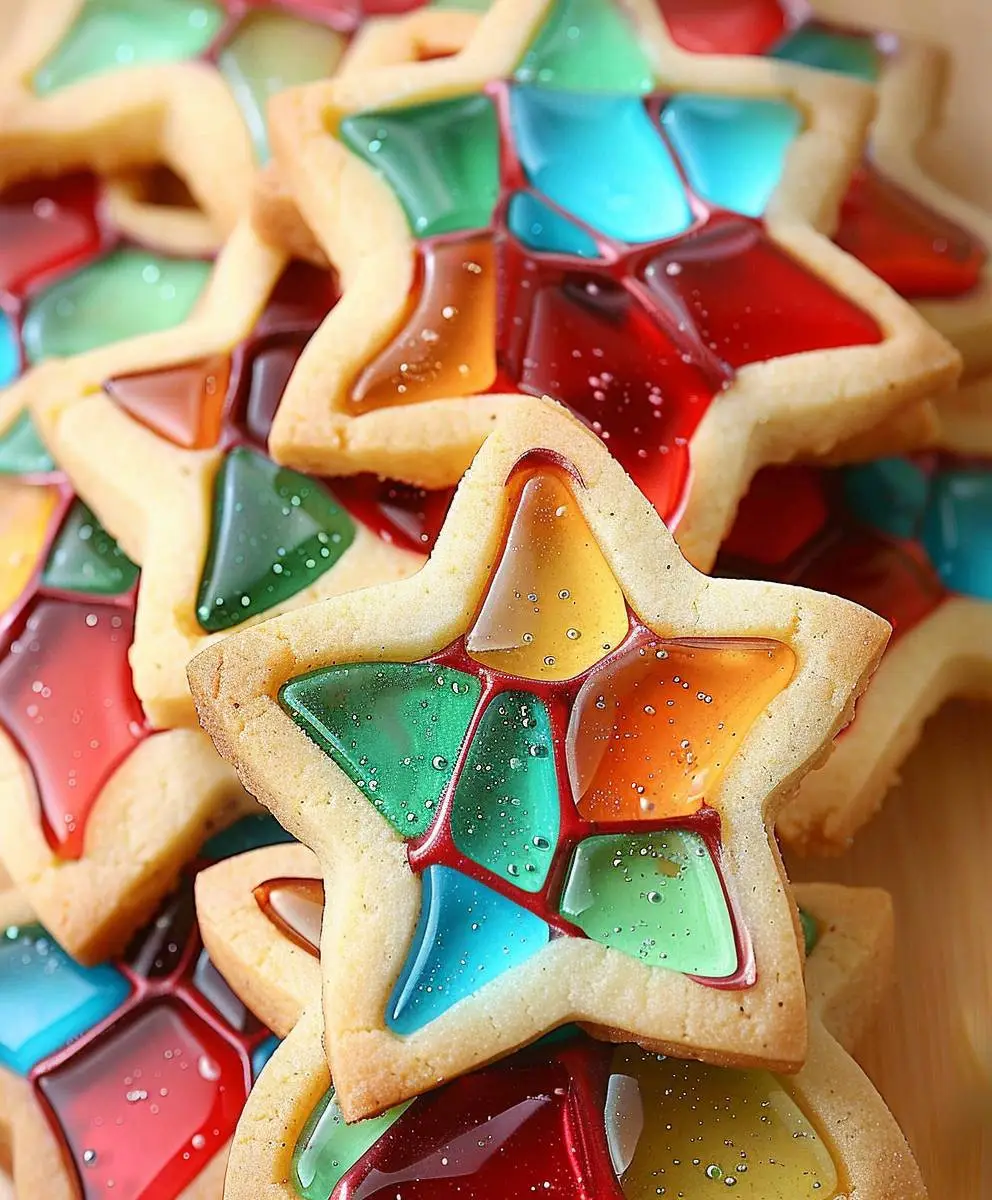
Stained Glass Cookies
Stained Glass Cookies: Have you ever wished you could capture the vibrant beauty of a cathedral’s stained glass window and enjoy it…edible? Well, with this recipe, you can! These aren’t your average holiday cookies; they’re a breathtaking culinary masterpiece that’s as fun to make as it is to devour. I’ve been making these Stained Glass Cookies for years, and they’re always a showstopper, guaranteed to impress even the most discerning palates.
While the precise origins are a little hazy, the concept of incorporating colorful candy melts into cookies to create a stained-glass effect has become a beloved tradition, particularly around the holidays. The visual appeal alone makes them perfect for festive gatherings, but their deliciousness ensures they’ll disappear quickly! Think of the rich, buttery shortbread base, providing a delightful contrast to the sweet, chewy candy centers. It’s a symphony of textures and flavors.
People adore these cookies for several reasons. First, the stunning visual impact is undeniable. They’re truly works of art, making them ideal for gifting or adding a touch of elegance to any occasion. Second, the combination of the crisp cookie and the gooey candy filling is simply irresistible. It’s a perfect balance of sweet and buttery, crunchy and chewy. And finally, while they look incredibly impressive, they’re surprisingly easy to make, even for beginner bakers. So, gather your ingredients and prepare to be amazed as you create your own batch of these captivating Stained Glass Cookies.

Ingredients:
- For the Cookies:
- 1 cup (2 sticks) unsalted butter, softened
- 1 ½ cups granulated sugar
- 2 large eggs
- 1 teaspoon vanilla extract
- 3 ½ cups all-purpose flour
- 1 teaspoon baking soda
- ½ teaspoon salt
- For the Icing:
- 4 cups powdered sugar
- ¼ cup meringue powder (this helps the icing stay firm and glossy)
- ½ cup milk (or more, as needed for consistency)
- Gel food coloring in assorted bright colors (red, yellow, blue, green, etc.)
- Small piping bags or zip-top bags with corners snipped off
- Toothpicks or small skewers
Preparing the Cookie Dough:
- Preheat your oven to 375°F (190°C). Line baking sheets with parchment paper. This is crucial for easy cleanup and prevents sticking.
- In a large bowl, cream together the softened butter and granulated sugar until the mixture is light and fluffy. I usually use an electric mixer for this step; it saves time and effort. Make sure the butter is truly softened, not melted, for the best results.
- Beat in the eggs one at a time, then stir in the vanilla extract. Scrape down the sides of the bowl to ensure everything is well combined.
- In a separate bowl, whisk together the flour, baking soda, and salt. Gradually add the dry ingredients to the wet ingredients, mixing on low speed until just combined. Be careful not to overmix; overmixing can lead to tough cookies.
- Once the dough is formed, I like to chill it for at least 30 minutes. This helps prevent the cookies from spreading too much during baking and makes them easier to handle.
- After chilling, roll out the dough on a lightly floured surface to about ¼ inch thickness. Use cookie cutters to cut out your desired shapes. I find that round or square shapes work best for the stained-glass effect, but feel free to experiment!
- Place the cut-out cookies onto the prepared baking sheets, leaving a little space between each one. This allows for even baking and prevents them from sticking together.
- Bake for 8-10 minutes, or until the edges are lightly golden brown. Keep a close eye on them, as oven temperatures can vary.
- Remove the baking sheets from the oven and let the cookies cool on the sheets for a few minutes before transferring them to a wire rack to cool completely. This prevents them from becoming soggy.
Making the Icing:
- In a large bowl, combine the powdered sugar and meringue powder. Gradually add the milk, mixing with a spoon or electric mixer until you achieve a smooth, creamy consistency. Start with less milk and add more as needed; you want a consistency that’s thick enough to hold its shape but not so thick that it’s difficult to pipe.
- Divide the icing into several smaller bowls. Add a few drops of gel food coloring to each bowl and mix thoroughly until you achieve your desired shades. Gel food coloring is more vibrant and less likely to affect the icing’s consistency than liquid food coloring.
- Transfer the icing to piping bags or zip-top bags with the corners snipped off. If using zip-top bags, make sure to seal the bag tightly before snipping the corner. I find that using different piping tips or varying the size of the snipped corner creates different icing effects.
Assembling the Stained Glass Cookies:
- Once the cookies are completely cool, carefully pipe outlines around the edges of each cookie using a contrasting color. This creates a frame for your “stained glass” effect.
- Next, fill in the outlined sections with different colored icings. I like to use a variety of colors to create a vibrant and colorful effect. Try to keep the icing lines relatively straight and even.
- Important Tip: If you want a truly “stained glass” look, don’t let the icing completely fill the space. Leave small gaps between the colors to allow the cookie to show through. This creates a beautiful translucent effect.
- Use toothpicks or small skewers to gently swirl the colors together, creating a marbled effect. Be careful not to over-mix, as you want to maintain the distinct colors.
- Let the icing set completely before serving or storing. This can take several hours, or even overnight, depending on the humidity and temperature. I usually let them set overnight to ensure they are completely firm.
- Once the icing is set, you can carefully stack the cookies if desired, but handle them gently to avoid smudging the icing.
Storage:
- Store your stained glass cookies in an airtight container at room temperature for up to a week. They are best enjoyed fresh, but they will still be delicious after a few days.
Conclusion:
So there you have it – my recipe for stunning Stained Glass Cookies! I truly believe this recipe is a must-try for several reasons. First, the visual impact is undeniable. These cookies are works of art, perfect for impressing guests at any gathering, from holiday parties to casual get-togethers. The vibrant, jewel-toned candies create a truly mesmerizing effect, making them a conversation starter guaranteed to delight everyone.
Beyond their beauty, these Stained Glass Cookies boast a delicious flavor profile. The buttery, melt-in-your-mouth cookie base provides the perfect canvas for the sweet, chewy candy filling. I’ve carefully balanced the sweetness with a hint of vanilla, creating a cookie that’s both satisfying and not overly sugary. It’s the perfect combination of texture and taste – a delightful experience from the first bite to the last.
Furthermore, this recipe is surprisingly easy to execute, even for beginner bakers. The step-by-step instructions are clear and concise, guiding you through each stage of the process with ease. Don’t be intimidated by the beautiful final product; with a little patience and attention to detail, you’ll be creating your own masterpieces in no time. And the best part? The cleanup is relatively straightforward, leaving you with more time to enjoy your delicious creations.
Serving Suggestions & Variations:
These Stained Glass Cookies are incredibly versatile. They’re delightful on their own, but you can also elevate them with a dusting of powdered sugar, a drizzle of melted chocolate, or a sprinkle of festive sprinkles. For a more sophisticated touch, consider serving them alongside a cup of hot cocoa, a strong coffee, or a glass of chilled milk. They also pair beautifully with a scoop of vanilla ice cream for a truly decadent treat.
Feel free to experiment with different candy colors and flavors to create your own unique designs. Try using crushed peppermint candies for a festive twist during the holidays, or incorporate colorful jelly beans for a brighter, more playful look. You can even use different types of hard candies, experimenting with different flavors and textures to find your perfect combination. The possibilities are truly endless!
Perhaps you’d like to try using different cookie cutters to create unique shapes. Heart-shaped cookies for Valentine’s Day, star-shaped cookies for the Fourth of July, or even custom-shaped cutters for birthdays and other special occasions. The beauty of this recipe is its adaptability; you can personalize it to suit any occasion or theme.
Encourage Your Creativity!
Don’t be afraid to get creative and make these cookies your own. This recipe is a starting point, a foundation upon which you can build your own culinary masterpiece. Let your imagination run wild and experiment with different flavors, colors, and shapes. The most important thing is to have fun and enjoy the process!
Share Your Creations!
I would absolutely love to see your Stained Glass Cookie creations! Once you’ve had a chance to bake these beauties, please share your photos and experiences on social media using the hashtag #StainedGlassCookies. I can’t wait to see the stunning results of your baking adventures. And don’t forget to let me know what candy combinations you experimented with and which ones became your favorites!
So, what are you waiting for? Gather your ingredients, preheat your oven, and get ready to create some truly magical Stained Glass Cookies. You won’t regret it!
Stained Glass Cookies: A Festive Holiday Treat Recipe
Vibrant, colorful cookies with a beautiful stained-glass effect, perfect for holidays or any celebration!
Ingredients
Instructions
Recipe Notes
- Softened butter is crucial for a light and fluffy cookie.
- Don’t overmix the cookie dough to prevent tough cookies.
- Chilling the dough prevents spreading during baking.
- Gel food coloring provides vibrant colors without thinning the icing.
- Allow ample time for the icing to set completely.
- Store cookies in an airtight container at room temperature for up to a week.