Halloween Oreo Stuffed Chocolate Chip Cookies are not just a dessert; they are an experience, a delightful fusion of classic comfort and festive fun that truly captures the spirit of the season. I’ve always believed that the best treats are those that bring a smile and a little surprise, and this recipe absolutely delivers.
Imagine sinking your teeth into a perfectly chewy, golden-brown chocolate chip cookie, only to discover a whole, crunchy Oreo cookie nestled within, its creamy filling a secret center of indulgence.
It’s the ultimate upgrade to a beloved classic, perfectly suited for the spookiest time of the year. Halloween, a holiday steeped in tradition and playful mischief, is synonymous with creative treats and delightful confections. While candy corn and caramel apples have their place, these cookies offer a modern, homemade twist that truly elevates the celebratory spread. People adore these cookies not only for their incredible taste – the harmonious blend of rich chocolate, buttery cookie, and the iconic chocolate-and-cream of an Oreo – but also for the wonderful texture contrast and the sheer novelty. They’re visually appealing, incredibly satisfying, and frankly, just plain fun to make and share. This year, I am thrilled to help you create the most memorable Halloween Oreo Stuffed Chocolate Chip Cookies that will undoubtedly be the star of any ghoulish gathering or a perfect treat for a cozy night in.

Ingredients:
- For the Chocolate Chip Cookie Dough:
- 2 ½ cups (300g) all-purpose flour, spooned and leveled
- 1 teaspoon baking soda
- 1 teaspoon salt
- 1 cup (226g) unsalted butter, softened completely to room temperature
- ¾ cup (150g) granulated sugar
- 1 cup (200g) packed light brown sugar
- 2 large eggs, at room temperature
- 2 teaspoons pure vanilla extract
- 1 ½ cups (270g) semi-sweet chocolate chips (or a mix of milk and dark chocolate chips for varied texture)
- For the Stuffing:
- 1 (13.2 oz) package Halloween Oreo cookies (the ones with the festive orange creme are perfect for this!)
- Optional Embellishments:
- Extra chocolate chips for sprinkling on top before baking
- Halloween-themed sprinkles (ensure they are oven-safe if applying before baking)
Preparing the Irresistible Cookie Dough
- First things first, let’s get our oven ready. Preheat your oven to 375°F (190°C). Then, line two large baking sheets with parchment paper or silicone baking mats. This is super important to prevent sticking and ensure even baking for our generously sized cookies. Trust me, you don’t want these beauties getting stuck!
- In a medium bowl, whisk together the dry ingredients: the all-purpose flour, baking soda, and salt. Make sure these are well combined. We want that baking soda evenly distributed to help our cookies rise beautifully and prevent any salty surprises in one bite. Set this bowl aside for now.
- Now, in a large bowl, using an electric mixer (either a stand mixer with a paddle attachment or a handheld mixer will work wonders), cream together the softened unsalted butter with both the granulated sugar and the light brown sugar. You’ll want to beat this mixture on medium speed until it’s wonderfully light and fluffy, usually about 2-3 minutes. This creaming process is vital because it incorporates air into the butter and sugar, which contributes to a light and tender cookie texture. Don’t rush this step!
- Next, beat in the two large eggs, one at a time, ensuring each egg is fully incorporated before adding the next. After the eggs, stir in the pure vanilla extract. Vanilla is the backbone of any great chocolate chip cookie, adding that classic warmth and depth of flavor we all adore. Scrape down the sides of the bowl as needed to ensure everything is evenly mixed.
- Gradually add the dry ingredients mixture to the wet ingredients, mixing on low speed until just combined. It’s really important not to overmix at this stage. Overmixing can develop the gluten in the flour too much, leading to tougher cookies, and we are definitely aiming for soft, chewy perfection here. As soon as you see no more streaks of flour, stop mixing.
- Finally, it’s time for the star of the show (besides the Oreos, of course!): the chocolate chips! Gently fold in the semi-sweet chocolate chips by hand using a spatula. We want them evenly distributed throughout the dough, ready to melt into gooey pockets of chocolatey goodness.
- Now, here’s a pro tip that makes a huge difference, especially with stuffed cookies: Cover the dough and refrigerate it for at least 30 minutes, or up to 2 hours. This chilling time allows the butter to firm up, which helps prevent the cookies from spreading too much during baking, and it also gives the flavors a chance to meld. This is particularly crucial for these Halloween Oreo Stuffed Chocolate Chip Cookies to ensure they hold their shape beautifully around the Oreo.
The Fun Part: Stuffing and Shaping Our Halloween Delights
- While your dough is chilling, unwrap your package of Halloween Oreo cookies. You’ll need one Oreo for each cookie you plan to make. I find that this recipe yields about 18-24 generously sized cookies, depending on how much dough you use for each.
- Once your cookie dough is nicely chilled, take it out of the refrigerator. Using a large cookie scoop (about 2-3 tablespoons worth) or by simply measuring, take a portion of dough and gently flatten it in the palm of your hand into a disc, roughly 3 inches in diameter. You want it thin enough to wrap, but not so thin it tears.
- Carefully place one Halloween Oreo cookie in the center of the flattened cookie dough disc.
- Now for the magic! Gently bring the edges of the cookie dough up and around the Oreo, completely enveloping it. It’s crucial that the Oreo is fully covered by the dough, with no gaps or exposed sections. This prevents the Oreo from burning or drying out during baking and keeps that wonderful orange creme safely tucked inside. Take your time with each one, ensuring a complete seal.
- Once the Oreo is completely covered, gently roll the dough in your hands to form a smooth, round ball. Place the stuffed cookie dough ball onto your prepared baking sheets, leaving about 2-3 inches between each cookie. These are going to spread a bit, and we want to give them plenty of room to grow into magnificent, giant cookies.
- If you’re using extra chocolate chips or Halloween sprinkles, now’s the time to gently press a few onto the top of each cookie dough ball. This adds an extra layer of visual appeal and makes them even more festive for the occasion. It’s totally optional, but highly recommended for that extra “wow” factor!
Baking Our Halloween Oreo Stuffed Chocolate Chip Cookies
- Carefully transfer the baking sheets to your preheated oven. Bake one sheet at a time for best results, or if your oven bakes evenly, you can bake two sheets at once, rotating them halfway through baking.
- Bake for 12-15 minutes, or until the edges are golden brown and set, but the centers still look slightly soft and gooey. Every oven is a little different, so keep a close eye on them. You want them to be perfectly baked – not underdone so they fall apart, and definitely not overdone, which can make them dry. The slightly soft center is key to that ultimate chewy texture.
- Once baked, remove the baking sheets from the oven. Allow the cookies to cool on the baking sheets for at least 10-15 minutes before attempting to move them. These cookies are quite large and tender right out of the oven, and cooling on the sheet allows them to firm up without breaking. This step is non-negotiable!
- After the initial cooling period on the baking sheets, carefully transfer the cooled (but still warm!) cookies to a wire rack to cool completely. The wire rack allows air to circulate around them, preventing the bottoms from getting soggy.
- Once completely cooled, or even while they’re still slightly warm and gooey from the oven, these Halloween Oreo Stuffed Chocolate Chip Cookies are ready to be devoured! The aroma filling your kitchen will be absolutely irresistible, I promise you.
Tips for Perfect Halloween Oreo Stuffed Cookies & Storage
- Room Temperature Ingredients: Always ensure your butter and eggs are at room temperature. This is not just a suggestion; it genuinely helps everything cream together smoothly and creates a more emulsified, consistent dough texture, which translates to a better cookie. If your butter isn’t soft enough, it won’t cream properly, and if your eggs are cold, they can seize the butter, affecting the final texture.
- Don’t Skip the Chill: I can’t stress this enough! Chilling the dough isn’t just for flavor development; it also prevents your cookies from spreading too much and helps them maintain their glorious, thick shape around the Oreo. If you’re short on time, even 30 minutes makes a noticeable difference.
- Seal the Oreo Completely: When wrapping the dough around the Oreo, be meticulous. Any exposed part of the Oreo might burn or dry out during baking, compromising the soft, chewy interior we’re aiming for. A fully sealed Oreo means a perfectly gooey surprise inside.
- Use Good Quality Chocolate: Since chocolate chips are a major component, using good quality ones can elevate your cookies. Whether you prefer semi-sweet, milk, or a mix of dark and milk, choose a brand you enjoy eating on its own. If you want extra gooeyness, consider using chopped chocolate bars instead of chips.
- Parchment Paper is Your Friend: While silicone mats are fantastic, parchment paper also works wonders for preventing sticking and ensuring easy cleanup. For such large, potentially sticky cookies, it’s a must-have.
- Don’t Overbake: This is a golden rule for all cookies, but especially for these. The cookies will continue to cook slightly from residual heat once they’re out of the oven. Aim for set edges and a slightly underbaked, gooey center. This is the secret to a soft and chewy texture.
- Storage: Once completely cooled, store your Halloween Oreo Stuffed Chocolate Chip Cookies in an airtight container at room temperature for up to 3-4 days. For longer storage, you can freeze them for up to 2-3 months. To enjoy from frozen, simply let them thaw at room temperature or warm them gently in the microwave for a few seconds for that fresh-baked feel.
- Make it Your Own: While the Halloween Oreos are festive and fun, feel free to experiment with other Oreo flavors for different occasions. Double-stuffed Oreos, peanut butter Oreos, or even mint Oreos could make fantastic variations!
- Serving Suggestion: These cookies are incredible on their own, but if you’re feeling extra indulgent, serve them warm with a scoop of vanilla bean ice cream. The contrast of the warm, chewy cookie with the cold, melting ice cream is absolutely divine. A tall glass of cold milk is also the perfect companion.

Conclusion:
And there you have it, my friends! We’ve reached the sweet end of our journey, but truly, it’s just the beginning of your own delicious adventure. If there’s one recipe I could implore you to try, it would undoubtedly be this one. These aren’t just cookies; they are a delightful experience, a culinary magic trick that never fails to bring smiles. Imagine biting into a warm, chewy chocolate chip cookie, perfectly golden brown on the edges, only to discover a creamy, crunchy Oreo surprise waiting for you in the very center. It’s an unexpected textural symphony and a flavor explosion that truly elevates the humble cookie to something extraordinary. I promise you, the joy of watching someone’s face light up with that delightful “aha!” moment when they discover the hidden treasure within is absolutely priceless.
What makes these cookies an absolute must-try isn’t just their incredible taste, but also the sheer fun of creating them. There’s a certain satisfaction in pressing that Oreo into the soft dough, knowing the delicious secret you’re about to bake into existence. They’re perfect for literally any occasion that calls for a touch of whimsy and a whole lot of deliciousness. From cozy movie nights with family to bustling potlucks and even as a thoughtful homemade gift, these cookies are guaranteed to be a hit. They represent the ultimate comfort food elevated, a familiar favorite given a thrilling new twist. Trust me, once you experience the chewy, melty chocolate chip cookie goodness combined with the unmistakable crunch and creaminess of an Oreo, your cookie expectations will be forever changed.
Elevate Your Cookie Experience: Serving Suggestions & Creative Variations
While these cookies are utterly phenomenal straight from the oven, still warm and gooey, there are so many wonderful ways to enjoy them. For the ultimate indulgence, serve them warm with a scoop of vanilla bean ice cream, allowing the residual heat to slightly melt the ice cream into a glorious puddle of deliciousness. A tall glass of cold milk is, of course, a timeless pairing that truly brings out their comforting charm. For a slightly more sophisticated dessert, crumble them over a bowl of Greek yogurt with some fresh berries, adding a fantastic texture contrast and a burst of flavor. They also make a fantastic addition to any dessert board, standing out with their unique profile and undeniable charm.
But don’t stop there! The beauty of these cookies lies in their versatility. For a fun twist, consider experimenting with different Oreo flavors. Think Birthday Cake Oreos for an extra sprinkle of cheer, Mint Oreos for a refreshing kick, or even Golden Oreos for a vanilla-on-vanilla dream. You could also mix in different types of chocolate chips – white chocolate, dark chocolate, or even peanut butter chips would add another layer of flavor. For a truly festive touch, especially if you’re making the Halloween Oreo Stuffed Chocolate Chip Cookies, consider adding a few drops of orange or purple food coloring to a portion of your cookie dough, or sprinkle some spooky-themed nonpareils or sprinkles on top before baking. A dash of flaky sea salt on top before baking also wonderfully enhances the chocolate notes and adds a subtle crunch. The possibilities for customization are truly endless, allowing you to make these delightful treats uniquely yours.
So, now it’s your turn! I genuinely hope you feel inspired to roll up your sleeves, preheat your oven, and dive into making these incredible cookies. This recipe isn’t just about following instructions; it’s about embracing the joy of baking and sharing something truly special with those you care about. I absolutely cannot wait for you to experience the magic of these Halloween Oreo Stuffed Chocolate Chip Cookies for yourself. Please, do me a favor and give them a try. And when you do, don’t keep your masterpieces a secret! I would be absolutely thrilled to see your creations. Share your photos, your baking triumphs, and your delightful experiences. Tag me or simply tell me all about it. Your feedback and your joy are what make sharing these recipes so incredibly rewarding for me. Happy baking, my friends, and get ready for a truly unforgettable cookie experience!
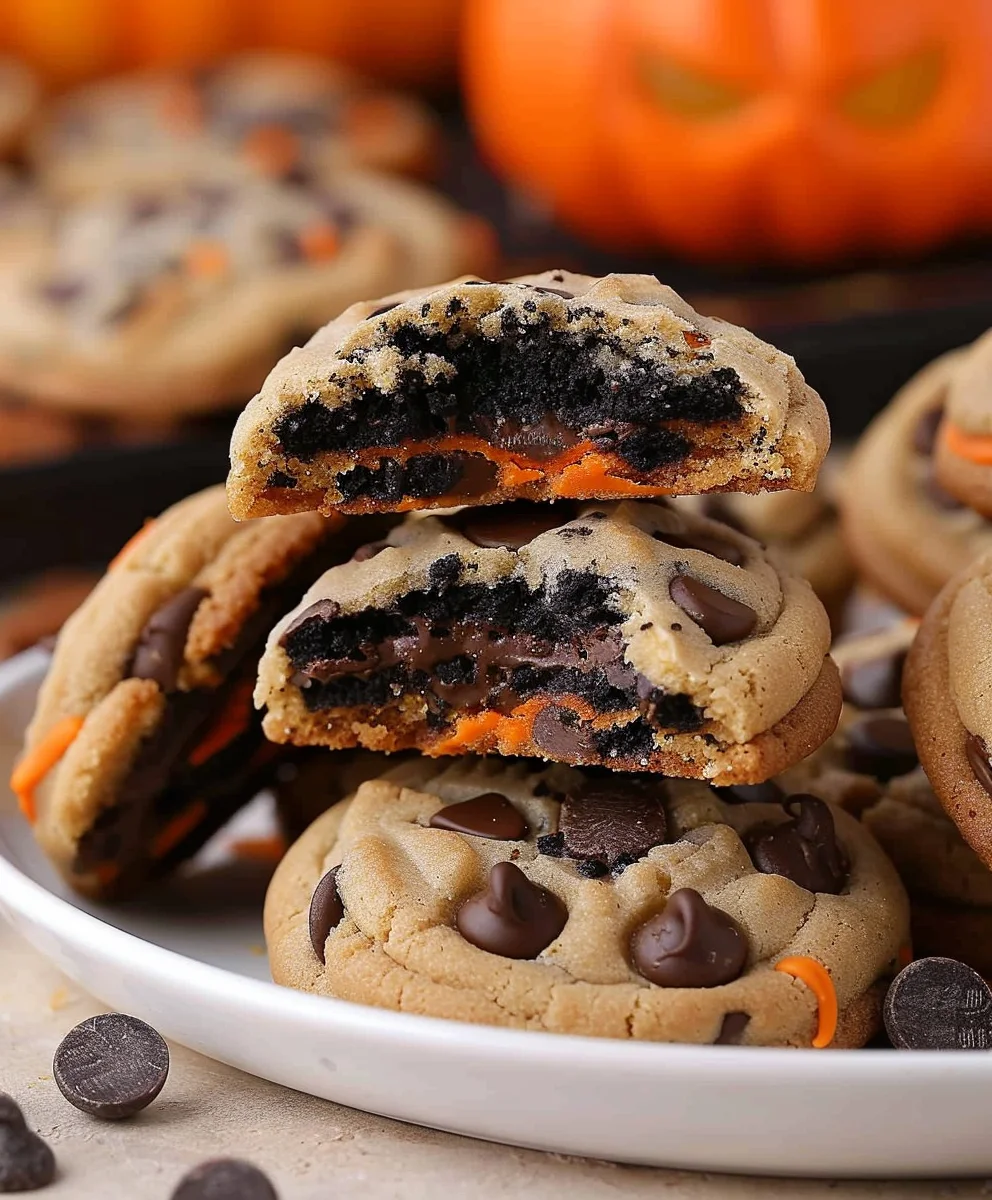
Spooky Halloween Oreo Stuffed Chocolate Chip Cookies!
These Halloween Oreo Stuffed Chocolate Chip Cookies are a delightful fusion of classic comfort and festive fun. Perfectly chewy chocolate chip cookies are wrapped around a whole, crunchy Halloween Oreo, creating a secret center of indulgence that’s perfect for the spookiest time of year.
Ingredients
-
1/2 cup butter, slightly softened
-
1/2 cup brown sugar
-
1/3 cup granulated sugar
-
1 egg
-
1 tsp vanilla extract
-
1 3/4 cup all-purpose flour
-
3 tbsp corn starch
-
1/2 tsp baking soda
-
1/4 tsp salt
-
2/3 cup semi-sweet chocolate chips (plus more for topping)
-
9 Halloween Oreo cookies
-
1/4 cup Halloween sprinkles
Instructions
-
Step 1
Preheat oven to 375°F (190°C) and line baking sheets with parchment paper. In a medium bowl, whisk together flour, corn starch, baking soda, and salt. Set aside. -
Step 2
In a large bowl, using an electric mixer, cream softened butter with granulated and brown sugars until light and fluffy (2-3 minutes). -
Step 3
Beat in the egg, then vanilla extract. Gradually add the dry ingredient mixture to the wet, mixing on low speed until just combined. Fold in chocolate chips. Chill dough for at least 30 minutes. -
Step 4
Take about 2-3 tablespoons of chilled dough, flatten into a disc. Place one Halloween Oreo in the center and completely seal it with the dough, ensuring no gaps. Roll into a smooth ball. Place stuffed cookie balls on prepared baking sheets, 2-3 inches apart. Optionally, press extra chocolate chips or Halloween sprinkles onto the tops. -
Step 5
Bake for 12-15 minutes, or until edges are golden brown and set, but centers still look slightly soft. Bake one sheet at a time for best results. -
Step 6
Remove from oven and allow cookies to cool on the baking sheets for at least 10-15 minutes. Carefully transfer to a wire rack to cool completely. Serve warm or at room temperature. -
Step 7
Store cooled cookies in an airtight container at room temperature for 3-4 days, or freeze for up to 2-3 months. Thaw at room temperature or warm gently in the microwave.
Important Information
Nutrition Facts (Per Serving)
It is important to consider this information as approximate and not to use it as definitive health advice.
Allergy Information
Please check ingredients for potential allergens and consult a health professional if in doubt.