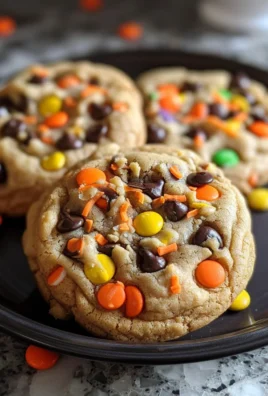
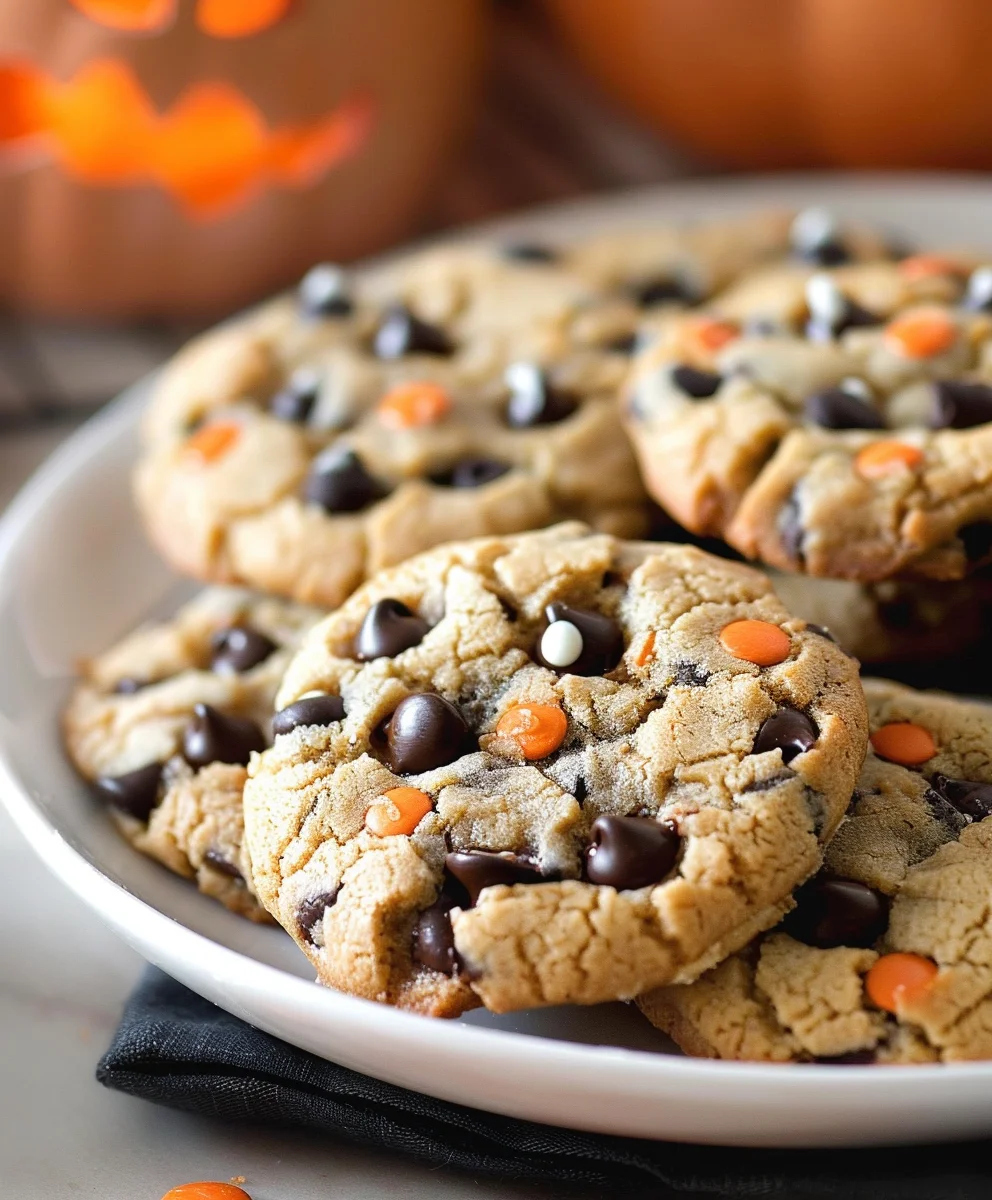
Halloween Chocolate Chip Cookies are more than just a sweet treat; they’re a delightful invitation to embrace the spirit of the season. As the air turns crisp and vibrant autumn leaves fall, there’s an undeniable charm in transforming a timeless classic into something spooktacular. We all cherish the comforting aroma of freshly baked chocolate chip cookies, a staple of American home baking for nearly a century. But when October arrives, this beloved recipe gets a thrilling makeover, becoming an integral part of our festive celebrations.
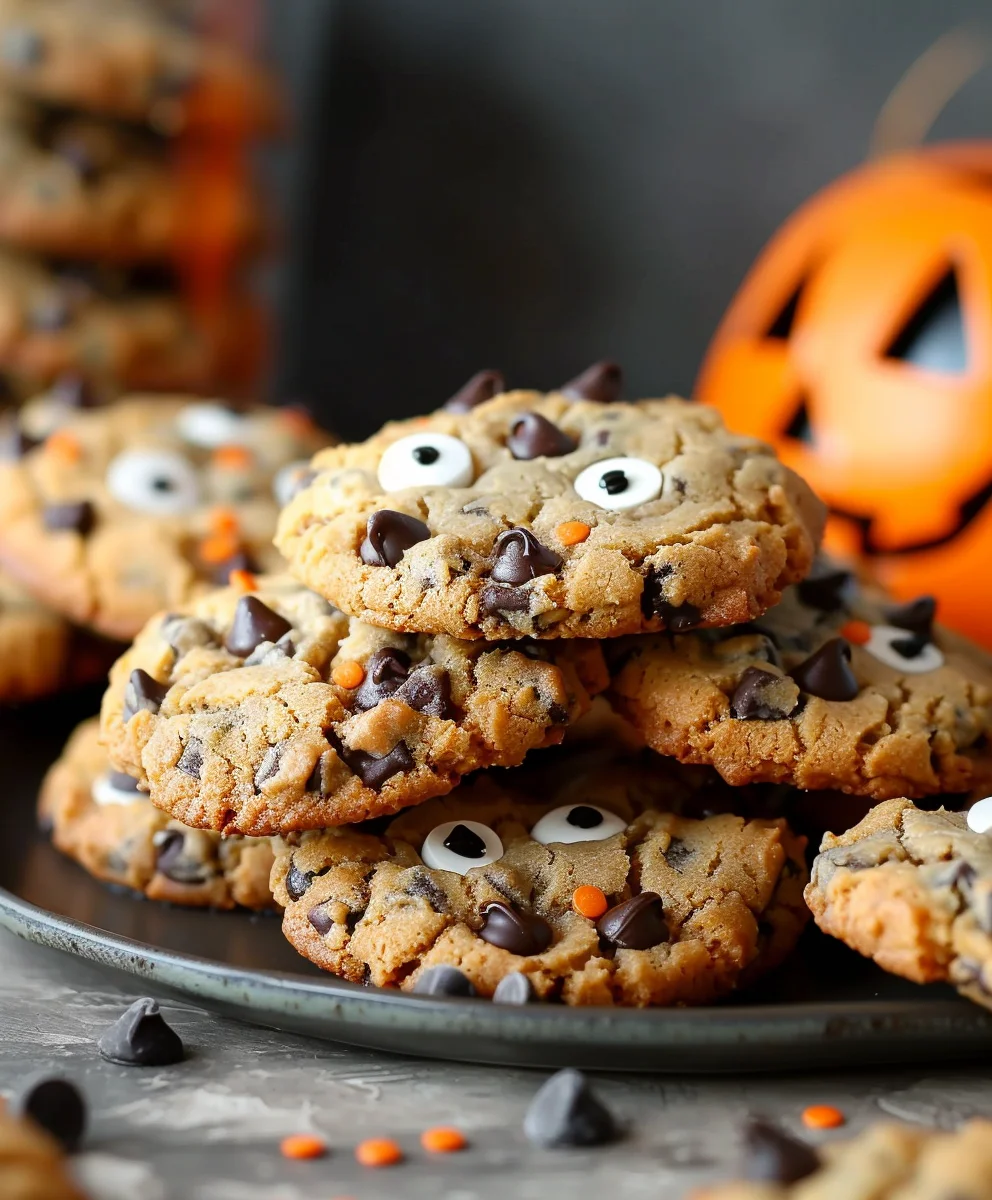
This particular rendition combines the familiar, comforting chewiness and rich chocolatey goodness that we adore, with an exciting twist of orange and black hues, playful sprinkles, and perhaps even some spooky candy eyes. It’s this fusion of nostalgic warmth and seasonal whimsy that makes these Halloween Chocolate Chip Cookies incredibly popular. Whether you’re baking for a school party, a neighborhood gathering, or simply to delight your trick-or-treaters, these cookies offer the perfect blend of ease, deliciousness, and festive appeal. Get ready to create some magical memories with a batch of these irresistible, ghoulishly good delights!

Ingredients:
- 2 ½ cups (300g) all-purpose flour
- 1 teaspoon baking soda
- 1 teaspoon salt (I prefer fine sea salt, as it disperses beautifully)
- 1 cup (226g) unsalted butter, truly softened to room temperature – this is absolutely crucial for the perfect creamy base. It should yield slightly when pressed.
- ¾ cup (150g) granulated sugar
- 1 cup (200g) packed light brown sugar, ensuring it’s fresh and moist for that deep molasses flavor
- 2 large eggs, also at room temperature; let them sit out with the butter for at least 30 minutes
- 2 teaspoons pure vanilla extract – don’t skimp here, it makes a world of difference!
- 1 ½ cups (about 250g) semi-sweet chocolate chips (or a mix of milk and semi-sweet for varied sweetness)
- ½ cup (about 85g) festive Halloween sprinkles (the orange, black, and purple mixes are fantastic, or even fun shapes like bats and ghosts!)
- ½ cup (about 85g) small Halloween candies, such as mini candy corn, M&M’s in Halloween colors, or chopped pieces of your favorite chocolate bars
- Optional: Flaky sea salt for sprinkling on top of the baked cookies, just a tiny pinch to enhance the chocolate flavor
Preparing Your Workspace and Ingredients for Spooky Success
- Preheat Your Oven and Prep Baking Sheets: My first step is always to get the oven ready. Set it to 375°F (190°C). While it’s preheating, prepare two large baking sheets by lining them with parchment paper. I find parchment paper is essential for preventing sticking and ensuring even baking, plus it makes cleanup an absolute breeze. You could also use silicone baking mats, which are fantastic for consistent heat distribution.
- Measure and Whisk Dry Ingredients: In a medium bowl, I carefully measure out my all-purpose flour, baking soda, and salt. Then, I grab a whisk and thoroughly combine them. You want to make sure the baking soda and salt are evenly distributed throughout the flour. This small step ensures that every bite of your Halloween Chocolate Chip Cookies will have the right balance of flavor and rise. Set this bowl aside for a moment.
- Ensure Butter and Eggs are at Room Temperature: This is one of my biggest secrets to truly amazing cookies! If your butter and eggs are cold, they won’t emulsify properly with the sugars, leading to a denser, less fluffy cookie. The butter should be soft enough that you can gently press a finger into it and leave an indentation without it being greasy or melted. Your eggs should also be at room temperature; a quick trick if you forget is to place them in a bowl of warm water for 5-10 minutes.
Crafting the Perfect Dough for Your Halloween Chocolate Chip Cookies
-
Cream the Butter and Sugars: In the bowl of a stand mixer fitted with the paddle attachment, or with a large bowl and an electric hand mixer, I combine the softened unsalted butter with both the granulated sugar and the packed light brown sugar. I beat this mixture on medium speed for a good 3-5 minutes, sometimes even longer, until it becomes wonderfully light, fluffy, and noticeably paler in color. This creaming process incorporates air into the butter, which is what gives our cookies that delightful chewiness and helps them spread beautifully without becoming too thin. Scrape down the sides of the bowl often to ensure everything is well combined.
The Secret to Light and Fluffy Cookies: Don’t Rush This Step!
You’re looking for a texture that almost resembles a cloud – seriously, it makes that much of a difference for these Halloween Chocolate Chip Cookies!
- Add Eggs and Vanilla: Once your butter and sugars are perfectly creamed, it’s time to add the eggs. I crack them into a small separate bowl first, just to make sure no shell bits make it into my precious dough. Then, I add them one at a time, beating well after each addition until it’s fully incorporated. After both eggs are in and the mixture is smooth, I pour in the pure vanilla extract. Beat for another minute or so, until the mixture is glossy and smooth. Again, scrape down the sides of the bowl to ensure everything is mixed in.
- Gradually Incorporate Dry Ingredients: Now, I turn the mixer speed down to low. I gradually add the whisked dry ingredients (flour, baking soda, salt) to the wet mixture, a third at a time. I mix only until just combined. This is a crucial step where you must resist the urge to overmix! Overmixing develops the gluten in the flour too much, which can lead to tough, dense cookies. As soon as you see no more streaks of dry flour, stop the mixer. It’s okay if there are a few small flour patches, they will disappear in the next step.
-
Fold in the Fun Halloween Add-ins: This is where the magic for our Halloween Chocolate Chip Cookies truly happens! I remove the bowl from the mixer and grab a sturdy rubber spatula. I gently fold in the semi-sweet chocolate chips, followed by the festive Halloween sprinkles and the small Halloween candies. The goal here is to distribute them evenly throughout the dough without crushing the sprinkles or candies, and without overworking the dough. I use a folding motion, scraping from the bottom of the bowl and folding it over the top, rotating the bowl as I go.
Tips for Maximum Festivity:
Don’t be shy with your Halloween-themed additions! The more, the merrier for these festive treats. If you want some extra flair, save a small handful of sprinkles and candies to press onto the tops of the cookie dough balls just before baking.
The Art of Chilling and Scooping for Perfect Halloween Chocolate Chip Cookies
-
Chill the Dough (Don’t Skip This!): I know, I know, waiting is the hardest part when you’re craving fresh cookies, but this step is non-negotiable for truly phenomenal Halloween Chocolate Chip Cookies. Cover the bowl tightly with plastic wrap and refrigerate the dough for at least 1 hour, or up to 24 hours. Chilling the dough allows the flavors to meld and deepen, and it also firms up the butter, which prevents the cookies from spreading too much in the oven, giving them a thicker, chewier texture. Trust me, it’s worth the wait!
Why Chilling is the Secret Weapon for Richer Flavor and Better Texture
The butter solidifies, making the cookies spread less, and the flour fully hydrates, leading to a softer, more uniform texture. Plus, the flavors develop beautifully.
- Scoop the Cookie Dough: Once the dough is properly chilled, I take it out of the fridge. Using a 2-tablespoon cookie scoop (or a standard ice cream scoop for larger cookies), I scoop rounded balls of dough onto the prepared baking sheets. It’s important to leave about 2 inches of space between each cookie dough ball, as they will spread a bit during baking. If I saved any extra sprinkles or candies, this is when I gently press a few onto the top of each dough ball for an extra pop of color and texture.
Baking Your Delightful Halloween Chocolate Chip Cookies
-
Bake to Golden Perfection: Place one baking sheet at a time into your preheated 375°F (190°C) oven. Bake for 10-12 minutes. The exact baking time can vary depending on your oven and the size of your cookies, so keep a close eye on them. You’re looking for edges that are golden brown and set, while the centers still look slightly soft and gooey. Don’t overbake them! A slightly underbaked center means a wonderfully chewy cookie.
Understanding Your Oven: Rotate for Even Baking
Around the 6-7 minute mark, I usually rotate my baking sheet 180 degrees. This helps ensure all the cookies bake evenly, especially if your oven has hot spots.
- Cool on the Baking Sheet: Once baked, I carefully remove the baking sheet from the oven. If I’m using flaky sea salt, this is when I sprinkle a tiny pinch over the warm cookies—the heat helps it adhere. I let the Halloween Chocolate Chip Cookies cool on the baking sheet for about 5-10 minutes. This allows them to firm up slightly before you attempt to move them, preventing them from breaking apart.
- Transfer to a Wire Rack: After their initial cooling period on the baking sheet, I use a thin spatula to gently transfer the still-warm cookies to a wire cooling rack to cool completely. Cooling completely on a rack allows air to circulate around them, preventing them from getting soggy on the bottom and ensuring a perfectly crisp edge and chewy interior.
Enjoying and Storing Your Festive Treats
- Serve and Share: Once fully cooled, these Halloween Chocolate Chip Cookies are ready to be devoured! They are absolutely perfect for trick-or-treaters, Halloween parties, or just a cozy evening in with a mug of hot cider. I love seeing the vibrant sprinkles and candies peeking out from the golden-brown cookies – they truly capture the spirit of Halloween!
- Storage Tips: To keep your Halloween Chocolate Chip Cookies fresh and delicious, store them in an airtight container at room temperature for up to 3-5 days. If you want to keep them longer, they freeze beautifully for up to 2-3 months. Just layer them between sheets of parchment paper in a freezer-safe container. When you’re ready to enjoy, simply let them thaw at room temperature. A quick zap in the microwave for 10-15 seconds can bring them back to that “freshly baked” warmth!
Conclusion:
So, there you have it, my dear fellow bakers and dessert enthusiasts! We’ve journeyed together through the simple yet magical process of creating what I believe are truly the best Halloween Chocolate Chip Cookies you’ll ever sink your teeth into. These aren’t just any cookies; they’re a symphony of crispy edges, delightfully chewy centers, and an abundance of molten chocolate that bursts with flavor in every single bite. I’ve poured my heart into perfecting this recipe because I genuinely believe everyone deserves to experience that pure, unadulterated joy that comes from biting into a freshly baked, warm cookie, especially one that perfectly encapsulates the playful, spooky spirit of Halloween. It’s the kind of treat that instantly transports you back to cherished childhood memories, to cozy evenings spent with loved ones, or to the exciting anticipation of trick-or-treating adventures. The meticulous balance of sweetness, the absolutely perfect texture that manages to be both soft and slightly crisp, and the irresistible allure of rich chocolate make these cookies an absolute showstopper. They effortlessly elevate any festive gathering or provide a comforting indulgence for a quiet night in. Moreover, this recipe is incredibly easy to make, remarkably forgiving for beginner bakers who might be nervous about their skills, and wonderfully adaptable for those who love to experiment and put their own unique twist on things. Trust me when I say, the aroma alone as these cookies bake will fill your entire home with an intoxicating fragrance that’s almost as satisfying as the first bite itself. This recipe isn’t just about the act of baking; it’s about creating lasting memories, sharing warmth and love with those around you, and indulging in a little bit of delicious, homemade magic.
Now, let’s talk about making these beauties even more spectacular and how you can truly make them your own. While they are undeniably divine straight from the oven, still wonderfully warm and gooey, there are so many delightful ways to enjoy and customize your batch. Imagine pairing one of these soft, chewy cookies with a tall, icy cold glass of milk – a timeless classic that never disappoints and always brings a smile. For a truly decadent experience that feels like a gourmet dessert, I absolutely love to serve them alongside a generous scoop of creamy vanilla bean ice cream, allowing the residual warmth of the cookie to slightly melt the ice cream, creating a delightful contrast in both temperatures and textures that is simply heavenly. A warm mug of freshly brewed coffee or a fragrant, spiced chai latte also makes for a perfect companion, especially on a crisp autumn evening when you need a little extra comfort. But why stop there? The incredible versatility of this cookie recipe is undoubtedly one of its greatest strengths, inviting you to get creative with your mix-ins! You could easily swap out some of the semi-sweet chocolate chips for vibrant white chocolate chunks for a different, creamier flavor profile, or even throw in some luscious butterscotch chips for a richer, more caramel-like note that’s incredibly satisfying. If you’re a devoted fan of nuts, a handful of finely chopped pecans or walnuts would add a wonderful, earthy crunch and depth of flavor. For an extra festive touch that truly screams Halloween, consider folding in some colorful, Halloween-themed M&M’s or vibrant sprinkles during the last stage of mixing – it adds a delightful burst of color and a playful texture that kids (and let’s be honest, adults too!) absolutely adore. You could even sandwich two of these perfect cookies together with a generous dollop of your favorite buttercream frosting or a creamy pumpkin spice filling for an epic, show-stopping cookie sandwich that will impress everyone. Don’t be afraid to experiment with a subtle pinch of cinnamon or nutmeg in the dough for an autumnal twist that complements the chocolate beautifully, or a tiny splash of orange extract to truly lean into the vibrant Halloween spirit. Each variation offers a unique and exciting dimension to these already incredible cookies, making them truly and deliciously your own signature bake.
My biggest hope is that by now, you’re feeling utterly inspired, perhaps even a little excited, to tie on your apron and embark on this delicious baking adventure. Don’t hesitate for a moment longer! Gather your ingredients, preheat your oven, and prepare to fill your home with the most wonderful, comforting aromas imaginable. There’s something incredibly therapeutic and deeply satisfying about the entire baking process, and the unparalleled reward of biting into your own homemade cookies is an experience like no other. I genuinely encourage you to give this recipe a try, whether it’s for a lively Halloween party that needs some sweet treats, a cozy family dessert that brings everyone together, or just a little well-deserved treat for yourself after a long and busy day. Once you’ve experienced the pure magic of these cookies, I would absolutely love to hear all about it! Did you try a fun and creative variation? What was your absolute favorite part of the baking process or the eating experience? Did they disappear faster than you expected (I bet they did!)? Please, please share your baking triumphs, your beautiful photos, and your heartwarming stories in the comments below or wherever you connect with me. Your feedback, your delightful experiences, and your shared joy mean the world to me, and they continually inspire me to keep creating and sharing delicious, approachable recipes with all of you. Let’s continue to build a wonderful community of happy bakers, one perfect, homemade cookie at a time. Go forth and bake, my friends – your taste buds, your family, and your inner child will all undoubtedly thank you!
Spooky Delicious Halloween Chocolate Chip Cookies
Halloween Chocolate Chip Cookies are a delightful invitation to embrace the spirit of the season, transforming a timeless classic into something spooktacular. This rendition combines comforting chewiness with orange and black hues, playful sprinkles, and spooky candy eyes, perfect for festive celebrations.
Ingredients
-
1/2 cup unsalted butter, melted
-
1/3 cup granulated sugar (67g)
-
1/2 cup packed light brown sugar (100g)
-
1 large egg
-
1 teaspoon vanilla extract
-
1/2 teaspoon salt
-
1/2 teaspoon baking soda
-
1 1/2 cups all-purpose flour (186g)
-
1 1/2 cups chocolate chips
-
1/2 to 3/4 cup Halloween sprinkles
-
Candy eyes (optional)
Instructions
-
Step 1
Preheat oven to 375°F (190°C). Line two large baking sheets with parchment paper. -
Step 2
In a medium bowl, whisk together the 1 1/2 cups all-purpose flour, 1/2 teaspoon baking soda, and 1/2 teaspoon salt until evenly combined. Set aside. -
Step 3
In a large bowl, whisk together the 1/2 cup melted unsalted butter with 1/3 cup granulated sugar and 1/2 cup packed light brown sugar until smooth. Then, whisk in the 1 large egg and 1 teaspoon vanilla extract until the mixture is glossy and well combined. -
Step 4
Gradually add the whisked dry ingredients to the wet mixture, mixing on low speed or by hand until just combined. Avoid overmixing; stop as soon as no dry flour streaks remain. -
Step 5
Remove the bowl from the mixer. Using a sturdy rubber spatula, gently fold in the 1 1/2 cups chocolate chips, 1/2 to 3/4 cup Halloween sprinkles, and candy eyes (if using) until evenly distributed throughout the dough. -
Step 6
Cover the bowl tightly with plastic wrap and refrigerate the dough for at least 1 hour. This step helps flavors meld and prevents excessive spreading during baking. -
Step 7
Once chilled, use a 2-tablespoon cookie scoop to portion rounded balls of dough onto the prepared baking sheets, ensuring about 2 inches of space between each cookie. (Optional: Press extra sprinkles/candies onto tops for added festivity). -
Step 8
Place one baking sheet at a time into the preheated 375°F (190°C) oven. Bake for 10-12 minutes, or until the edges are golden brown and set, but the centers still look slightly soft. Rotate the baking sheet 180 degrees halfway through baking for even results. -
Step 9
Remove the baking sheet from the oven and let the cookies cool on the sheet for 5-10 minutes to firm up. Then, gently transfer the cookies to a wire cooling rack to cool completely. -
Step 10
Once fully cooled, serve and enjoy your festive Halloween Chocolate Chip Cookies. Store leftovers in an airtight container at room temperature for 3-5 days, or freeze for up to 2-3 months, layering with parchment paper.
Important Information
Nutrition Facts (Per Serving)
It is important to consider this information as approximate and not to use it as definitive health advice.
Allergy Information
Please check ingredients for potential allergens and consult a health professional if in doubt.