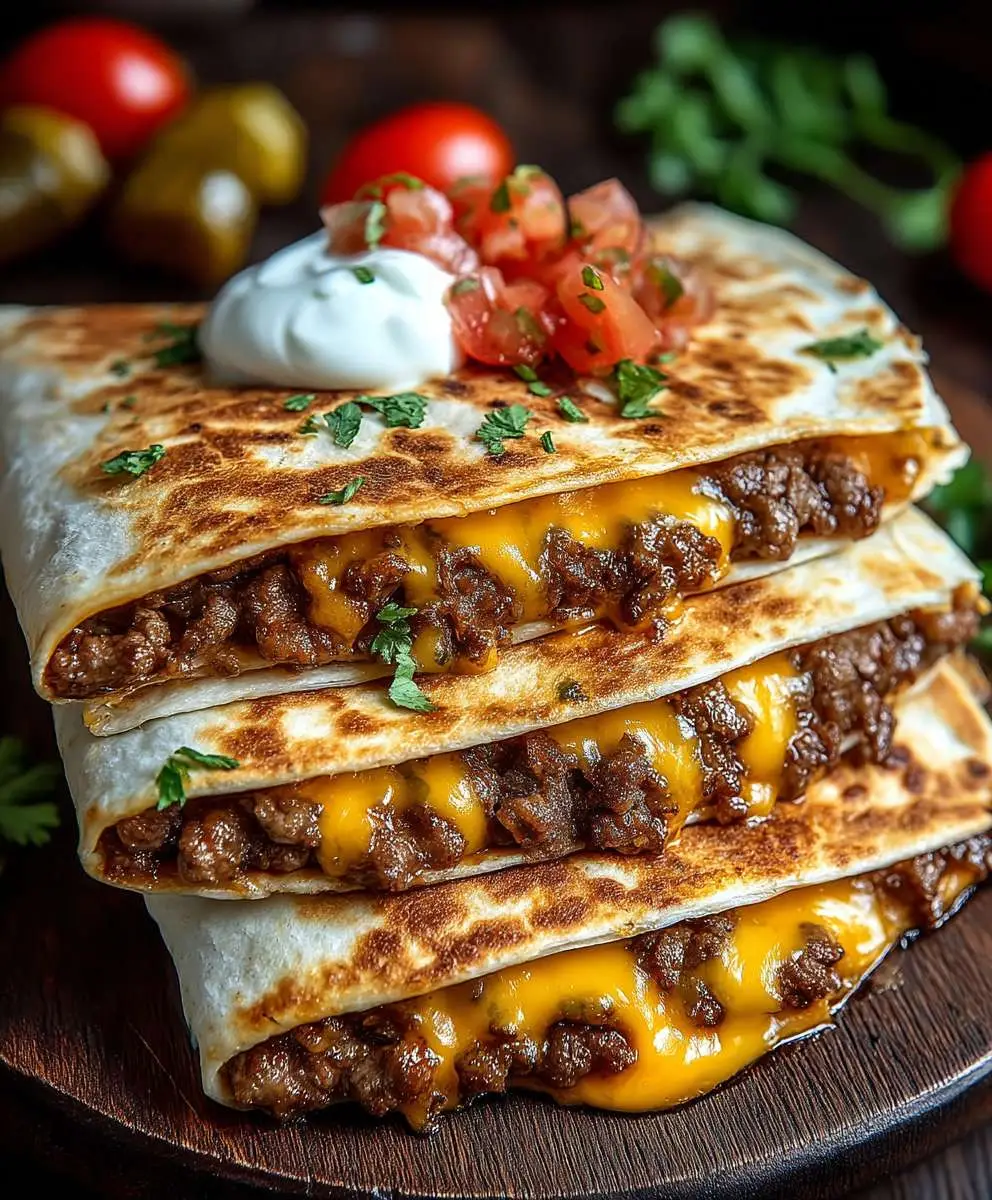
Smashburger Quesadilla: Prepare to have your taste buds blown away by the ultimate fusion food! Imagine the crispy, caramelized crust of a smashburger combined with the cheesy, comforting goodness of a quesadilla. It’s a culinary collision that’s surprisingly addictive, and I’m thrilled to share my version with you.
While the exact origins of the Smashburger Quesadilla are shrouded in delicious mystery (likely born from a late-night craving!), it represents a modern twist on classic comfort foods. The smashburger itself, known for its thin, crispy patty, gained popularity for its intense flavor and satisfying texture. Combining it with the quesadilla, a staple in Mexican cuisine, creates a dish that’s both familiar and excitingly new.
What makes this Smashburger Quesadilla so irresistible? It’s the perfect balance of textures – the crispness of the burger, the gooey cheese, and the soft tortilla. The flavor is a symphony of savory beef, melted cheese, and your favorite burger toppings, all conveniently wrapped in a warm tortilla. Plus, it’s incredibly quick and easy to make, making it ideal for a weeknight dinner or a fun weekend snack. Trust me, once you try this Smashburger Quesadilla, it will become a regular in your meal rotation!

Ingredients:
- For the Smashburgers:
- 1 pound ground beef (80/20 blend recommended for flavor and juiciness)
- 1 teaspoon kosher salt
- 1/2 teaspoon black pepper
- 1 tablespoon vegetable oil or canola oil
- 4 slices American cheese (or your favorite melting cheese)
- 4 hamburger buns, toasted
- For the Quesadillas:
- 8 large flour tortillas (burrito size, about 10-12 inches)
- 1 cup shredded cheddar cheese
- 1 cup shredded Monterey Jack cheese
- 1/2 cup finely diced white onion
- 1/4 cup finely diced dill pickles
- 2 tablespoons butter, divided
- Optional Toppings & Sauce:
- Ketchup
- Mustard
- Mayonnaise
- Lettuce, shredded
- Tomato slices
- Smashburger Sauce (recipe follows)
- Smashburger Sauce (Optional):
- 1/2 cup mayonnaise
- 2 tablespoons ketchup
- 1 tablespoon yellow mustard
- 1 tablespoon sweet pickle relish
- 1/2 teaspoon garlic powder
- 1/4 teaspoon paprika
- Pinch of cayenne pepper (optional)
Preparing the Smashburgers:
Alright, let’s get started with the heart of our Smashburger Quesadilla – the smashburgers themselves! This is where the magic happens, and we’ll create those crispy, flavorful patties that make this dish so irresistible.
- Divide the Ground Beef: Gently divide the ground beef into four equal portions. Don’t overwork the meat; we want to keep it loose for that perfect smash. Form each portion into a loose ball.
- Season the Beef: Season each beef ball generously with kosher salt and black pepper. Make sure to coat all sides for maximum flavor.
- Heat the Skillet: Place a large cast-iron skillet or heavy-bottomed pan over medium-high heat. Add the vegetable oil and let it heat up until it’s shimmering. This is crucial for getting that beautiful sear.
- Smash the Burgers: Place two beef balls in the hot skillet, leaving enough space between them. Immediately use a sturdy metal spatula (a burger press works great too!) to smash each ball down as thin as possible, about 1/4 inch thick. Hold the spatula firmly and press down hard for about 10-15 seconds to ensure good contact with the hot surface.
- Sear the Burgers: Let the burgers sear undisturbed for 2-3 minutes, or until a deep, dark crust forms on the bottom. This is where all that delicious flavor comes from, so don’t rush it!
- Flip and Cook: Carefully flip the burgers with the spatula and cook for another 1-2 minutes, or until cooked through. The internal temperature should reach 160°F (71°C).
- Add the Cheese: During the last 30 seconds of cooking, place a slice of American cheese (or your cheese of choice) on top of each burger patty. Let the cheese melt slightly.
- Remove from Skillet: Remove the smashburgers from the skillet and set aside. Repeat the process with the remaining beef balls.
Assembling the Quesadillas:
Now that we have our delicious smashburgers ready, it’s time to assemble the quesadillas! This is where we bring everything together to create that perfect cheesy, meaty, and satisfying bite.
- Prepare the Tortillas: Lay out four flour tortillas on a clean work surface.
- Cheese Layer: Sprinkle each tortilla evenly with a mixture of cheddar and Monterey Jack cheese. Don’t be shy with the cheese – it’s what holds everything together!
- Add the Smashburgers: Place one cheeseburger on one half of each tortilla.
- Add Toppings: Sprinkle diced white onion and diced dill pickles over the smashburgers. This adds a nice crunch and tangy flavor.
- More Cheese: Sprinkle another layer of cheddar and Monterey Jack cheese over the toppings. This will help everything melt together beautifully.
- Fold the Quesadillas: Carefully fold the tortillas in half, pressing down gently to seal.
Cooking the Quesadillas:
We’re almost there! Now it’s time to cook the quesadillas until they’re golden brown, crispy, and the cheese is melted and gooey. This is the final step that transforms our ingredients into a culinary masterpiece.
- Melt the Butter: Melt one tablespoon of butter in the same skillet you used for the smashburgers over medium heat.
- Cook the Quesadillas: Place two quesadillas in the skillet, making sure not to overcrowd the pan. Cook for 2-3 minutes per side, or until golden brown and crispy, and the cheese is melted and gooey.
- Repeat: Remove the cooked quesadillas from the skillet and set aside. Melt the remaining tablespoon of butter and repeat the process with the remaining quesadillas.
- Cut and Serve: Cut each quesadilla into wedges and serve immediately.
Making the Smashburger Sauce (Optional):
While the Smashburger Quesadilla is delicious on its own, adding a special sauce takes it to the next level! This Smashburger Sauce is a simple yet flavorful condiment that perfectly complements the flavors of the burger and quesadilla.
- Combine Ingredients: In a small bowl, combine the mayonnaise, ketchup, yellow mustard, sweet pickle relish, garlic powder, paprika, and cayenne pepper (if using).
- Mix Well: Stir all ingredients together until well combined.
- Taste and Adjust: Taste the sauce and adjust the seasonings as needed. You can add more relish for sweetness, mustard for tang, or cayenne pepper for heat.
- Chill: For best flavor, cover the sauce and chill in the refrigerator for at least 30 minutes before serving. This allows the flavors to meld together.
- Serve: Serve the Smashburger Sauce alongside the quesadillas for dipping.
Serving Suggestions:
The Smashburger Quesadilla is a complete meal on its own, but here are a few serving suggestions to make it even more enjoyable:
- Serve with a side of crispy french fries or sweet potato fries.
- Add a side salad for a lighter option.
- Offer a variety of toppings, such as shredded lettuce, tomato slices, and your favorite condiments.
- Pair with a cold beverage, such as a soda, iced tea, or beer.
Enjoy your homemade Smashburger Quesadillas! I hope you love them as much as I do. They’re perfect for a quick and easy weeknight meal, a fun weekend gathering, or any time you’re craving a delicious and satisfying burger-quesadilla hybrid.
Conclusion:
Okay, friends, let’s be honest: you’ve scrolled this far because you’re intrigued, and rightfully so! This Smashburger Quesadilla is not just another recipe; it’s a flavor explosion waiting to happen. It’s the ultimate comfort food mashup, taking the best parts of a juicy smashburger and wrapping them up in the cheesy, crispy goodness of a quesadilla. What’s not to love?
I know what you might be thinking: “Is it really worth the effort?” And my answer is a resounding YES! The beauty of this recipe lies in its simplicity and the incredible payoff. We’re talking minimal ingredients, quick cooking time, and maximum flavor. It’s perfect for a weeknight dinner when you’re short on time but craving something truly satisfying. It’s also a guaranteed crowd-pleaser for game day or a casual get-together with friends. Trust me, once you take that first bite, you’ll understand why I’m so excited about this recipe.
But the fun doesn’t stop there! This Smashburger Quesadilla is incredibly versatile. Feel free to get creative with your toppings and fillings. Want to add some heat? Throw in some sliced jalapeños or a dash of your favorite hot sauce. Craving something a little more decadent? Add a dollop of sour cream or guacamole. For a vegetarian option, you could easily substitute the beef with seasoned black beans or crumbled veggie burgers. The possibilities are truly endless!
Serving Suggestions and Variations:
* Serve with a side of crispy fries or sweet potato fries for the ultimate burger-and-fries experience.
* Pair it with a refreshing salad for a lighter meal.
* Cut the quesadilla into wedges and serve as an appetizer with your favorite dipping sauces, like ranch, BBQ sauce, or a spicy mayo.
* Try different cheeses! Pepper jack for a kick, or a blend of cheddar and Monterey Jack for a classic flavor.
* Experiment with different tortillas. Whole wheat tortillas add a nutty flavor, while spinach tortillas add a pop of color and extra nutrients.
I truly believe this Smashburger Quesadilla will become a new staple in your kitchen. It’s quick, easy, customizable, and, most importantly, absolutely delicious. It’s the perfect way to satisfy your burger cravings without all the fuss.
So, what are you waiting for? Gather your ingredients, fire up your skillet, and get ready to experience the magic of the Smashburger Quesadilla. I’m confident you’ll love it as much as I do!
And now, for the most important part: I want to hear from you! Once you’ve tried this recipe, please come back and share your experience in the comments below. Let me know what variations you tried, what toppings you loved, and any tips or tricks you discovered along the way. I’m always eager to learn from your culinary adventures. Happy cooking!
Smashburger Quesadilla: The Ultimate Guide to Making It at Home
Crispy, cheesy quesadillas filled with juicy smashburgers, onions, and pickles for a delicious burger-quesadilla hybrid!
Ingredients
Instructions
Recipe Notes
- Using an 80/20 ground beef blend is recommended for the best flavor and juiciness in the smashburgers.
- Don’t overwork the ground beef when forming the balls; keep it loose for optimal smashing.
- Make sure the skillet is hot before smashing the burgers to achieve a good sear.
- Press down firmly when smashing the burgers to create a thin patty.
- Don’t rush the searing process; allow a deep, dark crust to form on the bottom of the burgers.
- Adjust the amount of cheese and toppings to your preference.
- For best flavor, chill the Smashburger Sauce for at least 30 minutes before serving.
- Serve with your favorite sides and toppings.