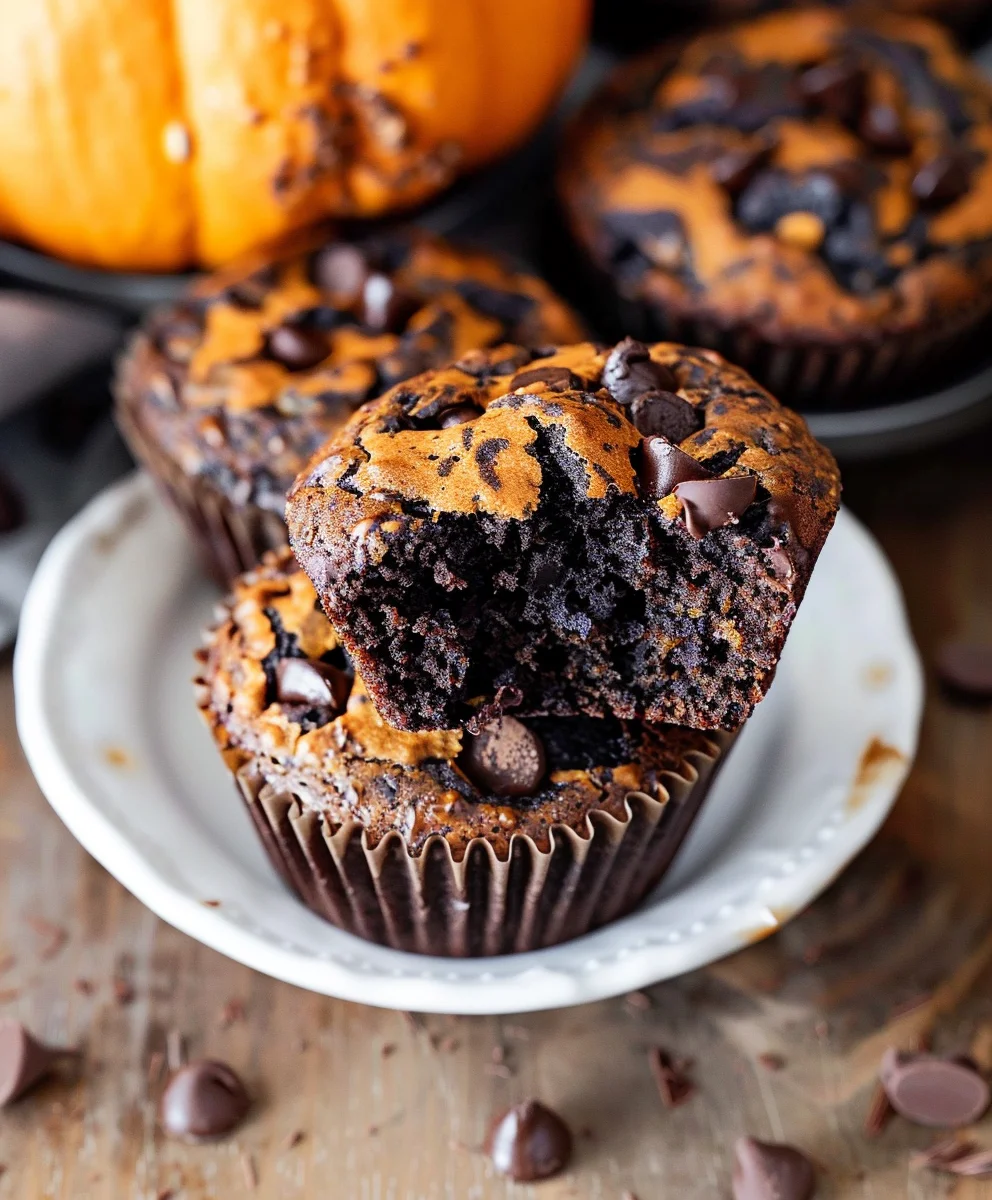
Chocolate Pumpkin Muffins are an absolute revelation, especially as the crisp air of autumn ushers in a desire for warmth and comfort. There’s a particular magic in these seasonal delights that transcends a simple baked good; they embody the very essence of cozy mornings and comforting afternoons, making them an irresistible treat.
While the precise moment rich chocolate and earthy pumpkin first united in a muffin might be a more recent culinary innovation, both ingredients carry profound historical and cultural weight. Pumpkin, a nutritional cornerstone for centuries in North America, symbolizes harvest and hearth, while chocolate has been a revered delicacy across diverse civilizations for millennia. This modern pairing, however, has quickly captured hearts and palates, becoming a beloved autumnal tradition that signals the start of the holiday season for many.
Why We Adore These Muffins: A Symphony of Flavors and Textures
I find myself utterly captivated by the harmonious blend of sweet, decadent chocolate and the subtle, earthy notes of pumpkin, perfectly spiced with cinnamon and nutmeg. Each bite offers a wonderfully moist, tender crumb, often studded with delightful pockets of melted chocolate chips, creating an irresistible texture that is both satisfying and comforting. Their versatility as a quick breakfast, a comforting snack, or a delightful dessert makes Chocolate Pumpkin Muffins a universally cherished treat. It’s this perfect marriage of convenience, comforting flavor, and satisfying texture that makes them an indispensable part of my fall baking repertoire, bringing a smile to every face.

Ingredients:
- All-Purpose Flour: 2 ½ cups (approximately 300 grams). I always recommend using a good quality, unbleached all-purpose flour for the best texture in our Chocolate Pumpkin Muffins. It provides the perfect balance of structure and tenderness, creating a muffin that’s neither too dense nor too crumbly. For consistent results, I measure my flour by spooning it into the measuring cup and then leveling it off, rather than scooping directly from the bag, which can compact the flour and lead to an inaccurate measurement.
- Granulated Sugar: 1 ½ cups (approximately 300 grams). This will give our muffins that lovely, classic sweetness, perfectly complementing the earthy notes of pumpkin and the rich, indulgent chocolate. It also contributes to the tender crumb and attractive golden-brown crust of our Chocolate Pumpkin Muffins.
- Light Brown Sugar: ½ cup (packed, approximately 100 grams). The brown sugar is a fantastic addition, bringing a wonderful depth of flavor with its subtle molasses notes. It’s my little secret weapon for achieving an incredibly moist and delightfully chewy crumb, which is a hallmark of truly exceptional Chocolate Pumpkin Muffins. Remember to pack it firmly into the measuring cup.
- Baking Powder: 2 teaspoons. This leavening agent is absolutely crucial for giving our Chocolate Pumpkin Muffins a beautiful, airy lift and a light, open texture. It works by creating carbon dioxide bubbles during baking, helping the batter expand.
- Baking Soda: 1 teaspoon. Working in conjunction with the natural acidity of the pumpkin puree, baking soda contributes to an even rise and helps achieve that attractive golden-brown color on the muffins. It’s vital for a balanced lift when an acidic ingredient is present.
- Ground Cinnamon: 2 teaspoons. The quintessential fall spice, cinnamon brings warmth, comfort, and that classic pumpkin spice aroma that makes these Chocolate Pumpkin Muffins irresistible. Its sweet, woody notes are foundational to any pumpkin baked good.
- Ground Nutmeg: 1 teaspoon. Freshly grated nutmeg, if you have it available, will make an incredible difference, offering a more pungent, vibrant, and aromatic spice profile. Otherwise, pre-ground nutmeg is perfectly fine and still contributes wonderfully to the overall spice blend, adding a sweet and somewhat piney depth.
- Ground Ginger: ½ teaspoon. Ginger adds a subtle peppery kick and further enhances the complexity of our spice blend, providing a bright, warm counterpoint to the other spices. It’s not just for gingerbread; it truly shines in pumpkin recipes!
- Ground Cloves: ¼ teaspoon. Just a touch of ground cloves provides a deep, warm, and slightly intense note that rounds out the pumpkin spice symphony perfectly. A little goes a long way with cloves, so be precise with this measurement.
- Salt: 1 teaspoon. Please, do not skip the salt! It’s absolutely essential for balancing the sweetness and enhancing all the other wonderful flavors in our Chocolate Pumpkin Muffins, making them truly sing and preventing them from tasting flat. I use fine sea salt, but table salt works well too.
- Canned Pumpkin Puree: 1 (15-ounce) can (approximately 425 grams). Important: Make absolutely sure it’s 100% pure pumpkin puree, not pumpkin pie filling. Pumpkin pie filling already contains added sugars and spices, which would throw off the carefully balanced flavors in our recipe. We want control over our flavor profile, and pure pumpkin is key for that rich, natural pumpkin essence.
- Large Eggs: 2. I always prefer to use large eggs, and ideally, they should be at room temperature. Room temperature eggs emulsify much better with the other wet ingredients, resulting in a more uniform, smooth batter and ultimately contributing to a more tender and consistent crumb in our Chocolate Pumpkin Muffins. If your eggs are cold, you can quickly bring them to room temperature by placing them in a bowl of warm (not hot) water for 5-10 minutes.
- Vegetable Oil (or other neutral oil): ½ cup (120 ml). Oil is a fantastic choice for muffins because it contributes to an incredibly moist crumb that stays soft and fresh for days. Unlike butter, oil remains liquid at room temperature, which helps maintain moisture. You can also use canola oil or a light olive oil if you prefer, as long as it’s a neutral-flavored oil that won’t overpower the other ingredients.
- Vanilla Extract: 2 teaspoons. A good quality vanilla extract always elevates baked goods, adding a sweet, fragrant aroma and a subtle depth of flavor that complements both the pumpkin and the chocolate beautifully. It’s like a warm hug in liquid form for your muffins.
- Milk (whole or 2%): ¼ cup (60 ml). This is often my little secret ingredient for a slightly lighter texture and to ensure the batter isn’t overly thick, especially once we incorporate all those delicious chocolate chips. It adds a touch more moisture without making the Chocolate Pumpkin Muffins dense, contributing to that desirable bakery-style texture.
- Chocolate Chips: 1 ½ cups (approximately 250 grams). This is where personal preference comes in! I personally love using a mix of semi-sweet and dark chocolate chips for a balanced flavor profile – the slight bitterness of the dark chocolate cuts through the sweetness of the muffin, while the semi-sweet provides classic comfort. However, feel free to use milk chocolate chips for a sweeter treat, or even white chocolate chips for a different twist. Miniature chocolate chips work wonderfully as they distribute more evenly throughout each bite, ensuring a delightful burst of chocolate in every single mouthful of your Chocolate Pumpkin Muffins.
Phase 1: Preparing Your Workspace and Dry Ingredients
Before we dive into the delicious world of baking Chocolate Pumpkin Muffins, it’s always a good idea to get everything organized. This methodical process, often called ‘mise en place’ (everything in its place), makes baking so much smoother, more efficient, and ultimately, more enjoyable. Trust me, a little preparation goes a long way in the kitchen!
- Preheat Your Oven and Prepare Muffin Tins: First things first, let’s get that oven ready to bake our beautiful Chocolate Pumpkin Muffins. Preheat your oven to 400°F (200°C). This initial higher temperature is a fantastic baker’s trick; it helps create that lovely, desirable domed top we all adore on muffins. While the oven preheats, line a standard 12-cup muffin tin with paper liners. I find that paper liners make for much easier cleanup and reliably prevent any sticking. If you don’t have paper liners, you can certainly grease and flour the muffin tin cups thoroughly instead. You might even want to prepare a second muffin tin or plan for a second batch, as this generous recipe for Chocolate Pumpkin Muffins often yields between 18 and 20 muffins. Having everything ready beforehand means no scrambling when the batter is perfectly mixed.
- Whisk Together the Dry Ingredients: In a truly large mixing bowl – one that gives you plenty of room to work – I like to combine all my dry ingredients for the Chocolate Pumpkin Muffins. This includes the 2 ½ cups of all-purpose flour, 1 ½ cups of granulated sugar, ½ cup of packed light brown sugar, 2 teaspoons of baking powder, 1 teaspoon of baking soda, 2 teaspoons of ground cinnamon, 1 teaspoon of ground nutmeg, ½ teaspoon of ground ginger, ¼ teaspoon of ground cloves, and 1 teaspoon of salt. My usual practice is to thoroughly whisk these ingredients together. This isn’t just about mixing them; it’s a vital step for aerating the flour, breaking up any lumps, and most importantly, ensuring that the leavening agents (baking powder and baking soda) and all those wonderful spices are evenly distributed throughout the mixture. An even distribution means an even rise and a consistent flavor in every single bite of our Chocolate Pumpkin Muffins. You want to make sure there are absolutely no hidden pockets of baking powder or clumps of spice, so whisk for at least 30-60 seconds until everything looks uniformly combined and light in color. This step is a key foundational element for achieving a beautifully textured and perfectly spiced muffin.
Phase 2: Combining the Wet Ingredients for Ultimate Moisture
Now that our dry ingredients are perfectly prepped, let’s move on to the wet components. This is where we build the essential base for our Chocolate Pumpkin Muffins’ incredible moisture, richness, and that fantastic, vibrant pumpkin flavor.
- Prepare the Pumpkin and Eggs: In a separate, medium-sized mixing bowl, crack your 2 large eggs. As I mentioned earlier, if your eggs aren’t already at room temperature, you can quickly bring them up to temp by placing them in a bowl of warm (but definitely not hot!) water for about 5-10 minutes. Room temperature eggs mix much more easily and create a smoother, more stable emulsion with the other wet ingredients. Once they’re ready, give the eggs a quick whisk until they are lightly beaten and the yolks and whites are fully combined. This initial whisk helps to break up the egg structure, allowing for easier integration into the batter.
- Add Remaining Wet Ingredients: To the lightly beaten eggs, add the entire 15-ounce can of pumpkin puree. Remember our golden rule: we’re using 100% pure pumpkin puree here, not the pre-spiced pie filling! Next, pour in the ½ cup of vegetable oil, which is our secret to extra moist muffins, and the 2 teaspoons of vanilla extract, adding a beautiful aromatic foundation. Finally, add the ¼ cup of milk. I personally find that a touch of whole milk gives these Chocolate Pumpkin Muffins an extra layer of richness and helps achieve the perfect batter consistency, ensuring they’re not too thick or too dry.
- Whisk Wet Ingredients Until Smooth: Now, using your whisk, combine all these wet ingredients until they are completely smooth and thoroughly well incorporated. This might require a minute or two of fairly vigorous whisking. What you’re aiming for is a uniform, light orange mixture without any visible streaks of egg yolk, oil, or separate dairy. This thorough mixing ensures that the moisture, fat, and flavor are evenly distributed throughout the wet mixture. This even distribution is critical, as it guarantees that when we combine it with the dry ingredients, it will lead to a perfectly moist, tender, and uniformly flavored Chocolate Pumpkin Muffin. Take your time with this step; it’s essential for the final texture.
Phase 3: Bringing it All Together – The Art of Gentle Mixing
This phase is arguably the most crucial step in the entire muffin-making process. The goal here is to combine everything with a gentle touch, because overmixing is truly the enemy of tender, fluffy muffins. We’re aiming for a perfectly delicate balance.
- Combine Wet and Dry Mixtures: Now for the moment of truth! Make a generous well (a little hollow) in the center of your large bowl of dry ingredients. Carefully pour the entire wet ingredient mixture that we just prepared into this well. This is where the magic starts to happen as the distinct elements begin their journey to becoming Chocolate Pumpkin Muffins.
- Fold Gently Until Just Combined: Using a sturdy rubber spatula or a wooden spoon, begin to gently fold the wet ingredients into the dry ingredients. Start from the center of the bowl and slowly work your way outwards, carefully incorporating the flour mixture into the wet. The absolute key here is to mix just until the dry ingredients are moistened and no visible streaks of dry flour remain. I usually stop mixing when I can still see only a few small, pea-sized pockets of flour. It’s not only perfectly okay, but actually desirable, for the batter to look a little lumpy. This lumpiness is your cue to stop mixing! Overmixing is the primary culprit behind tough, chewy muffins because it overdevelops the gluten in the flour. This results in a dense, rubbery texture instead of the light, tender crumb we’re aiming for with our Chocolate Pumpkin Muffins. It’s always better to have a few small, barely visible flour pockets than a dense, unpleasant muffin. This gentle mixing technique is paramount for achieving that coveted soft and tender texture.
- Fold in the Chocolate Chips: Once your batter is just combined – remember, just combined, slightly lumpy is good! – it’s time for the star of the show: the chocolate chips! Add your 1 ½ cups of chocolate chips to the batter. Here’s a little trick I often use to help prevent the chocolate chips from sinking to the bottom of the muffins during baking: I’ll toss them with about a tablespoon of flour before adding them to the batter. This light coating creates a barrier that helps them suspend more evenly. Gently fold the chocolate chips into the batter until they are evenly distributed. Again, be incredibly mindful not to overmix at this stage. Just a few deliberate folds until the chocolate chips are dispersed throughout the slightly lumpy batter will suffice. We want chocolate in every bite of our Chocolate Pumpkin Muffins, but we also want them tender!
Phase 4: Baking Your Delicious Chocolate Pumpkin Muffins
The moment we’ve been waiting for! Getting these Chocolate Pumpkin Muffins into the oven correctly, and managing the temperature, ensures those beautiful, high domed tops and perfectly baked, moist centers. This phase is all about precision and attention to detail.
- Fill Muffin Liners: Using a large ice cream scoop (my preferred tool for consistency) or two spoons, evenly divide the muffin batter among the prepared muffin liners in your tin. A little trick I always employ is to fill the muffin liners about two-thirds full. This generous fill helps create that classic, appealing domed top on our Chocolate Pumpkin Muffins, giving them that wonderful bakery-style appearance. However, be careful to avoid overfilling, which can lead to the batter spilling over the sides of the liners and causing the muffins to stick together or bake unevenly. As I mentioned earlier, this recipe often yields between 18 and 20 muffins, so if you only have one 12-cup muffin tin, be prepared to bake a second batch, or have a second prepared tin handy.
- Initial High Heat Bake: Carefully place the muffin tin (or tins) into your preheated 400°F (200°C) oven. Bake for an initial 5 minutes at this higher temperature. This burst of intense heat is a fantastic technique. It helps to activate the leavening agents (baking powder and baking soda) very quickly, causing the muffins to rise rapidly and achieve that desirable, impressive domed peak. It’s truly a game-changer for getting those beautiful, tall, bakery-style Chocolate Pumpkin Muffins. Don’t be tempted to open the oven door during this crucial initial phase!
- Reduce Heat and Continue Baking: After those critical 5 minutes, reduce the oven temperature to 375°F (190°C). It’s important to do this without opening the oven door, if possible, to maintain the internal temperature and the muffins’ momentum in rising. Continue baking for an additional 15-20 minutes, or until a wooden skewer or a clean toothpick inserted into the center of one of the Chocolate Pumpkin Muffins comes out clean or with just a few moist crumbs attached. The exact baking time can vary slightly depending on the nuances of your specific oven, so it’s always a good idea to keep a watchful eye on them. The tops should be beautifully golden brown and look set. If you’re baking more than one tray, you might find it beneficial to rotate them halfway through this second baking phase to ensure even cooking and browning.
- Check for Doneness: To confirm your Chocolate Pumpkin Muffins are perfectly baked, gently press the tops. They should spring back lightly when pressed. If they still feel soft, mushy, or squishy in the center, they definitely need a few more minutes of baking time. Don’t hesitate to pull one out and perform the toothpick test; it truly is the most reliable method for ensuring they’re baked through without being overdone. Perfectly baked muffins are moist, not wet.
Phase 5: Cooling and Storage for Lasting Freshness
Proper cooling is just as important as proper baking to ensure your Chocolate Pumpkin Muffins have the very best texture, maintain their delightful flavor, and stay fresh for as long as possible. Don’t rush this final stage!
- Cool in the Tin: Once your gorgeous Chocolate Pumpkin Muffins are baked to perfection, carefully remove the muffin tin from the oven. Let the muffins cool in the tin for about 5-10 minutes. This initial cooling period allows them to set up a bit, strengthening their structure and preventing them from falling apart when you try to transfer them. It also makes them much easier to handle without risking damage to their delicate, warm structure.
- Transfer to a Wire Rack: After this initial cooling period in the tin, carefully transfer the muffins from the tin to a wire cooling rack. Allow them to cool completely on the rack. It’s absolutely crucial to cool them completely on a wire rack to prevent any potential sogginess. If muffins are left to cool in the hot tin for too long, or are placed on a flat, non-circulating surface, steam can get trapped underneath their bottoms, making them wet, soft, and unappetizingly damp. A wire rack ensures optimal air circulation all around each muffin, allowing excess heat and moisture to escape efficiently, thus maintaining that lovely tender crumb and preventing a soggy bottom.
- Enjoy and Store: These Chocolate Pumpkin Muffins are absolutely delightful when still slightly warm, especially when the chocolate chips are still a little melty – pure bliss! But they are also fantastic once fully cooled, making them perfect for breakfast, a snack, or a lunchbox treat. For everyday storage, I highly recommend keeping them in an airtight container at room temperature for up to 3-4 days. To help keep them extra fresh and moist, you can even place a paper towel or a slice of plain bread in the container; it helps absorb any excess moisture, keeping the muffins from becoming sticky. For longer storage, these Chocolate Pumpkin Muffins freeze beautifully! Simply place them in a freezer-safe bag or container, making sure they are completely cooled first, and they will keep well for up to 2-3 months. When you’re ready to enjoy a frozen muffin, just thaw them at room temperature for a couple of hours or warm them gently in the microwave for 20-30 seconds for a quick, comforting, and wonderfully fresh-tasting treat. There’s truly nothing quite like a freshly warmed Chocolate Pumpkin Muffin with melty chocolate chips to brighten your day!
Conclusion:
So, there you have it! We’ve journeyed through the simple steps to create what I truly believe are some of the most delightful and comforting baked goods you’ll ever pull from your oven. If you’ve been searching for that perfect autumnal treat, or simply a universally loved muffin that marries two incredible flavors, then this recipe for Chocolate Pumpkin Muffins is, without a doubt, a must-try. What makes them so irresistible, you ask? Well, it’s that magical combination of ingredients that creates an unbelievably moist crumb, infused with the earthy sweetness of pumpkin and punctuated by decadent pockets of melted chocolate. Each bite is a harmonious blend of textures and tastes – a subtle warmth from the spices, a delicate sweetness from the pumpkin, and a rich, satisfying hit of chocolate that just makes your soul sing. They’re not just muffins; they’re little spheres of joy, perfect for brightening any day, whether it’s a chilly morning or a cozy afternoon. I’ve seen faces light up time and time again when these come out of the oven, and I promise yours will too. This isn’t just another recipe; it’s an invitation to experience pure, unadulterated comfort in every single bite. The ease of preparation combined with the gourmet-level taste makes these a staple in my kitchen, and I’m confident they’ll become one in yours too.
Beyond their incredible flavor and delightful texture, one of the many reasons I adore these muffins is their sheer versatility and the pure joy they bring to any occasion. Imagine waking up to the aroma of freshly baked goodness, grabbing a warm muffin, and pairing it with your favorite cup of coffee or a steaming mug of spiced tea. It’s the ultimate breakfast indulgence that feels both special and comforting. But don’t stop there! These aren’t just for breakfast. They make a fantastic mid-afternoon snack, giving you that much-needed energy boost without feeling heavy. Pack them in lunchboxes for a delightful surprise, or even serve them as a simple, elegant dessert. Want to elevate them further for a special occasion? Try serving them slightly warm with a dollop of freshly whipped cream, a scoop of creamy vanilla bean ice cream, or even a decadent drizzle of homemade caramel sauce or a light dusting of powdered sugar. They’re also absolutely divine when split open and spread with a generous layer of cream cheese frosting, turning them into almost a cupcake-like treat. For a truly seasonal experience, pair them with a glass of cold apple cider or a festive pumpkin spice latte. The possibilities for enjoyment are truly endless, making them a chameleon of the baking world, adaptable to any time of day or event.
And speaking of endless possibilities, let’s talk about how you can make this recipe uniquely yours. While the base recipe for these incredible Chocolate Pumpkin Muffins is perfect as is, feel free to experiment with a few variations to suit your personal taste or what you have on hand. For an extra layer of indulgence, consider using a mix of dark and milk chocolate chips, or even chopped chocolate bars for bigger, melty pools that burst with flavor in every mouthful. If you’re a nut-lover, a handful of chopped pecans or walnuts folded into the batter would add a wonderful textural contrast and a hint of earthy, nutty flavor that complements the pumpkin beautifully. You could also sprinkle a delightful streusel topping over the unbaked muffins for a lovely crunch, made simply with a mixture of flour, brown sugar, and cold butter rubbed together until crumbly. For those who enjoy a spicier kick, feel free to slightly increase the amount of cinnamon, nutmeg, or even add a pinch of ground ginger or cloves to really bring out those autumnal notes and make the flavors sing. Another idea is to incorporate dried cranberries or golden raisins for a chewy, fruity counterpoint to the rich chocolate and pumpkin. The beauty of baking is that it encourages creativity, so don’t be afraid to experiment and find your perfect version!
Now It’s Your Turn!
I genuinely hope I’ve convinced you to roll up your sleeves and give these fantastic Chocolate Pumpkin Muffins a try. Trust me when I say, the aroma alone as they bake will make your home feel incredibly cozy and inviting, drawing everyone into the kitchen with anticipation. Baking is such a rewarding experience, and there’s nothing quite like the satisfaction of sharing something delicious you’ve made yourself. Don’t be intimidated; the steps are straightforward, and the results are consistently amazing, even for novice bakers. Once you’ve pulled your beautiful batch from the oven and tasted that first glorious bite, I would absolutely love to hear all about your experience. Did you make any fun variations? What did your family think? Did they disappear in minutes, leaving everyone wanting more? Please, don’t hesitate to share your stories, photos, and any tips or tricks you discovered along the way in the comments section below. Your feedback is what keeps this community vibrant and inspires others to get baking too. So, go on, embrace the flavors of the season, and let’s get baking! You won’t regret adding these delightful Chocolate Pumpkin Muffins to your regular baking rotation.

Chocolate Pumpkin Muffins
These Chocolate Pumpkin Muffins are a revelation, embodying the essence of cozy autumn mornings and comforting afternoons. They offer a harmonious blend of sweet chocolate and earthy pumpkin, perfectly spiced, with a wonderfully moist, tender crumb and delightful pockets of melted chocolate chips. A cherished autumnal tradition, perfect as a quick breakfast, snack, or dessert.
Ingredients
-
1 ¾ cups (218.75g) all-purpose flour
-
¾ teaspoon baking soda
-
⅜ teaspoon salt
-
1½ teaspoons pumpkin spice
-
¼ cup (59.15ml) canola or vegetable oil
-
¼ cup (50g) granulated sugar
-
¼ cup (50g) light brown sugar, packed
-
1 large egg, room temperature
-
¾ teaspoon vanilla extract
-
¾ cup (183.75g) pumpkin puree
-
3 tablespoons (18g) cocoa powder
-
¾ cup (127.5g) mini semi-sweet chocolate chips (½ cup for batter, ¼ cup for topping, optional)
Instructions
-
Step 1
Preheat oven to 400°F (200°C). Line a standard 12-cup muffin tin with paper liners or grease and flour thoroughly. Prepare a second muffin tin as this recipe yields 18-20 muffins. -
Step 2
In a large mixing bowl, whisk together the 1 ¾ cups all-purpose flour, ¼ cup granulated sugar, ¼ cup packed light brown sugar, ¾ teaspoon baking soda, ⅜ teaspoon salt, 1½ teaspoons pumpkin spice, and 3 tablespoons cocoa powder until well combined and aerated. -
Step 3
In a separate medium bowl, whisk the 1 large egg until lightly beaten. Then add the ¾ cup pure pumpkin puree, ¼ cup vegetable oil, and ¾ teaspoon vanilla extract. Whisk thoroughly until the mixture is completely smooth and uniformly combined. -
Step 4
Make a well in the center of the dry ingredients. Pour the entire wet ingredient mixture into the well. Using a rubber spatula or wooden spoon, gently fold the wet into the dry ingredients. Mix just until the dry ingredients are moistened and no visible streaks of dry flour remain. The batter should look lumpy; do not overmix, as this can lead to tough muffins. -
Step 5
Once the batter is just combined, gently fold in ½ cup of the mini semi-sweet chocolate chips until evenly distributed. (Optional tip: Toss chocolate chips with about a tablespoon of flour before adding to prevent sinking.) -
Step 6
Evenly divide the batter among the prepared muffin liners, filling each about two-thirds full. Place the muffin tin(s) into the preheated 400°F (200°C) oven and bake for an initial 5 minutes. After 5 minutes, reduce the oven temperature to 375°F (190°C) and continue baking for an additional 15-20 minutes, or until a wooden skewer or toothpick inserted into the center of a muffin comes out clean or with just a few moist crumbs attached. The tops should be golden brown and spring back when lightly pressed. -
Step 7
Carefully remove the muffin tin from the oven and let the muffins cool in the tin for 5-10 minutes. Then, transfer them to a wire cooling rack to cool completely, preventing sogginess. Enjoy them slightly warm or fully cooled. Store cooled muffins in an airtight container at room temperature for 3-4 days, or freeze in a freezer-safe bag or container for up to 2-3 months. Thaw at room temperature or warm gently in the microwave.
Important Information
Nutrition Facts (Per Serving)
It is important to consider this information as approximate and not to use it as definitive health advice.
Allergy Information
Please check ingredients for potential allergens and consult a health professional if in doubt.