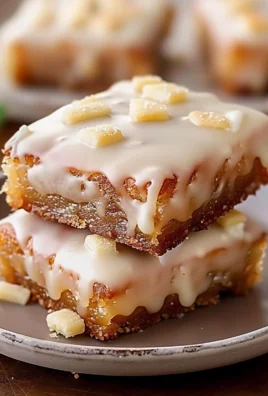
Salted Caramel Cracker Bites. Just hearing those words conjures up images of pure, unadulterated snack bliss, doesn’t it? I’m thrilled to invite you into my kitchen today to discover one of the most delightfully simple yet incredibly addictive treats you’ll ever make. While these weren’t passed down through generations of ancient culinary wisdom, their genius lies in their modern inception, born from the brilliant idea of combining humble pantry staples into something utterly extraordinary. Think about it: the irresistible crunch of crackers, the luxurious chew of homemade caramel, and that tantalizing whisper of sea salt that elevates every single bite. It’s a symphony of textures and flavors that has captivated snack lovers everywhere, making these Salted Caramel Cracker Bites a true contemporary classic.
People absolutely adore this dish for so many reasons. The incredible balance of sweet and salty is truly next-level, hitting all the right notes on your palate. Then there’s the delightful contrast of the crisp cracker against the rich, gooey caramel, creating a textural experience that keeps you reaching for just one more. They’re also incredibly convenient to whip up, requiring minimal effort for maximum impact, making these delightful bites an instant hit at potlucks, family gatherings, or simply as a perfect treat for a quiet evening in. I’ve always found that the sheer simplicity combined with the gourmet taste makes Salted Caramel Cracker Bites an undeniable crowd-pleaser. Get ready to fall in love with your new favorite go-to dessert!

Ingredients:
Creating these irresistible Salted Caramel Cracker Bites is a delightful journey, and it all starts with gathering the right high-quality ingredients. I find that using specific types of ingredients truly makes a difference in the final taste and texture of these heavenly treats.
- Crackers: One standard box (about 5-6 ounces or 150g) of plain, buttery, rectangular crackers. Think a classic butter cracker style – something that offers a crisp, sturdy base without being too salty on its own. I usually opt for ones that are not too thin, as they need to hold up to the caramel and baking process.
- Unsalted Butter: 1 cup (2 sticks or 226g) of good quality unsalted butter. Using unsalted butter gives you complete control over the saltiness of your caramel, allowing the added sea salt to truly shine. Make sure it’s softened slightly before you begin, but not melted, as this will help it combine more easily.
- Light Brown Sugar: 1 cup (200g) of packed light brown sugar. The molasses in light brown sugar contributes to a richer, deeper caramel flavor and a chewier texture compared to granulated sugar alone. Always make sure to pack it firmly into your measuring cup for accuracy.
- Vanilla Extract: 1 teaspoon of pure vanilla extract. While seemingly a small amount, vanilla plays a crucial role in enhancing the complexity of the caramel, adding a warm, aromatic depth that balances the sweetness and saltiness beautifully. I always recommend pure vanilla over artificial for the best flavor profile.
- Fine Sea Salt: ½ teaspoon for the caramel itself, plus an additional ¼ to ½ teaspoon for sprinkling on top of the finished Salted Caramel Cracker Bites. Fine sea salt dissolves beautifully into the caramel and offers a clean, bright salinity. The extra sprinkle on top provides that essential textural contrast and bursts of salty goodness that define these bites. If you prefer a bolder salt presence, don’t hesitate to lean towards the higher end of the range for sprinkling.
- Optional Topping (for extra indulgence): 1 cup (about 170g) of chocolate chips (semi-sweet or milk chocolate, depending on your preference). While not strictly necessary for the classic Salted Caramel Cracker Bites, a thin layer of melted chocolate adds another layer of decadence and creates a delightful three-tiered texture.
Preparing the Baking Sheet for Your Salted Caramel Cracker Bites
Before we even think about melting butter or simmering sugar, I always recommend getting your workstation ready. This isn’t just about being organized; it’s about ensuring a smooth, stress-free process and, most importantly, easy cleanup once these irresistible Salted Caramel Cracker Bites are baked. Trust me, caramel is delicious, but sticky! So, let’s get everything lined up perfectly.
- Preheat Your Oven: Start by preheating your oven to 350°F (175°C). Having the oven at the correct temperature when your crackers are ready to bake is crucial for achieving that perfect golden caramel and crisp cracker base.
- Prepare Your Baking Sheet: Take a large baking sheet, ideally one with a rim to prevent any caramel from spilling over. Line the entire surface of the baking sheet with aluminum foil. I usually use heavy-duty foil for extra protection.
- Add Parchment Paper: Now, here’s my secret to truly non-stick caramel perfection: place a sheet of parchment paper directly over the aluminum foil. The foil acts as a shield for your baking sheet, catching any potential drips, while the parchment paper ensures that your baked Salted Caramel Cracker Bites lift off cleanly without sticking, which can be a real headache with caramel. Make sure both the foil and parchment paper extend slightly over the edges of the baking sheet for easy removal later.
- Arrange the Crackers: Carefully unwrap your crackers and arrange them in a single, neat layer on the parchment-lined baking sheet. Try to place them as close together as possible without overlapping. This creates a solid “sheet” of crackers that will be easier to cover with caramel and then break apart later. I usually find that one standard box fits perfectly on a large baking sheet. Taking the time to arrange them meticulously now will save you fuss later.
Crafting the Perfect Salted Caramel for Your Cracker Bites
Now for the heart and soul of our recipe: the rich, buttery, and utterly divine salted caramel! This step requires a little attention, but it’s incredibly rewarding. Don’t be intimidated; I’ll walk you through every bubbling, aromatic moment to ensure you achieve the perfect consistency and flavor for your Salted Caramel Cracker Bites.
- Melt the Butter: In a medium-sized, heavy-bottomed saucepan, combine the 1 cup (226g) of unsalted butter and 1 cup (200g) of packed light brown sugar. I always recommend a heavy-bottomed saucepan because it distributes heat more evenly, which is vital for preventing the caramel from scorching. Place the saucepan over medium heat.
- Bring to a Boil and Stir: As the butter melts and combines with the brown sugar, stir continuously with a heat-proof spatula or wooden spoon. Your goal here is to fully incorporate the butter and sugar until the mixture becomes smooth and homogenous. Once the butter is completely melted and the sugar is dissolved, bring the mixture to a full, rolling boil. This isn’t a gentle simmer; you want to see large, consistent bubbles across the entire surface.
- Boil for the Perfect Consistency: Once it reaches that full rolling boil, continue to boil the mixture for exactly 3 minutes, stirring constantly. This constant stirring is crucial to prevent the caramel from sticking to the bottom and burning, and it helps the sugar cook evenly. During these three minutes, you’ll notice the caramel transforming. It will thicken slightly, deepen in color, and develop a rich, inviting aroma. Resist the urge to shorten this boiling time, as those three minutes are essential for the caramel to reach the correct consistency that will set properly on your Salted Caramel Cracker Bites.
- Remove from Heat and Flavor: Immediately after the 3 minutes of boiling, remove the saucepan from the heat. This is important to stop the cooking process promptly. Now, carefully stir in the ½ teaspoon of fine sea salt and the 1 teaspoon of pure vanilla extract. The vanilla will release a beautiful fragrance, and the salt will begin to dissolve, infusing the caramel with that signature salted flavor. Stir until both are fully incorporated. Be cautious as you add the vanilla; the steam can be quite hot.
Expert Tip: Achieve the Ideal Caramel Texture
For me, the key to successful caramel is patience and observation. Don’t rush the boiling process, and pay attention to the visual cues. The caramel should be a beautiful deep amber color, not too pale (meaning it hasn’t cooked enough) and definitely not dark brown or smoking (meaning it’s overcooked and likely burnt). The consistency should be thick enough to coat the back of your spoon but still pourable. If you find your caramel looks too thin after 3 minutes, it might be due to a lower heat setting; next time, ensure it’s a vigorous, rolling boil. If it looks too thick, you might have boiled it too long, in which case it might be a bit chewier than desired, but still delicious!
Assembling Your Delicious Salted Caramel Cracker Bites
With our golden caramel ready, it’s time for the exciting assembly phase! This is where those plain crackers are transformed into the base of our incredible Salted Caramel Cracker Bites. You’ll want to work fairly quickly here, as the caramel will start to cool and thicken.
- Pour the Caramel: Carefully and evenly pour the hot caramel mixture over the arranged crackers on your prepared baking sheet. Start by pouring a generous stream down the middle, then move outwards to cover all the crackers. Don’t worry if it doesn’t look perfectly even right away.
- Spread Evenly: Using your heat-proof spatula or the back of a spoon, gently and quickly spread the caramel to cover every single cracker. Make sure to nudge it into all the cracks and crevices between the crackers, creating a unified sheet of caramel-coated goodness. The goal is to ensure a consistent layer of caramel over all the crackers. Take care not to disturb the crackers themselves too much. I find that gently tilting the baking sheet can also help the caramel flow and settle into place.
Baking Your Salted Caramel Cracker Bites to Golden Perfection
Now, we move to the oven, where a little heat will further caramelize our mixture and fuse it beautifully with the crackers, creating that irresistible crisp-chewy texture that makes these Salted Caramel Cracker Bites so addictive. This baking step is critical for developing the final depth of flavor and setting the caramel just right.
- Into the Oven They Go: Carefully transfer the baking sheet with the caramel-covered crackers to your preheated 350°F (175°C) oven.
- Bake Until Bubbly and Golden: Bake for 10-12 minutes. During this time, you’ll observe the caramel bubbling vigorously and spreading further over the crackers. It will also deepen in color to a beautiful golden-brown. Keep a close eye on it, especially towards the end of the baking time, as ovens can vary. You want the caramel to be actively bubbling across the entire surface and showing signs of a richer, more toasted hue. If it looks like it’s browning too quickly on the edges, you can gently rotate the pan halfway through baking. The baking process helps to dry out the caramel slightly, making it more stable and giving it that signature crisp-chewy texture once cooled.
The Finishing Touches: Sprinkling, Cooling, and Optional Indulgence
The journey to creating these incredible Salted Caramel Cracker Bites is nearly complete! This final stage is all about adding that last layer of salt, allowing them to cool and set perfectly, and, if you’re feeling extra indulgent, adding a delightful chocolate topping. Each step here contributes to the irresistible allure and texture of your finished treats.
- Sprinkle with More Sea Salt: As soon as you remove the baking sheet from the oven, and while the caramel is still hot and molten, evenly sprinkle the remaining ¼ to ½ teaspoon of fine sea salt over the entire surface. The residual heat will help the salt adhere beautifully to the caramel. This extra sprinkle of salt is what truly elevates these bites, providing a delightful contrast to the sweet caramel and enhancing all the flavors. Don’t skip this step – it’s a hallmark of the Salted Caramel Cracker Bites experience!
- Optional Chocolate Layer (If Desired): If you’re adding chocolate, this is the perfect moment. Immediately after sprinkling with salt, evenly scatter the 1 cup of chocolate chips over the hot caramel. The residual heat from the caramel and the baking sheet will begin to melt the chocolate. Let it sit for 3-5 minutes, allowing the chocolate to soften and become glossy.
- Spread the Chocolate (If Using): Once the chocolate chips are soft and shiny, use an offset spatula or the back of a spoon to gently spread the melted chocolate evenly over the caramel layer, creating a smooth, luscious topping. Work quickly and gently to avoid disturbing the underlying caramel. This chocolate layer, when set, adds a wonderful snap and extra richness to your Salted Caramel Cracker Bites.
- Cool Completely: This is arguably the most crucial step for achieving the perfect texture. Allow the entire sheet of Salted Caramel Cracker Bites to cool completely on the baking sheet. I usually let it sit at room temperature for at least 1-2 hours, or until the caramel is firm to the touch and no longer warm. If you’re in a hurry, you can transfer the baking sheet to the refrigerator for about 30-45 minutes to speed up the cooling process. Do not try to cut or break the bites while they are still warm, as the caramel will be too soft and sticky, resulting in a messy, gooey situation. Patience here will be greatly rewarded with perfectly crisp and clean breaks.
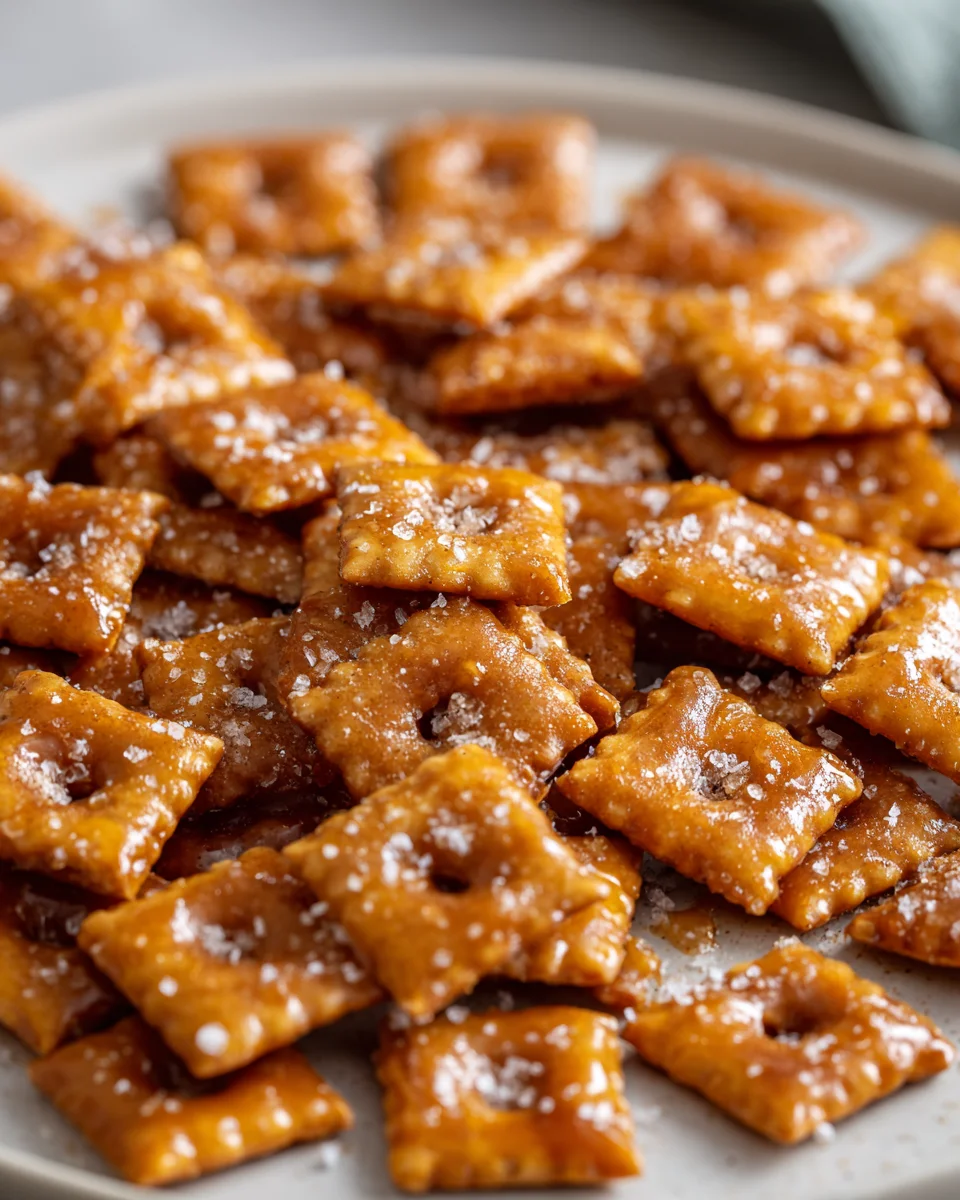
- Break into Bites: Once completely cooled and set, carefully lift the entire sheet of Salted Caramel Cracker Bites off the baking sheet using the parchment paper. Transfer it to a cutting board. You can either use a sharp knife to cut them into neat squares or rectangles, or, for a more rustic and charming look, simply break the sheet apart with your hands into irregular pieces. I often prefer the latter, as it adds a homemade touch. Aim for bite-sized pieces that are easy to pick up and enjoy.
Storage Tips for Long-Lasting Freshness
Once your amazing Salted Caramel Cracker Bites are broken into pieces, store them in an airtight container at room temperature. They will stay fresh and delightfully crisp for up to one week. If you’ve added a chocolate layer, storing them in the refrigerator can help prevent the chocolate from blooming in warmer climates, but they might become a bit firmer. Simply bring them to room temperature for a few minutes before serving for the best texture. These make fantastic gifts, party treats, or simply a well-deserved indulgence for yourself!
Conclusion:
Well, my friends, we’ve reached the sweet end of our journey, and I genuinely hope you’re as excited as I am about this incredible recipe. If there’s one dessert that truly embodies the perfect harmony of flavors and textures, it’s the one we’ve just explored. These aren’t just any treats; they are a delightful symphony of crispy, chewy, sweet, and salty, all rolled into one irresistible bite. I’m talking about a snack that’s deceptively simple to make yet delivers an utterly gourmet experience. It’s the kind of recipe that makes you look like a kitchen wizard without requiring hours of complex culinary work. The blend of rich, buttery caramel with that satisfying snap of a cracker, all elevated by a sprinkle of flaky sea salt, creates a sensation that is truly addictive. This isn’t just a dessert; it’s a mood lifter, a crowd-pleaser, and an absolute game-changer for your dessert repertoire. I truly believe everyone needs this kind of simple joy in their life, and that’s precisely what this recipe delivers. It’s perfect for a quick indulgence, a thoughtful homemade gift, or a standout addition to any party spread. The ease with which these come together means you can whip up a batch whenever a craving strikes or an unexpected guest arrives, ensuring you’re always prepared with something spectacular. This recipe has quickly become a staple in my home for its sheer versatility and undeniable deliciousness, and I know it will in yours too.
Once you’ve mastered the basic technique, the fun truly begins with serving and customizing your new favorite indulgence. For a simple yet elegant presentation, arrange them artfully on a platter with a fresh cup of coffee or a comforting mug of tea. The contrasting temperatures and flavors are a match made in heaven. Imagine a plate of these alongside a scoop of vanilla bean ice cream, where the crunch and chew of the cracker bites perfectly complement the creamy coldness. You could even get creative and crush them slightly to use as a unique topping for yogurt parfaits, a cheesecake crust, or to add texture to a simple fruit salad. They make an exceptional edible gift, packaged beautifully in a clear bag with a ribbon – trust me, your friends and family will be begging for the recipe. I’ve found that they are always the first to disappear from any potluck or gathering I bring them to, sparking conversations and smiles all around. Their portable nature also makes them ideal for school lunches or a delightful office treat, bringing a moment of unexpected bliss to a busy day.
Creative Variations to Make Them Yours!
Now, let’s talk about how you can truly make this recipe your own. While the classic version is utterly sublime, the beauty of this creation lies in its adaptability. Don’t feel limited to just one type of cracker; experiment with buttery Ritz crackers for a richer base, crunchy graham crackers for a more classic s’mores vibe, or even sturdy shortbread cookies for an extra decadent foundation. The chocolate possibilities are endless too! Instead of just a drizzle, consider fully coating half of your Salted Caramel Cracker Bites in dark chocolate for an intense cocoa punch, or use white chocolate with a sprinkle of colorful sprinkles for a festive look. Feeling nutty? Sprinkle chopped pecans, toasted almonds, or even crunchy peanuts over the chocolate layer before it sets for added flavor and texture. A tiny pinch of cinnamon or even a whisper of chili powder in your caramel can introduce a surprising depth that will intrigue and delight. For special occasions, you could adorn them with edible glitter, festive sprinkles, or even finely chopped peppermint candy during the holiday season. The key is to have fun and let your imagination run wild! Each batch can be a new adventure, tailoring them to your specific cravings or the theme of your next gathering. This adaptability is truly what makes these treats so enduringly popular and why I keep coming back to them time and time again.
So, my wonderful readers, I wholeheartedly urge you to roll up your sleeves and give this recipe a try. You’re not just making a dessert; you’re creating moments of joy, sharing warmth, and perhaps even starting a new tradition. There’s an unparalleled satisfaction that comes from creating something so delicious with your own hands, and this recipe offers that in spades. Once you experience the magic, I truly hope you’ll come back and share your creations with me! Did you try a new cracker? Experiment with a different chocolate? Add a unique topping? I absolutely love hearing about your kitchen adventures and seeing how you put your personal stamp on these treats. Don’t hesitate to share your photos and tell us about your experience in the comments or on social media. Your feedback and creativity inspire us all. So go ahead, treat yourself, treat your loved ones, and discover the pure delight of homemade Salted Caramel Cracker Bites. Happy baking, and I can’t wait to hear all about it!
Salted Caramel Cracker Bites: Easy Sweet & Salty Treat!
Discover one of the most delightfully simple yet incredibly addictive treats you’ll ever make. Combining humble pantry staples like crisp crackers, luxurious homemade caramel, and a tantalizing whisper of sea salt, these Salted Caramel Cracker Bites offer an irresistible crunch, a rich chew, and a perfect balance of sweet and salty flavors. An undeniable crowd-pleaser for any occasion!
Ingredients
Instructions
Important Information
Nutrition Facts (Per Serving)
It is important to consider this information as approximate and not to use it as definitive health advice.
Allergy Information
Please check ingredients for potential allergens and consult a health professional if in doubt.