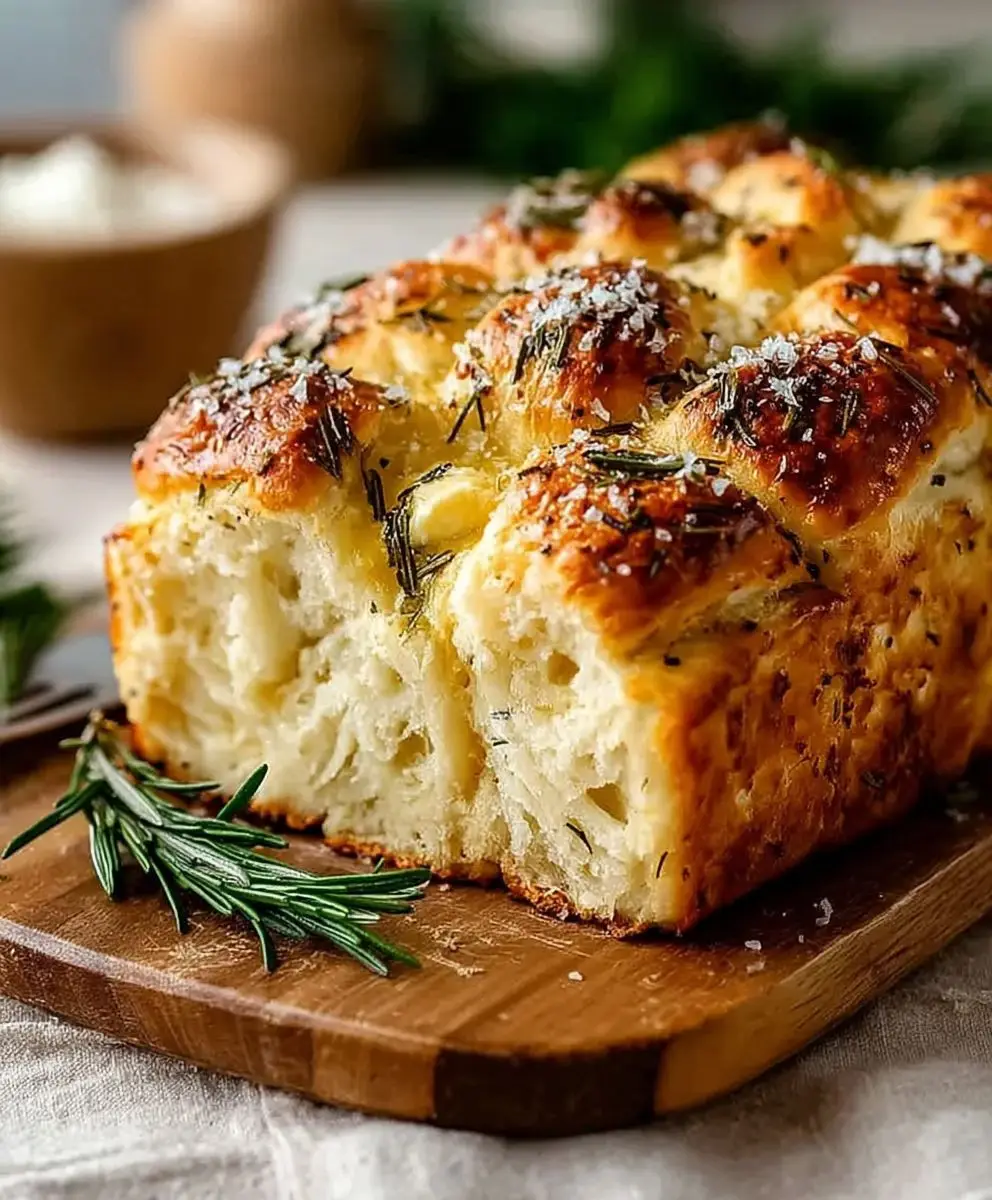
Rosemary Garlic Pull Apart Bread: just the name conjures images of warm, fragrant loaves gracing tables at cozy gatherings, doesn’t it? Imagine sinking your teeth into soft, buttery layers infused with the earthy aroma of rosemary and the pungent kick of garlic. This isn’t just bread; it’s an experience, a conversation starter, and a guaranteed crowd-pleaser.
While the exact origins of pull-apart bread are somewhat debated, its concept draws inspiration from various baking traditions where sharing and communal eating are central. Think of the monkey bread of American fame, or even the enriched doughs found in many European cuisines. The beauty of Rosemary Garlic Pull Apart Bread lies in its simplicity and adaptability. It transforms a basic bread dough into something truly special, perfect for everything from casual weeknight dinners to elegant holiday feasts.
But why is this bread so universally loved? It’s a symphony of textures and flavors. The soft, pillowy interior contrasts beautifully with the slightly crisp, golden-brown exterior. The rosemary and garlic create an irresistible savory profile that’s both comforting and sophisticated. And let’s not forget the sheer fun of pulling apart each individual piece, making it an interactive and engaging dish for all ages. Plus, it’s surprisingly easy to make, requiring minimal effort for maximum impact. So, are you ready to bake a loaf of happiness? Let’s get started!

Ingredients:
- For the Dough:
- 3 ½ cups (420g) all-purpose flour, plus more for dusting
- 1 teaspoon (5g) instant yeast
- 1 ½ teaspoons (8g) salt
- 1 ½ cups (360ml) warm water (105-115°F / 40-46°C)
- 2 tablespoons olive oil, plus more for greasing
- For the Garlic Rosemary Butter:
- ½ cup (1 stick / 113g) unsalted butter, melted
- 6 cloves garlic, minced
- 2 tablespoons fresh rosemary, finely chopped
- ½ teaspoon salt
- ¼ teaspoon black pepper
- For the Topping (Optional):
- 2 tablespoons grated Parmesan cheese
- 1 tablespoon fresh rosemary, chopped
Preparing the Dough:
- Combine Dry Ingredients: In a large bowl, whisk together the flour, instant yeast, and salt. Make sure the yeast is well distributed throughout the flour. This helps ensure even rising.
- Add Wet Ingredients: Add the warm water and olive oil to the dry ingredients. Use a wooden spoon or your hands to mix until a shaggy dough forms. The dough will be sticky, and that’s perfectly fine!
- Knead the Dough: Turn the dough out onto a lightly floured surface. Knead for 5-7 minutes, or until the dough becomes smooth and elastic. If the dough is too sticky, add a little more flour, one tablespoon at a time, until it’s manageable. You can also use a stand mixer with a dough hook attachment for this step. Knead on medium speed for about 5 minutes.
- First Rise: Lightly grease a large bowl with olive oil. Place the dough in the bowl, turning to coat all sides with oil. Cover the bowl with plastic wrap or a clean kitchen towel. Let the dough rise in a warm place for 1-1.5 hours, or until doubled in size. This rise is crucial for developing the flavor and texture of the bread.
Making the Garlic Rosemary Butter:
- Melt the Butter: In a small bowl, melt the butter in the microwave or in a saucepan over low heat. Be careful not to burn the butter.
- Add Garlic and Rosemary: Add the minced garlic, chopped rosemary, salt, and pepper to the melted butter. Stir well to combine. The warmth of the butter will help release the flavors of the garlic and rosemary.
- Let it Infuse: Let the garlic rosemary butter sit for at least 10 minutes to allow the flavors to meld together. This step is important for maximizing the flavor of the bread.
Assembling the Pull-Apart Bread:
- Punch Down the Dough: After the dough has doubled in size, gently punch it down to release the air. Turn the dough out onto a lightly floured surface.
- Divide the Dough: Divide the dough into 16-20 equal pieces. I find it easiest to cut the dough in half, then each half in half again, and so on, until you have the desired number of pieces.
- Shape the Dough Balls: Roll each piece of dough into a small ball. Don’t worry about making them perfectly round.
- Dip and Layer: Dip each dough ball into the garlic rosemary butter, making sure to coat it well. Then, place the buttered dough balls in a greased 9-inch springform pan or cake pan, layering them on top of each other. You can arrange them randomly or in a more organized pattern.
- Second Rise: Cover the pan with plastic wrap or a clean kitchen towel. Let the dough rise again for 30-45 minutes, or until puffy. This second rise helps create a light and airy texture.
Baking the Bread:
- Preheat the Oven: Preheat your oven to 375°F (190°C). Make sure your oven is properly preheated for even baking.
- Prepare the Topping (Optional): If using, sprinkle the grated Parmesan cheese and chopped rosemary over the top of the bread.
- Bake the Bread: Bake for 25-30 minutes, or until the bread is golden brown and cooked through. To check for doneness, insert a toothpick into the center of the bread. If it comes out clean, the bread is done. If the top of the bread is browning too quickly, you can tent it with aluminum foil during the last 10 minutes of baking.
- Cool Slightly: Let the bread cool in the pan for 10-15 minutes before releasing it from the springform pan. This prevents the bread from falling apart.
- Serve and Enjoy: Serve the rosemary garlic pull-apart bread warm. It’s perfect as an appetizer, side dish, or even a snack! Enjoy pulling apart the delicious, buttery, garlicky bread.
Tips and Variations:
- Use Different Herbs: Feel free to experiment with different herbs in the garlic butter. Thyme, oregano, or sage would all be delicious additions.
- Add Cheese: You can add shredded mozzarella or provolone cheese to the layers of dough for an extra cheesy pull-apart bread.
- Make it Spicy: Add a pinch of red pepper flakes to the garlic butter for a little bit of heat.
- Prepare Ahead: You can prepare the dough ahead of time and store it in the refrigerator for up to 24 hours. Just let it come to room temperature before shaping and baking.
- Freezing Instructions: Baked pull-apart bread can be frozen for up to 2 months. Wrap it tightly in plastic wrap and then in aluminum foil. Thaw overnight in the refrigerator before reheating.
- Reheating Instructions: To reheat, wrap the bread in aluminum foil and bake at 350°F (175°C) for 10-15 minutes, or until warmed through.
Troubleshooting:
- Dough Not Rising: Make sure your yeast is fresh and that the water is warm enough (but not too hot) to activate the yeast. Also, make sure the room is warm enough for the dough to rise properly.
- Bread is Too Dense: Make sure you don’t add too much flour when kneading the dough. Over-kneading can also result in a dense bread.
- Bread is Burning: If the top of the bread is browning too quickly, tent it with aluminum foil during the last 10 minutes of baking.
Conclusion:
This Rosemary Garlic Pull Apart Bread is more than just a recipe; it’s an experience. The aroma alone, as it bakes, will transform your kitchen into a cozy haven. But the real magic happens when you tear into that warm, fragrant loaf, each piece infused with the savory goodness of rosemary and garlic. It’s the perfect blend of rustic charm and sophisticated flavor, making it a guaranteed crowd-pleaser.
Why is this a must-try? Because it’s incredibly easy to make, even for novice bakers. The dough comes together quickly, and the pull-apart design is forgiving and fun. Plus, the combination of fresh rosemary and garlic is simply irresistible. It’s a dish that elevates any meal, from a casual weeknight dinner to a special occasion gathering. Forget store-bought bread; once you taste this homemade delight, you’ll never go back!
But the beauty of this recipe lies in its versatility. Feel free to experiment with different herbs and cheeses. Imagine adding a sprinkle of Parmesan or Asiago cheese between the layers for an extra cheesy kick. Or, for a spicier version, incorporate a pinch of red pepper flakes into the garlic butter. Sun-dried tomatoes would also be a fantastic addition, adding a burst of tangy sweetness.
Serving suggestions are endless! This Rosemary Garlic Pull Apart Bread is the perfect accompaniment to hearty soups and stews, adding a warm and comforting touch. It’s also a fantastic appetizer for parties, served with a side of marinara sauce or a creamy dip. For a truly decadent experience, try serving it alongside a cheese board with a selection of your favorite cheeses and cured meats. It also makes a wonderful addition to any brunch spread, offering a savory contrast to sweeter dishes.
And don’t limit yourself to just dinner or appetizers! Leftover pull-apart bread (if there are any!) makes fantastic croutons for salads or a delicious base for bruschetta. Simply cube the bread, toss it with olive oil and herbs, and bake until golden brown. Or, slice the bread and toast it for a flavorful breakfast toast.
I truly believe that this Rosemary Garlic Pull Apart Bread will become a staple in your kitchen. It’s a recipe that’s both satisfying to make and incredibly rewarding to eat. The joy of sharing this homemade bread with friends and family is unmatched. The smiles and compliments you’ll receive will make all the effort worthwhile.
So, what are you waiting for? Gather your ingredients, preheat your oven, and get ready to embark on a culinary adventure. I’m confident that you’ll love this recipe as much as I do. And most importantly, I want to hear about your experience! Did you try any variations? What did your family and friends think? Share your photos and stories in the comments below. I can’t wait to see your creations and hear about your baking triumphs. Happy baking! Let me know how your Rosemary Garlic Pull Apart Bread turns out!
Rosemary Garlic Pull Apart Bread: Easy Recipe & Baking Tips
Soft, buttery pull-apart bread with garlic and rosemary. Great appetizer or side!
Ingredients
Instructions
Recipe Notes
- Use Different Herbs: Experiment with thyme, oregano, or sage in the garlic butter.
- Add Cheese: Add shredded mozzarella or provolone cheese to the layers of dough.
- Make it Spicy: Add a pinch of red pepper flakes to the garlic butter.
- Prepare Ahead: Prepare the dough ahead of time and store it in the refrigerator for up to 24 hours.
- Freezing Instructions: Baked pull-apart bread can be frozen for up to 2 months.
- Reheating Instructions: Reheat, wrap the bread in aluminum foil and bake at 350°F (175°C) for 10-15 minutes, or until warmed through.
- Dough Not Rising: Make sure your yeast is fresh and that the water is warm enough (but not too hot) to activate the yeast.
- Bread is Too Dense: Make sure you don’t add too much flour when kneading the dough.
- Bread is Burning: If the top of the bread is browning too quickly, tent it with aluminum foil during the last 10 minutes of baking.