Red Velvet Cheesecake Bundt Dump Cake Recipe
Oh my goodness, get ready to fall head over heels for the Red Velvet Cheesecake Bundt Dump Cake Recipe! If you’re anything like me, you adore desserts that look like they took hours to create but secretly came together with minimal fuss. And let me tell you, this recipe is the ultimate star of that show!
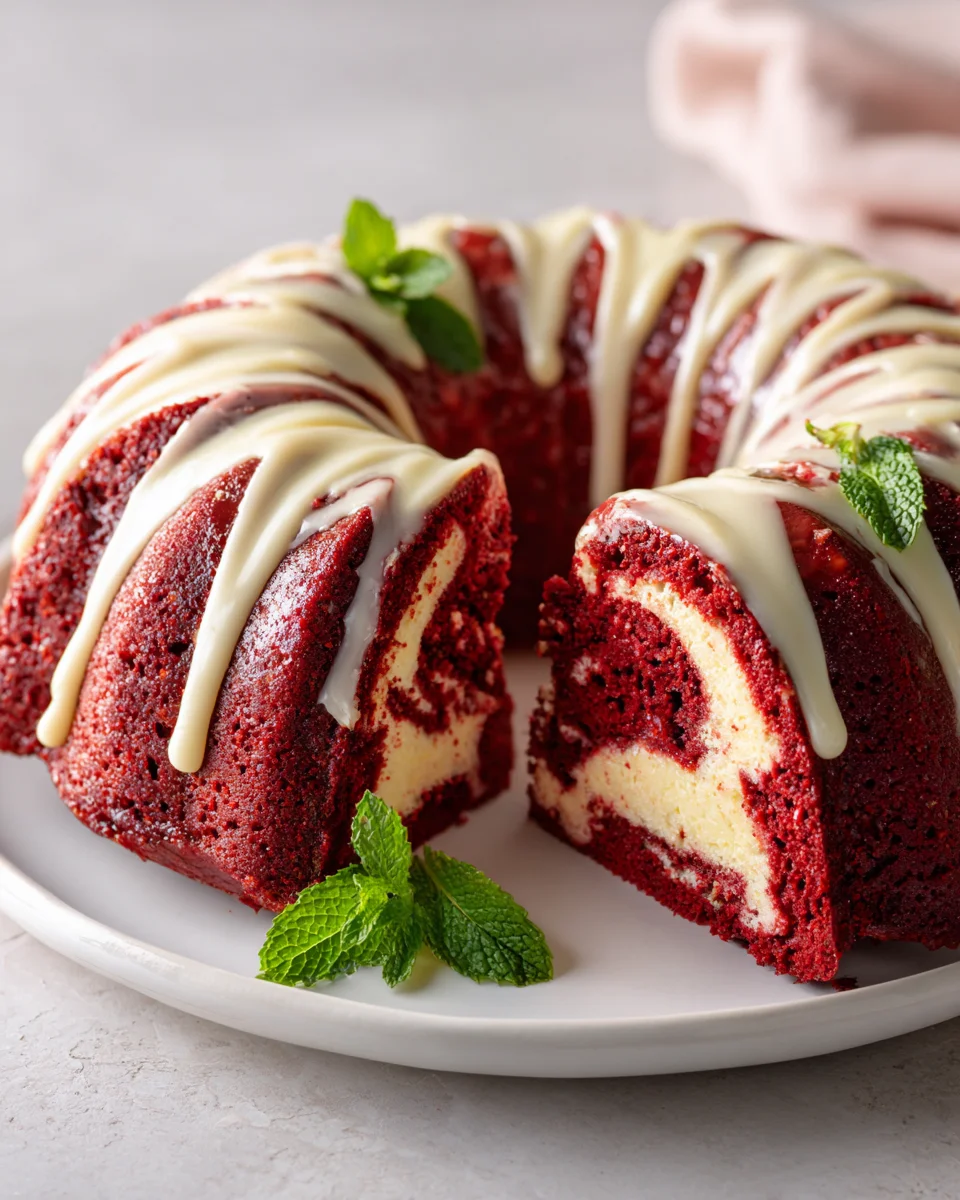
What makes this particular dish so special, you ask? Well, it’s a triple threat of deliciousness! We’re talking about the deep, iconic flavor and vibrant hue of classic red velvet cake, perfectly intertwined with the rich, tangy creaminess of cheesecake. And then, to top it all off, it’s baked in an elegant Bundt pan using the magical “dump cake” method. That means incredible flavor and stunning presentation with ridiculously little effort from you – seriously, it’s almost too good to be true!
You are absolutely going to adore this Red Velvet Cheesecake Bundt Dump Cake because it’s the perfect solution for satisfying multiple dessert cravings at once. Imagine a moist, tender red velvet cake base, generously swirled with pockets of dreamy cheesecake filling, all baked into that gorgeous Bundt shape. It’s decadent, it’s impressive, and it’s surprisingly simple to pull off. Whether you’re hosting a party, looking for a show-stopping potluck contribution, or just want to treat yourself to something truly special without spending all day in the kitchen, this recipe is about to become your new best friend. Trust me, every bite is pure bliss!

Ingredient Notes
Creating this Red Velvet Cheesecake Bundt Dump Cake is a delightful experience, and it all starts with gathering your ingredients. While the beauty of a dump cake lies in its simplicity, using good quality components will truly elevate your dessert!
- Red Velvet Cake Mix: This is the undeniable star of our show. I highly recommend using a premium brand for the best flavor and a wonderfully vibrant red hue. Any standard 15.25-ounce box will work perfectly. If you’re feeling adventurous and want to try a scratch-made version, you would need to prepare your red velvet cake batter from scratch, but that moves away from the “dump cake” ease! For a quick substitution if red velvet isn’t available, a chocolate fudge cake mix with a teaspoon or two of red food coloring could technically work, but it won’t quite capture that signature red velvet tang and subtle cocoa notes. Stick to red velvet if you can!
- Cream Cheese: You’ll want a full-fat block of cream cheese, softened to room temperature. This is essential for a smooth, lump-free cheesecake swirl. Avoid using whipped cream cheese or cream cheese spreads, as they have a different consistency and fat content that won’t yield the desired texture for the cheesecake layer. Lower-fat cream cheese might work, but it could result in a slightly less rich and creamy texture.
- Granulated Sugar & Powdered Sugar: Granulated sugar will be used in your cake mix preparation (as per box instructions), while powdered sugar is critical for the cheesecake filling. Powdered sugar dissolves beautifully into the cream cheese, ensuring a silky-smooth and sweet cheesecake layer without any graininess.
- Eggs: You’ll need eggs for both the cake mix (according to package directions) and for the cheesecake filling. Make sure your eggs are at room temperature, especially for the cream cheese mixture, as this helps everything emulsify smoothly.
- Milk or Buttermilk: For the cake mix, you’ll follow the package instructions, often calling for water or milk. I prefer using whole milk or even buttermilk if the cake mix allows, as it adds a richer flavor and moistness to the red velvet cake. For the cheesecake mixture, you might use a splash of milk to achieve the perfect consistency if it’s too thick.
- Vegetable Oil: Typically used in the cake mix batter, as per package directions, to ensure a moist cake. You could substitute with an equal amount of melted unsalted butter for an even richer flavor, if desired.
- Vanilla Extract: A good quality vanilla extract is key for both layers. It enhances the subtle chocolate notes in the red velvet and really brings out the classic creaminess in the cheesecake. Don’t skip it!
- Optional Add-ins: For extra indulgence, consider adding a handful of white chocolate chips or semi-sweet chocolate chips to the red velvet cake batter or sprinkled over the cheesecake layer. This adds another dimension of flavor and texture.
Regarding substitutions, thankfully, this dessert doesn’t involve any meat or alcohol, so the specific substitutions for pork to beef or alcohol to non-alcohol alternatives are not applicable here. Just focus on these delicious dessert ingredients!
Step-by-Step Instructions
Get ready for one of the easiest, yet most impressive, Bundt cakes you’ll ever make! This Red Velvet Cheesecake Bundt Dump Cake lives up to its name by being incredibly simple to assemble while delivering big on flavor and that stunning marbled effect. Here’s how I make it:
- Preheat and Prepare Your Bundt Pan: First things first, preheat your oven to 350°F (175°C). This is a crucial step for Bundt cakes: thoroughly grease your Bundt pan. I like to use baking spray with flour (like Baker’s Joy) or shortening, making sure to get into every nook and cranny, then lightly dust with flour, tapping out any excess. This ensures your beautiful cake will release perfectly.
- Prepare the Cheesecake Filling: In a medium bowl, combine your softened cream cheese, powdered sugar, one large egg, and vanilla extract. Using an electric mixer (or a whisk and some elbow grease), beat these ingredients together until the mixture is completely smooth and creamy, with no lumps. Be careful not to overbeat, as this can incorporate too much air. Set this aside.
- Mix the Red Velvet Cake Batter: In a large bowl, prepare the red velvet cake mix according to the package directions. Typically, this involves combining the cake mix with water (or milk), vegetable oil, and 2-3 large eggs. Mix until just combined and smooth. Remember, for a moist cake, avoid overmixing the batter!
- Layer into the Bundt Pan: Now for the “dump” part!
- Pour about half of your prepared red velvet cake batter evenly into the bottom of your greased Bundt pan.
- Next, carefully dollop spoonfuls of the cheesecake filling over the red velvet batter. Try to distribute it somewhat evenly, but don’t worry if it’s not perfect; it’s a dump cake after all!
- Finally, gently pour the remaining red velvet cake batter over the cheesecake dollops, spreading it as evenly as you can to cover the cheesecake layer.
- Create the Swirl (Optional but Recommended): For that signature cheesecake swirl, take a butter knife or a thin skewer and gently run it through the batters in a swirling motion a few times. Don’t overdo it, or your distinct layers will blend completely! Just a few passes will create beautiful marbling.
- Bake to Perfection: Place your Bundt pan in the preheated oven and bake for approximately 50-65 minutes. Baking times can vary depending on your oven, so start checking around 50 minutes. The cake is done when a wooden skewer inserted into the cake (avoiding the cheesecake areas) comes out clean, and the top springs back when lightly touched.
- Cool and Release: Once baked, remove the cake from the oven and let it cool in the Bundt pan on a wire rack for 10-15 minutes. This cooling time in the pan is crucial for the cake to set and firm up, preventing it from breaking when inverted. After 10-15 minutes, place your wire rack over the Bundt pan and carefully invert the cake. Lift the pan off gently. If it doesn’t release immediately, give it a few gentle taps on the bottom. Let the cake cool completely on the wire rack before glazing or slicing.
Once cooled, you can dust it with powdered sugar, drizzle with a simple cream cheese glaze, or just enjoy it as is!
Tips & Suggestions
Making this Red Velvet Cheesecake Bundt Dump Cake is already incredibly easy, but I’ve gathered a few extra tips and suggestions to ensure your cake turns out absolutely perfect every single time. Trust me, these little details make a big difference!
- The Bundt Pan is Your Best Friend (or Foe!): Seriously, take your time greasing and flouring your Bundt pan. This is the number one reason Bundt cakes stick. I always use a baking spray with flour, ensuring I get into every ridge and crevice. If you don’t have spray, use solid shortening to coat thoroughly, then dust with flour, tapping out the excess. A well-prepped pan means a beautifully released cake!
- Room Temperature Ingredients are Key: For the cheesecake layer, ensure your cream cheese and egg are at room temperature. This allows them to mix smoothly and evenly, preventing lumps in your cheesecake swirl and creating a truly creamy texture.
- Don’t Overmix Anything: Whether it’s the cake batter or the cheesecake filling, overmixing can lead to a tough cake or a cracked cheesecake. Mix until just combined and smooth. A gentle hand is all you need for a tender cake.
- The Swirl: Less is More: When creating that beautiful marble effect, resist the urge to over-swirl! Just a few gentle passes with a knife or skewer through the layers are enough. Too much swirling will cause the red velvet and cheesecake to completely blend, losing that distinct, pretty pattern.
- Patience During Cooling: I know it’s hard to wait, especially when your kitchen smells divine, but letting the cake cool in the pan for 10-15 minutes before inverting is non-negotiable. This allows the cake to set and firm up, reducing the chance of it breaking or crumbling when you remove it. Once out of the pan, let it cool completely on a wire rack before attempting to slice or glaze. Warm cheesecake can be messy!
- Enhance the Red Velvet Flavor: If you want to deepen the red velvet flavor even more, you can add a teaspoon of unsweetened cocoa powder to your cake batter, even if it’s from a mix. It won’t turn it into a chocolate cake, but it will enhance the subtle cocoa notes that are characteristic of red velvet.
- Serving Suggestions: This cake is absolutely delicious on its own, but a simple dusting of powdered sugar really makes it pop. For an extra touch, I love to drizzle it with a homemade cream cheese glaze (just powdered sugar, softened cream cheese, milk, and vanilla extract mixed until smooth) or serve it with a dollop of freshly whipped cream.
- Vary Your Mix-Ins: Feel free to customize! White chocolate chips or even a handful of chopped pecans could be folded into the red velvet batter for added texture and flavor.
Storage
Storing your Red Velvet Cheesecake Bundt Dump Cake properly is important to maintain its freshness and delicious flavor, especially because of the cream cheese component. Here’s how I handle leftovers:
- Room Temperature: Due to the cream cheese in this cake, it’s best not to leave it at room temperature for an extended period. I generally adhere to the two-hour rule for food safety with dairy products. If you’re serving it at a gathering, it’s fine to leave it out for a couple of hours, but after that, it should be refrigerated.
- Refrigeration: This cake keeps beautifully in the refrigerator. Once completely cooled, store the cake in an airtight container or wrap it tightly with plastic wrap. It will stay fresh and moist for 3-4 days. I find that the flavors sometimes even meld and deepen a bit overnight in the fridge! It’s delightful served chilled, or you can let individual slices come to room temperature for about 15-20 minutes before enjoying if you prefer.
- Freezing: Yes, you can absolutely freeze this Bundt cake! If you plan to freeze it, I recommend doing so without any glaze or dusting. Once the cake is completely cool, wrap it tightly first in plastic wrap, and then again in aluminum foil. You can freeze the whole cake or individual slices. It will keep well in the freezer for up to 1 month. To thaw, simply transfer it to the refrigerator overnight, or let individual slices thaw at room temperature for a few hours.
Final Thoughts
And there you have it! I truly hope you’re as excited as I am about this incredible Red Velvet Cheesecake Bundt Dump Cake Recipe. What makes this cake an absolute game-changer in your kitchen? It’s the perfect marriage of convenience and decadence. You get the striking visual appeal and tender crumb of a classic red velvet cake, beautifully swirled with a rich, tangy cheesecake layer, all baked effortlessly in a bundt pan. No complicated steps, just pure, unadulterated deliciousness ready to impress. This isn’t just another dessert; it’s a showstopper that tastes like you spent hours, but actually came together in a flash. Trust me, once you experience the joy of biting into this harmonious blend of flavors and textures, you’ll understand why this Red Velvet Cheesecake Bundt Dump Cake Recipe is destined to become a staple in your baking repertoire. Go ahead, give it a try – your taste buds will thank you!

Red Velvet Cheesecake Bundt Dump Cake: Easy & Delicious!
- Total Time: 21 minute
- Yield: 8 servings 1x
Description
This Red Velvet Cheesecake Bundt Dump Cake combines the rich flavors of red velvet cake and creamy cheesecake into one stunning dessert. It’s impressively simple to make, perfect for any occasion!
Ingredients
- 1 box (15.25 ounces) Red Velvet Cake Mix
- 1 block (full-fat) Cream Cheese, softened to room temperature
- Granulated Sugar (as per cake mix instructions)
- Powdered Sugar
- 2–3 large Eggs (room temperature)
- Milk or Buttermilk (as per cake mix instructions)
- Vegetable Oil (as per cake mix instructions)
- Vanilla Extract
- Optional: white chocolate chips or semi-sweet chocolate chips
Instructions
- Preheat your oven to 350°F (175°C) and thoroughly grease your Bundt pan with baking spray or shortening, then dust with flour.
- In a medium bowl, combine softened cream cheese, powdered sugar, one large egg, and vanilla extract. Beat until smooth and creamy.
- In a large bowl, prepare the red velvet cake mix according to package directions, combining it with water (or milk), vegetable oil, and 2-3 large eggs. Mix until just combined.
- Pour about half of the red velvet cake batter into the bottom of the greased Bundt pan.
- Dollop spoonfuls of the cheesecake filling over the red velvet batter, distributing it somewhat evenly.
- Pour the remaining red velvet cake batter over the cheesecake layer, spreading it evenly.
- For a cheesecake swirl, gently run a butter knife or skewer through the batters a few times.
- Bake in the preheated oven for approximately 50-65 minutes, checking for doneness with a wooden skewer.
- Let the cake cool in the Bundt pan on a wire rack for 10-15 minutes before inverting onto the rack to cool completely.
- Prep Time: 15 mins
- Cook Time: 50-65 mins
- Category: Dessert
- Method: Baking
- Cuisine: American
Nutrition
- Serving Size: 1 slice
- Calories: 350
- Sugar: 30 g
- Sodium: 300 mg
- Fat: 18 g
- Saturated Fat: 8 g
- Unsaturated Fat: 10 g
- Trans Fat: 0 g
- Carbohydrates: 40 g
- Fiber: 1 g
- Protein: 5 g
- Cholesterol: 70 mg
Keywords: Ensure all ingredients are at room temperature for the best texture. Don't overmix the batters to avoid a tough cake. You can enhance the red velvet flavor with a teaspoon of unsweetened cocoa powder.