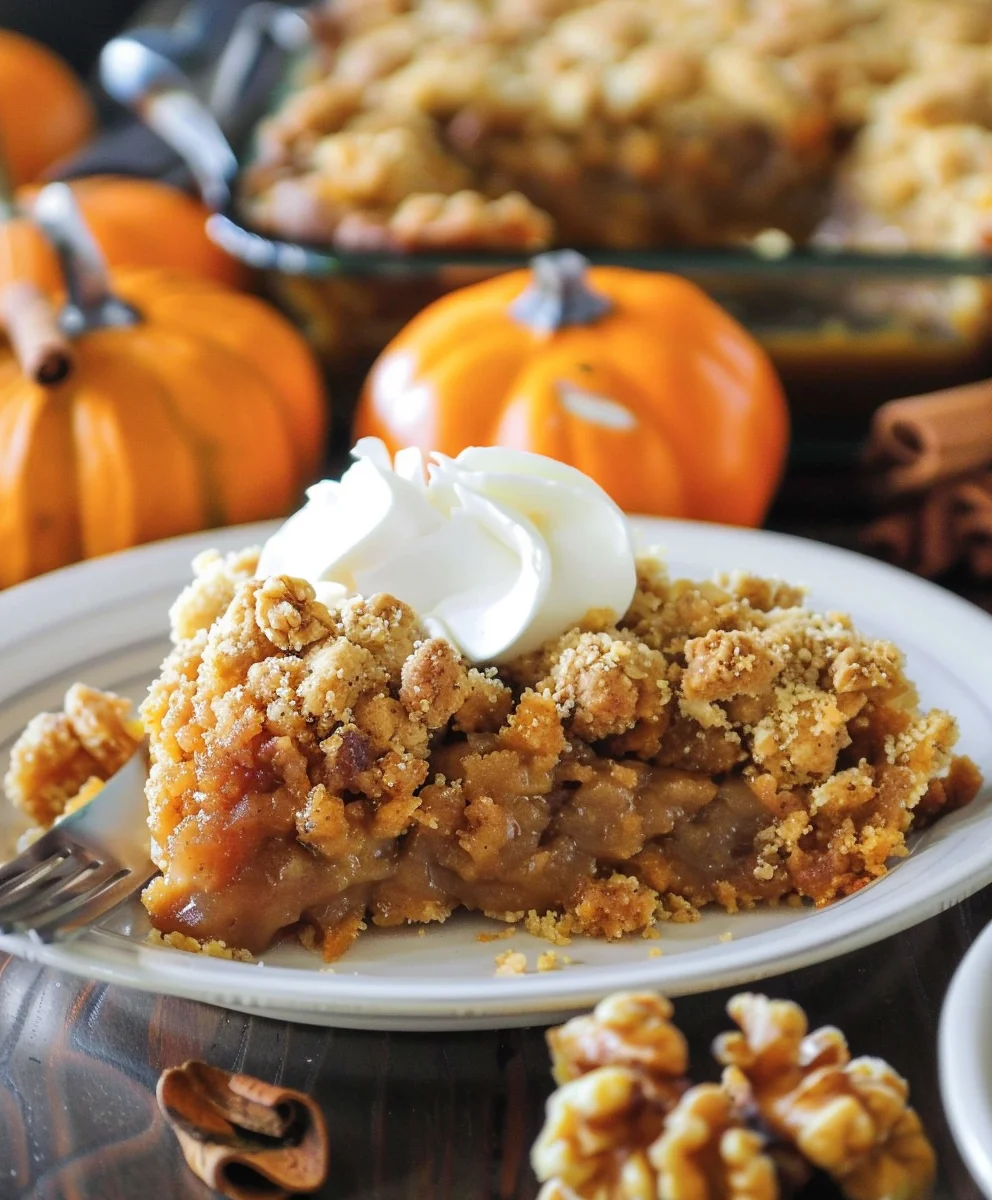
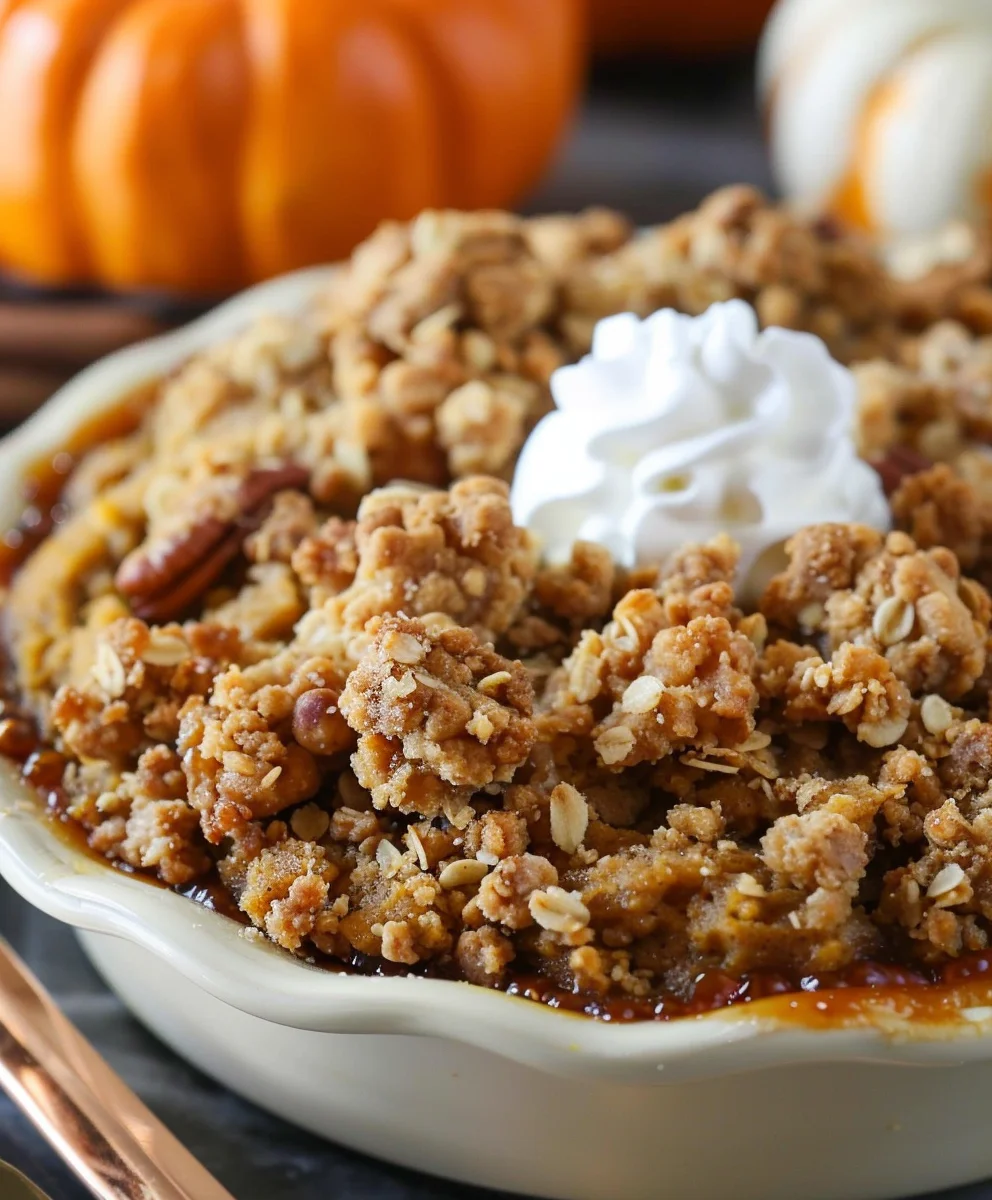
Pumpkin Pie Crisp is an autumn dessert dream come true, offering all the beloved flavors of a classic pumpkin pie but with an irresistibly easy, buttery, and crunchy streusel topping. I’ve always found something uniquely comforting about pumpkin-spiced treats, and this delightful confection takes that cozy feeling to a whole new level. While the traditional pumpkin pie holds a revered spot in American culinary history, especially during Thanksgiving and other fall celebrations, this crisp variation brings a contemporary, fuss-free approach to those cherished seasonal tastes. People simply adore this dish for its harmonious blend of textures – the smooth, creamy, and warmly spiced pumpkin custard beneath a golden, sweet, and perfectly crumbly oat topping. It provides the iconic taste of pumpkin pie without the elaborate crust work, making it a fantastic, convenient option for any gathering or a simple cozy evening at home. I am so excited for you to experience the magic of this Pumpkin Pie Crisp yourself.

Ingredients:
- For the Creamy Pumpkin Filling:
- One (1) 29-ounce can (approximately 3 ½ cups) pure pumpkin puree, not pumpkin pie filling. Make sure it’s 100% pure pumpkin for that authentic flavor.
- One (1) 12-ounce can evaporated milk. This provides a wonderfully rich and creamy texture that traditional milk just can’t quite achieve.
- Three (3) large eggs, preferably at room temperature. Room temperature eggs emulsify better and create a smoother, more uniform custard.
- One (1) cup granulated sugar. This sweetens the pumpkin beautifully without making it overly sugary, allowing the spices to shine.
- Two (2) tablespoons all-purpose flour. A small amount of flour helps stabilize the filling and prevents it from becoming watery.
- Two (2) teaspoons ground cinnamon. A classic spice that truly defines pumpkin pie flavor.
- One (1) teaspoon ground ginger. Adds a warm, slightly spicy kick that complements the cinnamon.
- ½ teaspoon ground nutmeg. Essential for that traditional, aromatic pumpkin spice blend.
- ¼ teaspoon ground cloves. A potent spice that adds depth and warmth; use sparingly but don’t omit!
- ½ teaspoon salt. Don’t skip the salt! It balances the sweetness and enhances all the other flavors, making the spices pop.
- One (1) teaspoon pure vanilla extract. Adds another layer of warmth and complexity to the filling.
- For the Irresistible Crisp Topping:
- One and a half (1 ½) cups all-purpose flour. This forms the base of our crumbly topping.
- One (1) cup packed light brown sugar. Brown sugar adds moisture and a rich, molasses-like sweetness that pairs perfectly with pumpkin.
- ½ cup granulated sugar. For additional sweetness and a little textural contrast.
- One (1) teaspoon ground cinnamon. To echo the flavors in the filling and create a cohesive taste profile.
- ½ teaspoon ground nutmeg. Again, tying in with the pumpkin spice blend.
- ¼ teaspoon salt. Crucial for balancing the sweetness and enhancing the buttery flavor of the topping.
- One (1) cup (two sticks) unsalted butter, chilled and cut into ½-inch cubes. Cold butter is key for a truly crisp and crumbly topping. It creates pockets of steam during baking, resulting in that delightful texture.
- One (1) cup old-fashioned rolled oats. These add a wonderful chewiness and nutty flavor to the crisp. Avoid instant oats as they can become mushy.
- One (1) cup chopped pecans or walnuts (optional, but highly recommended). These add a fantastic crunch and depth of flavor to the topping, making your Pumpkin Pie Crisp even more special.
Instructions:
Preparing the Pumpkin Filling for Your Pumpkin Pie Crisp
- Preheat Your Oven: My first step, always, is to preheat my oven to 350°F (175°C). This ensures your oven is at the correct temperature when you’re ready to bake, which is crucial for even cooking and proper setting of the filling.
- Prepare Your Baking Dish: Lightly grease a 9×13-inch baking dish. I usually use a little non-stick cooking spray or a pat of butter to ensure nothing sticks, making cleanup so much easier.
- Combine Wet Ingredients: In a large mixing bowl, or the bowl of your stand mixer fitted with the whisk attachment, combine the pure pumpkin puree, evaporated milk, and room temperature eggs. Whisk these ingredients together until they are well combined and smooth. I like to start on a low speed to avoid splatters, then increase to medium until everything is homogenous.
- Sift Dry Ingredients (for filling): In a separate, smaller bowl, whisk together the granulated sugar, all-purpose flour, ground cinnamon, ground ginger, ground nutmeg, ground cloves, and salt. Whisking them together before adding ensures that all the spices and flour are evenly distributed throughout the filling, preventing clumps of spice or undissolved sugar. This also incorporates a little air, which helps later.
- Incorporate Dry into Wet: Gradually add the dry ingredient mixture to the wet pumpkin mixture, mixing on low speed until just combined. Be careful not to overmix at this stage. Overmixing can lead to a tougher, less creamy filling. As soon as you see no more streaks of dry ingredients, stop mixing.
- Add Vanilla: Stir in the pure vanilla extract. A good quality vanilla extract really elevates the flavor profile of the Pumpkin Pie Crisp. Give it one last gentle stir to fully incorporate.
- Set Aside: Your beautiful, spiced pumpkin filling is now ready! Set it aside while we prepare the star of the show – that glorious crisp topping.
Crafting the Delicious Crisp Topping
- Combine Dry Topping Ingredients: In a large bowl, combine the all-purpose flour, light brown sugar (make sure it’s packed firmly into the measuring cup for accuracy!), granulated sugar, ground cinnamon, ground nutmeg, and salt. Use a whisk or a fork to thoroughly mix these dry ingredients together. You want to make sure the sugars are broken up and evenly distributed with the flour and spices.
- Cut in the Cold Butter: Now for the fun part – incorporating the butter! Add the chilled, cubed unsalted butter to the dry ingredient mixture. You have a few options here:
- Using a Pastry Blender: This is my preferred method. Work the butter into the flour mixture until it resembles coarse crumbs, with some pieces of butter still about the size of small peas. This takes a few minutes of consistent work.
- Using Your Fingertips: If you don’t have a pastry blender, your fingertips work wonderfully! Gently rub the butter into the flour mixture. The key is to work quickly so the butter doesn’t get too warm from the heat of your hands.
- Using a Food Processor: For a super quick method, pulse the dry ingredients and cold butter in a food processor until coarse crumbs form. Be careful not to over-process, or you’ll end up with a paste instead of a crumble.
The goal is to have varying sizes of butter pieces – some pea-sized, some smaller, which will melt and create that incredible crispy, flaky texture in your Pumpkin Pie Crisp.
- Add Oats and Nuts: Once the butter is incorporated to your liking, add the old-fashioned rolled oats and, if using, the chopped pecans or walnuts. Gently mix them in with your hands or a spoon until they are evenly distributed throughout the crumb mixture. These additions provide fantastic texture and a nutty depth that truly elevates this dessert.
Assembling and Baking Your Perfect Pumpkin Pie Crisp
- Pour the Filling: Pour the prepared pumpkin filling evenly into your lightly greased 9×13-inch baking dish. Use a spatula to spread it gently from edge to edge, ensuring a uniform layer. This smooth base is critical for a beautiful, even bake.
- Evenly Distribute the Crisp Topping: Carefully sprinkle the entire crisp topping mixture over the pumpkin filling. Try to get an even layer from one end of the dish to the other. Don’t press it down; just let it rest lightly on top of the filling. This allows for maximum crispiness during baking. You want every bite of your Pumpkin Pie Crisp to have that delicious crunch!
- Bake the Pumpkin Pie Crisp: Place the baking dish into your preheated 350°F (175°C) oven. Bake for approximately 50-65 minutes. The baking time can vary slightly depending on your oven, so keep an eye on it.
- Visual Cues for Doneness: The filling should be mostly set – a slight jiggle in the very center is okay, as it will continue to set as it cools. The crisp topping should be beautifully golden brown and look wonderfully crunchy. If the topping starts to brown too quickly before the filling is set, you can loosely tent the dish with aluminum foil for the last 15-20 minutes of baking.
- To Test for Doneness: You can carefully insert a knife into the pumpkin filling about 1 inch from the edge. If it comes out clean, the filling is likely set.
- Cool Completely: This step is arguably the most important for achieving the perfect texture. Once baked, carefully remove the Pumpkin Pie Crisp from the oven and place it on a wire rack to cool completely. This usually takes at least 2-3 hours, but sometimes longer, especially if your kitchen is warm. Resist the urge to cut into it early! Cooling allows the pumpkin filling to fully set into that creamy, custardy consistency and for the crisp topping to firm up to its ideal crunch. If you cut into it too soon, the filling might be too soft and messy. I’ve learned this the hard way more times than I care to admit!
Serving and Storing Your Homemade Pumpkin Pie Crisp
- Serve Warm or at Room Temperature: While delicious warm, especially with a scoop of vanilla bean ice cream or a dollop of freshly whipped cream, your Pumpkin Pie Crisp is also fantastic served at room temperature once fully set. The flavors of the spices truly deepen and meld beautifully as it cools.
- Garnishes (Optional, but Encouraged!): Elevate your serving experience with a dusting of powdered sugar, a sprinkle of extra cinnamon, or a drizzle of caramel sauce. These small touches make it feel extra special.
- Storage: If you happen to have any leftovers (which is a big “if” with this recipe!), cover the baking dish tightly with plastic wrap or aluminum foil. Store the Pumpkin Pie Crisp in the refrigerator for up to 3-4 days. While the crisp topping might lose a tiny bit of its initial crunch after refrigeration, the flavors remain absolutely delightful. You can gently warm individual servings in the microwave or a low oven if you prefer it warm again.
There you have it! A truly satisfying and incredibly delicious Pumpkin Pie Crisp that’s perfect for any fall gathering or simply as a comforting treat on a cozy evening. Enjoy every single bite of your homemade creation!
Conclusion:
Well, my friends, we’ve reached the sweet end of our journey, and I genuinely hope you’re feeling as excited as I am about this incredible recipe. After spending time perfecting every detail, I can confidently say that what we’ve created here isn’t just another dessert; it’s an experience. This dish masterfully blends the classic, comforting essence of traditional pumpkin pie with the delightful, crunchy texture of a crisp, offering the absolute best of both worlds in every single bite. It’s the kind of dessert that doesn’t just satisfy a sweet tooth; it warms the soul and brings people together around the table. Trust me, if you’re searching for that perfect autumnal treat that truly stands out, your quest ends right here.
Why is this recipe an absolute must-try, you ask? Let me count the ways! First, there’s the unparalleled flavor profile. We’re talking about a rich, creamy, perfectly spiced pumpkin filling that evokes all the cozy feelings of fall. It’s not overly sweet, allowing the natural pumpkin flavor to shine through, beautifully complemented by hints of cinnamon, nutmeg, and ginger. Then, there’s the glorious contrast provided by the crisp topping. Imagine golden-brown oats, buttery streusel, and a subtle crunch that elevates the entire dish from simply good to utterly divine. It’s this textural interplay – the smooth, luscious pumpkin against the crumbly, satisfying topping – that makes each spoonful an adventure. It’s also surprisingly straightforward to prepare, meaning you don’t need to be a seasoned baker to achieve spectacular results. I’ve designed this recipe to be approachable yet impressive, perfect for busy weeknights when you crave something special, or for grand holiday gatherings where you want to wow your guests without the stress. This isn’t just a dessert; it’s a testament to simple ingredients coming together to create something truly magical and utterly comforting. The aroma alone as it bakes will fill your home with the most inviting, autumnal fragrance, promising a treat that lives up to its delicious scent. Seriously, the moment you pull that bubbling, golden creation from the oven, you’ll understand exactly what I mean.
Elevate Your Pumpkin Pie Crisp Experience
Now, let’s talk about taking your Pumpkin Pie Crisp from amazing to absolutely unforgettable. While it’s utterly divine on its own, there are so many delightful ways to serve and customize it. My personal favorite way to enjoy a warm slice is with a generous scoop of vanilla bean ice cream. The cold, melting ice cream against the warm, spiced crisp is a match made in heaven, creating a luxurious sensory experience. If you’re not an ice cream person, a dollop of freshly whipped cream, perhaps infused with a hint of maple syrup or a dash of bourbon, would be equally spectacular. For an extra touch of elegance and crunch, consider sprinkling some toasted pecans or walnuts over the top just before serving. A light drizzle of caramel sauce or a sprinkle of flaky sea salt can also add intriguing layers of flavor. Don’t be afraid to experiment with your spices in the crisp topping either; a pinch of allspice or cardamom could add an exciting new dimension. For individual servings at a party, try baking the crisp in ramekins – they look adorable and make serving a breeze! You could even add a layer of chopped apples to the bottom of the pumpkin filling for an apple-pumpkin crisp hybrid, offering another fruity dimension. The possibilities are truly endless, and part of the fun is making this recipe uniquely your own. This Pumpkin Pie Crisp is incredibly versatile, making it perfect for any occasion or preference.
Your Turn!
So, what are you waiting for? I’ve poured my heart into developing this recipe, and now it’s your turn to bring it to life in your kitchen. I promise you, the joy of baking this beautiful dessert is only surpassed by the pleasure of sharing it with loved ones. Imagine the smiles, the satisfied sighs, and the compliments you’ll receive when you present this stunning creation. Don’t just read about it; go ahead and make it! Gather your ingredients, put on your favorite apron, and prepare for your home to be filled with the most delightful autumnal aromas. And once you’ve had a chance to try it, I would absolutely love to hear from you. Your feedback and experiences mean the world to me. Please come back and leave a comment below, share your photos on social media (I’d be thrilled to see them!), or simply tell me how it turned out for you. Did you try a unique serving suggestion? Did you make a brilliant variation? I’m eager to learn about your culinary adventures. Let’s create a community around delicious food, starting with this truly special Pumpkin Pie Crisp. Happy baking, and enjoy every single delightful bite!
Pumpkin Pie Crisp
Pumpkin Pie Crisp is an autumn dessert dream come true, offering all the beloved flavors of a classic pumpkin pie but with an irresistibly easy, buttery, and crunchy streusel-like topping. This contemporary, fuss-free approach provides the iconic taste of pumpkin pie without elaborate crust work.
Ingredients
-
1 (15 oz) can pure pumpkin puree
-
1 cup granulated sugar (for filling)
-
3 large eggs
-
2 teaspoons pumpkin pie spice
-
½ teaspoon salt (for filling)
-
2 teaspoons vanilla extract
-
⅔ cup heavy cream
-
2 cups all-purpose flour
-
1 ½ cups granulated sugar (for topping)
-
2 teaspoons cinnamon
-
½ teaspoon salt (for topping)
-
12 tablespoons (1 1/2 sticks) unsalted butter, melted
Instructions
-
Step 1
Preheat your oven to 350°F (175°C). Lightly grease a 9×13-inch baking dish. -
Step 2
In a large mixing bowl, whisk together the pumpkin puree, 1 cup granulated sugar, eggs, pumpkin pie spice, ½ teaspoon salt (for filling), vanilla extract, and heavy cream until well combined and smooth. Pour this filling evenly into the prepared baking dish. -
Step 3
In a separate large bowl, combine 2 cups all-purpose flour, 1 ½ cups granulated sugar (for topping), 2 teaspoons cinnamon, and ½ teaspoon salt (for topping). Pour in the 12 tablespoons (1 1/2 sticks) of melted unsalted butter and mix with a fork or your hands until coarse crumbs form. (Note: This recipe uses melted butter for the topping, resulting in a streusel-like texture.) -
Step 4
Carefully sprinkle the entire crisp topping mixture evenly over the pumpkin filling. Place the baking dish into the preheated oven and bake for approximately 50-65 minutes. The filling should be mostly set (a slight jiggle in the center is acceptable), and the topping should be golden brown and appear crunchy. -
Step 5
Remove the Pumpkin Pie Crisp from the oven and place it on a wire rack to cool completely. This crucial step usually takes at least 2-3 hours, allowing the filling to fully set and the topping to firm up. Serve warm or at room temperature, optionally with whipped cream or ice cream. -
Step 6
Cover any leftover Pumpkin Pie Crisp tightly and store it in the refrigerator for up to 3-4 days. The topping may soften slightly after refrigeration, but the flavors remain delicious.
Important Information
Nutrition Facts (Per Serving)
It is important to consider this information as approximate and not to use it as definitive health advice.
Allergy Information
Please check ingredients for potential allergens and consult a health professional if in doubt.