Pumpkin Energy Balls are quickly becoming my absolute favorite solution for a satisfying, healthy snack, and I am genuinely thrilled to share why. Are you perpetually on the hunt for a guilt-free treat that genuinely fuels your busy schedule without compromising on exceptional flavor? If so, then allow me to introduce you to a true culinary gem that promises to revolutionize your snack game!
The Modern Appeal of Pumpkin Energy Balls
The beauty of these delightful bites lies in their incredible versatility and the sheer convenience they offer in our fast-paced lives. In an era where wholesome, on-the-go nutrition is paramount, innovative snacks like these rise perfectly to the occasion. They represent a delicious, modern answer to an age-old desire for sustained energy, brilliantly blending the comforting, autumnal warmth of pumpkin and fragrant spices with an array of nutrient-dense ingredients. People adore them not only for their perfectly soft, chewy texture and the nostalgic taste of pumpkin pie concentrated into a convenient bite but also for their remarkable no-bake simplicity. Forget complicated preparations; these are thoughtfully designed for maximum efficiency and pure enjoyment.
I find immense satisfaction in knowing that with each delectable bite of these Pumpkin Energy Balls, I’m nourishing my body with beneficial ingredients while indulging in a truly delicious and wholesome treat. Get ready to transform your snacking routine with these irresistible creations!

Ingredients:
- 1 cup (90g) Rolled Oats: I always reach for old-fashioned rolled oats because they provide a wonderful chewiness and structure to our Pumpkin Energy Balls. They’re also a great source of fiber! If you’re gluten-intolerant, ensure you pick up certified gluten-free oats.
- ½ cup (120g) Canned Pumpkin Puree: Make sure it’s 100% pure pumpkin, not pumpkin pie filling, which already has added sugars and spices. This is the star of our show, giving these bites their signature flavor and moist texture.
- ½ cup (125g) Creamy Nut Butter: My go-to is typically unsweetened almond butter for a neutral base that lets the pumpkin shine, but peanut butter or cashew butter work beautifully too. Just ensure it’s a drippy, smooth variety for easy mixing and binding.
- ¼ cup (80g) Maple Syrup or Honey: This adds a lovely, natural sweetness. Adjust to your preference – if you like things less sweet, you can slightly reduce it, or for a touch more indulgence, add an extra tablespoon. Agave nectar is also a fantastic vegan alternative.
- ¼ cup (25g) Ground Flaxseed or Chia Seeds: These are absolute powerhouses! They act as a fantastic binder, absorbing moisture and helping to hold our Pumpkin Energy Balls together, while also boosting the omega-3 content and fiber. I often use a mix of both.
- 1 ½ teaspoons Pumpkin Pie Spice: This blend of cinnamon, nutmeg, ginger, cloves, and sometimes allspice is what truly brings that cozy, autumnal feeling to our bites. If you don’t have a pre-made blend, you can create your own with individual spices.
- 1 teaspoon Vanilla Extract: A splash of good quality vanilla extract always enhances the overall flavor profile, adding a subtle warmth and depth.
- ¼ teaspoon Sea Salt: Just a tiny pinch to balance the sweetness and really make all the other flavors pop. Don’t skip this!
- Optional Add-ins (choose one or a combination):
- ½ cup Mini Chocolate Chips: Because who doesn’t love chocolate with pumpkin? Dark chocolate chips provide a delightful contrast.
- ½ cup Chopped Pecans or Walnuts: For an extra crunch and nutty flavor that complements the pumpkin beautifully.
- ¼ cup Shredded Unsweetened Coconut: Adds a tropical twist and lovely texture.
- 1 scoop Vanilla or Unflavored Protein Powder: If you’re looking for an extra protein boost, this is a great way to sneak it in. You might need an extra splash of liquid if the mixture becomes too dry.
- Optional Coatings (for rolling, choose one or a combination):
- Extra Shredded Unsweetened Coconut: For a pretty, textural finish.
- Cocoa Powder: For a slightly bitter, rich chocolate shell.
- Finely Chopped Nuts: To match any nuts you might have added inside, or for extra crunch.
- Sesame Seeds: A less common but surprisingly delicious option, adding a nutty, savory note.
- Cinnamon Sugar Mix: A simple, sweet coating.
Gathering Your Ingredients & Initial Prep
- Prepare Your Workspace and Gather Tools: Before we dive into the deliciousness, let’s make sure our kitchen is set up for success. I always find that having everything measured out and ready makes the process so much more enjoyable and less stressful. You’ll want a large mixing bowl, a sturdy spatula or spoon, measuring cups and spoons, and a parchment-lined baking sheet or plate for chilling our finished Pumpkin Energy Balls. This ensures nothing sticks and they firm up perfectly.
- Measure Dry Ingredients: In your large mixing bowl, combine the 1 cup of rolled oats, ¼ cup of ground flaxseed or chia seeds, 1 ½ teaspoons of pumpkin pie spice, and ¼ teaspoon of sea salt. Give these a good whisk or stir with your spoon. We want to ensure the spice is evenly distributed throughout the dry mixture, so every single one of your future Pumpkin Energy Balls bursts with that incredible autumn flavor. This foundational step is crucial for the overall taste profile. If you’re using protein powder as an add-in, this is the best time to incorporate it into your dry mixture, ensuring it doesn’t clump later on.
Mixing the Magic: Bringing Your Pumpkin Energy Balls Together
- Combine Wet Ingredients: In a separate, medium-sized bowl or directly with your dry ingredients if you prefer less dishes (I’m all for efficiency!), measure out your wet components. Add the ½ cup of pumpkin puree, ½ cup of creamy nut butter, ¼ cup of maple syrup or honey, and 1 teaspoon of vanilla extract. Give these a thorough stir until they are completely smooth and well-combined. The mixture should look homogeneous and lusciously creamy. This is where the magic really starts to happen, as these ingredients will bind everything together and impart that signature rich, sweet, and comforting flavor. Make sure your nut butter is at room temperature; if it’s too cold and stiff, it can be tricky to mix evenly, so consider warming it slightly in the microwave for 10-15 seconds if needed.
- Marrying Wet and Dry: Now, it’s time to bring our two mixtures together! Pour the wet pumpkin-nut butter mixture into the bowl with your dry oat and spice blend. Using your sturdy spatula or spoon, begin to mix everything together. This might take a little elbow grease, especially at first. You want to ensure that every single oat flake is coated with the wet mixture. Scrape down the sides of the bowl as you go, making sure there are no dry pockets left behind. Continue mixing until a thick, cohesive “dough” forms. It should be moist enough to hold its shape when pressed together, but not overly sticky or crumbly. This is the perfect consistency for forming our delectable Pumpkin Energy Balls. This thorough mixing is key to ensure your energy balls don’t fall apart later.
- Incorporate Optional Add-ins: If you’re adding any extra goodies like mini chocolate chips, chopped nuts, shredded coconut, or any other treats, now is the time to gently fold them into the mixture. Do this by hand with your spatula, ensuring they are evenly distributed throughout the dough. You don’t want all the chocolate chips ending up in one ball and none in another! These add-ins contribute wonderful texture and bursts of flavor, making each bite of your Pumpkin Energy Balls even more exciting. Don’t overmix once these are in, just enough to distribute them.
- The Crucial Chill Time: This step is non-negotiable for perfectly firm and easy-to-handle Pumpkin Energy Balls. Cover your bowl with plastic wrap or transfer the mixture to an airtight container. Place it in the refrigerator for at least 30 minutes to 1 hour. Why is this so important? The oats and flax/chia seeds need time to fully absorb the moisture from the pumpkin puree and nut butter. This absorption process causes the mixture to thicken and firm up significantly, making it much easier to roll into neat, uniform balls without a sticky mess. If you’re in a rush, you can pop it in the freezer for about 15-20 minutes, but keep a close eye on it to prevent freezing. I often prepare the mixture the night before and let it chill overnight; it makes the morning prep a breeze!
Forming the Pumpkin Energy Balls & Optional Coatings
- Prepare for Rolling: Take the chilled mixture out of the refrigerator. It should be much firmer now and less sticky. Have your parchment-lined baking sheet or plate ready. If you plan to use any optional coatings, pour them into separate shallow dishes or small bowls now, making them easily accessible for dipping. This streamlines the coating process.
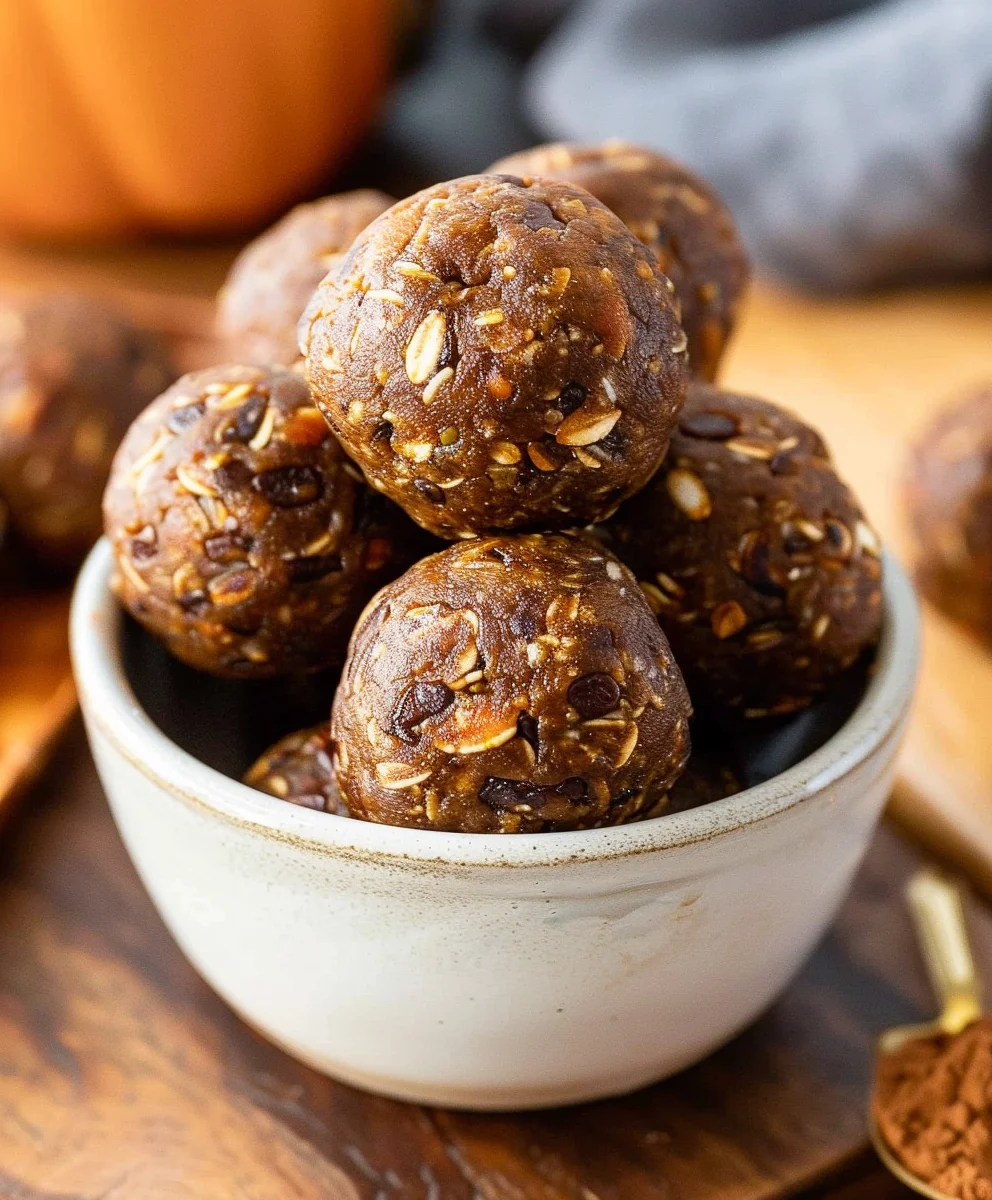
- Roll into Balls: Now for the fun part! Using a small cookie scoop (about 1.5 tablespoons) or simply your hands, scoop out portions of the mixture. Gently roll each portion between the palms of your hands to form neat, uniform spheres. I aim for a size that’s a perfect two-bite snack, roughly an inch to an inch and a half in diameter. If the mixture starts to get a little warm and sticky as you work, pop it back into the fridge for 10-15 minutes to firm up again. This ensures all your Pumpkin Energy Balls are beautifully shaped. You’ll typically get between 16 to 20 energy balls from this recipe, depending on the size you make them. Keep them consistent in size for even enjoyment!
- Apply Optional Coatings (if desired): If you’re using a coating, gently roll each formed Pumpkin Energy Ball through your chosen coating. Press lightly to ensure the coating adheres evenly to the surface. I love rolling some in shredded coconut for texture, others in cocoa powder for a rich twist, and sometimes I even leave a few plain, celebrating the natural beauty of the pumpkin. This step adds not only visual appeal but also an extra layer of flavor and texture, truly elevating your homemade Pumpkin Energy Balls. Arrange the coated balls on your prepared baking sheet as you go.
- Final Chill and Storage: Once all your Pumpkin Energy Balls are rolled and coated, return the baking sheet to the refrigerator for another 15-30 minutes. This final chill helps them set completely, ensuring they’re firm and ready to enjoy. Once fully chilled and firm, transfer your delicious Pumpkin Energy Balls to an airtight container. They will keep beautifully in the refrigerator for up to 1-2 weeks. For longer storage, you can freeze them for up to 2-3 months. Simply thaw them in the refrigerator for a few hours or at room temperature for about 15-30 minutes before enjoying. They make an absolutely fantastic grab-and-go snack, a delightful breakfast addition, or a healthy dessert anytime you’re craving something sweet and satisfying. Trust me, these become a staple in my household, especially during the fall months! They are truly the perfect healthy pumpkin snack.

Conclusion:
I truly hope that by now, you’re as excited as I am about these absolutely delightful and incredibly versatile bites of goodness. Seriously, if you’ve been searching for that perfect guilt-free snack that genuinely satisfies, look no further. These delightful Pumpkin Energy Balls are the answer to so many of our snacking dilemmas, offering a delicious and wholesome alternative to processed treats. I’ve shared my absolute love for these incredible creations, and for good reason! They are ridiculously easy to prepare, require no baking whatsoever, and are packed with nourishing ingredients that will keep you feeling energized and focused throughout your day. The combination of earthy pumpkin, warm cinnamon, nutmeg, and ginger creates a comforting flavor profile that is simply irresistible, especially as the cooler months approach, but honestly, they’re a fantastic year-round staple.
Beyond their ease and impressive nutritional benefits, what makes this recipe a true must-try is its incredible adaptability. These aren’t just a one-hit wonder; they are a canvas for your culinary creativity!
Serving Suggestions and Delicious Variations to Explore:
The magic truly begins once you start thinking about how to serve and customize your energy balls.
First, let’s talk about serving. These are absolutely perfect as a grab-and-go breakfast when you’re rushing out the door, providing sustained energy without the sugar crash. They’re an ideal post-workout refuel, helping your body recover with natural sugars and healthy fats. For parents, they make a wholesome and appealing addition to lunchboxes, a much better option than many store-bought snacks. Personally, I love enjoying one or two with my afternoon tea or coffee; they’re a delightful pick-me-up that curbs any sweet cravings. And let’s not forget them as a satisfying little treat after dinner without the guilt!
Now, for the fun part: variations! Don’t feel confined to the exact recipe; let it inspire you.
- Nut Butter Swaps: While almond butter provides a wonderful base, feel free to swap it out for cashew butter, sunflower seed butter (for a nut-free option!), or even peanut butter if that’s your jam. Each will lend a slightly different flavor and texture.
- Added Crunch and Texture: Want more bite? Fold in some finely chopped walnuts, pecans, or even a sprinkle of toasted pumpkin seeds or hemp seeds for an extra boost of healthy fats and protein. Chia seeds or ground flax seeds are also excellent additions for added fiber and omega-3s.
- Spice It Up: If you’re a spice enthusiast like me, don’t hesitate to adjust the spice blend. A pinch of cardamom can add an exotic twist, or a touch more ginger for a spicier kick. Allspice or a hint of cloves would also be lovely.
- Sweetness Level: While the Medjool dates provide ample natural sweetness, if you prefer a sweeter bite, a small drizzle of maple syrup or agave nectar can be added to the mixture. Just taste as you go!
- Fun Coatings: This is where you can truly get creative! Roll your finished energy balls in shredded coconut, a dusting of cocoa powder for a richer, chocolatey flavor, finely chopped nuts, or even a colorful sprinkle for a fun, kid-friendly treat.
- Extra Goodies: Mini chocolate chips (dark chocolate, of course!) or dried cranberries are always a welcome addition for an extra burst of flavor and texture within the balls themselves.
I genuinely can’t wait for you to experience the joy and convenience these energy balls bring to your daily routine. They truly embody the idea that healthy eating can be both easy and incredibly delicious.
Your Turn to Create and Share!
Now it’s your turn! I wholeheartedly encourage you to give this recipe a try. You won’t regret it! The process is so simple, the ingredients are wholesome, and the results are truly rewarding. Once you’ve whipped up your own batch of these incredible Pumpkin Energy Balls, I’d absolutely love to hear about it! What variations did you try? Did you add a secret ingredient that made them extra special? How did your family and friends react to this healthy snack? Please share your photos, your tips, and your triumphs! Your culinary adventures inspire me and countless others in our shared journey towards delicious, healthy eating. Don’t be shy; let’s build a community around making wholesome, flavorful food that fuels our bodies and brings us joy. So, go ahead, gather your ingredients, get rolling, and prepare to fall in love with your new favorite healthy snack. Happy rolling!
Pumpkin Energy Balls: Quick & Healthy No-Bake Treat!
These Pumpkin Energy Balls are a perfect guilt-free, no-bake snack designed to fuel your busy schedule. They blend the comforting taste of pumpkin pie with nutrient-dense ingredients for a satisfying, on-the-go treat.
Ingredients
-
1 cup no salt added creamy drippy almond butter
-
⅓ cup canned pumpkin
-
¼ teaspoon cinnamon
-
½ cup honey
-
½ cup vanilla protein powder
-
1 ½ cups rolled oats
-
salt, to taste
-
1 ½ teaspoons pumpkin pie spice
-
½ cup mini chocolate chips
Instructions
-
Step 1
In a large mixing bowl, combine the rolled oats, vanilla protein powder, pumpkin pie spice, cinnamon, and salt. Whisk to ensure spices are evenly distributed. -
Step 2
In a separate medium-sized bowl, measure out the almond butter, canned pumpkin, and honey. Stir thoroughly until completely smooth and well-combined. -
Step 3
Pour the wet pumpkin-nut butter mixture into the dry oat and spice blend. Mix vigorously with a sturdy spatula until a thick, cohesive dough forms, ensuring all dry pockets are incorporated. -
Step 4
Gently fold in the mini chocolate chips until they are evenly distributed throughout the dough. Avoid overmixing. -
Step 5
Cover the bowl and refrigerate for at least 30 minutes to 1 hour. This crucial step allows the oats and binders to absorb moisture, firming the mixture for easier rolling. -
Step 6
Once chilled, scoop out portions (about 1.5 tablespoons) and roll between your palms to form neat spheres. If desired, roll each ball through your chosen optional coating (e.g., shredded coconut, cocoa powder). -
Step 7
Place the formed balls on a parchment-lined baking sheet and return to the refrigerator for another 15-30 minutes to set completely. Transfer to an airtight container and store in the refrigerator for 1-2 weeks, or freeze for 2-3 months.
Important Information
Nutrition Facts (Per Serving)
It is important to consider this information as approximate and not to use it as definitive health advice.
Allergy Information
Please check ingredients for potential allergens and consult a health professional if in doubt.