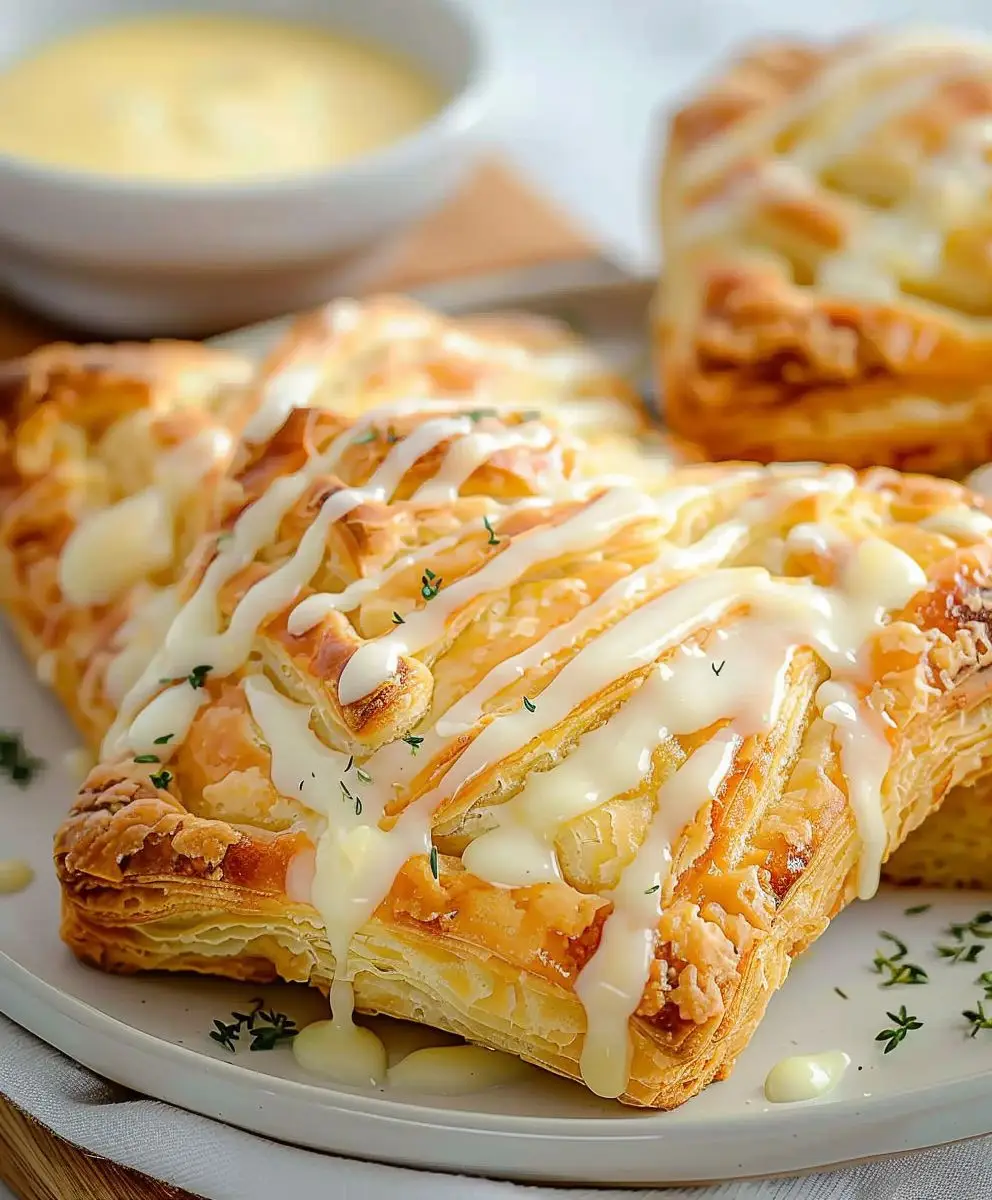
Puff Pastry Cheese Danish: the very words conjure images of flaky, golden pastry, creamy cheese filling, and a sweet glaze that melts in your mouth. Have you ever craved a pastry so intensely that you could practically taste it? That’s the power of a perfectly baked cheese danish, and today, I’m going to show you how to create that experience in your own kitchen with this surprisingly simple recipe.
While the exact origins of the cheese danish are debated, its close cousin, the Danish pastry (or “wienerbr酶d” as it’s known in Denmark), has roots tracing back to Austrian bakers in the 19th century. These skilled bakers brought their techniques to Denmark, where they were adapted and refined, eventually leading to the delectable pastries we know and love today. The puff pastry cheese danish is a delightful variation, offering a shortcut to achieving that bakery-quality taste without the days-long process of traditional Danish pastry dough.
What makes the cheese danish so irresistible? It’s the symphony of textures and flavors. The light, airy, and shatteringly crisp puff pastry provides the perfect contrast to the smooth, rich, and slightly tangy cheese filling. The sweetness of the glaze adds another layer of indulgence, making each bite a truly satisfying experience. Plus, this recipe is incredibly convenient. Using store-bought puff pastry means you can whip up a batch of these treats in under an hour, making them perfect for a weekend brunch, a special occasion, or simply a delightful afternoon treat. Get ready to impress your friends and family with your newfound baking skills!

Ingredients:
- 1 package (14.1 ounces) frozen puff pastry sheets, thawed
- 8 ounces cream cheese, softened
- 1/2 cup granulated sugar
- 1 large egg
- 1 teaspoon vanilla extract
- 1/4 teaspoon almond extract (optional, but recommended!)
- 1/4 cup milk
- 1 tablespoon granulated sugar (for sprinkling)
- Optional toppings: fruit preserves (cherry, apricot, raspberry), sliced almonds, coarse sugar
Preparing the Cream Cheese Filling:
Okay, let’s get started with the heart of our danish 鈥?the creamy, dreamy filling! This is where the magic happens, and it’s surprisingly simple.
- Soften the Cream Cheese: This is crucial! Make sure your cream cheese is properly softened. Take it out of the refrigerator at least an hour before you plan to start baking. If you’re short on time, you can microwave it in 15-second intervals, checking and stirring in between, until it’s soft but not melted. We want it nice and smooth for easy mixing.
- Combine Cream Cheese and Sugar: In a medium-sized bowl, add the softened cream cheese and 1/2 cup of granulated sugar. Using an electric mixer (handheld or stand mixer), beat the cream cheese and sugar together until they are light and fluffy. This usually takes about 2-3 minutes. Make sure to scrape down the sides of the bowl occasionally to ensure everything is evenly incorporated.
- Add Egg and Extracts: Crack in the large egg and add the vanilla extract and almond extract (if using). Beat again until everything is well combined. Be careful not to overmix at this stage, as overmixing can lead to a less tender filling. Just mix until the egg is fully incorporated and the mixture is smooth.
- Set Aside: Once the filling is ready, cover the bowl with plastic wrap and set it aside while you prepare the puff pastry. This will give the flavors a chance to meld together even more.
Working with the Puff Pastry:
Puff pastry can be a little intimidating, but don’t worry! I’ll walk you through it. The key is to keep it cold and work quickly.
- Thaw the Puff Pastry: Make sure your puff pastry is completely thawed according to the package directions. Usually, this involves letting it sit in the refrigerator overnight or at room temperature for about 30-40 minutes. It should be pliable but still cold to the touch. If it gets too warm, it will be difficult to work with and won’t puff up properly in the oven.
- Unfold and Lightly Flour: Lightly flour a clean, flat surface (like a cutting board or countertop). Gently unfold one sheet of puff pastry onto the floured surface. If the pastry is sticking, add a little more flour underneath.
- Cut the Pastry: Using a sharp knife or pizza cutter, cut the puff pastry sheet into 9 equal squares. You can do this by first cutting the sheet into thirds lengthwise and then cutting each third into thirds crosswise. Aim for squares that are roughly 3-4 inches in size.
- Repeat with Second Sheet: Repeat the process with the second sheet of puff pastry, cutting it into 9 squares as well. You should now have a total of 18 squares.
Assembling the Cheese Danishes:
Now for the fun part 鈥?putting it all together! This is where your creativity can shine.
- Preheat Oven and Prepare Baking Sheet: Preheat your oven to 400掳F (200掳C). Line a baking sheet with parchment paper. This will prevent the danishes from sticking and make cleanup a breeze.
- Add Filling to Pastry Squares: Place the puff pastry squares onto the prepared baking sheet, leaving a little space between each one. Spoon about 1-2 tablespoons of the cream cheese filling into the center of each square. Don’t overfill them, or the filling might spill out during baking.
- Create the Danish Shape: There are a few ways to shape your danishes. Here are two popular options:
- Option 1: Simple Square: Leave the squares as they are. The filling will puff up around the edges, creating a rustic look.
- Option 2: Folded Corners: Gently fold two opposite corners of each square towards the center, pinching them together to secure. This will create a diamond shape with the filling exposed in the middle.
Choose whichever method you prefer! Both will taste delicious.
- Egg Wash: In a small bowl, whisk together the milk and the remaining egg to create an egg wash. Brush the egg wash over the exposed puff pastry. This will give the danishes a beautiful golden-brown color and a slightly glossy finish.
- Sprinkle with Sugar: Sprinkle the tops of the danishes with the remaining 1 tablespoon of granulated sugar. This will add a touch of sweetness and a nice crunch.
- Add Optional Toppings: If you’re using any optional toppings, now is the time to add them. A dollop of fruit preserves in the center of each danish is a classic choice. Sliced almonds add a nice nutty flavor and texture. Coarse sugar provides extra sparkle and crunch.
Baking the Cheese Danishes:
Almost there! Now it’s time to bake these beauties to golden perfection.
- Bake: Place the baking sheet in the preheated oven and bake for 15-20 minutes, or until the puff pastry is golden brown and puffed up and the filling is set. Keep a close eye on them, as baking times can vary depending on your oven.
- Cool: Once the danishes are golden brown, remove them from the oven and let them cool on the baking sheet for a few minutes before transferring them to a wire rack to cool completely. This will prevent them from getting soggy.
Serving and Storing:
Congratulations! You’ve made delicious homemade cheese danishes. Now it’s time to enjoy them!
- Serve: These danishes are best served warm or at room temperature. They’re perfect for breakfast, brunch, or a sweet treat any time of day.
- Store: Store any leftover danishes in an airtight container at room temperature for up to 2 days. You can also freeze them for longer storage. To freeze, wrap each danish individually in plastic wrap and then place them in a freezer bag. They can be frozen for up to 2 months. To thaw, simply let them sit at room temperature for a few hours. You can also reheat them in a low oven (around 300掳F or 150掳C) for a few minutes to crisp them up.
Tips for Success:
- Keep the Puff Pastry Cold: This is the most important tip! Cold puff pastry will puff up beautifully in the oven. If it gets too warm, it will become greasy and won’t rise properly.
- Don’t Overfill: Overfilling the danishes can cause the filling to spill out during baking. Stick to about 1-2 tablespoons of filling per square.
- Use a Sharp Knife: A sharp knife or pizza cutter will help you cut the puff pastry cleanly without tearing it.
- Experiment with Fillings: Feel free to get creative with your fillings! You can add lemon zest, cinnamon, or other spices to the cream cheese filling. You can also use different types of fruit preserves or add fresh fruit.
- Enjoy! Most importantly, have fun and enjoy the process of making these delicious cheese danishes!
Conclusion:
And there you have it! These Puff Pastry Cheese Danishes are truly a must-try recipe, and I’m confident they’ll become a new favorite in your household. The flaky, buttery puff pastry combined with the creamy, slightly tangy cheese filling is a match made in breakfast (or dessert!) heaven. Honestly, the simplicity of this recipe belies its incredible flavor. It’s the perfect balance of sweet and savory, rich and light, and the best part? It’s surprisingly easy to make, even if you’re not a seasoned baker.
I know what you might be thinking: “Another pastry recipe? I don’t have time!” But trust me, this one is different. The pre-made puff pastry is our secret weapon, cutting down on prep time significantly. You can whip up a batch of these danishes in under an hour, making them ideal for a weekend brunch, a special occasion, or even just a delightful weekday treat. Plus, the aroma that fills your kitchen while they’re baking is simply divine!
But the real reason these Puff Pastry Cheese Danishes are a must-try is the sheer joy they bring. There’s something incredibly satisfying about biting into that perfectly golden, flaky crust and experiencing the burst of creamy cheese filling. It’s a little moment of pure indulgence that will brighten your day.
Now, let’s talk serving suggestions and variations! These danishes are delicious served warm, straight from the oven, or at room temperature. A light dusting of powdered sugar adds a touch of elegance, but they’re equally enjoyable plain. For a more decadent treat, try drizzling them with a simple glaze made from powdered sugar and milk.
Want to get creative? Feel free to experiment with different fillings! Add a spoonful of your favorite fruit preserves to the cheese mixture for a fruity twist. A sprinkle of chopped nuts, like almonds or pecans, adds a delightful crunch. You could even incorporate a hint of lemon or orange zest for a brighter, more citrusy flavor. The possibilities are endless!
Here are a few more ideas to get your creative juices flowing:
* Berry Bliss: Add fresh raspberries or blueberries to the cheese filling before baking.
* Apple Cinnamon Delight: Incorporate diced apples and a pinch of cinnamon into the filling.
* Chocolate Chip Surprise: Fold in mini chocolate chips for a chocolatey twist.
* Savory Sensation: For a savory option, try adding crumbled bacon and chives to the cheese filling.
Ultimately, the best way to enjoy these Puff Pastry Cheese Danishes is to make them your own! Don’t be afraid to experiment with different flavors and ingredients to create a danish that perfectly suits your taste.
I truly hope you’ll give this recipe a try. I’m confident you’ll love it as much as I do. And when you do, please share your experience! I’d love to hear what you think, what variations you tried, and how they turned out. You can leave a comment below, tag me on social media, or simply share your photos with the hashtag #PuffPastryCheeseDanishes. I can’t wait to see your creations! Happy baking!
Puff Pastry Cheese Danish: The Ultimate Guide to Baking Perfection
Easy homemade cheese danishes with flaky puff pastry and a creamy, sweet filling. Perfect for breakfast, brunch, or a treat!
Ingredients
Instructions
Recipe Notes
- Keep the puff pastry cold for best results.
- Don’t overfill the danishes.
- Use a sharp knife or pizza cutter to cut the puff pastry.
- Experiment with different fillings.