Rezept_pizzawaffeln.html
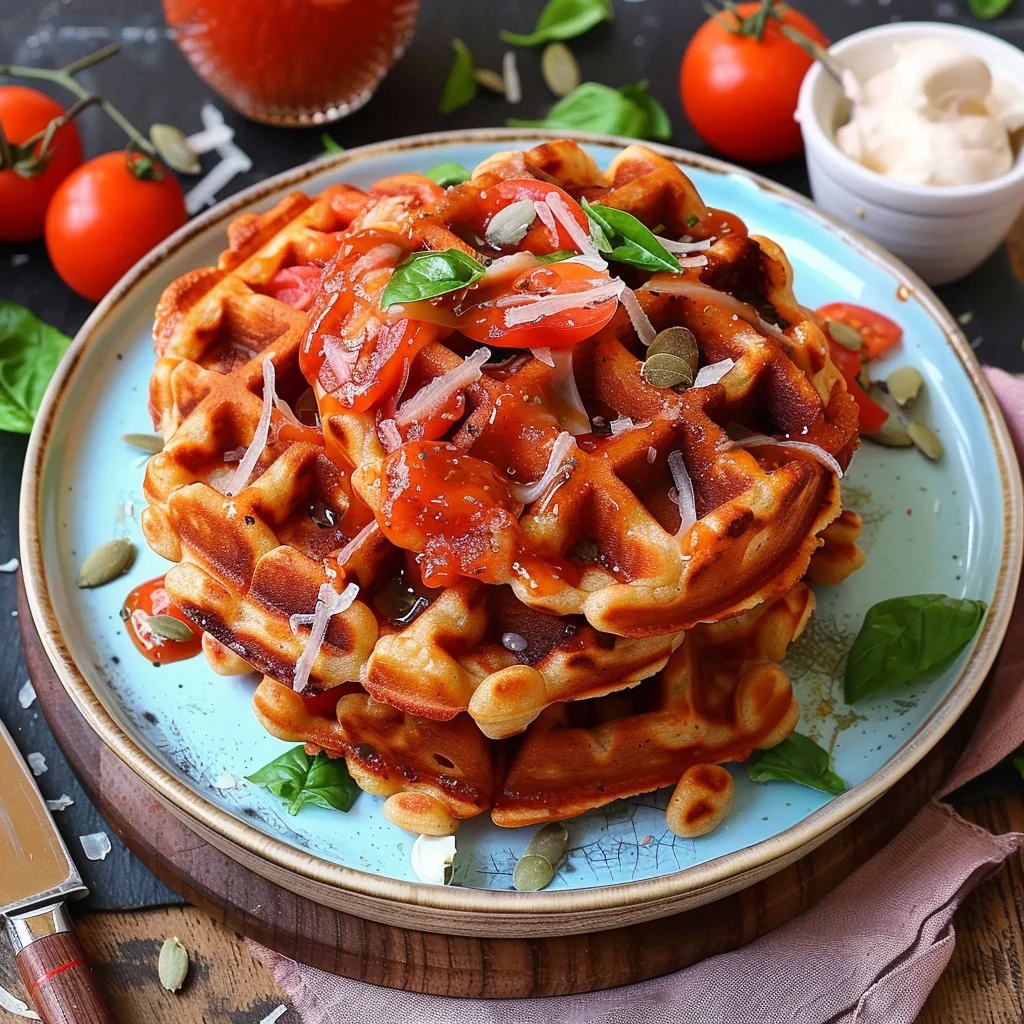
Imagine the irresistible flavors of your favorite pizza, but with a delightful, crispy twist, ready in minutes! I am absolutely thrilled to present an innovative culinary creation that marries two beloved comfort foods into one spectacular dish: Pizza Waffles. While the classic pizza boasts a rich history stretching back to ancient times, evolving into the iconic Italian staple we adore today, and waffles have long been a versatile canvas for both sweet and savory delights across various cultures, the ingenious concept of combining them is a testament to modern culinary creativity. This brilliant fusion takes the familiar taste profile of pizza – the tangy tomato sauce, melting cheese, and your chosen toppings – and encases it within the inviting, textured embrace of a golden-brown waffle.
I find these Pizza Waffles absolutely irresistible not only for their phenomenal taste but also for their incredible convenience and playful charm. People truly adore this dish because it offers the ultimate comfort food experience in a fun, handheld form. The satisfying crunch of the waffle exterior gives way to a warm, gooey interior bursting with cheesy, savory goodness. It’s a perfect solution for a quick weeknight dinner, a crowd-pleasing appetizer for gatherings, or a delightful snack that caters to both kids and adults. This ingenious Pizza Waffles Recipe truly redefines fast food, proving that delicious and exciting meals can be created with ease and a touch of imagination right in your own kitchen.

Ingredients:
- For the Pizza Waffle Batter:
- 2 cups (240g) all-purpose flour
- 2 teaspoons baking powder
- 1/2 teaspoon salt
- 1 teaspoon Italian seasoning blend (I like a good quality one with oregano, basil, thyme, and marjoram)
- 1/4 teaspoon garlic powder (optional, but I find it really elevates the flavor)
- 2 large eggs, at room temperature
- 1 3/4 cups (420ml) milk (any kind works, but I prefer whole milk for richness)
- 1/4 cup (60ml) olive oil or melted unsalted butter (olive oil gives a nice savory touch, butter adds a classic richness)
- 2 tablespoons grated Parmesan cheese (freshly grated is always superior here)
- For the Pizza Filling & Toppings:
- 1/2 cup (120ml) good quality marinara or pizza sauce (your favorite brand, or homemade if you’re feeling ambitious!)
- 1 1/2 cups (170g) shredded mozzarella cheese (low-moisture, part-skim works best to prevent sogginess)
- 1/2 cup (50g) mini pepperoni slices, or regular pepperoni cut into quarters (I find mini pepperonis distribute perfectly)
- 1/4 cup (30g) finely diced red bell pepper
- 1/4 cup (30g) finely diced red onion
- 2 tablespoons sliced black olives, finely chopped
- 2 tablespoons fresh basil, finely chopped (for garnish and adding into some of the waffles)
- Optional additions for extra flavor:
- Pinch of red pepper flakes
- Extra grated Parmesan for serving
- Dried oregano or a little extra Italian seasoning for sprinkling
- Other finely diced vegetables like mushrooms (sautéed first to remove moisture), spinach (squeezed dry), or corn.
Preparing Your Flavorful Pizza Waffle Batter
Creating the perfect base for our pizza waffles begins with a well-mixed and properly rested batter. This is where we infuse those initial savory notes and ensure our waffles will be beautifully light and fluffy.
- Gather and Measure: First things first, I always like to lay out all my ingredients. It makes the process so much smoother and ensures I don’t miss anything. Make sure your eggs are at room temperature; it helps them incorporate better into the batter, leading to a smoother, more emulsified mixture. This might seem like a small detail, but it truly makes a difference in the final texture of your waffles.
- Whisk the Dry Ingredients: In a large mixing bowl, I combine my all-purpose flour, baking powder, salt, Italian seasoning blend, and garlic powder (if I’m using it, which is almost always!). I give these a good whisk together for about 30 seconds, or until they are thoroughly combined. This step is crucial because it evenly distributes the baking powder, ensuring a consistent rise in every waffle, and prevents any pockets of flour in the final batter. It also disperses the seasonings throughout, so every bite is packed with that lovely Italian flavor we’re aiming for. Don’t skip this; a well-aerated dry mix is the foundation of a great waffle.
- Combine the Wet Ingredients: In a separate, medium-sized bowl, I crack my two large eggs. Then, I pour in the milk and either the olive oil or melted unsalted butter. I whisk these wet ingredients together vigorously until they are well combined and uniform. This separate mixing helps prevent overmixing later when the wet and dry ingredients come together, which can develop the gluten in the flour too much and lead to tough, chewy waffles. We want tender, fluffy pizza waffles that melt in your mouth, not a dense, bready texture.
- Marry Wet and Dry: Now, I pour the wet ingredients into the bowl with the dry ingredients. Using a whisk or a rubber spatula, I gently mix everything together. The key here is to mix just until the ingredients are combined and no streaks of dry flour remain. A few small lumps are perfectly fine, even desirable. In fact, overmixing is the enemy of tender waffles! If you overmix, you activate too much gluten, and your waffles will be chewy and dense rather than light and airy. At this stage, I also gently fold in the grated Parmesan cheese; it adds a wonderful savory depth directly into the batter, ensuring flavor in every bite.
- Rest the Batter: This step is often skipped by home cooks, but I find it makes a noticeable difference in the final product. I let the batter rest at room temperature for at least 10-15 minutes, or even up to 30 minutes if I have the time. During this resting period, two wonderful things happen: first, the flour has a chance to fully hydrate, absorbing all the liquid and resulting in a more tender, uniformly textured waffle; second, it allows the baking powder to start working its magic, preparing for a superior rise and creating those delightful pockets of air. While the batter rests, it’s the perfect time to get all your delicious pizza fillings ready!
Prepping Your Delicious Pizza Toppings and Filling
While my waffle batter is taking its beauty nap, I turn my attention to preparing all the wonderful pizza elements that will transform these waffles into a true savory delight. Precision here makes all the difference in ensuring even distribution and perfect cooking within the confined space of a waffle iron.
- Get Your Sauce Ready: I pour my marinara or pizza sauce into a small bowl. Sometimes, if I’m feeling fancy or my sauce is a bit thick, I’ll add a tiny splash of water or olive oil and whisk it to a slightly thinner consistency. This makes it easier to spread thinly over the batter and helps prevent the waffles from becoming too soggy from excess moisture. I’m looking for a nice, spreadable texture that won’t overwhelm the waffle but will still deliver that classic pizza taste.
- Shred the Mozzarella: If you’re using a block of mozzarella, I highly recommend shredding it yourself. While convenient, pre-shredded cheese often contains anti-caking agents like cellulose that can affect how it melts and browns. Freshly shredded mozzarella melts beautifully, becoming wonderfully gooey and giving you that perfect, stringy cheese pull we all love in pizza. I make sure it’s shredded finely enough to distribute well throughout the waffle without creating big, unmanageable clumps that might prevent the waffle from cooking evenly.
- Chop Your Veggies and Meats: This is where the “finely diced” part of the ingredient list comes into play, and it’s a critical step for pizza waffles. For this dish, we aren’t layering large slices of toppings like on a traditional pizza. Instead, we want small, uniform pieces that will cook quickly and distribute evenly throughout the batter, integrating seamlessly into the waffle’s structure.
- For the red bell pepper and red onion, I chop them very finely, almost to a mince. This ensures they soften adequately and meld into the waffle without being too crunchy or creating a raw onion flavor.
- My black olives also get a fine chop. This ensures their briny flavor is present but not overwhelming, and their texture is soft.
- If I’m using regular-sized pepperoni, I quarter them. Mini pepperoni slices are absolutely fantastic because they require no extra work and disperse beautifully, ensuring you get a little bit of pepperoni flavor in nearly every bite. The goal is to have small pieces of toppings that won’t overwhelm the delicate waffle structure or prevent the waffle iron from closing properly, which can lead to uneven cooking or overflow.
Expert Tip: If you’re planning to add any high-moisture vegetables such as mushrooms or spinach, it’s absolutely essential to sauté them beforehand to release their water content, then squeeze them thoroughly dry. This crucial step prevents your pizza waffles from becoming watery, soggy, and ensures they crisp up properly in the waffle iron. Excess moisture is the enemy of a crispy waffle!
- Chop Fresh Herbs: I finely chop my fresh basil. Some of this will go directly into the waffle batter with the other fillings, and I always reserve a little for garnishing the finished waffles. The bright, fresh aroma and flavor of basil are simply divine and add a beautiful touch to the cooked waffles. If you don’t have fresh, a little dried basil can be used in a pinch, but fresh truly elevates the dish.
- Combine Your Toppings: In a separate bowl, I gently toss together the shredded mozzarella, mini pepperoni (or quartered regular pepperoni), finely diced red bell pepper, finely diced red onion, and chopped black olives. I like to add about half of my chopped fresh basil into this mix as well. This pre-mixing helps to ensure that every scoop of filling I add to the waffle iron has a good distribution of all the delicious elements. It’s like creating a mini-pizza topping blend that is perfectly portioned for our waffles. This step guarantees consistent flavor in every single pizza waffle you make.
Waffle Iron Magic: Cooking Your Perfect Pizza Waffles
Now for the truly exciting part – turning that amazing batter and those delightful toppings into crispy, savory pizza waffles! Proper technique with your waffle iron is absolutely key here to achieve that golden-brown exterior and perfectly cooked interior.
- Preheat Your Waffle Iron: I always make sure my waffle iron is fully preheated before I add any batter. Most waffle irons have a light that indicates when they’ve reached the optimal cooking temperature. This step is non-negotiable for crispy waffles! If you add batter to a cold or lukewarm iron, your waffles will stick, absorb too much grease, and turn out soggy and pale rather than beautifully golden and crisp. Patience in preheating pays off immensely.
- Grease Your Iron Generously: Even if your waffle iron boasts a non-stick coating, I still highly recommend giving it a good spray with cooking spray or lightly brushing it with a neutral oil (like canola or vegetable oil) before the very first waffle. This ensures an easy release and contributes to a nice, crispy crust. For subsequent waffles, you might not need to grease every single time, but keep a close eye on it. If you notice any tendency for sticking or if your waffles aren’t as golden, a quick re-greasing will save the day.
- Portion the Batter: For each pizza waffle, I typically use about 1/2 to 3/4 cup of batter, depending on the size of my waffle iron grids. You’ll quickly learn the perfect amount for your specific iron after the first one or two waffles. My trick is to pour about half of the required batter amount (so, about 1/4 to 3/8 cup) into the center of the preheated waffle iron. This forms the base layer of our waffle.
- Add Your Pizza Filling: Once that initial layer of batter is down, I quickly and evenly sprinkle about 2-3 tablespoons of my prepared pizza topping mixture (mozzarella, pepperoni, veggies, etc.) over the batter. I avoid piling it too high, as we still need to cover it with more batter. This layering technique is brilliant because it ensures that the delicious fillings are nestled inside the waffle, rather than just sitting on top or sinking to the bottom. This prevents burnt cheese or toppings and gives you a wonderful surprise with every bite.
- Top with More Batter: I then pour the remaining 1/4 to 1/2 cup of batter over the filling, ensuring that the toppings are mostly covered. You want enough batter to form a complete, well-formed waffle but not so much that it overflows significantly when you close the lid. A little bit of overflow is common and easily trimmed, but a huge mess means you’ve added too much batter. You’ll get a feel for it.
- Close and Cook: Gently close the lid of your waffle iron. Don’t press down too hard, especially if it’s a Belgian-style iron, as you want the waffles to rise and be fluffy. Cook the pizza waffle for approximately 4-7 minutes, or until the waffle iron’s indicator light signals it’s done (if it has one) and the waffle is deeply golden brown and wonderfully crispy. Cooking times can vary significantly based on your waffle iron’s wattage and style (Belgian waffles take a bit longer and are thicker than classic ones). I always peek after about 4 minutes to check the color and crispness. The key to achieving true crispiness is to let them cook until they’re truly a deep golden brown, not just light yellow. Don’t be afraid to let them go a little longer if they seem pale.
- Remove and Repeat: Once cooked to perfection, I carefully open the waffle iron and use a silicone spatula or tongs to gently lift the pizza waffle out. I place it on a wire rack set over a baking sheet to cool slightly. This crucial step allows air to circulate around the entire waffle, preventing it from getting soggy from steam. If you stack them directly on a plate, they’ll steam and lose all that wonderful crispness we worked so hard to achieve. Repeat steps 13-16 with the remaining batter and filling, re-greasing your iron as needed to maintain that perfect non-stick surface.
Serving Suggestions, Customization, and Making Them Ahead
These pizza waffles are incredibly versatile and truly shine with a little personalization. They’re more than just a novelty; they’re a blank canvas for your favorite pizza flavors! Here are my favorite ways to enjoy them and some tips for making your life easier!
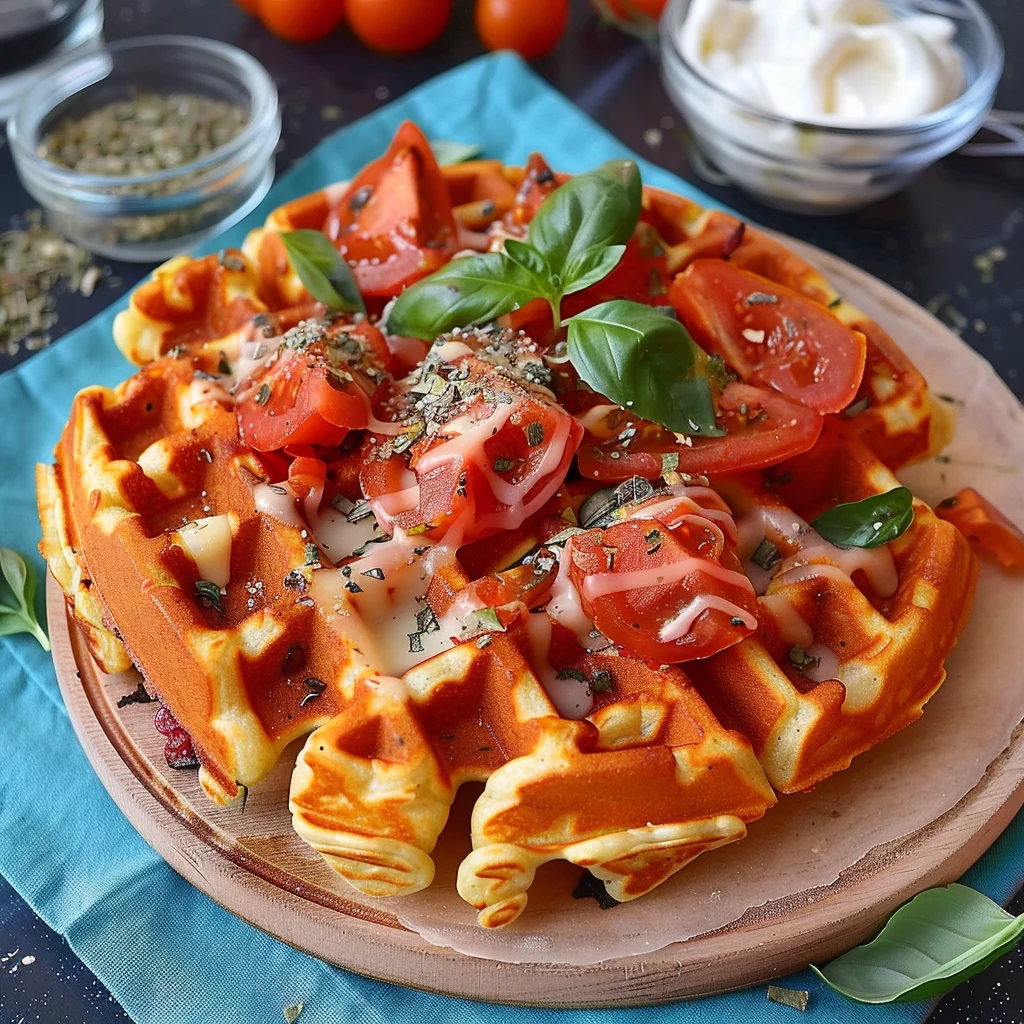
- Immediate Enjoyment: My absolute favorite way to eat these is straight off the waffle iron, when they’re still hot and wonderfully crispy. The cheese is gooey and melted, the toppings are warm and flavorful, and the outside has that perfect satisfying crunch. I often serve them with a small bowl of extra marinara sauce for dipping – it’s just divine and enhances that classic pizza experience! A final sprinkle of fresh Parmesan cheese and a few more delicate fresh basil leaves right before serving adds a touch of elegance, aroma, and a burst of fresh flavor that truly brightens the dish.
- Dipping Delights: Don’t limit yourself to just marinara! These are fantastically versatile. They’re wonderful with creamy ranch dressing, a homemade creamy garlic dip, or even a spicy arrabbiata sauce if you enjoy a little kick. A vibrant green pesto can also add a wonderful herbaceous and nutty note, transforming the flavor profile entirely. Experiment with what you love!
- Customization is Key: This recipe is a fantastic base for all your wildest pizza cravings. It’s so easy to adapt to your personal preferences or whatever ingredients you have on hand.
- Cheese Lovers: Experiment with different cheese blends! A mix of mozzarella, sharp provolone, and a touch of smoked gouda or even mild cheddar can add more depth and complexity to the flavor profile. Feta crumbles would be an interesting and tangy addition, especially if you’re going for a Mediterranean twist.
- Meat Mania: Cooked and crumbled Italian sausage, finely diced and pan-fried ham, or even shredded cooked chicken (imagine a BBQ chicken pizza waffle!) would be fantastic additions. Just ensure any meat is fully cooked and finely diced or crumbled before adding it to the waffle mixture to ensure even cooking and distribution.
- Veggie Power: Get creative with your vegetables! Beyond bell peppers and onions, consider finely chopped sun-dried tomatoes (packed in oil, drained well), finely chopped sautéed spinach (again, squeezed bone-dry to remove moisture!), finely chopped artichoke hearts, or even corn kernels for a touch of sweetness. Remember, the smaller the dice, the better they will integrate and cook within the waffle.
- Herb Heaven: Beyond basil and Italian seasoning, consider a pinch of dried oregano, some fresh parsley, or even a very small touch of finely minced fresh rosemary for a different, more earthy flavor profile. A sprinkle of red pepper flakes always adds a pleasant warmth.
My personal favorite variation: A little bit of cooked, crumbled bacon mixed in with the pepperoni and mozzarella is absolutely irresistible! The salty, smoky crunch of bacon takes these pizza waffles to a whole new level of savory indulgence.
- Make Ahead and Reheating: These pizza waffles are wonderful for meal prep, a quick snack later in the week, or for serving a crowd. They hold up beautifully!
- Cool Completely: After cooking, it is absolutely vital to allow them to cool completely on a wire rack before storing. This is the secret to preventing sogginess during storage.
- Storing: Once thoroughly cooled, I store them in an airtight container in the refrigerator for up to 3-4 days. For longer storage, they freeze beautifully! I place them in a single layer on a baking sheet to freeze solid (this prevents them from sticking together), then transfer them to a freezer-safe bag or container. They’ll keep wonderfully in the freezer for up to 2-3 months.
- Reheating: My absolute preferred method for reheating, which restores their delightful crispiness, is in a toaster oven or a regular oven preheated to 350°F (175°C) for 5-10 minutes, or until heated through and crispy again. You can also pop them back into your waffle iron for a minute or two to crisp them up perfectly! The microwave is an option for sheer speed, but be warned, you’ll lose all that wonderful crispiness.
- Breakfast, Lunch, or Dinner: Don’t pigeonhole these as just a dinner item! They make a fantastic savory breakfast, a fun and exciting school lunch (they’re great cold too, which is a huge plus for packed lunches!), or an impressive and unique appetizer for a party. I’ve even served them as a creative side dish to a simple soup or salad. Their incredible versatility is truly one of their best qualities, making them a recipe you’ll come back to again and again. You’ll be amazed at how quickly these pizza waffles disappear, no matter when you serve them!
Conclusion:
And there you have it, my friends! We’ve reached the delicious culmination of our culinary journey with these absolutely incredible pizza waffles. I truly believe that once you try this recipe, it will quickly become a cherished staple in your home, just as it has in mine. It’s not just a meal; it’s an experience, a delightful fusion of two beloved comfort foods that, when combined, create something truly extraordinary. This recipe offers the best of both worlds: the crispy, golden-brown texture of a perfectly cooked waffle meeting the savory, cheesy goodness of a classic pizza.
Why is this a must-try, you ask? Well, for starters, its simplicity is genius. Forget the complexities of traditional pizza making or the fuss of intricate gourmet dishes. This recipe strips away the unnecessary, focusing on maximum flavor with minimal effort. It’s perfect for those busy weeknights when you crave something satisfying but don’t have hours to spend in the kitchen. It’s also incredibly fun to make, transforming an ordinary appliance – your waffle maker – into a culinary powerhouse that produces crispy, golden pockets of cheesy delight. Moreover, the sheer joy of pulling a steaming, perfectly formed pizza waffle from the iron is unmatched. The aroma alone is enough to get anyone’s mouth watering, promising a treat that delivers on every front: texture, taste, and pure comfort.
But the true beauty of these pizza waffles lies in their phenomenal versatility. While the base recipe provides a fantastic foundation, think of it as a blank canvas awaiting your personal touch. For a quick and delightful breakfast or brunch, I love serving these warm with a perfectly fried egg on top, perhaps a sprinkle of fresh chives, and a side of crispy bacon. The runny yolk mingling with the cheesy waffle is pure bliss! Alternatively, elevate them into a sophisticated lunch by pairing them with a vibrant, fresh garden salad dressed with a light vinaigrette. The contrast between the rich waffle and the crisp greens is surprisingly satisfying.
When it comes to dinner, these pizza waffles shine as a fun, interactive meal. Offer a variety of dipping sauces – a classic marinara, a spicy arrabiata, a creamy ranch, or even a pesto aioli – and let everyone customize their plate. You could even create a “pizza waffle bar” for gatherings, offering bowls of different toppings like mini pepperoni, crumbled sausage, sliced mushrooms, olives, bell peppers, or even pineapple (for those who dare!). For a vegetarian twist, load them up with finely chopped spinach, sundried tomatoes, and feta cheese, or experiment with different cheese blends like provolone, fontina, or a smoked gouda for a truly unique flavor profile. Don’t be afraid to think outside the box; I’ve even tried a dessert version with Nutella and strawberries, and believe me, it was a revelation!
My hope is that you feel inspired, perhaps even a little excited, to dive into your kitchen and give this amazing recipe a try. Don’t let your waffle iron gather dust; put it to work creating these golden wonders! I promise you, the smiles and satisfied sighs you’ll hear will be your greatest reward. There’s a special kind of magic that happens when you combine simplicity with innovation, and that’s precisely what this recipe delivers. Remember, cooking is an adventure, a journey of discovery and joy, and this particular dish is a fantastic waypoint on that journey. I’m incredibly proud of the effort I put into refining this specific preparation, so much so that I’ve affectionately dubbed this perfected version the Rezept_pizzawaffeln.html in my personal culinary archives. It’s truly a testament to how simple ingredients can create extraordinary happiness.
Once you’ve whipped up your own batch of these delightful creations, I would absolutely love to hear about your experience! Did you stick to the classic toppings, or did you venture into exciting new flavor combinations? Did you serve them for breakfast, lunch, or a late-night snack? Please, don’t hesitate to share your stories, your photos, and any brilliant variations you come up with in the comments section below. Your insights and culinary adventures inspire not only me but also our entire community of food enthusiasts. Let’s build a delicious conversation around these fantastic pizza waffles! Happy cooking, and I can’t wait to see what you create!
Pizza Waffles Recipe: Quick & Easy Waffle Iron Snack!
Imagine the irresistible flavors of your favorite pizza, but with a delightful, crispy twist, ready in minutes! This innovative culinary creation marries two beloved comfort foods into one spectacular dish: Pizza Waffles. This brilliant fusion takes the familiar taste profile of pizza – the tangy tomato sauce, melting cheese, and your chosen toppings – and encases it within the inviting, textured embrace of a golden-brown waffle.
Ingredients
-
300 g Spelt flour
-
2 Eggs
-
80 g Margarine
-
250 ml Water
-
1 tsp Baking powder
-
1 tsp Salt
-
1 tsp Pizza herbs (Italian seasoning)
-
2 tbsp Tomato paste
-
100 g Beef salami (or cooked beef ham or beef bacon bits)
-
100 g Cheese (Gouda, Feta, Mozzarella, or pizza cheese)
-
1 Bell pepper (or other vegetable of choice)
-
Cream cheese (any variety, for serving)
Instructions
-
Step 1
In a bowl, combine eggs, margarine, water, and tomato paste; mix until creamy. Add spelt flour, baking powder, salt, and pizza herbs; stir to form a smooth batter. -
Step 2
Dice beef salami (or beef ham/bacon) and bell pepper. Gently fold the diced meat, bell pepper, and cheese into the prepared batter. -
Step 3
Fully preheat your waffle iron. Lightly grease the iron with cooking spray or a neutral oil, especially before the first waffle. -
Step 4
Pour approximately 1/2 to 3/4 cup of batter into the center of the hot waffle iron. Close the lid gently and cook for 4-7 minutes, or until the waffle is deeply golden brown and wonderfully crispy. -
Step 5
Carefully remove the cooked pizza waffle from the iron and place it on a wire rack to cool slightly and maintain crispness. Serve warm, optionally with cream cheese or extra marinara for dipping. Repeat with remaining batter.
Important Information
Nutrition Facts (Per Serving)
It is important to consider this information as approximate and not to use it as definitive health advice.
Allergy Information
Please check ingredients for potential allergens and consult a health professional if in doubt.