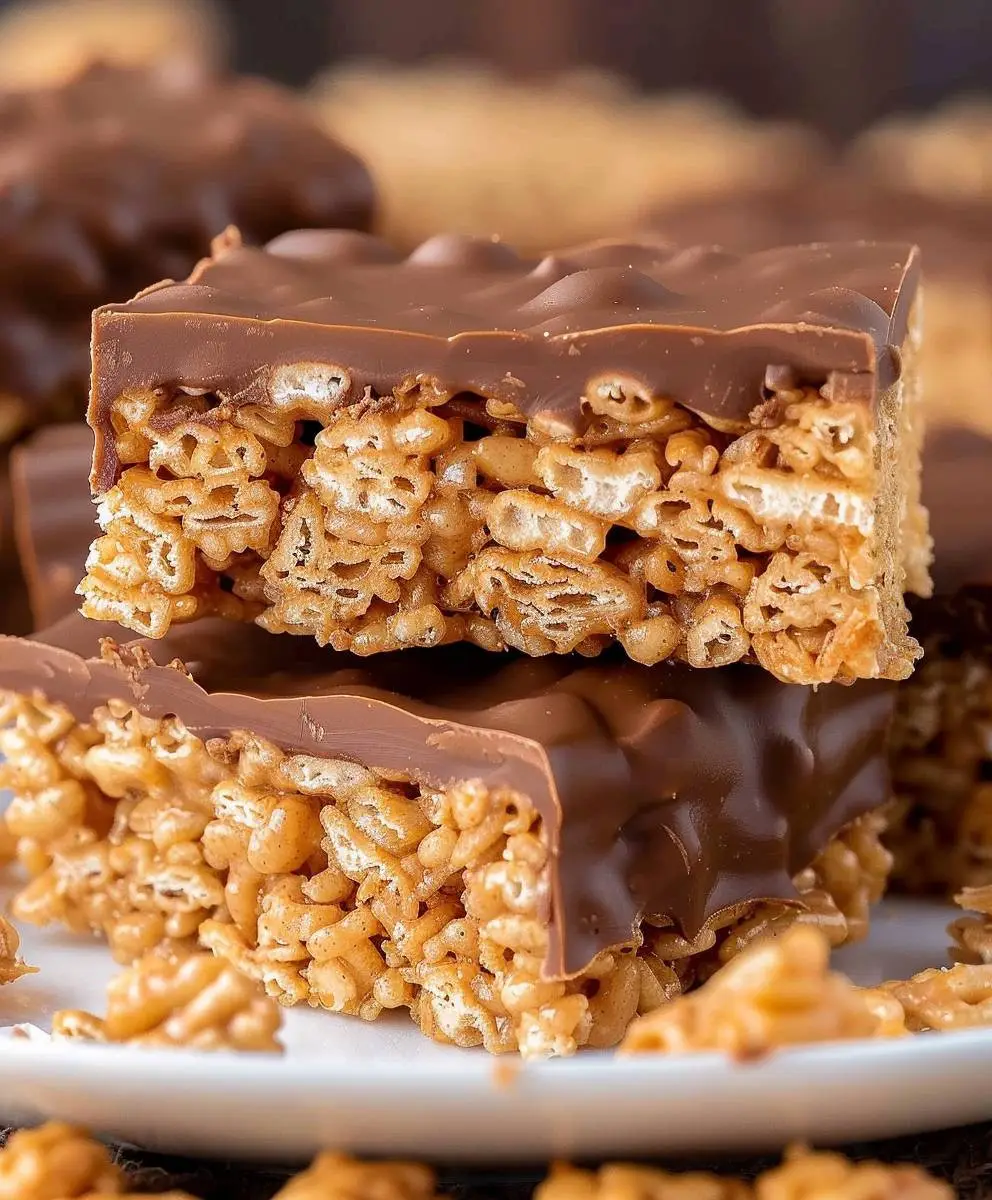
Peanut Butter Krispie Treats: A Nostalgic Twist on a Classic
Peanut Butter Krispie Treats: Just the name conjures up images of gooey, peanut buttery goodness, doesn’t it? I’ve always loved the simple pleasure of a classic Rice Krispie Treat, that melt-in-your-mouth sweetness and satisfying chew. But what happens when you elevate that classic with the rich, nutty depth of peanut butter? You get a truly unforgettable treat!
While the original Rice Krispie Treat boasts a long and cherished history, dating back to the 1930s and Kellogg’s clever marketing, our Peanut Butter Krispie Treats recipe puts a delightful spin on this beloved confection. It’s a testament to the enduring power of simple ingredients transformed into something extraordinary. I’ve always been fascinated by how a few basic pantry staples can create such a satisfying snack.
The beauty of these Peanut Butter Krispie Treats lies in their irresistible combination of textures and flavors. The crispy rice cereal provides a delightful crunch, perfectly complemented by the creamy, smooth peanut butter. It’s a harmonious blend of sweet and salty, a textural masterpiece that’s both comforting and exciting. And let’s be honest, the convenience factor is a huge plus! These treats are incredibly easy to make, requiring minimal ingredients and even less time. Perfect for a quick after-school snack, a bake sale contribution, or simply satisfying a sudden craving for something sweet and nutty.
So, are you ready to embark on this culinary adventure with me? Let’s dive into the recipe and create some truly sensational Peanut Butter Krispie Treats!

Ingredients:
- 6 tablespoons (3 ounces) unsalted butter
- 1 (10 ounce) package marshmallows (mini marshmallows work best, but regular will do)
- 1 teaspoon vanilla extract
- 1 cup creamy peanut butter (I prefer a natural peanut butter, but any will work)
- 6 cups Rice Krispies cereal (or other similar crispy rice cereal)
- 1 cup semi-sweet chocolate chips (optional, but highly recommended!)
- 1/4 cup peanut butter chips (optional, for extra peanut butter flavor)
- Coarse sea salt (optional, for sprinkling on top)
- Cooking spray
Preparing the Peanut Butter Marshmallow Mixture
- First, I like to grease my 9×13 inch baking pan generously with cooking spray. This prevents sticking and makes cleanup a breeze. Trust me, you’ll thank me later!
- Next, in a large, heavy-bottomed saucepan (I find a nonstick one works best), melt the butter over medium-low heat. Don’t rush this step! Low and slow is the key to preventing burning.
- Once the butter is completely melted, add the marshmallows. Stir constantly with a wooden spoon or spatula until the marshmallows are completely melted and the mixture is smooth. This usually takes about 5-7 minutes, depending on your stovetop.
- Remove the saucepan from the heat. Now, stir in the vanilla extract and peanut butter. Keep stirring until the peanut butter is fully incorporated and the mixture is smooth and creamy. This is where the magic happens!
- Now for the fun part! Gently fold in the Rice Krispies cereal until it’s evenly coated with the peanut butter marshmallow mixture. Be careful not to overmix; you want to keep the cereal nice and crispy.
Assembling and Finishing the Treats
- Quickly transfer the mixture to your prepared 9×13 inch baking pan. Use a spatula or your hands (lightly greased with cooking spray) to press the mixture evenly into the pan. This ensures even thickness and prevents any gaps.
- If you’re using chocolate chips and/or peanut butter chips, sprinkle them evenly over the top of the Krispie treat mixture. I like to gently press them down slightly so they adhere to the surface.
- For an extra touch of deliciousness, sprinkle some coarse sea salt over the chocolate chips. The salty-sweet combination is amazing!
- Let the treats cool completely at room temperature. This usually takes about 30-45 minutes. Resist the urge to cut them too soon! They need time to set properly.
- Once the treats are completely cool, use a sharp knife (I recommend a butter knife) to cut them into squares. Wipe the knife clean between cuts to prevent sticking.
- Store the Peanut Butter Krispie Treats in an airtight container at room temperature for up to 3 days. They’re best enjoyed fresh, but they’ll still be delicious for a couple of days.
Tips and Variations
For Extra Flavor:
- Try adding a pinch of cinnamon or nutmeg to the marshmallow mixture for a warm, spiced flavor.
- Use different types of chocolate chips, such as milk chocolate, dark chocolate, or white chocolate.
- Add chopped nuts, such as peanuts, pecans, or cashews, for added crunch and flavor.
Troubleshooting:
- If your mixture is too sticky: Add a little more Rice Krispies cereal, one cup at a time, until it reaches the desired consistency.
- If your mixture is too dry: Add a tablespoon or two of melted butter, stirring gently until combined.
- If your treats are sticking to the pan: Make sure you greased the pan well with cooking spray before adding the mixture.
Serving Suggestions:
- Serve these treats as a delicious after-school snack.
- Bring them to a party or potluck for a crowd-pleasing dessert.
- Pack them in lunchboxes for a sweet treat on the go.
Storage:
Store your Peanut Butter Krispie Treats in an airtight container at room temperature for up to 3 days. For longer storage, you can freeze them for up to 2 months. Just be sure to let them thaw completely before serving.
Conclusion:
So there you have it – my take on the classic Peanut Butter Krispie Treats! I truly believe this recipe is a must-try for several reasons. First, it’s incredibly easy. Even the most novice baker can whip up a batch of these gooey, peanut buttery squares in under 30 minutes. Second, the flavor combination is simply irresistible. The salty-sweet balance of peanut butter and marshmallows is a timeless classic, and this recipe elevates it to another level with the addition of creamy peanut butter throughout. The texture is perfect too – chewy, crispy, and utterly satisfying. It’s the kind of treat that will disappear quickly, leaving everyone wanting more.
This Peanut Butter Krispie Treats recipe is perfect for any occasion. Whether you’re looking for a quick after-school snack, a delightful dessert for a potluck, or a fun activity to do with the kids, this recipe delivers. The possibilities are endless!
Speaking of possibilities, let’s talk variations! For a richer, more intense peanut butter flavor, try using a high-quality, all-natural peanut butter. You can also add a swirl of chocolate – either melted milk chocolate or dark chocolate – for an extra decadent touch. If you’re feeling adventurous, try incorporating chopped peanuts, pretzels, or even cookie crumbs into the mixture for added texture and flavor. For a festive twist, use different colored marshmallows around holidays – red and green for Christmas, orange and black for Halloween, etc. The possibilities are truly endless!
Beyond the variations, I encourage you to get creative with how you serve these Peanut Butter Krispie Treats. They’re delicious on their own, of course, but they also make a fantastic addition to a dessert platter. You can cut them into small squares for easy snacking, or create larger bars for a more substantial treat. They also pair wonderfully with a scoop of vanilla ice cream or a drizzle of caramel sauce. Imagine the combination of warm, gooey Peanut Butter Krispie Treats and a cold scoop of vanilla ice cream – pure bliss!
I’ve personally enjoyed experimenting with different serving styles. I’ve served them at birthday parties, family gatherings, and even just as a simple treat for myself after a long day. They’re always a hit, no matter the occasion. And the best part? The cleanup is minimal! Just a quick wipe of the bowl and your kitchen is ready for the next adventure.
So, what are you waiting for? Head to the kitchen and give this Peanut Butter Krispie Treats recipe a try. I’m confident you’ll love them as much as I do. And once you’ve made your own batch, I’d love to hear about your experience! Share your photos and feedback on social media using the hashtag #PeanutButterKrispieTreats. I can’t wait to see your creations and hear about your delicious adventures in the kitchen. Happy baking!
Remember, the best part of baking is sharing your creations with loved ones. So gather your friends and family, and enjoy these delightful Peanut Butter Krispie Treats together!
Don’t forget to let me know how your Peanut Butter Krispie Treats turn out! I’m always eager to hear from my readers and see your culinary masterpieces. Happy baking!
Peanut Butter Krispie Treats: No-Bake Recipe & Easy Guide
Creamy peanut butter and Rice Krispies cereal combine for a delicious twist on a classic treat. Optional chocolate chips add extra indulgence.
Ingredients
Instructions
Recipe Notes
- For extra flavor: Add a pinch of cinnamon or nutmeg, use different types of chocolate chips, or add chopped nuts.
- If the mixture is too sticky: Add more Rice Krispies cereal, one cup at a time.
- If the mixture is too dry: Add a tablespoon or two of melted butter.
- If treats stick to the pan: Ensure the pan was well greased.