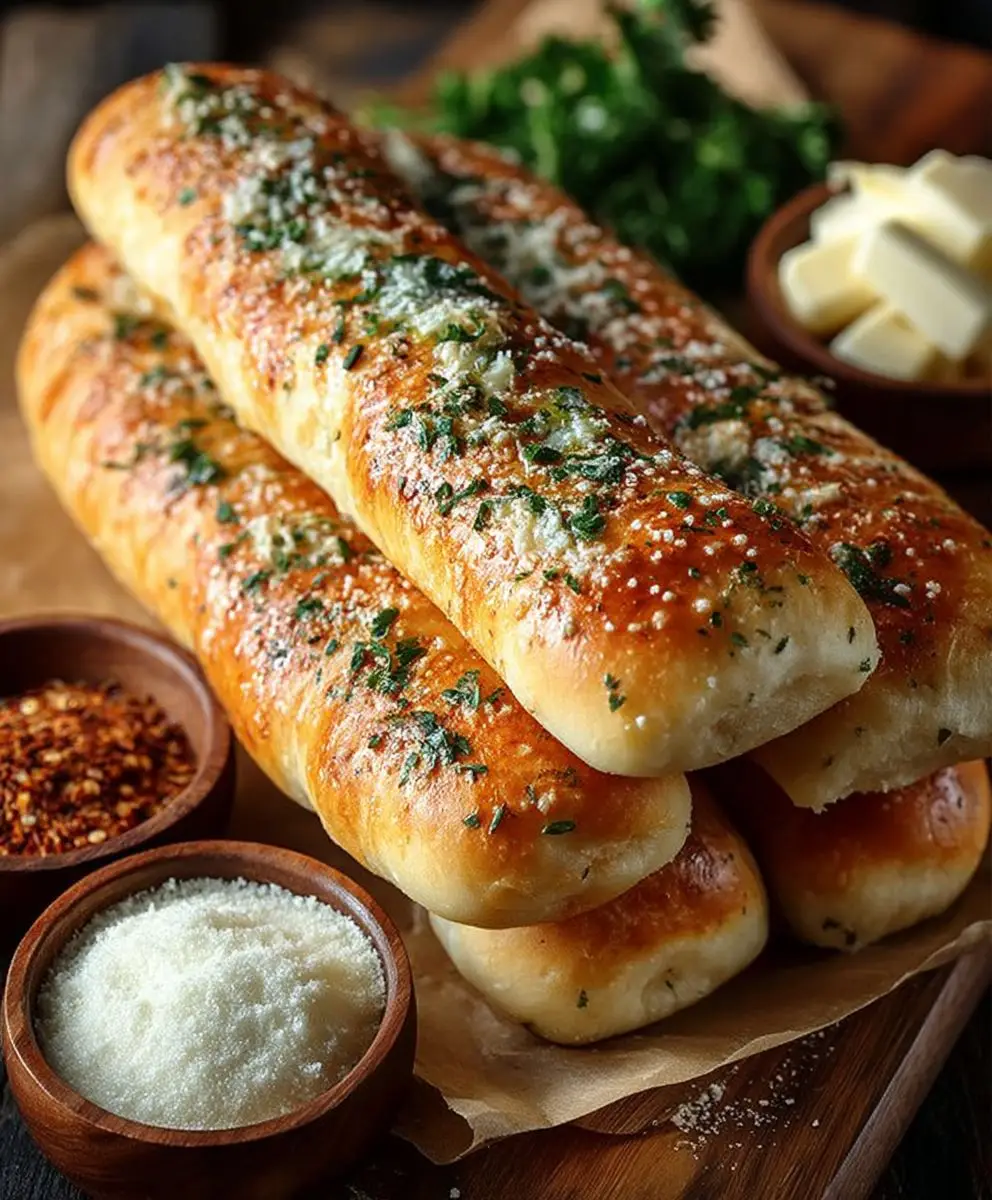
Olive Garden Breadsticks: Is there anything more iconic than those warm, garlicky, and impossibly soft breadsticks that arrive at your table before you even order at Olive Garden? I think not! For years, these seemingly simple breadsticks have been the subject of countless copycat recipes, and for good reason. They’re utterly addictive!
While the exact recipe remains a closely guarded secret, the allure of these breadsticks isn’t just about the taste; it’s about the experience. They represent the start of a comforting, family-style meal, a promise of good things to come. The unlimited supply adds to the feeling of abundance and generosity, making them a memorable part of the Olive Garden experience.
But what makes these Olive Garden Breadsticks so irresistible? It’s the perfect combination of a soft, slightly chewy texture, a subtle sweetness, and that unmistakable garlic butter glaze. They’re warm, comforting, and incredibly easy to eat. Plus, let’s be honest, who can resist dipping them in a bowl of steaming pasta sauce? Today, I’m excited to share my take on this beloved classic, so you can enjoy that Olive Garden magic right in your own kitchen. Get ready to bake up a batch of pure happiness!

Ingredients:
- For the Dough:
- 1 ½ cups warm water (105-115°F)
- 2 ¼ teaspoons (1 packet) active dry yeast
- 1 tablespoon granulated sugar
- 1 tablespoon olive oil, plus more for brushing
- 1 ½ teaspoons salt
- 3 ¾ – 4 cups all-purpose flour, plus more for dusting
- For the Garlic Butter Topping:
- ½ cup (1 stick) unsalted butter, melted
- 2 cloves garlic, minced
- ½ teaspoon garlic powder
- ¼ teaspoon salt
- ¼ teaspoon dried parsley
Preparing the Dough:
- Activate the Yeast: In a large bowl, combine the warm water, yeast, and sugar. Let it sit for 5-10 minutes, or until the yeast is foamy. This step is crucial to ensure your yeast is alive and active, which will give you light and fluffy breadsticks. If it doesn’t foam, your yeast might be old or the water was too hot or cold, and you’ll need to start over with fresh yeast.
- Add Wet Ingredients: Once the yeast is foamy, add the olive oil and salt to the bowl. Stir to combine.
- Gradually Add Flour: Begin adding the flour, one cup at a time, mixing well after each addition. I like to use a wooden spoon for this part, as it helps to incorporate the flour evenly. As the dough starts to come together, it will become more difficult to stir.
- Knead the Dough: Once the dough has formed a shaggy mass, turn it out onto a lightly floured surface. Knead the dough for 5-7 minutes, or until it is smooth and elastic. If the dough is too sticky, add a little more flour, one tablespoon at a time. Don’t add too much flour, though, or your breadsticks will be dry. You want the dough to be slightly tacky but not stick to your hands. Kneading develops the gluten in the flour, which gives the breadsticks their structure and chewiness.
- First Rise: Place the kneaded dough in a lightly oiled bowl, turning to coat all sides. Cover the bowl with plastic wrap or a clean kitchen towel. Let the dough rise in a warm place for 1-1.5 hours, or until it has doubled in size. The warmer the environment, the faster the dough will rise. You can place the bowl in a slightly warmed oven (turned off!) or near a sunny window. This first rise is essential for developing the flavor of the dough.
Shaping the Breadsticks:
- Punch Down the Dough: After the dough has doubled, gently punch it down to release the air. This helps to redistribute the yeast and prevents large air pockets from forming in the breadsticks.
- Divide the Dough: Turn the dough out onto a lightly floured surface. Divide the dough into 16-20 equal pieces. I like to use a kitchen scale to ensure that each piece is the same size, but you can also eyeball it.
- Shape the Breadsticks: Roll each piece of dough into a long, thin rope, about 8-10 inches long. Try to keep the thickness consistent along the entire length of the breadstick. If the dough is resisting being rolled out, let it rest for a few minutes to allow the gluten to relax.
- Arrange on Baking Sheet: Place the shaped breadsticks on a baking sheet lined with parchment paper. Leave about an inch of space between each breadstick. The parchment paper prevents the breadsticks from sticking to the baking sheet and makes cleanup easier.
- Second Rise: Cover the breadsticks with a clean kitchen towel and let them rise for another 20-30 minutes. This second rise allows the breadsticks to become even lighter and fluffier.
Baking the Breadsticks:
- Preheat Oven: Preheat your oven to 400°F (200°C). Make sure your oven is fully preheated before baking the breadsticks, as this will ensure that they bake evenly.
- Bake: Bake the breadsticks for 12-15 minutes, or until they are golden brown. Keep a close eye on them, as they can burn easily. The baking time may vary depending on your oven.
Preparing the Garlic Butter Topping:
- Melt the Butter: While the breadsticks are baking, melt the butter in a small saucepan or in the microwave.
- Add Garlic and Seasonings: Add the minced garlic, garlic powder, salt, and dried parsley to the melted butter. Stir to combine. I like to let the garlic infuse the butter for a few minutes to enhance the flavor.
Finishing Touches:
- Brush with Garlic Butter: As soon as the breadsticks come out of the oven, brush them generously with the garlic butter topping. Make sure to coat all sides of the breadsticks. The heat from the breadsticks will help the butter to melt and absorb into the dough.
- Serve Immediately: Serve the breadsticks immediately. They are best enjoyed warm and fresh. These breadsticks are delicious on their own, or served with soup, salad, or pasta.
Tips for Perfect Breadsticks:
- Water Temperature: The water temperature is crucial for activating the yeast. It should be warm, but not too hot. If the water is too hot, it will kill the yeast. If it’s too cold, the yeast won’t activate. Aim for 105-115°F.
- Don’t Overknead: Overkneading can result in tough breadsticks. Knead the dough until it is smooth and elastic, but not overly stiff.
- Proper Rising: Allow the dough to rise in a warm place. This will help the breadsticks to become light and fluffy.
- Even Baking: Make sure your oven is properly preheated and that the breadsticks are evenly spaced on the baking sheet. This will ensure that they bake evenly.
- Fresh Ingredients: Use fresh yeast and good quality flour for the best results.
- Garlic Intensity: Adjust the amount of garlic in the garlic butter topping to your liking. If you prefer a stronger garlic flavor, add more minced garlic.
- Herb Variations: Feel free to experiment with different herbs in the garlic butter topping. Italian seasoning, oregano, or basil would all be delicious additions.
- Cheese Please: For a cheesy twist, sprinkle the breadsticks with grated Parmesan cheese after brushing them with the garlic butter.
- Freezing: You can freeze the baked breadsticks for later use. Allow them to cool completely before wrapping them tightly in plastic wrap and placing them in a freezer bag. To reheat, bake them in a preheated oven at 350°F (175°C) for 5-10 minutes, or until warmed through.
- Dough Variations: For a slightly different flavor, you can substitute some of the all-purpose flour with whole wheat flour. This will give the breadsticks a slightly nutty flavor and a denser texture.
Troubleshooting:
- Dough Not Rising: If your dough isn’t rising, it could be due to several factors: the yeast is old, the water was too hot or cold, or the environment is too cold. Make sure your yeast is fresh, the water is the correct temperature, and the dough is in a warm place.
- Breadsticks Too Dense: If your breadsticks are too dense, it could be because you didn’t knead the dough enough or you didn’t allow it to rise properly. Make sure to knead the dough for the recommended amount of time and allow it to rise in a warm place until it has doubled in size.
- Breadsticks Too Dry: If your breadsticks are too dry, it could be because you added too much flour or you overbaked them. Be careful not to add too much flour to the dough, and keep a close eye on the breadsticks while they are baking.
- Breadsticks Burning: If your breadsticks are burning, it could be because your oven is too hot or you are baking them for too long. Make sure your oven is properly preheated and keep a close eye on the breadsticks while they are baking. You may need to reduce the baking time or lower the oven temperature.
Conclusion:
This Olive Garden Breadsticks recipe isn’t just another bread recipe; it’s a passport to warm, garlicky, comforting goodness. Seriously, if you’ve ever craved that endless basket of breadsticks while waiting for your pasta, this is your chance to bring that experience home. And trust me, homemade is even better! The soft, pillowy texture, the generous coating of garlic butter, and that subtle hint of salt – it’s a symphony of flavors that will have everyone reaching for more.
But why is this recipe a must-try? Because it’s surprisingly simple! You don’t need to be a master baker to achieve breadstick perfection. The instructions are straightforward, the ingredients are readily available, and the satisfaction of pulling a batch of these golden beauties out of your oven is simply unmatched. Forget store-bought imitations; this is the real deal, a taste of Olive Garden magic made with your own two hands.
Beyond the classic experience, there are so many ways to customize these breadsticks to your liking. For a spicier kick, add a pinch of red pepper flakes to the garlic butter. If you’re a cheese lover (and who isn’t?), sprinkle some grated Parmesan or Romano cheese over the breadsticks before baking. Want to make them even more decadent? Brush them with melted butter again after they come out of the oven.
These breadsticks are incredibly versatile. Of course, they’re the perfect accompaniment to any Italian meal, from pasta dishes to soups and salads. But they’re also fantastic on their own as a snack, dipped in marinara sauce, or even used as the base for mini pizzas. Imagine topping these warm, garlicky breadsticks with your favorite pizza toppings and baking them until the cheese is melted and bubbly – pure heaven!
And don’t forget about serving suggestions! For a truly authentic Olive Garden experience, serve these breadsticks warm in a basket lined with a cloth napkin. You can also arrange them on a platter alongside a bowl of marinara sauce for dipping. If you’re feeling fancy, drizzle them with a balsamic glaze for a touch of sweetness and acidity.
I’m so excited for you to try this recipe and experience the joy of homemade Olive Garden Breadsticks. I know you’ll love them as much as I do. So, gather your ingredients, preheat your oven, and get ready to bake up a batch of these irresistible treats.
I truly believe that this recipe will become a family favorite. It’s perfect for weeknight dinners, special occasions, or simply when you’re craving a little bit of comfort food. The aroma alone will fill your kitchen with warmth and happiness.
Now, it’s your turn! I can’t wait to hear about your experience making these breadsticks. Did you try any variations? What did you serve them with? Share your photos and stories in the comments below. Let’s create a community of breadstick lovers and inspire each other with our culinary creations. Happy baking!
Olive Garden Breadsticks: The Ultimate Guide to Copycat Recipes
Fluffy, homemade breadsticks brushed with a flavorful garlic butter topping. Perfect as a side dish or snack!
Ingredients
Instructions
Recipe Notes
- The water temperature is crucial for activating the yeast. It should be warm, but not too hot (105-115°F).
- Don’t overknead the dough.
- Allow the dough to rise in a warm place.
- Make sure your oven is properly preheated and that the breadsticks are evenly spaced on the baking sheet.
- Use fresh yeast and good quality flour for the best results.
- Adjust the amount of garlic in the garlic butter topping to your liking.
- Feel free to experiment with different herbs in the garlic butter topping.
- For a cheesy twist, sprinkle the breadsticks with grated Parmesan cheese after brushing them with the garlic butter.
- You can freeze the baked breadsticks for later use.
- For a slightly different flavor, you can substitute some of the all-purpose flour with whole wheat flour.