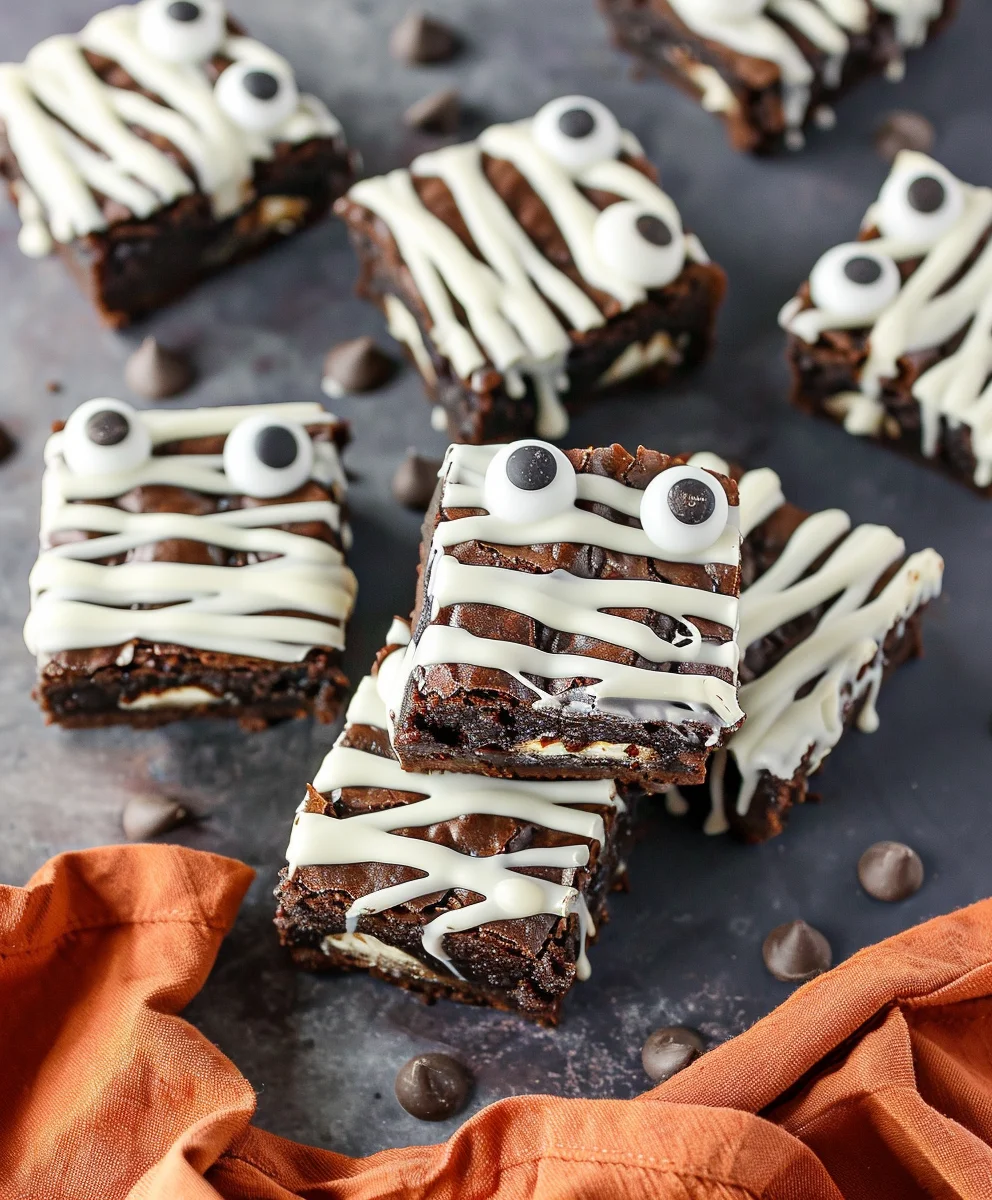
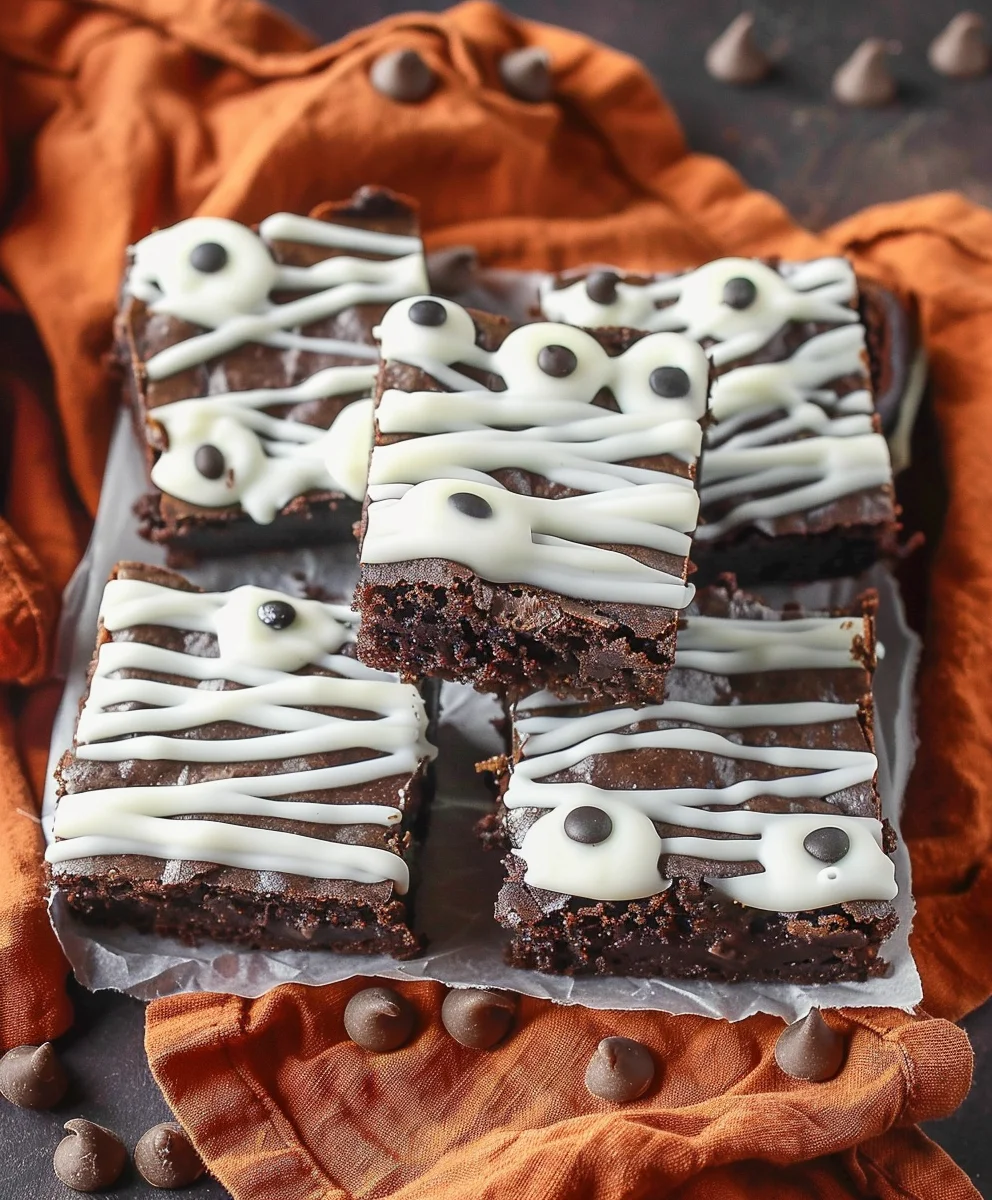
Mummy Brownies, with their adorable yet spooky charm, transform a classic dessert into a festive masterpiece that’s simply irresistible. As the crisp autumn air ushers in the beloved Halloween season, our kitchens buzz with the promise of ghoulish delights and playful frights. This delightful recipe is a perfect nod to one of the most anticipated nights of the year, bringing ancient Egyptian vibes to your modern dessert table in the most delicious way possible. There’s an undeniable joy in serving a treat that is as fun to look at as it is utterly decadent to eat.
Beyond their captivating, themed appearance, these delightful treats offer the ultimate combination of a rich, fudgy chocolate brownie base and a whimsical, edible decoration that’s surprisingly simple to achieve. I’ve found that everyone, from little monsters to grown-up goblins, is captivated by the creativity and, of course, the incredibly satisfying taste. The satisfying chewiness and deep chocolate flavor of a perfectly baked brownie, coupled with the fun, edible bandages, make for a truly memorable experience. Making Mummy Brownies is not just about baking; it’s an enjoyable activity that brings smiles and a touch of seasonal magic to any gathering, making them a consistently sought-after dessert during the autumn months.

Ingredients:
To create the most enchanting and delectable Mummy Brownies, you’ll need a collection of high-quality ingredients for both the rich brownie base and the ghostly white frosting. Let’s gather everything we need before we embark on this spooky culinary adventure!
-
For the Fudgy Brownie Base:
- 1 cup (2 sticks or 226g) unsalted butter, cut into cubes
- 8 ounces (226g) good quality semi-sweet chocolate, chopped (I often use a mix of semi-sweet chocolate chips and a baking bar for depth of flavor)
- 1 ¾ cups (350g) granulated sugar
- 4 large eggs, at room temperature
- 1 tablespoon pure vanilla extract (the good stuff makes a difference!)
- 1 cup (120g) all-purpose flour, spooned and leveled
- ½ cup (45g) unsweetened cocoa powder (Dutch-processed for a darker, richer brownie, or natural for a slightly fruitier note)
- ½ teaspoon salt
- Optional: 1 cup chocolate chips, nuts (walnuts or pecans), or other mix-ins for extra texture and flavor
-
For the Ghostly White Buttercream Frosting:
- 1 cup (2 sticks or 226g) unsalted butter, softened to room temperature
- 4 cups (480g) powdered sugar (confectioners’ sugar), sifted
- 2-3 tablespoons milk or heavy cream (I prefer heavy cream for a richer frosting)
- 1 teaspoon pure vanilla extract
- Pinch of salt (just a tiny bit to balance the sweetness!)
-
For the Mummy Decoration:
- Candy eyes (various sizes are fun!)
Equipment You’ll Need:
Having the right tools on hand makes the baking process smoother and more enjoyable. Here’s what I recommend for creating your perfect batch of Mummy Brownies:
- 9×13 inch baking pan
- Parchment paper
- Non-stick cooking spray
- Large heatproof bowl (for melting chocolate)
- Medium mixing bowl
- Whisk
- Rubber spatula
- Electric mixer (stand mixer or hand mixer is ideal for frosting)
- Fine-mesh sieve (for sifting flour and powdered sugar)
- Measuring cups and spoons
- Wire cooling rack
- Piping bag(s)
- Round piping tip (a Wilton 1A or 12 works well, or just snip the end of the bag for a rustic look)
- Sharp knife or bench scraper for cutting brownies
Preparing Your Spooky Brownie Base:
Let’s get started on the foundation of our delightful Mummy Brownies – the gloriously fudgy brownie base! This recipe ensures a rich, dense brownie that holds up perfectly to the frosting decoration.
- Preheat and Prep: First things first, preheat your oven to 350°F (175°C). Then, line a 9×13 inch baking pan with parchment paper, leaving an overhang on the sides. This “sling” will make it incredibly easy to lift your baked brownies out of the pan later. Give the parchment paper a light spray with non-stick cooking spray for extra insurance. Preparing your pan properly is key for easy removal and clean cuts.
-
Melt Chocolate and Butter: In your large heatproof bowl, combine the chopped semi-sweet chocolate and cubed unsalted butter. You have a couple of options for melting:
- Microwave Method: Heat in 30-second intervals, stirring well after each, until mostly melted and smooth. Be careful not to scorch the chocolate!
- Double Boiler Method: Place the bowl over a saucepan of simmering water (make sure the bottom of the bowl doesn’t touch the water). Stir occasionally until the mixture is smooth and glossy. This method offers more control and less risk of overheating.
Once melted, set the chocolate mixture aside to cool slightly. We don’t want to scramble our eggs later!
- Whisk Wet Ingredients: In a separate medium mixing bowl, whisk together the granulated sugar and the four large eggs until well combined and light in color, about 1-2 minutes. This step helps to dissolve some of the sugar and incorporates air, contributing to a lovely chewy texture. Stir in the pure vanilla extract.
- Combine Wet and Chocolate Mixtures: Pour the slightly cooled chocolate and butter mixture into the egg and sugar mixture. Whisk gently until just combined. Don’t overmix here; we want to keep it just incorporated. The mixture should be smooth and luscious.
- Sift Dry Ingredients: In a clean bowl, or directly over your wet mixture (using a fine-mesh sieve), sift together the all-purpose flour, unsweetened cocoa powder, and salt. Sifting helps to break up any lumps and aerates the dry ingredients, ensuring a smoother batter and preventing pockets of dry flour in your finished brownies.
- Gently Fold in Dry Ingredients: Add the sifted dry ingredients to the wet chocolate mixture. Using your rubber spatula, fold the ingredients together until just combined. It’s incredibly important not to overmix at this stage. Overmixing develops the gluten in the flour, leading to tough, cakey brownies rather than the fudgy texture we’re aiming for. A few streaks of flour are fine; they will disappear during baking.
- Add Optional Mix-ins: If you’re using chocolate chips, nuts, or any other mix-ins, gently fold them into the batter now. I always find a handful of extra chocolate chips makes for extra special Mummy Brownies.
- Bake to Perfection: Pour the brownie batter evenly into your prepared 9×13 inch baking pan. Spread it with your spatula to reach all corners. Bake for 25-30 minutes. The brownies are done when a toothpick inserted into the center comes out with moist crumbs, but not wet batter. You want them slightly underbaked for maximum fudginess! An overbaked brownie is a dry brownie, and nobody wants that.
- Cool Completely: Remove the pan from the oven and place it on a wire cooling rack. Allow the brownies to cool completely in the pan before attempting to frost them. This is crucial! Warm brownies will melt your beautiful buttercream frosting, turning your mummies into a sad, gooey mess. Patience is a virtue when it comes to perfect Mummy Brownies. This cooling process can take a couple of hours, or you can speed it up slightly by placing them in the refrigerator once they’ve cooled to room temperature.
Crafting the Ethereal White Frosting:
Now that our gorgeous brownie base is cooling, let’s turn our attention to the star of the show for our Mummy Brownies – the ghostly white buttercream frosting! This frosting is smooth, creamy, and holds its shape beautifully for piping.
- Soften the Butter: Ensure your unsalted butter for the frosting is truly softened to room temperature. This means it should be pliable but still hold its shape, not melted or greasy. If it’s too cold, your frosting will be lumpy; too warm, and it might be too thin.
- Cream the Butter: In the bowl of your electric mixer (or using a hand mixer), beat the softened butter on medium-high speed for 2-3 minutes until it becomes light, fluffy, and pale in color. This step incorporates air, making the frosting wonderfully light.
- Sift Powdered Sugar: While the butter is creaming, sift your powdered sugar into a separate bowl. This step is absolutely essential for a smooth, lump-free frosting. Nothing ruins a beautiful piped design like a stubborn lump of sugar!
- Gradually Add Powdered Sugar: With the mixer on low speed, gradually add the sifted powdered sugar to the creamed butter, one cup at a time. Mix until just combined after each addition. Once all the sugar is added, increase the speed to medium-high and beat for another 2-3 minutes. The mixture will start to thicken and become more unified.
- Incorporate Liquid and Flavor: Reduce the mixer speed to low. Add 2 tablespoons of milk or heavy cream, the pure vanilla extract, and the pinch of salt. Beat on low until combined, then increase the speed to medium-high and beat for another 1-2 minutes until the frosting is light, fluffy, and spreadable.
- Adjust Consistency: Check the consistency of your frosting. If it seems too thick, add the remaining tablespoon of milk or cream, a tiny bit at a time (half a teaspoon even!), until you reach your desired piping consistency. If, by chance, it seems too thin, you can add a little more sifted powdered sugar. The perfect consistency for piping mummy bandages is firm enough to hold its shape but soft enough to flow smoothly through a piping bag.
- Keep Covered: If you’re not using the frosting immediately, cover the bowl with plastic wrap directly touching the surface of the frosting to prevent a crust from forming.
Assembling Your “Mummy Brownies”: The Unwrapping!
This is where the magic happens! Turning our delicious brownie base and creamy white frosting into adorable and slightly spooky Mummy Brownies is the best part. Make sure your brownies are completely cool before you start this stage.
- Lift and Cut Brownies: Once your brownies are completely cool, use the parchment paper overhang to gently lift the entire slab of brownies out of the pan and place it on a cutting board. Use a sharp knife (I like to wipe mine with a little cooking spray or warm water between cuts to keep it clean) to cut the brownies into individual rectangles. I usually aim for 12-16 brownies from a 9×13 inch pan, depending on how large I want my mummies to be. Consistency in size will make for uniform and attractive Mummy Brownies.
- Prepare Your Piping Bag: Fit a piping bag with your chosen round piping tip (such as a Wilton 1A or 12). If you don’t have a piping tip, you can simply snip a small corner off the end of the piping bag for a more rustic, hand-cut bandage look. Fill the piping bag about two-thirds full with your prepared white buttercream frosting. Don’t overfill it, as it will be harder to control.
-
Pipe the Mummy Bandages: Now for the fun part! Take one brownie rectangle. Starting at one end, pipe horizontal or diagonal lines across the top of the brownie to create the “bandages.”
- Leave a small gap towards the top center where the “eyes” will go.
- Vary the length and angle of your lines slightly to create a more authentic, tattered mummy look.
- You can layer the lines slightly, crisscrossing them, to add dimension.
- Don’t worry about perfection; slightly uneven lines can add to the charm of your Mummy Brownies!
Continue this process for all your brownie rectangles, creating a unique mummified look for each one.
- Place the Candy Eyes: While the frosting is still soft, carefully place two candy eyes in the small gap you left near the top of each “mummy.” Gently press them into the frosting so they adhere. The contrast of the white frosting and the dark candy eyes truly brings these Mummy Brownies to life (or rather, undeath!).
- Allow to Set: Once all your Mummy Brownies are decorated, you can let them sit at room temperature for a short while to allow the frosting to slightly set, making them easier to handle. If your kitchen is warm, or you want them to firm up quicker, a brief stint in the refrigerator for about 15-20 minutes will do the trick.
Tips for the Best Mummy Brownies:
To ensure your Mummy Brownies are the talk of the town (or graveyard!), here are some of my favorite tips and tricks:
-
Use Quality Ingredients:
Good quality chocolate really makes a difference in brownie flavor. I love using a mix of chocolate chips and a chopped baking bar for complex flavor. Similarly, pure vanilla extract elevates both the brownie and the frosting.
-
Do Not Overmix:
I cannot stress this enough for the brownie batter! Overmixing develops gluten, leading to a cakey, dry brownie instead of the desired fudgy texture. Mix until just combined, even if there are a few flour streaks.
-
The Perfect Bake:
Brownies are often best when slightly underbaked. A toothpick inserted into the center should come out with moist crumbs, not wet batter, but also not perfectly clean. This ensures a wonderfully gooey center.
-
Cool Completely:
This is critical for successful frosting. Warm brownies will melt your buttercream, leading to a messy, un-mummified disaster. Patience, my friends, patience!
-
Sift Your Powders:
Always sift the flour, cocoa powder, and especially the powdered sugar for the frosting. This prevents lumps and ensures a smooth, professional finish.
-
Butter Temperature for Frosting:
Softened butter is key for smooth buttercream. Too cold, and it will be lumpy; too warm, and it will be greasy and thin. It should be pliable but still hold its shape.
-
Frosting Consistency Control:
Have extra powdered sugar and milk/cream on hand. If your frosting is too thick, add liquid a tiny bit at a time. If it’s too thin, add more sifted powdered sugar. It’s easier to add than to take away!
-
Creative Bandages:
Don’t be afraid to get creative with your piping! Different piping tips or simply snipping the bag differently can create various bandage textures. Diagonal lines, crisscrossed patterns, or even slightly wavy lines can make your Mummy Brownies unique.
-
Variety of Eyes:
Using candy eyes of different sizes or slightly different positions can give each mummy its own personality, adding to the fun of your spooky treats.
Storage and Serving Suggestions:
Once you’ve successfully brought your army of delicious Mummy Brownies to life, knowing how to store them properly ensures they stay fresh and delightful for days. Here’s what I recommend:
-
Room Temperature Storage:
Your Mummy Brownies can be stored in an airtight container at room temperature for up to 3-4 days. Placing a piece of parchment paper between layers, if stacking, will help prevent the frosting from sticking or getting smushed. Ensure they are in a cool, dry place away from direct sunlight.
-
Refrigeration:
If you want them to last a bit longer, or if your kitchen is particularly warm, you can store the Mummy Brownies in an airtight container in the refrigerator for up to a week. Just be aware that refrigeration can sometimes make brownies a little firmer. I suggest letting them come to room temperature for about 15-20 minutes before serving for the best texture and flavor.
-
Freezing:
Yes, you can freeze your Mummy Brownies! To do so, first, place the decorated brownies on a baking sheet and freeze for about an hour until the frosting is firm. This prevents smudging. Then, transfer the brownies to an airtight freezer-safe container or a heavy-duty freezer bag. They can be frozen for up to 2-3 months. Thaw them overnight in the refrigerator and then bring them to room temperature before serving. They’ll still be incredibly delicious!
-
Serving Suggestions:
These adorable and delicious Mummy Brownies are perfect for Halloween parties, school bake sales, or just a fun treat at home. Serve them as they are, or alongside a scoop of vanilla ice cream for an extra indulgent dessert. They also make fantastic edible gifts for friends and neighbors during the spooky season. They are sure to be a hit with everyone who tries them!
<h2>Conclusion:</h2>
<p>Well, my fellow dessert enthusiasts, we’ve reached the sweet end of our journey, and I genuinely hope you’re as excited as I am about the prospect of whipping up a batch of these truly unforgettable treats. <strong>These aren’t just any ordinary chocolate squares; they are the quintessential Mummy Brownies, a delightful fusion of rich, fudgy goodness and whimsical charm.</strong> What makes them an absolute must-try, you ask? It’s that perfect balance of deep, intense chocolate flavor, a wonderfully chewy texture, and, of course, the undeniable cuteness factor that makes them utterly irresistible. Imagine biting into a brownie that’s crisp on the outside, incredibly gooey in the middle, and then discovering that playful little face staring back at you! It’s an experience that brings a smile to everyone’s face, regardless of age. I’ve found that even the most reluctant dessert eaters can’t resist their appeal. They’re more than just a dessert; they’re a conversation starter, a centerpiece, and a testament to how much fun baking can truly be. Whether you’re preparing for a spooky celebration, a casual get-together with friends, or simply looking for a way to brighten a regular Tuesday, these brownies fit the bill perfectly. Their unique visual appeal, combined with a taste that’s pure comfort, solidifies their place as a recipe you’ll want to revisit again and again. Trust me when I say, once you try them, there’s no going back to plain old brownies!</p>
<h4>Elevate Your Mummy Brownies: Serving Suggestions & Variations</h4>
<p>Now that you’re convinced these Mummy Brownies are a game-changer, let’s talk about how you can make them even more spectacular. While they are undoubtedly fantastic on their own, a few simple additions can transform them into an even grander affair. For a truly decadent experience, I highly recommend serving them warm with a scoop of premium vanilla bean ice cream. The contrast between the warm, fudgy brownie and the cold, creamy ice cream is pure bliss. A drizzle of homemade caramel sauce or a generous dollop of freshly whipped cream would also take them to another level of indulgence. Don’t shy away from experimenting with different ice cream flavors either – a scoop of coffee ice cream or even a mint chip could offer an exciting twist!</p>
<p>If you’re feeling adventurous and want to put your own spin on these delightful treats, there are countless variations to explore. Consider adding a pinch of espresso powder to your brownie batter to deepen the chocolate flavor, or a touch of orange zest for a subtle, zesty undertone. For those who love a bit of heat, a tiny dash of cayenne pepper can create a surprisingly sophisticated “Mexican chocolate” profile. You could also mix in different types of chocolate chips – white chocolate, peanut butter chips, or even chopped nuts like walnuts or pecans – to add texture and additional layers of flavor to the already perfect brownie base. <strong>For a truly festive touch beyond the spooky season, think about altering the “bandages” with different colored icing for various holidays, perhaps green for St. Patrick’s Day or pink for Valentine’s Day. Imagine adorable “love monster” brownies!</strong> And if you’re catering to different dietary needs, remember that many gluten-free brownie mixes or flours work wonderfully, and dairy-free chocolate can easily be substituted without compromising on flavor or texture. The beauty of this recipe lies in its versatility and its ability to be customized to suit any taste or occasion.</p>
<h4>Your Turn! Bake, Share, and Inspire!</h4>
<p>So, what are you waiting for? I’ve given you all the tools, tips, and inspiration you need to create your own batch of these incredible Mummy Brownies. <strong>Baking is an adventure, and this recipe is your ticket to a world of fun, flavor, and fantastic memories.</strong> Don’t be shy; embrace the process, gather your ingredients, and let your creativity flow in the kitchen. I promise you, the joy of seeing these adorable little mummies come to life is just as rewarding as eating them!</p>
<p>Once you’ve baked your masterpieces, I would absolutely love to hear all about your experience. Did you add any unique twists? What was your favorite part of the process? More importantly, I want to see them! Please consider sharing photos of your delightful Mummy Brownies with me and our baking community. Your creations inspire others and help us all discover new ways to enjoy our favorite recipes. <strong>Let’s build a delicious gallery of spooky (or sweet!) treats together!</strong> Your feedback, your photos, and your stories are what make this culinary journey truly special. Happy baking, everyone, and get ready to enjoy the most charmingly delicious brownies you’ve ever made! I can’t wait to see what you create.</p>
Mummy Brownies
Adorable yet spooky Mummy Brownies transform a classic fudgy chocolate dessert into a festive Halloween treat with whimsical white buttercream bandages and candy eyes, perfect for seasonal gatherings.
Ingredients
-
½ cup unsalted butter
-
1 cup semi-sweet chocolate chips
-
¾ cup granulated sugar
-
1 teaspoon vanilla extract
-
1 teaspoon instant espresso
-
2 eggs
-
¼ cup all-purpose flour
-
¼ cup unsweetened cocoa powder
-
½ teaspoon baking powder
-
¼ teaspoon salt
-
Candy eyes
-
½ cup unsalted butter, at room temperature (1 stick)
-
1 ½ cups powdered sugar
-
1 teaspoon vanilla extract
-
1 tablespoon milk
Instructions
-
Step 1
Preheat oven to 350°F (175°C). Line a 9×13 inch baking pan with parchment paper, leaving an overhang, and spray lightly. In a heatproof bowl, melt ½ cup butter and 1 cup semi-sweet chocolate chips until smooth. Set aside to cool slightly. In a separate bowl, whisk ¾ cup granulated sugar, 2 eggs, 1 tsp vanilla extract, and 1 tsp instant espresso until light in color. -
Step 2
Pour the slightly cooled chocolate mixture into the egg mixture; whisk gently until just combined. In a separate bowl, sift together ¼ cup all-purpose flour, ¼ cup unsweetened cocoa powder, ½ tsp baking powder, and ¼ tsp salt. Gently fold the dry ingredients into the wet mixture using a rubber spatula until just combined; do not overmix. -
Step 3
Pour the batter into the prepared pan and spread evenly. Bake for 25-30 minutes, or until a toothpick inserted into the center comes out with moist crumbs. Remove from oven and cool completely on a wire rack in the pan. This is crucial before frosting. -
Step 4
In the bowl of an electric mixer, beat ½ cup softened unsalted butter on medium-high speed until light and fluffy (2-3 minutes). Gradually add 1 ½ cups sifted powdered sugar, beating on low speed until combined, then increase speed to medium-high and beat for another 2-3 minutes. Add 1 tsp vanilla extract and 1 tablespoon milk; beat until the frosting is light, fluffy, and smooth. Adjust consistency with more powdered sugar or milk if needed for piping. -
Step 5
Once brownies are completely cool, lift them from the pan using the parchment paper overhang and place on a cutting board. Cut into 12-16 individual rectangles. Fit a piping bag with a round tip (or snip a small corner). Fill the bag about two-thirds full with the buttercream frosting. -
Step 6
Pipe horizontal or diagonal lines across the top of each brownie rectangle to create ‘bandages,’ leaving a small gap near the top center for the eyes. Vary lines for a tattered look. Carefully place two candy eyes into the gap on each frosted mummy. Let the frosting set slightly at room temperature or briefly in the refrigerator (15-20 minutes) before serving. -
Step 7
Store Mummy Brownies in an airtight container at room temperature for up to 3-4 days, or in the refrigerator for up to a week. For longer storage, freeze brownies on a baking sheet until frosting is firm, then transfer to a freezer-safe container for up to 2-3 months. Thaw in the refrigerator overnight and bring to room temperature before serving.
Important Information
Nutrition Facts (Per Serving)
It is important to consider this information as approximate and not to use it as definitive health advice.
Allergy Information
Please check ingredients for potential allergens and consult a health professional if in doubt.