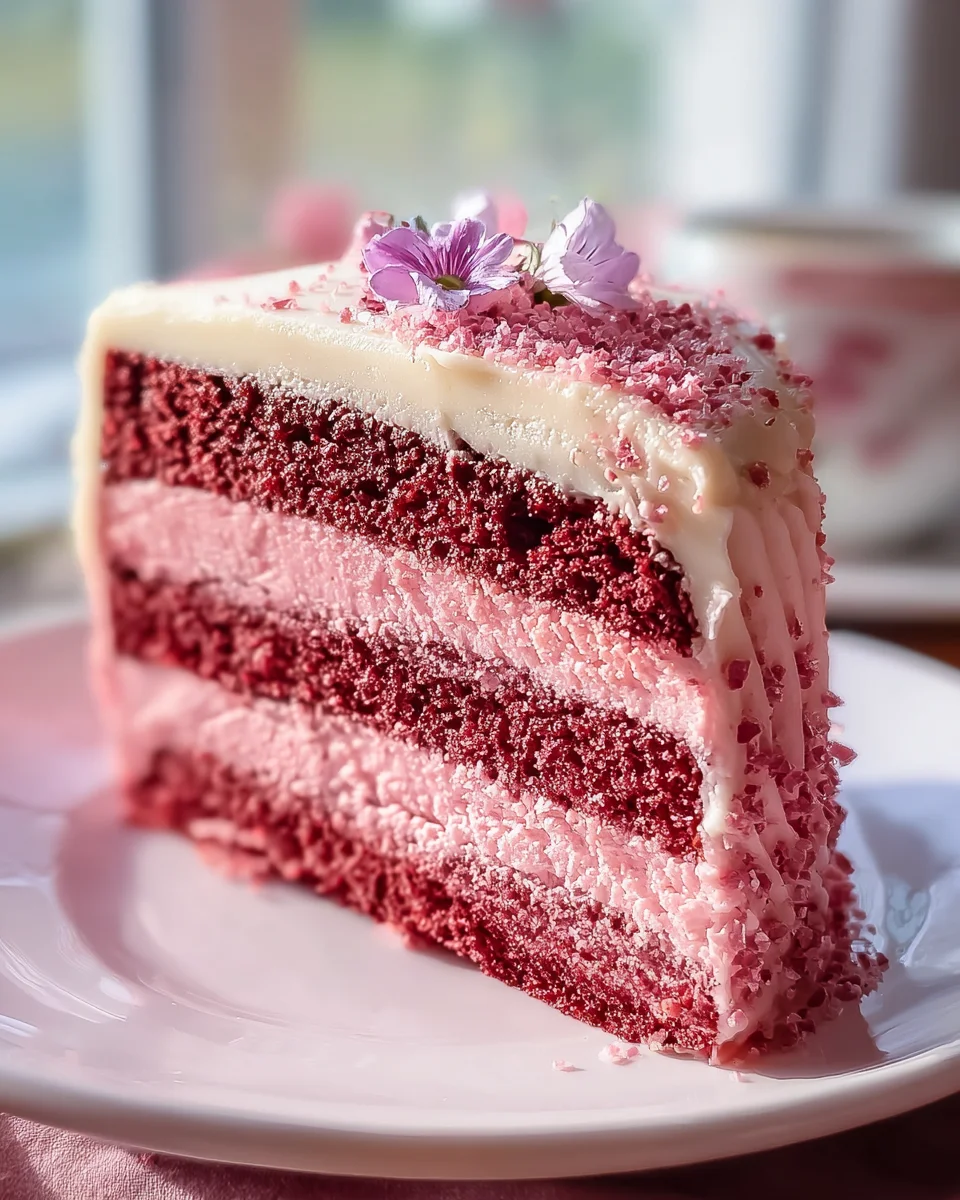
Mothers Day Pink Velvet Cake is an exquisite dessert that, for me, truly embodies the joy and love we want to share with the incredible mothers in our lives. I can just imagine the delight on Mom’s face as she sees this stunning, vibrant cake, a masterpiece of tender pink layers crowned with luscious cream cheese frosting. It’s not merely a cake; it’s a heartfelt gesture, a delectable centerpiece I believe is perfectly designed to make her feel cherished and adored, promising a sweet memory long after the last slice is savored.
The “velvet” tradition in baking signifies a cake with an incredibly fine, soft, and moist crumb, a characteristic that makes this dessert so universally adored. While its cousin, the classic Red Velvet, boasts a storied past tied to elegant hotels and even wartime ingenuity, our enchanting Pink Velvet variation captures that same beloved texture with a playful, celebratory twist. The subtle hint of cocoa paired with the cake’s striking rose hue creates a sensory experience that is both sophisticated and wonderfully joyful. I know people truly love this dish not just for its breathtaking appearance but for its melt-in-your-mouth tenderness, its balanced sweetness, and the way it instantly elevates any occasion. I’m so excited to guide you through creating a showstopper that tastes as incredible as it looks, making this Mothers Day Pink Velvet Cake the undisputed star of your festive table.

Ingredients:
-
For the Moist Pink Velvet Cake Layers:
- 2 ½ cups (300g) all-purpose flour, spooned and leveled
- 1 ½ cups (300g) granulated sugar
- 1 teaspoon baking soda
- 1 teaspoon salt
- 2 tablespoons unsweetened natural cocoa powder (not Dutch-processed, as we need the acidity to react with baking soda)
- 1 cup (226g) unsalted butter, softened to room temperature
- 2 large eggs, at room temperature
- 1 cup (240ml) buttermilk, at room temperature
- 2 teaspoons pure vanilla extract
- 2-3 tablespoons liquid red food coloring (adjust for desired pink hue; gel food coloring can be used for a more intense color with less liquid)
- 1 tablespoon white vinegar
-
For the Luscious Cream Cheese Frosting:
- 16 ounces (452g) full-fat cream cheese, softened to room temperature
- 1 cup (226g) unsalted butter, softened to room temperature
- 4-5 cups (480-600g) powdered sugar (confectioners’ sugar), sifted, or more to taste and desired consistency
- 2 teaspoons pure vanilla extract
- Pinch of salt
-
For Elegant Decoration (Optional but highly recommended for Mothers Day Pink Velvet Cake!):
- Fresh raspberries or strawberries
- Edible flowers (e.g., small rosebuds, pansies)
- White chocolate shavings or curls
- Pink or pearl sprinkles
Baking the Pink Velvet Cake Layers
- Prepare Your Workspace and Oven: Before we begin the magic, let’s get organized! Preheat your oven to 350°F (175°C). This ensures a consistent baking temperature from the moment your cake goes in. Generously grease and flour three 8-inch round cake pans. For an extra layer of non-stick insurance and easy removal, I always recommend lining the bottom of each pan with a circle of parchment paper. This prevents any heartbreaking sticking disasters and makes unmolding a breeze. Set these prepared pans aside.
- Combine the Dry Ingredients: In a large mixing bowl, whisk together the all-purpose flour, granulated sugar, baking soda, salt, and cocoa powder. It’s crucial to whisk these thoroughly to ensure that the leavening agents and cocoa are evenly distributed throughout the flour mixture. This prevents any pockets of unmixed ingredients and guarantees a uniform rise and flavor in your Mothers Day Pink Velvet Cake. Setting this aside for a moment.
- Cream the Butter and Sugar: In the bowl of a stand mixer fitted with the paddle attachment, or using a large bowl and a handheld electric mixer, cream together the softened unsalted butter and granulated sugar on medium speed for about 3-5 minutes. You’re looking for a light, fluffy, and pale-yellow mixture. This creaming process incorporates air into the butter, which will contribute to the cake’s tender texture later on. Scrape down the sides of the bowl often to ensure everything is well combined.
- Add the Eggs: Add the two large eggs to the creamed butter and sugar, one at a time, beating well after each addition. Make sure each egg is fully incorporated before adding the next. This helps create an emulsion, preventing the batter from curdling and ensuring a smooth, cohesive mixture. Continue beating until the mixture is light and fluffy again.
- Prepare the Wet Ingredients: In a separate medium bowl, whisk together the buttermilk, vanilla extract, and your chosen red food coloring. For a vibrant pink velvet cake, I usually start with 2 tablespoons of liquid red food coloring and add more if I want a deeper hue. If you’re using gel food coloring, you’ll need significantly less—start with ½ teaspoon and increase as needed, mixing until the color is consistent and beautiful. This combination of liquids will be added to our dry and wet mixtures.
- Alternate Dry and Wet Additions: With the mixer on low speed, gradually add the dry ingredients to the wet ingredients, alternating with the buttermilk mixture. Begin and end with the dry ingredients. For example, add about a third of the dry mixture, mix until just combined, then add half of the buttermilk mixture, mix, then another third of the dry, the remaining buttermilk, and finally the last third of the dry. Do not overmix! Overmixing develops the gluten in the flour too much, leading to a tough cake. Mix only until just combined and no streaks of flour remain. Scrape down the sides and bottom of the bowl as needed to ensure everything is incorporated.
- The Velvet Secret Ingredient: In a small bowl, combine the white vinegar and the remaining ½ teaspoon of baking soda. This mixture will immediately fizz—this is exactly what we want! It’s the classic reaction that helps create the signature “velvet” texture and contributes to the cake’s rise. Quickly pour this foamy mixture into the cake batter and gently fold it in by hand with a spatula until just incorporated. This step is crucial for that tender, fine crumb.
- Divide and Bake: Divide the beautiful pink batter evenly among your three prepared 8-inch cake pans. Use a kitchen scale for precision if you have one; equal batter in each pan ensures even baking and level layers. Gently tap the pans on the counter a couple of times to release any large air bubbles. Bake for 25-30 minutes, or until a wooden skewer or toothpick inserted into the center of a cake comes out clean.
- Cooling Process: Once baked, remove the cakes from the oven and let them cool in their pans on a wire rack for about 10-15 minutes. This allows the cakes to firm up slightly. Then, carefully invert the cakes onto the wire rack, remove the parchment paper, and let them cool completely before frosting. This is super important! Frosting warm cakes will result in a melty, messy frosting situation, which we absolutely want to avoid for our elegant Mothers Day Pink Velvet Cake.
Preparing the Luscious Cream Cheese Frosting
- Soften and Prepare Ingredients: Ensure your full-fat cream cheese and unsalted butter are at perfect room temperature. This is essential for a smooth, lump-free frosting. Cold cream cheese or butter will result in a clumpy texture that’s difficult to spread and won’t achieve that wonderfully fluffy consistency we’re aiming for.
- Cream Cheese and Butter Power Duo: In the bowl of a stand mixer fitted with the paddle attachment (or using a large bowl and a handheld electric mixer), beat the softened cream cheese and butter together on medium speed for 3-4 minutes. You want this mixture to be incredibly light, fluffy, and completely smooth, with no lumps of cream cheese visible. Scrape down the sides and bottom of the bowl frequently to ensure even mixing. This initial beating is key to getting that airy frosting.
- Gradually Add Powdered Sugar: With the mixer on low speed, gradually add the sifted powdered sugar, one cup at a time. Sifting the powdered sugar beforehand is a small extra step that makes a huge difference, preventing lumps and ensuring a super smooth frosting. Once each cup is added, mix until just incorporated before adding the next. Once all the sugar is added, increase the speed to medium-high and beat for another 2-3 minutes until the frosting is light, fluffy, and voluminous. This incorporates more air, giving it that perfect texture.
- Flavor Boost: Reduce the mixer speed to low and add the pure vanilla extract and a tiny pinch of salt. The salt might seem odd in frosting, but it actually enhances the sweetness and balances the richness of the cream cheese, making the flavor pop. Mix until just combined.
- Final Adjustments: Taste the frosting. If you prefer it sweeter, add a little more sifted powdered sugar, a tablespoon at a time, beating until combined. If it’s too thick, you can add a tiny splash of milk or heavy cream (about ½ teaspoon at a time) to reach your desired consistency. If it seems too soft, you can chill it in the refrigerator for 15-20 minutes, then re-whip it for a minute or two before frosting. You now have the most irresistible cream cheese frosting, perfect for your Mothers Day Pink Velvet Cake!
Assembling and Decorating Your Mothers Day Pink Velvet Cake
- Level the Cake Layers: Once your cake layers are completely cool, it’s time to level them. If your cakes have domed tops, use a serrated knife or a cake leveler to carefully trim the tops off, making them perfectly flat. This ensures your cake layers stack neatly and your finished cake looks professional and elegant. Save any cake scraps for a little chef’s snack or use them for cake pops later!
- The First Layer: Place one leveled cake layer on your serving plate or cake stand. Dollop a generous amount of cream cheese frosting onto the center of the cake layer. Using an offset spatula, spread the frosting evenly to the edges, creating a layer about ½ inch thick.
- Stacking and Frosting: Carefully place the second cake layer directly on top of the first frosted layer, aligning the edges. Apply another generous dollop of frosting and spread it evenly to the edges. Repeat with the third and final cake layer.
- The Crumb Coat (Your Best Friend!): Now, apply a thin, even layer of frosting all over the top and sides of the stacked cake. This is called a “crumb coat,” and it’s essential! Its purpose is to trap any loose crumbs, preventing them from getting into your beautiful final layer of frosting. Don’t worry about perfection here; just get a thin coat all over.
- Chill Time: Once the crumb coat is applied, place the cake in the refrigerator for at least 20-30 minutes, or until the crumb coat is firm to the touch. This step is crucial for achieving a smooth, crumb-free final frosting layer, making your Mothers Day Pink Velvet Cake look absolutely pristine.
- The Final Frosting Flourish: Remove the chilled cake from the refrigerator. Now, apply a thicker, more generous layer of the remaining cream cheese frosting to the top and sides of the cake. Use your offset spatula or a cake scraper to smooth the frosting as much as desired. Take your time, working around the cake until you achieve a beautiful, even finish. If you want decorative swirls, use the tip of your spatula to create soft peaks or patterns.
- Decorate with Love for Mom: This is where you can truly personalize your Mothers Day Pink Velvet Cake! Arrange fresh raspberries or sliced strawberries elegantly on top or around the base. Gently place delicate edible flowers for a truly sophisticated and thoughtful touch. A sprinkle of white chocolate shavings or curls adds texture and a lovely contrast. You could also add some elegant pink or pearl sprinkles. Let your creativity shine to make this cake extra special for Mother’s Day!
- Serving and Storage: Once decorated, your magnificent Pink Velvet Cake is ready to be admired and enjoyed! Because it contains cream cheese, it’s best stored in an airtight container in the refrigerator. Allow it to come to room temperature for about 30-60 minutes before serving for the best flavor and texture, as the cold can stiffen the cake and frosting.
Conclusion:
As we wrap up our delightful journey with this recipe, I truly hope you’re as excited as I am about the prospect of bringing this stunning dessert to life in your own kitchen. This isn’t just another cake; it’s a celebration, a splash of joy, and a truly unforgettable experience for anyone who takes a bite. What makes this recipe an absolute must-try, in my humble opinion, is its perfect blend of visual appeal and incredible taste. The vibrant hue, often difficult to achieve without compromising flavor, is here met with a tender, moist crumb that practically melts in your mouth. Coupled with the signature tangy-sweet cream cheese frosting, every forkful is a symphony of textures and tastes. It’s the kind of dessert that elicits gasps of delight when it’s brought to the table, and sighs of contentment when it’s enjoyed. It’s comforting yet sophisticated, playful yet elegant.
Why This Cake Will Be Your New Favorite
I believe you’ll find immense satisfaction in creating something so beautiful and delicious from scratch. There’s a certain magic in watching the batter transform into that signature pink hue, and the aroma filling your home as it bakes is simply intoxicating. This particular recipe has been fine-tuned to ensure success even for those who might be new to baking, making it incredibly accessible without sacrificing quality. From the carefully measured ingredients to the step-by-step instructions, I’ve aimed to remove any intimidation from the process, leaving you with pure baking bliss. It’s the kind of cake that makes you feel proud, a genuine showstopper that speaks volumes about the care and effort you’ve put into it. And for those special moments, like a heartwarming gathering, this Mothers Day Pink Velvet Cake is simply unparalleled, promising to be the centerpiece of any festive table and an unforgettable treat for your loved ones.
Creative Ways to Serve and Enjoy Your Masterpiece
Once your beautiful cake is complete, the fun doesn’t have to stop! While it’s absolutely perfect as is, served simply on a pretty plate, there are many ways to elevate the experience or tailor it to your specific tastes. For an extra touch of elegance, consider garnishing each slice with a few fresh raspberries or a sprig of mint; the contrasting colors and freshness will truly pop. A light dusting of powdered sugar just before serving also adds a charming, rustic touch. If you’re feeling indulgent, a small scoop of vanilla bean ice cream or a dollop of homemade whipped cream alongside a warm slice makes for an extraordinary dessert pairing. Imagine enjoying a slice with a perfectly brewed cup of tea or coffee, creating a luxurious afternoon treat.
For those who love to experiment, this recipe is incredibly versatile. Don’t be afraid to play with the frosting; while cream cheese is classic, a white chocolate ganache or even a delicate lemon zest cream cheese frosting could add an exciting twist. You could also transform this cake into delightful cupcakes, reducing the baking time and making them perfect for individual servings at a party or picnic. Imagine mini pink velvet cupcakes, each a bite-sized piece of heaven! For a different occasion, you could easily swap the pink food coloring for another vibrant shade – a blue velvet for a baby shower, or a green velvet for a festive St. Patrick’s Day celebration. The possibilities for customization are truly endless, allowing you to make this recipe uniquely yours, every single time.
Your Baking Adventure Starts Now!
I wholeheartedly encourage you to roll up your sleeves, gather your ingredients, and embark on this wonderful baking adventure. There’s a unique joy that comes from creating something so special with your own hands, and the reward of seeing happy faces as they enjoy your creation is truly priceless. Don’t be shy; take a leap of faith and experience the magic of this recipe for yourself. I promise you won’t regret it. Once you’ve baked and shared your incredible cake, I would absolutely love to hear about your experience! Please share your thoughts, your photos, and any creative twists you added. Your stories and successes inspire me, and I can’t wait to see the beautiful results of your efforts. Happy baking, my friends!
Mothers Day Pink Velvet Cake
An exquisite Mother’s Day Pink Velvet Cake, featuring tender pink layers crowned with luscious cream cheese frosting. This heartfelt dessert is designed to make Mom feel cherished and adored, promising a sweet memory long after the last slice is savored. Its fine, soft, and moist crumb with a subtle hint of cocoa and striking rose hue makes it a sophisticated and wonderfully joyful treat.
Ingredients
Instructions
Important Information
Nutrition Facts (Per Serving)
It is important to consider this information as approximate and not to use it as definitive health advice.
Allergy Information
Please check ingredients for potential allergens and consult a health professional if in doubt.