Milk Mochi
Milk Mochi, oh my goodness, get ready to discover a dessert that’s going to utterly enchant you with its simplicity and heavenly texture! What makes this recipe so incredibly special? It’s the delightful dance between an unbelievably soft, almost melt-in-your-mouth creaminess and that signature, gentle mochi chew. It’s not just another sweet treat; it’s an experience of subtle milky sweetness combined with a uniquely bouncy and satisfying mouthfeel that you won’t soon forget.
You are absolutely going to love how ridiculously easy it is to create this magic right in your own kitchen. With just a handful of common ingredients and minimal fuss, you’ll transform them into these delightful, pillowy morsels. It’s the perfect fuss-free dessert for when you crave something comforting yet light, or when you want to impress without spending hours slaving away. Every bite is a little cloud of milky bliss, making it irresistible for kids and adults alike.
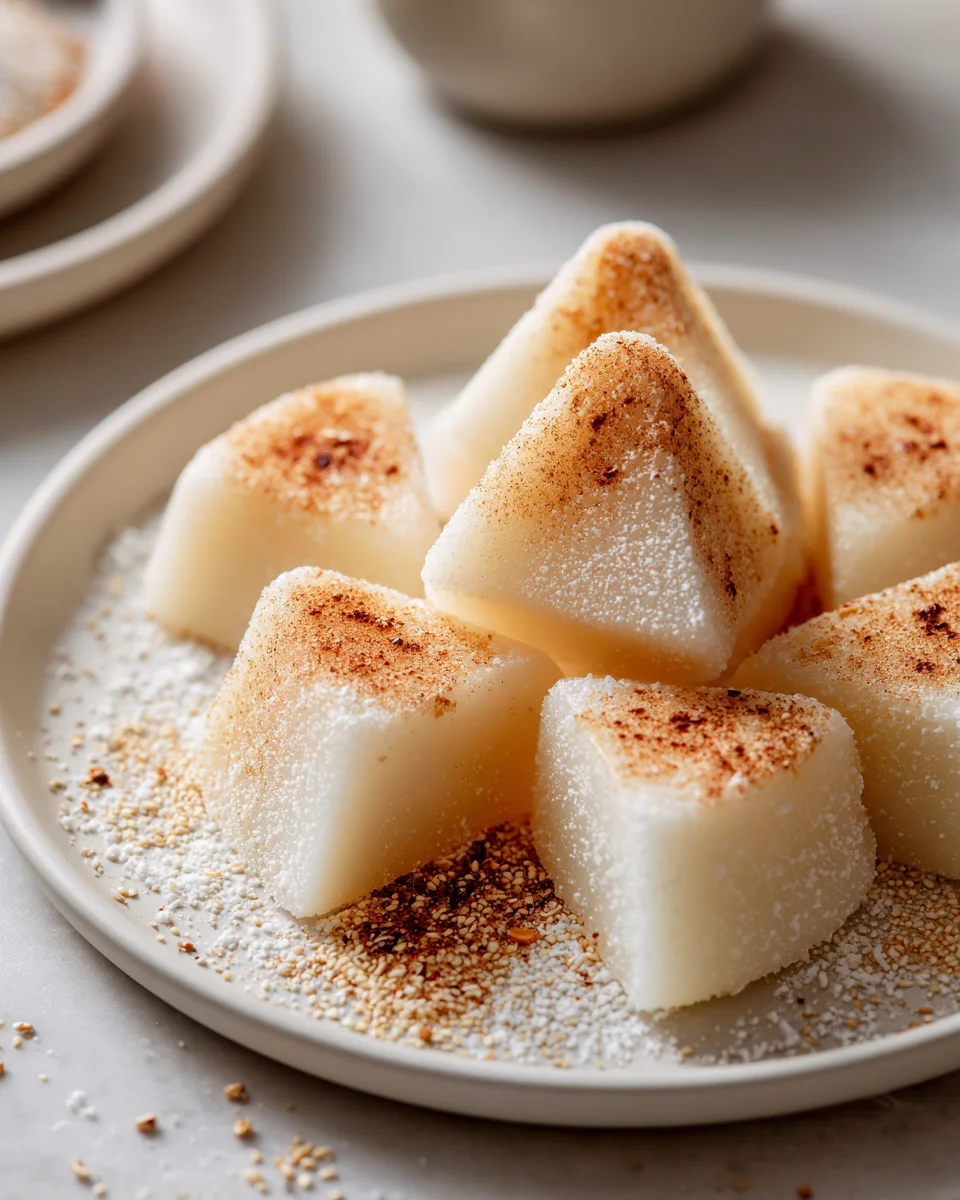
So, what exactly is Milk Mochi? Imagine a Japanese-inspired confection that takes the best parts of traditional mochi – its wonderful chewiness – and infuses it with a creamy, dairy-rich essence. It’s essentially a sweet, tender dough made primarily from milk, sugar, and a starch, gently cooked until it transforms into a soft, elastic, and utterly delightful treat. Once cooled, sliced, and often dusted with a light coating to prevent sticking, you’re left with these charming, ethereal bites that are wonderfully soothing and addictively fun to eat!

Oh, the joy of a perfectly chewy and delightfully soft Milk Mochi! This simple yet incredibly satisfying Japanese confection is one of my absolute favorites to whip up. It’s wonderfully versatile, melt-in-your-mouth tender, and surprisingly easy to make right in your own kitchen. Forget complicated processes; we’re going for delicious simplicity here. This recipe focuses on creating that signature bouncy texture and gentle sweetness that makes milk mochi so irresistible. Whether you’re new to making mochi or a seasoned pro looking for a straightforward approach, you’re in for a treat. Let’s get started!
Ingredient Notes
Making delicious Milk Mochi starts with understanding the role each ingredient plays. While the list is short, quality and type do make a difference in the final texture and flavor of your delightful chewy treats.
Key Ingredients
- Glutinous Rice Flour (Mochiko): This is the star of our show, absolutely non-negotiable for achieving that signature chewy, stretchy mochi texture. Regular rice flour or other flours will not work the same way. Mochiko is typically found in Asian grocery stores or sometimes in the international aisle of larger supermarkets. Make sure it specifically says “glutinous rice flour” or “sweet rice flour.”
- Milk: I personally love using whole milk for Milk Mochi. The higher fat content contributes to a richer flavor and a wonderfully tender texture. However, you can absolutely use lower-fat milk if that’s what you have on hand, though it might result in a slightly less rich taste. For those looking for a dairy-free option, unsweetened almond milk, oat milk, or soy milk are excellent substitutes. Just be aware that they might impart a subtle flavor difference, but the texture should remain quite similar.
- Granulated Sugar: This adds the perfect amount of sweetness to balance the mild flavor of the milk and rice flour. You can adjust the amount to your preference; if you like things less sweet, feel free to slightly reduce it. For a hint of caramel flavor, you could experiment with a small portion of light brown sugar, but granulated sugar is classic for a pure milk flavor.
- Cornstarch (or other dusting starch): This isn’t for the mochi batter itself, but it’s crucial for preventing sticking once your mochi is cooked and for handling it. Cornstarch is my go-to, but potato starch or tapioca starch work equally well. Don’t skimp on this! It’s what allows you to cut and handle the sticky cooked mochi without a struggle.
Optional Toppings & Flavor Boosters
- Kinako (Roasted Soybean Flour): This is a traditional and highly recommended coating for mochi. It has a delightful nutty, slightly savory flavor that pairs beautifully with the sweet, milky mochi. It’s also often served with a drizzle of brown sugar syrup.
- Cocoa Powder: For a chocolatey twist, dusting your Milk Mochi with unsweetened cocoa powder is a fantastic option. It adds a lovely bitterness that complements the sweetness.
- Matcha Powder: If you love green tea, matcha powder makes for an elegant and flavorful coating. Use ceremonial grade matcha for the best flavor and color.
- Sweetened Condensed Milk: A drizzle of this over the finished mochi pieces, especially if you’ve used a plain dusting, adds another layer of sweet creaminess.
I find that keeping these simple ingredients on hand means I can whip up a batch of Milk Mochi whenever the craving strikes!
Step-by-Step Instructions
Preparing Milk Mochi is quite straightforward, and I’ll walk you through my preferred method using a microwave – it’s quick, easy, and minimizes cleanup. If you prefer a stovetop approach, I’ll touch on that too!
Preparation is Key
- Get Your Dusting Station Ready: Before you even start mixing, prepare a clean, flat surface (like a large cutting board or baking sheet) by generously dusting it with cornstarch, kinako, or your chosen coating. You’ll need this immediately after cooking.
- Prepare Your Tools: Have a whisk, a heatproof mixing bowl, a rubber spatula (also dusted with cornstarch), and a sharp knife or kitchen shears ready. Dust the spatula and knife/shears generously as well; mochi is incredibly sticky when hot!
Mixing the Batter
- Combine Dry Ingredients: In your heatproof mixing bowl, add the glutinous rice flour and granulated sugar. Give them a quick whisk to combine them thoroughly and break up any lumps.
- Whisk in Milk: Gradually pour in the milk while continuously whisking. Continue whisking until the batter is completely smooth, with no lumps of flour visible. It should resemble a thin pancake batter. Take your time here to ensure a lump-free base, as this makes a big difference in the final mochi texture.
Cooking the Mochi (Microwave Method)
This is my favorite way for speed and convenience!
- First Microwave Interval: Cover your bowl loosely with plastic wrap (or a microwave-safe lid), leaving a small vent. Microwave on high for 1 minute.
- Stir Vigorously: Carefully remove the bowl (it will be hot!). The edges might start to look opaque and slightly firm. Using your dusted rubber spatula, stir the mixture vigorously from the edges to the center, breaking up any cooked portions and mixing them into the still-liquid batter. It will be lumpy and sticky at this stage, but keep stirring until it’s as smooth as you can get it.
- Second Microwave Interval: Cover again and microwave on high for another 1 minute.
- Repeat Stirring: Remove and stir vigorously again. You’ll notice it’s getting thicker and more translucent. Keep working at it until it’s as uniform as possible.
- Final Microwave Intervals: Continue microwaving in 30-second intervals, stirring vigorously after each, until the entire mixture is thick, glossy, translucent, and stretchy. This usually takes a total of 3-5 minutes depending on your microwave’s power and the amount of batter. When it’s ready, it should pull away from the sides of the bowl easily and have a uniform, gel-like consistency.
Cooking the Mochi (Stovetop Method – Alternative)
If you prefer a stovetop approach, it gives you a bit more control but requires constant attention.
- Prepare a Double Boiler: Place your heatproof bowl containing the mochi batter over a pot of simmering water, ensuring the bottom of the bowl does not touch the water.
- Stir Constantly: Cook over medium-low heat, stirring constantly with a rubber spatula. It will gradually thicken. Keep stirring, scraping the sides and bottom, to prevent lumps.
- Cook Until Translucent: Continue cooking and stirring for about 10-15 minutes, or until the mixture becomes thick, glossy, translucent, and stretchy, similar to the microwave method. This method tends to yield an incredibly smooth mochi.
Shaping and Finishing
- Transfer to Dusting Surface: Immediately and carefully scrape the hot, cooked mochi mixture onto your generously dusted surface using your dusted rubber spatula.
- Dust and Flatten: Generously dust the top of the mochi with more cornstarch or your chosen coating. Gently pat or roll out the mochi to your desired thickness (I usually aim for about ½ inch to 1 inch). Be gentle, as it’s still quite soft and sticky.
- Cut into Pieces: Using your dusted knife or kitchen shears, cut the mochi into small, bite-sized pieces (squares, rectangles, or triangles work well). Re-dust your cutting tool as needed to prevent sticking.
- Coat Thoroughly: As you cut each piece, transfer it to a separate bowl or plate with more of your chosen coating (kinako, cocoa, matcha, etc.). Gently toss or roll each piece to ensure it’s fully coated, preventing sticking and adding flavor.
Your beautiful Milk Mochi is now ready to enjoy! I always find it’s hard to resist trying a piece or two right away.
Tips & Suggestions
To help you achieve the best Milk Mochi experience, here are a few tips and suggestions that I’ve learned along the way. These specific pointers will ensure your mochi is perfectly chewy and delicious every time.
Mastering the Texture
- Don’t Skimp on Stirring: Whether microwaving or stovetop cooking, vigorous and thorough stirring is absolutely crucial. This breaks up any cooked clumps and ensures an evenly cooked, smooth, and lump-free mochi. If you don’t stir enough, you’ll end up with pockets of uncooked flour or tough, uneven sections.
- Cook Until Fully Translucent: Your mochi isn’t done until it’s uniformly translucent and stretchy. If it still looks opaque or powdery in places, it needs more cooking. Under-cooked mochi will taste raw and gluey, not delightfully chewy. Over-cooking is less common, but watch for it becoming too stiff.
- Generous Dusting is Your Friend: I cannot stress this enough! Mochi is inherently sticky, especially when hot. Dust your work surface, your spatula, your hands (if you dare to touch it directly), and your knife or shears liberally with cornstarch or kinako. This prevents frustration and ensures clean cuts and easy handling.
Handling and Shaping
- Work Quickly While Hot: Mochi is easiest to work with when it’s still warm and pliable. As it cools, it becomes firmer and a bit harder to cut cleanly.
- Cutting Tools: A sharp knife dusted with starch works well, but I often find kitchen shears even easier for cutting mochi into neat pieces. Keep them well-dusted between cuts.
- Don’t Over-Handle: While you need to coat the mochi, try not to over-handle it with your bare hands, as the warmth can make it even stickier. Use spatulas or tongs for tossing in coatings.
Flavor Variations & Serving Ideas
- Infuse the Milk: For an extra layer of flavor, gently warm the milk with a vanilla bean pod, a few cardamom pods, or even a small piece of orange peel before adding it to the dry ingredients. Just remember to strain out the aromatics before mixing.
- Mix-ins: While this is a simple Milk Mochi, you can get creative. A small amount of finely chopped, dried fruit or toasted nuts can be folded in at the very end of cooking, but be mindful not to add too much, as it can affect the chewiness.
- Syrup Drizzle: Traditional kinako mochi is often served with kuromitsu (Japanese brown sugar syrup). A simple homemade version can be made by simmering brown sugar and water until thickened. Honey or maple syrup also make delicious drizzles.
- Serve Fresh: Milk Mochi is absolutely at its best when served fresh, ideally at room temperature, within a few hours of making it. That’s when its delicate chewiness and softness are most prominent.
With these tips in mind, you’re well on your way to making perfect, delicious Milk Mochi that will impress anyone who tries it!
Storage
When it comes to Milk Mochi, understanding how to store it (and whether to store it at all) is crucial for maintaining its unique texture. Here’s what I recommend based on my experience:
Best Consumed Fresh
My number one piece of advice for Milk Mochi is to enjoy it on the day it’s made. The magic of mochi lies in its fresh, soft, and incredibly chewy texture, which is truly at its peak right after cooking and cooling slightly. As time passes, the glutinous rice flour naturally starts to harden, even with milk in the mixture, changing that delightful bounce.
Room Temperature Storage (Short-Term)
If you absolutely must store it for a few hours, or even overnight, room temperature is generally your best bet for preserving some of its texture.
- Airtight Container: Place the fully cooled and thoroughly coated Milk Mochi pieces in an airtight container. Make sure they are well-separated by the dusting powder to prevent them from sticking to each other.
- Away from Heat: Keep the container in a cool, dry place away from direct sunlight or any heat sources.
- Consume Quickly: Even at room temperature, the mochi will begin to firm up. It’s best to consume it within 12-24 hours for the closest resemblance to its freshly made texture. While still edible beyond that, it will become progressively tougher.
Refrigeration – Generally Not Recommended
This is where I strongly advise against storing Milk Mochi. While it might seem logical to refrigerate perishable items, the cold temperature has a very specific and undesirable effect on mochi made from glutinous rice flour:
- Hardening: Refrigeration causes the starch molecules in the mochi to recrystallize and harden significantly, turning it from soft and chewy to tough and rubbery. It loses its signature delicate texture almost entirely.
- Texture Loss: Even if you bring it back to room temperature, it won’t fully regain its original softness and chewiness. It will likely remain much firmer than when it was fresh.
If you have no other option and must refrigerate, ensure it’s in a truly airtight container to prevent drying out. But please, be prepared for a noticeable change in texture.
Freezing – Not Recommended
Freezing is also not recommended for this type of mochi. While some more robust types of mochi or filled mochi might fare better, the delicate nature of Milk Mochi does not stand up well to freezing and thawing. The texture will become mealy, crumbly, or overly tough, losing all the qualities we love about it.
My best advice? Make a batch that you know you and your loved ones can finish within the day. That way, every bite is enjoyed at its absolute prime!
Final Thoughts
There you have it! I truly hope you enjoyed making this delightful Milk Mochi. It’s more than just a dessert; it’s a little cloud of happiness that you can whip up with such simple ingredients. The unique combination of its incredibly soft, pillowy texture and delicate sweetness makes Milk Mochi an absolute standout. I find it utterly irresistible – that satisfying chewiness followed by the melt-in-your-mouth creaminess is pure bliss!
Whether you’re looking for a quick treat to impress guests or a comforting snack for yourself, this Milk Mochi recipe is a fantastic choice. It’s incredibly forgiving and so rewarding to see come together. Trust me, once you experience the joy of biting into a freshly made piece of this wonderful dessert, you’ll understand why it’s become a personal favorite of mine. So go on, indulge a little, and let the magic of Milk Mochi brighten your day!

Melt-in-Your-Mouth Milk Mochi: Easy Japanese Dessert Recipe
- Total Time: 25 minutes
- Yield: 4 servings
Description
Discover the enchanting simplicity and heavenly texture of Milk Mochi, a delightful Japanese dessert that’s irresistibly soft and chewy. With just a handful of ingredients, you can create these pillowy morsels that are perfect for any occasion.
Ingredients
- Glutinous Rice Flour (Mochiko)
- Milk
- Granulated Sugar
- Cornstarch (or other dusting starch)
- Kinako (Roasted Soybean Flour) – optional
- Cocoa Powder – optional
- Matcha Powder – optional
- Sweetened Condensed Milk – optional
Instructions
- Get Your Dusting Station Ready: Prepare a clean, flat surface by generously dusting it with cornstarch, kinako, or your chosen coating.
- Prepare Your Tools: Have a whisk, a heatproof mixing bowl, a rubber spatula (dusted with cornstarch), and a sharp knife or kitchen shears ready.
- Combine Dry Ingredients: In your heatproof mixing bowl, add the glutinous rice flour and granulated sugar. Whisk to combine thoroughly.
- Whisk in Milk: Gradually pour in the milk while continuously whisking until the batter is completely smooth.
- First Microwave Interval: Cover your bowl loosely with plastic wrap and microwave on high for 1 minute.
- Stir Vigorously: Carefully remove the bowl and stir the mixture vigorously from the edges to the center until smooth.
- Second Microwave Interval: Cover again and microwave on high for another 1 minute.
- Repeat Stirring: Remove and stir vigorously again until it becomes thicker and more translucent.
- Final Microwave Intervals: Continue microwaving in 30-second intervals, stirring after each, until the mixture is thick, glossy, and stretchy.
- Transfer to Dusting Surface: Scrape the hot, cooked mochi mixture onto your generously dusted surface.
- Dust and Flatten: Dust the top of the mochi with more cornstarch and gently pat or roll out to your desired thickness.
- Cut into Pieces: Using your dusted knife or kitchen shears, cut the mochi into small, bite-sized pieces.
- Coat Thoroughly: Transfer each piece to a bowl with more of your chosen coating and gently toss to ensure it's fully coated.
- Prep Time: 15 mins
- Cook Time: 10 mins
- Category: Dessert
- Method: Microwave or Stovetop
- Cuisine: Japanese
Nutrition
- Serving Size: 1 piece
- Calories: 100
- Sugar: 10 g
- Sodium: 5 mg
- Fat: 2 g
- Saturated Fat: 1 g
- Unsaturated Fat: 1 g
- Trans Fat: 0 g
- Carbohydrates: 20 g
- Fiber: 0 g
- Protein: 2 g
- Cholesterol: 5 mg
Keywords: For a richer flavor, use whole milk. You can also experiment with different coatings like kinako, cocoa, or matcha for added flavor.