Melt In Your Mouth Chicken Breast is not merely a descriptive phrase; it’s a culinary promise I am incredibly excited to share with you. Have you ever yearned for chicken breast that’s exquisitely juicy, remarkably tender, and absolutely never dry? I know the struggle is real when it comes to achieving that perfect texture, but today, I promise that dream becomes a delicious reality right in your own kitchen.
For too long, chicken breast has, perhaps unfairly, earned a reputation for being bland or, worse, rubbery. Yet, the timeless pursuit of perfectly tender poultry is an art, perfected through careful technique and just a touch of kitchen magic. This particular recipe isn’t about obscure ingredients; it’s about mastering the everyday and elevating it to something truly extraordinary. It’s about transforming a simple cut of meat into a centerpiece that delights everyone at the table.
People genuinely adore this preparation because it unequivocally delivers on its enticing name. The unparalleled tenderness and rich, savory flavor make it a guaranteed family favorite, perfect for a quick yet impressive weeknight meal or even a relaxed Sunday dinner. It’s wonderfully versatile, pairing beautifully with virtually any side dish you can imagine, and the sheer convenience of having such a stellar main course come together with surprising ease is, in my opinion, truly unbeatable. Prepare yourself to experience the definitive Melt In Your Mouth Chicken Breast – a dish I am confident you’ll want to revisit time and time again.

Ingredients:
- 4 boneless, skinless chicken breasts (approximately 1.5 – 2 pounds total)
- 2 tablespoons extra virgin olive oil, divided
- 1 teaspoon salt, or to taste
- ½ teaspoon freshly ground black pepper, or to taste
- 1 teaspoon dried oregano
- ½ teaspoon dried thyme
- ½ teaspoon paprika (smoked paprika for an extra layer of flavor)
- ¼ teaspoon garlic powder
- 2 cloves garlic, minced (about 1 teaspoon)
- 2 tablespoons fresh lemon juice (from about 1 medium lemon)
- ½ cup chicken broth (low sodium preferred)
- ¼ cup heavy cream or half-and-half
- 1 tablespoon unsalted butter
- 1 teaspoon Dijon mustard
- 2 tablespoons fresh parsley, chopped, for garnish
Preparing the ‘Melt In Your Mouth’ Chicken Breasts
The journey to truly achieve that “Melt In Your Mouth Chicken Breast” texture begins even before we think about cooking. This initial preparation is absolutely crucial for ensuring even cooking, maximum tenderness, and an optimal surface for absorbing all those wonderful flavors. Trust me, these steps are worth every moment!
- Pat the Chicken Dry: Take your boneless, skinless chicken breasts out of their packaging. Using paper towels, thoroughly pat each chicken breast dry on all sides. This step is often overlooked but it’s incredibly important. Excess moisture on the surface of the chicken will steam rather than sear, preventing that beautiful golden-brown crust we’re aiming for. A dry surface is the secret to getting a fantastic sear and locking in juices, contributing significantly to that coveted “Melt In Your Mouth Chicken Breast” quality.
- Butterfly (Optional, for Thicker Breasts): If your chicken breasts are particularly thick (more than about 1 inch at their thickest point), you might consider butterflying them. To do this, place one hand flat on top of the chicken breast. With a sharp knife, carefully slice horizontally through the thickest part of the breast, from one side almost all the way to the other, but do not cut entirely through. Open the breast up like a book. This creates a larger, thinner piece that will cook more evenly and quickly. If your breasts are already reasonably thin, you can skip this step.
- Pound for Even Thickness: This is arguably one of the most critical steps for achieving a “Melt In Your Mouth Chicken Breast.” Place each chicken breast (or butterflied half) between two sheets of plastic wrap or inside a large freezer bag. Using a meat mallet or the flat side of a heavy pan, gently but firmly pound the chicken until it is an even thickness, about ½ to ¾ inch thick across the entire piece. The goal here is not to flatten it to paper-thinness, but to eliminate any thick spots. Even thickness ensures that the chicken cooks uniformly, preventing drier, overcooked edges while the center is still cooking. This also tenderizes the meat fibers, making it incredibly tender and juicy. This foundational step is a non-negotiable for our “Melt In Your Mouth Chicken Breast” masterpiece.
Crafting the Flavorful Marinade
A good marinade is the foundation of flavor for our “Melt In Your Mouth Chicken Breast.” It not only infuses the meat with incredible taste but also helps to tenderize it further, ensuring every bite is succulent and flavorful.
- Combine Marinade Ingredients: In a medium-sized bowl, we’re going to whisk together the first set of flavor heroes. Add 1 tablespoon of the extra virgin olive oil, the salt, freshly ground black pepper, dried oregano, dried thyme, paprika (I love using smoked paprika for a deeper, more complex flavor profile that really enhances the chicken), and garlic powder. Now, mince your two cloves of fresh garlic – the fresh garlic truly makes a difference here, adding a pungent, aromatic kick that powdered garlic alone can’t replicate. Add the minced garlic to the bowl.
- Add the Citrus Element: Squeeze in the fresh lemon juice. The acidity from the lemon juice is a star player in our marinade. It not only brightens the flavors but also works wonders as a natural tenderizer. The acid helps to break down the proteins in the chicken, contributing to that desired “Melt In Your Mouth Chicken Breast” texture. Make sure to catch any seeds!
- Whisk Thoroughly: Using a fork or a small whisk, mix all these ingredients vigorously until they are well combined. You want a consistent paste-like or slightly oily mixture that will adhere beautifully to the chicken. Take a moment to smell it – isn’t that aroma just wonderful? This marinade is going to transform our chicken.
Marinating for Maximum Tenderness and Flavor
Marinating is where the magic truly starts to happen, transforming ordinary chicken breasts into an extraordinary “Melt In Your Mouth Chicken Breast” experience. This step is about infusing deep flavor and ensuring ultimate tenderness.
- Coat the Chicken: Place the prepared chicken breasts (pounded to even thickness) into the bowl with the marinade. Using your clean hands or tongs, ensure each piece of chicken is thoroughly coated on all sides with the flavorful mixture. Really rub it in, ensuring every nook and cranny gets covered. We want maximum flavor penetration for our “Melt In Your Mouth Chicken Breast.”
- Cover and Chill: Once coated, cover the bowl tightly with plastic wrap. Alternatively, you can transfer the chicken and marinade into a resealable plastic bag, pressing out any excess air before sealing. This method ensures maximum contact between the chicken and the marinade. Place the covered chicken in the refrigerator.
- Marinate for Optimal Time: Now, for the crucial timing: you’ll want to marinate the chicken for a minimum of 30 minutes. However, for the absolute best results and to truly achieve that “Melt In Your Mouth Chicken Breast” quality, I highly recommend marinating for at least 2 hours, or even better, up to 4 hours. You can marinate for longer, up to 8 hours, but with the lemon juice, I find 2-4 hours is the sweet spot to tenderize without making the chicken mushy. The longer the chicken bathes in this aromatic mixture, the more flavor it will absorb, and the more tender it will become. This patient waiting period is essential for the ultimate outcome.
- Bring to Room Temperature (Optional but Recommended): About 15-20 minutes before you plan to cook, take the marinated chicken out of the refrigerator and let it sit at room temperature. This step is not strictly necessary but it helps the chicken cook more evenly. If the chicken is too cold when it hits the hot pan, it can seize up, leading to a tougher texture. Bringing it closer to room temperature allows for a more gentle and even cooking process, further contributing to our “Melt In Your Mouth Chicken Breast” goal. Discard any excess marinade before cooking; do not reuse it.
Searing the ‘Melt In Your Mouth’ Chicken to Golden Perfection
This is where we develop that gorgeous golden crust and begin the cooking process that will lead to a truly “Melt In Your Mouth Chicken Breast.” The searing step is all about building flavor and texture.
- Preheat Your Skillet: Choose a large, heavy-bottomed skillet, preferably cast iron or stainless steel. Place it over medium-high heat. Allow the skillet to heat up for a good 2-3 minutes until it’s hot. You can test if it’s ready by flicking a few drops of water into it; if they sizzle and evaporate quickly, you’re good to go. A properly hot pan is paramount for achieving a beautiful sear.
- Add Olive Oil: Add the remaining 1 tablespoon of extra virgin olive oil to the hot skillet. Swirl it around to coat the bottom evenly. You’ll notice it shimmering, indicating it’s ready for the chicken. We want to ensure a generous, even coating to prevent sticking and promote browning.
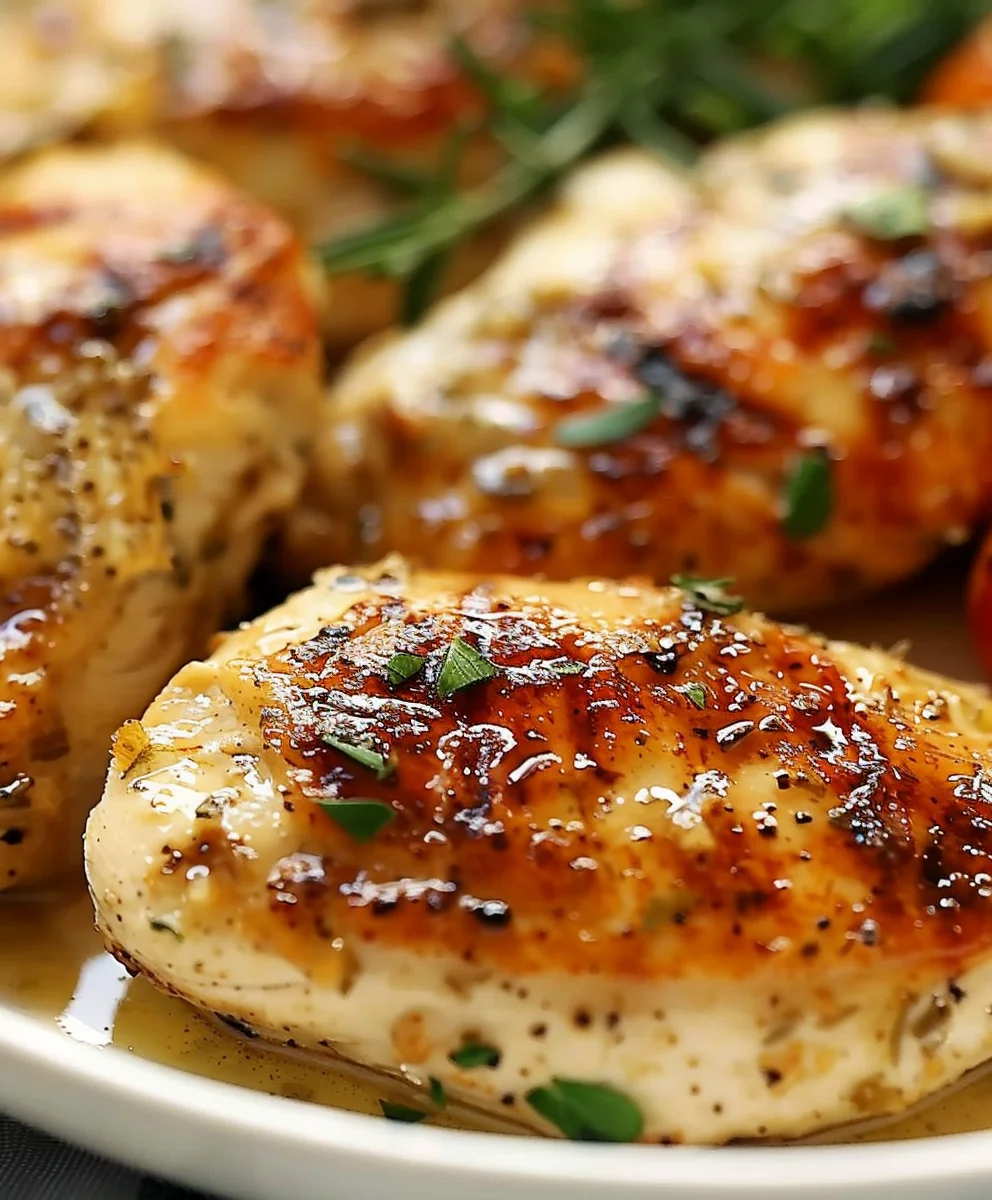
- Sear the Chicken: Carefully place the marinated chicken breasts into the hot skillet in a single layer, ensuring not to overcrowd the pan. If your skillet isn’t large enough to hold all four pieces without touching, cook them in two batches. Overcrowding will lower the pan’s temperature and cause the chicken to steam instead of sear, preventing that delicious golden crust. Leave the chicken undisturbed for 4-6 minutes. Resist the urge to move it! This undisturbed time is critical for developing that beautiful golden-brown crust and sealing in the juices, which are vital for a “Melt In Your Mouth Chicken Breast.”
- Flip and Continue Cooking: After 4-6 minutes, or once you see a lovely golden-brown crust formed on the bottom, carefully flip each chicken breast over. Reduce the heat to medium. Continue to cook for another 5-7 minutes on the second side, or until the chicken is cooked through. The internal temperature of the thickest part of the chicken should reach 165°F (74°C) when measured with an instant-read thermometer. The exact cooking time will depend on the thickness of your chicken and the heat of your stove, so using a thermometer is your best friend here. Don’t overcook it – that’s the enemy of a “Melt In Your Mouth Chicken Breast”!
- Remove and Rest: Once the chicken has reached the target temperature, carefully remove the cooked chicken breasts from the skillet and transfer them to a clean plate or cutting board. Tent them loosely with aluminum foil. This resting period is incredibly important – probably one of the most overlooked steps. Allowing the chicken to rest for at least 5-10 minutes allows the juices to redistribute throughout the meat, rather than gushing out when you cut into it. This ensures every slice remains incredibly juicy and tender, truly living up to the “Melt In Your Mouth Chicken Breast” promise. While the chicken rests, we’ll move on to creating our incredible pan sauce.
Developing the Velvety Pan Sauce
While our “Melt In Your Mouth Chicken Breast” is resting and becoming even more tender, we’ll create a quick, flavorful sauce directly in the same pan. This sauce will capture all those delicious browned bits and elevate our dish to gourmet status.
- Deglaze the Pan: With the chicken removed, reduce the heat to medium-low. Add the unsalted butter to the skillet. Let it melt, scraping up any browned bits (fond) from the bottom of the pan with a wooden spoon or spatula. These browned bits are packed with flavor, and we absolutely want to incorporate them into our sauce.
- Build the Sauce Base: Once the butter is melted and you’ve scraped up the fond, immediately pour in the chicken broth. The broth will bubble and help release any remaining delicious bits stuck to the bottom of the pan. Continue to scrape the bottom vigorously. Let the broth simmer for about 1-2 minutes, allowing it to reduce slightly and concentrate its flavor. This reduction is key for a rich, deep taste.
- Introduce the Cream and Dijon: Now, stir in the heavy cream (or half-and-half) and the Dijon mustard. The cream will add a wonderful richness and silkiness to our sauce, while the Dijon mustard provides a subtle tang and depth that beautifully complements the chicken and brightens the overall flavor profile. Whisk everything together until the sauce is smooth and creamy.
- Simmer and Thicken: Continue to simmer the sauce gently for another 2-3 minutes, stirring occasionally, until it slightly thickens to your desired consistency. It should coat the back of a spoon nicely. Taste the sauce and adjust the seasoning if necessary. You might want a pinch more salt or pepper, or even a tiny squeeze of lemon juice if you desire a little more zest. The goal here is a luscious, flavorful sauce that perfectly complements our “Melt In Your Mouth Chicken Breast.”
Finishing Touches and Serving Your ‘Melt In Your Mouth Chicken Breast’
The final steps are all about bringing everything together for a truly memorable dining experience. After all that careful preparation, it’s time to enjoy the fruits of your labor!
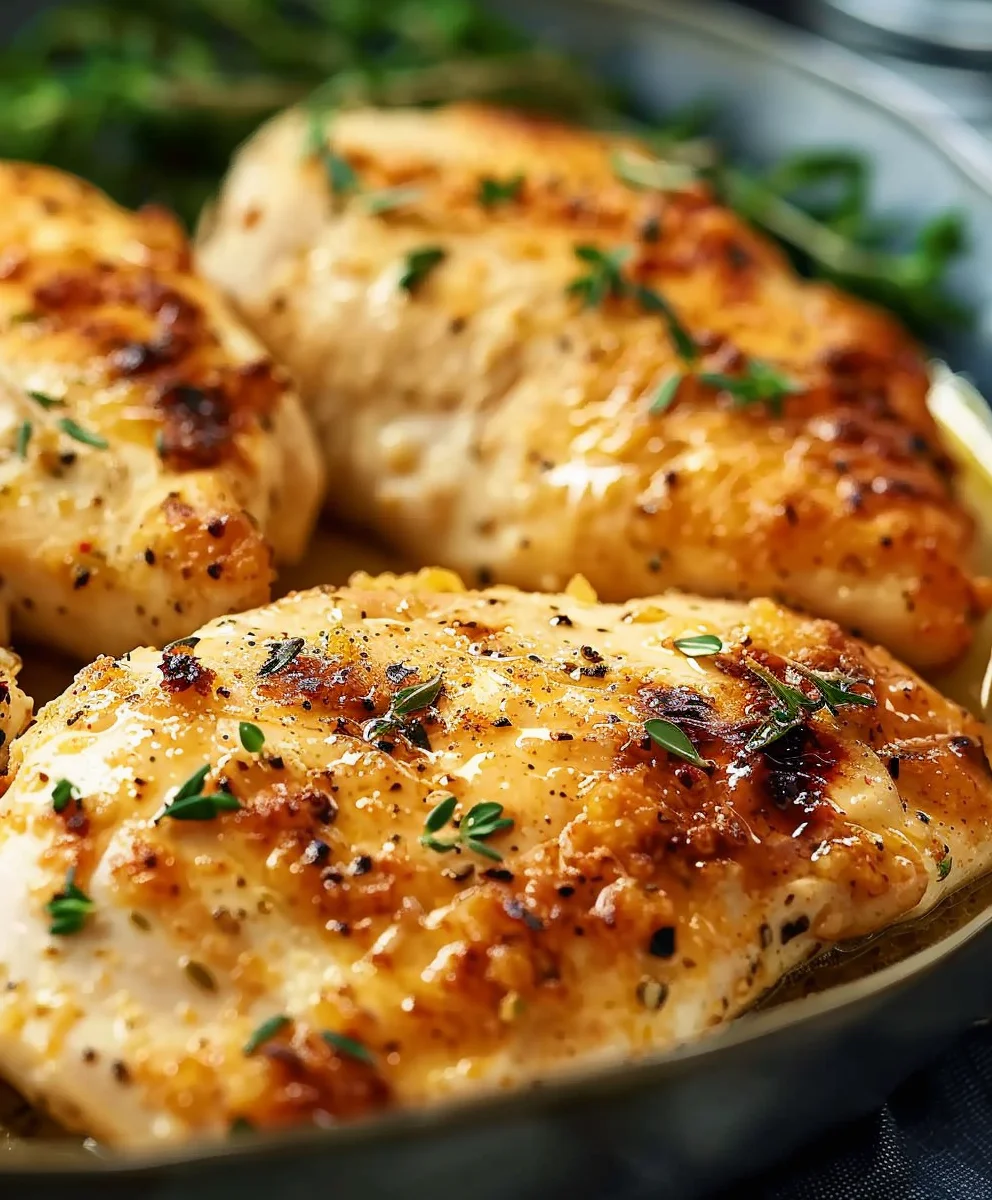
- Slice the Chicken: Once the chicken has rested sufficiently, transfer it to a clean cutting board. Slice each “Melt In Your Mouth Chicken Breast” against the grain into ½-inch thick slices. Cutting against the grain shortens the muscle fibers, making the chicken even more tender and easier to chew, reinforcing that desired “Melt In Your Mouth” texture. You’ll notice how juicy and perfectly cooked the chicken looks from edge to edge – that’s the result of our careful pounding and even cooking!
- Assemble the Dish: Arrange the sliced chicken breasts beautifully on individual serving plates. You can overlap them slightly or fan them out to create an appealing presentation.
- Spoon Over the Sauce: Generously spoon the warm, velvety pan sauce over the sliced chicken. Make sure every piece gets a good coating of that rich, flavorful sauce. This is where all those incredible flavors come together.
-
Garnish and Serve: Finally, sprinkle the fresh chopped parsley over the chicken and sauce for a burst of color and a fresh, herbaceous aroma. The parsley not only looks lovely but also adds a bright, clean note that cuts through the richness of the sauce.
Your ‘Melt In Your Mouth Chicken Breast’ is now ready to be enjoyed!
Serve immediately with your favorite side dishes. This chicken pairs wonderfully with creamy mashed potatoes, fluffy rice, roasted asparagus, or a simple green salad. Each bite should be a testament to the care and attention you put into preparing it – tender, juicy, and bursting with flavor, truly living up to its “Melt In Your Mouth Chicken Breast” name. Get ready for rave reviews, because this recipe is designed to impress and delight with its incredible tenderness and rich, satisfying taste. Enjoy every single moment of this culinary triumph!
Conclusion:
So, there you have it – my absolute go-to recipe for what I truly believe is the most delicious, tender, and incredibly satisfying chicken dish you’ll ever make at home. We’ve walked through the simple yet effective steps, and now you understand why this isn’t just another chicken recipe; it’s a culinary revelation that consistently delivers on its promise. This isn’t just dinner; it’s an experience.
Why This Recipe Is a Must-Try
The carefully selected ingredients and the thoughtful, straightforward technique combine to transform a simple chicken breast into something truly extraordinary. Imagine sinking your teeth into a piece of chicken that is so unbelievably succulent, so perfectly seasoned, that it practically dissolves on your tongue. That’s precisely what this recipe achieves, and it’s why I confidently call it a Melt In Your Mouth Chicken Breast experience. It’s flavor-packed, incredibly juicy, and utterly comforting, hitting all the right notes for a fantastic meal any day of the week.
And when I say it’s easy, I genuinely mean it. Even on your busiest weeknights, you can whip up this meal that impresses without demanding hours of your precious time. It’s a recipe I return to again and again, not just because it’s simple, but because the results are unfailingly spectacular. Guests always ask for the recipe, and my family requests it weekly. It truly is a testament to how incredible a well-prepared chicken breast can be, proving that with a few smart steps, ordinary can become extraordinary. This recipe takes away all the guesswork, providing a reliable path to chicken perfection every single time. Forget dry, bland chicken; prepare for a juicy, flavorful masterpiece that will elevate your home cooking and become a permanent fixture in your culinary repertoire.
Unleash Your Creativity: Serving Suggestions & Variations
Now that you’ve mastered the primary dish, let’s talk about how to elevate it even further or adapt it to suit any mealtime or preference. For a classic pairing, I love serving this chicken alongside a generous scoop of creamy mashed potatoes or a fluffy bed of jasmine rice, allowing the incredible pan juices to mingle and create a truly divine bite. Roasted asparagus, steamed green beans, or a vibrant mixed greens salad with a light vinaigrette are also fantastic companions, adding freshness and balance to the meal. Don’t hesitate to explore your favorite seasonal vegetables; this chicken plays incredibly well with almost anything you can imagine, making it a truly versatile centerpiece for any dinner.
But the versatility doesn’t stop there! This chicken isn’t just for a standalone dinner; it’s an incredible foundation for a myriad of other dishes. Imagine slicing it thinly and layering it into a gourmet sandwich or wrap with some fresh avocado and a zesty aioli for a satisfying lunch. Or, for a lighter option, chop it up and toss it into a hearty salad, adding protein and incredible flavor to your greens. Leftovers, if you’re lucky enough to have any, are fantastic shredded for quick chicken tacos, quesadillas, or even stirred into a creamy pasta dish the next day. You could even incorporate different herbs into the original marinade, like a sprig of fresh rosemary for an earthier note, or a pinch of smoked paprika for a hint of warmth and color, slightly changing the flavor profile to keep things exciting. A squeeze of fresh lemon juice just before serving also brightens the entire dish, adding a lovely tang that beautifully complements the savory richness.
Feeling adventurous? After the chicken is cooked, deglaze the pan with a splash of white wine or chicken broth, stir in a touch of cream and some fresh herbs like parsley or chives, and you’ve got yourself a quick, elegant pan sauce that takes this incredible chicken to an even higher level of gourmet delight. The possibilities are truly endless, limited only by your imagination and what you have on hand in your pantry. This recipe is robust enough to handle various additions and substitutions, allowing you to truly make it your own.
Your Turn to Shine!
So, what are you waiting for? I genuinely hope you feel inspired and ready to give this recipe a try in your own kitchen. It’s more than just a recipe; it’s a gateway to consistently delicious, stress-free meals that will bring smiles to everyone at your table. Trust me, once you experience the tenderness and flavor, you’ll understand why it’s become such a beloved staple in my home. And when you do, please, please share your experience! I absolutely adore seeing your creations and hearing your feedback. Did you try a new side dish? A unique variation? Or perhaps you simply loved how easy and flavorful it was? Tag me on social media, leave a comment below, or send me an email. Your cooking journey inspires me just as much as I hope my recipes inspire you. I can’t wait to hear how your amazing chicken turns out! Happy cooking, everyone!
Melt-in-Your-Mouth Chicken Breast Recipe – Easy & Juicy
This recipe promises exquisitely juicy and remarkably tender chicken breast, transforming a simple cut of meat into a delightful centerpiece. It’s a guaranteed family favorite, perfect for quick weeknight meals or relaxed dinners, and wonderfully versatile with any side dish.
Ingredients
-
4 boneless, skinless chicken breasts
-
1 cup mayonnaise (or plain Greek yogurt for lighter version)
-
½ cup grated Parmesan cheese
-
1 teaspoon garlic powder
-
1 teaspoon onion powder
-
1 teaspoon salt
-
½ teaspoon black pepper
-
Optional: ½ teaspoon paprika or Italian seasoning (for topping)
-
1 tablespoon olive oil (for cooking)
Instructions
-
Step 1
Pat chicken breasts dry with paper towels. Pound each breast to an even ½-¾ inch thickness using a meat mallet or the flat side of a heavy pan. This ensures even cooking and tenderness. -
Step 2
In a medium bowl, combine mayonnaise (or plain Greek yogurt), grated Parmesan cheese, garlic powder, onion powder, salt, and black pepper. Mix thoroughly until a smooth paste forms. -
Step 3
Thoroughly coat each pounded chicken breast on all sides with the mayonnaise mixture. If desired, sprinkle with the optional paprika or Italian seasoning for extra flavor and color. -
Step 4
Heat 1 tablespoon olive oil in a large, heavy-bottomed skillet (preferably cast iron or stainless steel) over medium-high heat until shimmering. Carefully place coated chicken breasts in a single layer, ensuring not to overcrowd the pan. Sear for 4-6 minutes per side, or until golden brown and cooked through. The internal temperature of the thickest part should reach 165°F (74°C) as measured with an instant-read thermometer. -
Step 5
Transfer the cooked chicken breasts to a clean plate or cutting board. Tent them loosely with aluminum foil and let rest for 5-10 minutes. This crucial step allows the juices to redistribute throughout the meat, ensuring maximum tenderness. Slice the chicken against the grain into ½-inch thick slices and serve immediately with your favorite side dishes.
Important Information
Nutrition Facts (Per Serving)
It is important to consider this information as approximate and not to use it as definitive health advice.
Allergy Information
Please check ingredients for potential allergens and consult a health professional if in doubt.