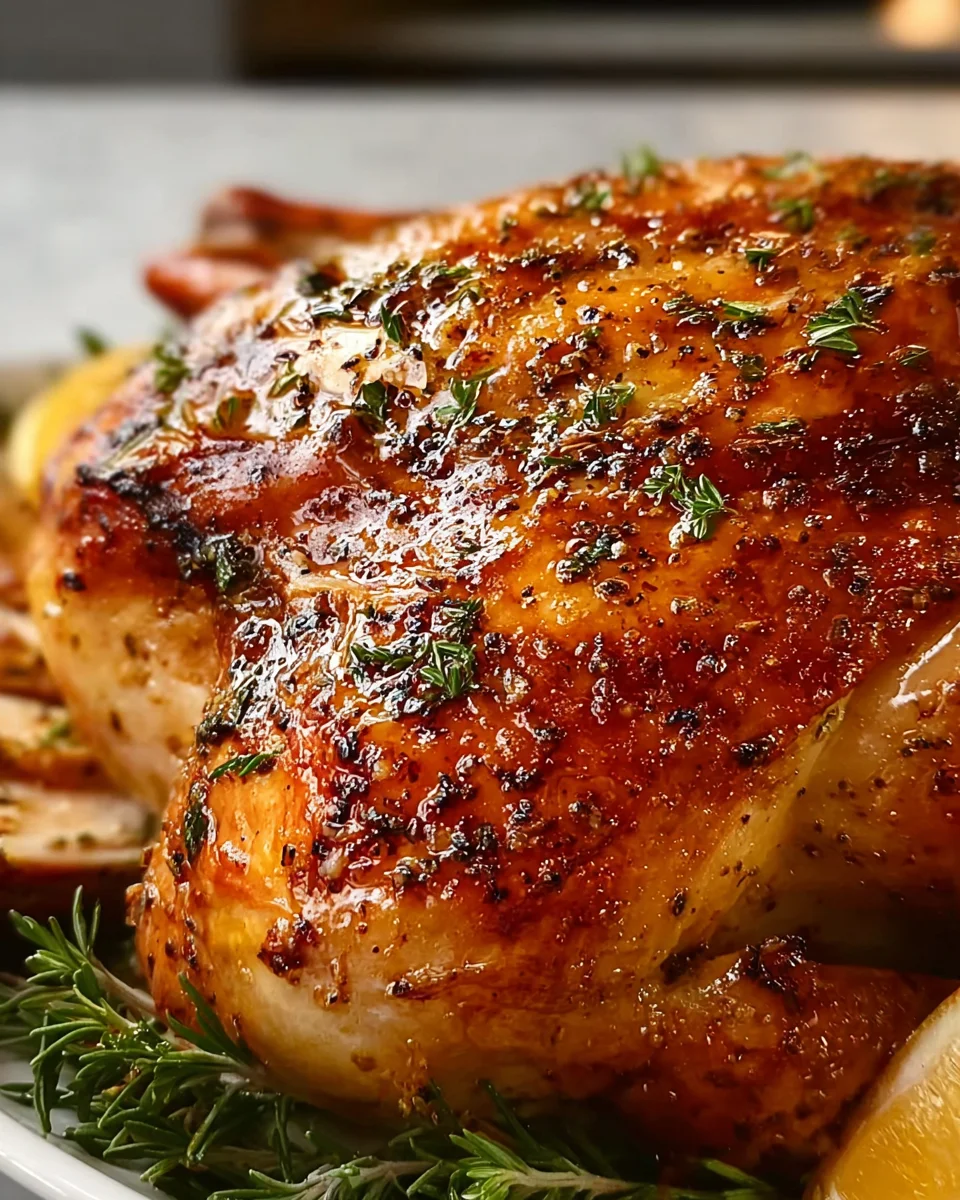
Garlic Thanksgiving Turkey – just hearing those words conjures images of a golden-brown masterpiece, glistening with aromatic herbs, ready to grace your holiday table. I’m absolutely thrilled to guide you through preparing a show-stopping dish that promises to elevate your festive feast to new heights this year. For centuries, the turkey has been the undisputed star of the Thanksgiving meal, a cherished symbol of abundance and gratitude shared amongst loved ones. While the tradition of serving turkey is deeply rooted in American history and family gatherings, there’s always room to innovate and infuse new life into this beloved classic, transforming it into something truly extraordinary.
A Show-Stopping Centerpiece for Your Thanksgiving Feast!
This isn’t just any roasted bird; we’re talking about a turkey infused with the irresistible pungency and warmth of garlic, promising incredible flavor in every single bite. People adore this particular preparation because it transforms an already special meal into an unforgettable culinary experience. The savory notes of garlic penetrate deep into the meat, ensuring unparalleled juiciness and a remarkably crispy, flavorful skin that everyone will fight over. Forget dry, bland turkey – this Garlic Thanksgiving Turkey recipe guarantees a moist, tender, and incredibly aromatic bird that will have your guests asking for your secret long after the plates are cleared. It’s the perfect blend of tradition and bold, modern flavor, making your holiday celebration truly memorable.

Ingredients:
- For the Turkey:
- 1 whole fresh or thawed turkey (12-16 pounds) – I recommend this size for a typical Thanksgiving gathering, it cooks more evenly.
- 2-3 heads of fresh garlic – yes, you read that right, we’re going big on garlic for our Garlic Thanksgiving Turkey!
- 1 large yellow onion, quartered
- 2 celery stalks, roughly chopped
- 2 carrots, roughly chopped
- 1 lemon, halved
- A few sprigs of fresh rosemary
- A few sprigs of fresh thyme
- A few sprigs of fresh sage
- 2 cups low-sodium chicken or turkey broth, plus more for basting if needed
- Salt and freshly ground black pepper to taste
- 2 tablespoons olive oil
- For the Garlic Herb Butter:
- 1 cup (2 sticks) unsalted butter, softened to room temperature – this is crucial for easy mixing.
- 12-15 cloves fresh garlic, minced very finely – this is where the garlic in our Garlic Thanksgiving Turkey really shines!
- 2 tablespoons fresh rosemary, finely chopped
- 2 tablespoons fresh thyme, finely chopped
- 1 tablespoon fresh sage, finely chopped
- 1 teaspoon sea salt
- ½ teaspoon freshly ground black pepper
- For the Optional Pan Gravy:
- All the turkey drippings from the roasting pan
- ¼ cup all-purpose flour
- 2-3 cups additional chicken or turkey broth
- Salt and freshly ground black pepper to taste
- Optional: A splash of white wine or dry sherry for deglazing
Prepping the Turkey
1. Thaw Your Turkey Properly: If you’re using a frozen turkey, please ensure it’s completely thawed before you begin. The safest method is in the refrigerator, allowing about 24 hours for every 4-5 pounds. For a 12-16 pound turkey, this means 3-4 days in advance. A partially frozen turkey will cook unevenly and can pose a food safety risk. Trust me, planning ahead here makes all the difference for a stress-free Thanksgiving!
2. Remove Giblets and Neck: Once thawed, carefully unwrap your turkey. Reach inside both cavities (the large one and the neck cavity) and remove the giblet bag (usually containing the liver, gizzard, and heart) and the neck. You can reserve these for gravy or discard them. I often use the neck and giblets to make a quick broth for gravy, adding an extra layer of flavor.
3. Rinse and Pat Dry: Gently rinse the turkey inside and out with cold water. Then, and this is a really important step for crispy skin, pat the turkey thoroughly dry with paper towels. You want every nook and cranny as dry as possible. Moisture on the skin prevents browning and crisping, which is a tragedy for any roasted bird, especially our magnificent Garlic Thanksgiving Turkey.
4. Loosen the Skin: This is a key technique for infusing flavor directly into the breast meat and ensuring crispy skin. Carefully slide your fingers under the skin over the breast, moving from the cavity opening towards the neck. Gently separate the skin from the meat, being careful not to tear it. Create pockets over the breasts and thighs. This space is where our incredible garlic herb butter will go!
5. Stuff the Cavity with Aromatics: Take your quartered onion, chopped celery, chopped carrots, lemon halves, and sprigs of fresh rosemary, thyme, and sage. Stuff them into the turkey’s main cavity. Don’t pack it too tightly, as air circulation is still important for even cooking. This aromatic blend will perfume the turkey from the inside out, adding depth of flavor to the entire bird and your pan drippings.
6. Prepare Roasting Pan: If you have a V-rack, place it in your large roasting pan. If not, you can create a bed of chopped vegetables (extra carrots, celery, onion) on the bottom of the pan to elevate the turkey slightly. This allows hot air to circulate all around the bird, promoting even cooking and crispy skin.
Preparing the Garlic Herb Butter
7. Soften the Butter: Ensure your unsalted butter is genuinely at room temperature, soft enough to easily mix but not melted. If it’s too cold, it won’t mix well, and if it’s too warm, it’ll be greasy and hard to spread.
8. Mince the Garlic and Chop Herbs: Take your 12-15 cloves of fresh garlic and mince them as finely as you can. The smaller the pieces, the more evenly the garlic flavor will distribute. For the rosemary, thyme, and sage, strip the leaves from the stems and chop them very finely. Finely chopped herbs release their oils and fragrance beautifully into the butter.
9. Combine Ingredients: In a medium bowl, combine the softened butter, minced garlic, chopped rosemary, thyme, sage, sea salt, and black pepper. Use a spatula or a fork to mix everything together thoroughly until it’s uniform and well combined. This is our magical flavor bomb for the Garlic Thanksgiving Turkey!
Roasting the Garlic Thanksgiving Turkey
10. Preheat Your Oven: Adjust an oven rack to the lowest position and preheat your oven to 425°F (220°C). Roasting at an initially high temperature helps to crisp the skin quickly.
11. Apply the Garlic Herb Butter: Now for the fun part! Gently take about two-thirds of your prepared garlic herb butter and carefully slide it under the loosened skin over the turkey breasts and thighs. Use your fingers to spread it as evenly as possible over the meat. The butter will melt and baste the meat from within, resulting in incredibly juicy and flavorful meat. The remaining one-third of the butter will be for the outside.
12. Season the Exterior: Rub the remaining garlic herb butter generously all over the exterior of the turkey. After applying the butter, drizzle the turkey with 2 tablespoons of olive oil. This extra layer of fat helps create a gorgeous, golden-brown, crispy skin. Season the entire exterior generously with additional salt and freshly ground black pepper. Don’t be shy with the seasoning; a large bird needs a lot of flavor!
13. Truss the Turkey (Optional but Recommended): Trussing helps the turkey cook more evenly and results in a more compact, attractive presentation. Tie the drumsticks together with kitchen twine. Tuck the wing tips underneath the body. This prevents the wing tips from burning and keeps the breast puffed up nicely.
14. Initial High-Heat Roast: Carefully place the prepared turkey, breast-side up, on the V-rack in your roasting pan. Pour 2 cups of chicken or turkey broth into the bottom of the roasting pan. This creates moisture in the oven and contributes to the pan drippings for your gravy. Place the turkey in the preheated 425°F (220°C) oven for 30 minutes. This initial burst of high heat helps render the fat and start the crisping process.
15. Lower Heat and Continue Roasting: After 30 minutes, reduce the oven temperature to 325°F (160°C). Do not open the oven door during this transition. Continue roasting for an additional 2 to 3 hours, or until a meat thermometer inserted into the thickest part of the thigh (without touching bone) registers 165°F (74°C). The total roasting time will vary depending on your oven and the exact size of your turkey. A 12-16 pound turkey typically takes 3 to 4 hours total.
16. Basting Strategy: Every 45 minutes to an hour, baste the turkey with the pan drippings. If the pan drippings start to evaporate too much, add more broth to the pan, about ½ cup at a time. Basting helps to keep the skin moist, develop a rich color, and infuse even more flavor.
17. Prevent Over-Browning: If the turkey skin starts to brown too quickly before the turkey is cooked through, loosely tent the turkey with aluminum foil. This will protect the skin from burning while allowing the internal temperature to continue rising. This is especially common over the breast meat.
18. Check for Doneness: The most accurate way to determine if your Garlic Thanksgiving Turkey is done is with a reliable meat thermometer. Insert the thermometer into the thickest part of the thigh, away from the bone, and also into the thickest part of the breast. The turkey is done when both areas read 165°F (74°C). The juices should also run clear when you pierce the thigh with a knife. Resist the urge to pull it out early; an undercooked turkey is a holiday disaster!
Resting and Carving
19. The Crucial Rest: Once the turkey reaches 165°F (74°C), remove it from the oven and carefully transfer it to a large carving board or platter. Tent it loosely with aluminum foil and let it rest for at least 20-30 minutes, or even up to 45 minutes for a larger bird. This step is non-negotiable! Resting allows the juices within the meat to redistribute throughout the bird. If you carve it too soon, all those delicious, garlicky juices will just run out onto the board, leaving you with dry meat. Patience here is rewarded with an incredibly juicy and tender Garlic Thanksgiving Turkey.
20. Carve with Confidence: After resting, remove the twine and the aromatics from the cavity. Carve your turkey according to your preference. Start by removing the legs and thighs, then slice the breast meat against the grain. Arrange the carved meat on a warm platter, ready to serve alongside your festive feast.
Making the Optional Pan Gravy
21. Prepare the Drippings: While the turkey is resting, you can make the gravy. Carefully pour all the pan drippings from the roasting pan into a fat separator, or into a large measuring cup and let the fat separate naturally. Skim off and reserve about ¼ cup of the fat. Discard any excess fat, but keep the flavorful turkey stock that has collected at the bottom.
22. Deglaze the Pan (Optional): Place the roasting pan (without the turkey) over two burners on your stovetop over medium heat. If desired, add a splash of white wine or dry sherry and use a wooden spoon to scrape up any browned bits stuck to the bottom of the pan. This adds incredible flavor to your gravy. Let it simmer for a minute or two to cook off the alcohol, then pour this liquid into your separated drippings.
23. Make the Roux: In the same roasting pan (or a large saucepan), melt the reserved ¼ cup of turkey fat (or use butter if you didn’t have enough fat) over medium heat. Whisk in the ¼ cup of all-purpose flour. Cook, whisking constantly, for 1-2 minutes until a smooth, golden-brown paste (a roux) forms. This is the base that will thicken your gravy.
24. Whisk in Liquids: Gradually whisk in the reserved turkey drippings (the stock part, not the fat) and 2-3 cups of additional chicken or turkey broth. Continue whisking constantly to prevent lumps from forming. Bring the mixture to a simmer, whisking until the gravy thickens to your desired consistency. If it’s too thick, add more broth; if it’s too thin, simmer longer to reduce it.
25. Season and Strain: Taste the gravy and season with salt and freshly ground black pepper as needed. I often find it needs a good pinch of both. For an extra smooth gravy, you can strain it through a fine-mesh sieve into a clean saucepan or gravy boat. Keep warm until ready to serve. This rich, flavorful gravy, infused with the essence of your Garlic Thanksgiving Turkey, is the perfect accompaniment to every slice!
Conclusion:
After guiding you through each step, I truly hope you’re as excited as I am about bringing this incredible recipe to your holiday table. What makes this Garlic Thanksgiving Turkey a true standout isn’t just its stunning presentation, but the unforgettable depth of flavor that permeates every single bite. We’ve meticulously crafted a method to achieve that coveted, crispy golden skin, while ensuring the meat beneath remains unbelievably moist, tender, and succulent. This magic happens thanks to that glorious garlic-herb butter working its way into every fiber of the bird from the inside out, infusing it with an aromatic richness that is simply unparalleled.
A Symphony of Flavor and Aroma
The moment that perfectly roasted turkey emerges from the oven, filling your home with the intoxicating fragrance of roasted garlic, savory herbs, and rich, caramelized meat, you’ll understand exactly why this recipe is a must-try. It’s more than just a meal; it’s an experience that captivates the senses and sets the stage for a truly special celebration. This isn’t merely another turkey; it’s a centerpiece designed to be the undisputed star of your holiday feast, promising rave reviews, delighted smiles, and plates eagerly scraped clean. It’s a testament to how simple, quality ingredients, combined with a little love and technique, can create something profoundly extraordinary and deeply satisfying for everyone gathered around your table. I sincerely believe this particular preparation elevates the traditional holiday bird to a gourmet level without requiring professional chef skills.
Serving Suggestions & Creative Variations
Now that you’ve mastered your culinary masterpiece, let’s talk about enhancing the experience even further. While the turkey itself is a showstopper, a few thoughtfully chosen accompaniments can elevate your meal to new heights. I always recommend serving generous slices alongside a rich, homemade gravy, preferably made from the flavorful pan drippings – please, never let those precious juices go to waste! Classic creamy mashed potatoes, a vibrant homemade cranberry sauce, and perhaps a comforting green bean casserole are timeless pairings that complete the traditional Thanksgiving spread with delightful harmony. For a delightful twist, consider a hearty wild rice stuffing, baked separately to ensure every grain is perfectly cooked and infused with extra flavor, or a medley of colorful roasted root vegetables like sweet carrots and parsnips to add sweetness and earthy notes.
If you’re feeling adventurous and want to put your own spin on it for future holiday meals, don’t hesitate to experiment with the herb butter. Imagine infusing it with fresh rosemary and thyme for a more traditional woodsy aroma, or even a hint of orange or lemon zest for a brighter, citrusy counterpoint that truly awakens the palate. You could also try adding a touch of smoked paprika to the rub for a subtle, smoky undertone. And remember, the magic doesn’t end on Thanksgiving Day! Leftover turkey is a treasure trove of culinary opportunities. Think glorious turkey sandwiches piled high with all the fixings, a hearty turkey noodle soup to warm you on a chilly evening, comforting turkey pot pies, or even flavorful turkey tacos. The versatility of this magnificent bird extends the joy and deliciousness for days to come, ensuring every part is savored.
Your Thanksgiving Masterpiece Awaits!
I truly hope this recipe inspires you to create a memorable holiday feast that your family and friends will talk about for years to come. Please, don’t be intimidated by the idea of roasting a whole turkey; follow the steps, trust the process, and you’ll be absolutely amazed at what you can achieve. The joy of cooking, especially for those we love, is one of life’s greatest pleasures, and there’s immense satisfaction in presenting a meal that not only tastes incredible but also looks absolutely magnificent. I cannot wait for you to experience the success, the compliments, and the sheer delight that comes with serving such a beautiful and delicious bird.
After you’ve tried your hand at this recipe, I sincerely encourage you to come back and share your experience! What did you love most about it? Did you try any unique variations or discover a new favorite side dish? Your insights, your stories, and even your photos truly inspire me and our wonderful community of home cooks. Happy cooking, and may your holiday table be filled with warmth, laughter, cherished memories, and the irresistible aroma of your perfectly roasted turkey!
Juicy Garlic Thanksgiving Turkey
Prepare a show-stopping Garlic Thanksgiving Turkey that promises to elevate your festive feast. This golden-brown masterpiece, glistening with aromatic herbs, is infused with irresistible garlic flavor for unparalleled juiciness and crispy skin.
Ingredients
Instructions
Important Information
Nutrition Facts (Per Serving)
It is important to consider this information as approximate and not to use it as definitive health advice.
Allergy Information
Please check ingredients for potential allergens and consult a health professional if in doubt.