Jello Popsicles: the vibrant, jiggly, and utterly irresistible treat that brings back childhood memories with every lick! Forget store-bought popsicles loaded with artificial flavors and questionable ingredients. We’re diving headfirst into a world of homemade frozen fun, crafting these delightful delights right in your own kitchen.
While the exact origins of the popsicle are debated, the concept of freezing flavored liquids dates back centuries. But let’s be honest, the real magic happened when Jell-O entered the picture! This iconic dessert, with its rainbow of colors and playful texture, was destined to be transformed into a frozen sensation. The beauty of Jello Popsicles lies in their simplicity and versatility. They’re incredibly easy to make, requiring just a few basic ingredients and minimal effort.
But why do people adore these frozen treats so much? It’s a combination of factors! The bright, cheerful colors are instantly appealing, especially to children (and the young at heart!). The smooth, slightly chewy texture is incredibly satisfying, and the burst of fruity flavor is a welcome refreshment on a hot day. Plus, they’re a fantastic way to sneak in some extra hydration, making them a guilt-free indulgence for the whole family. So, grab your popsicle molds and let’s get ready to create some frozen magic!

Ingredients:
- 6 oz box of Jell-O (any flavor, or a combination of flavors!)
- 2 cups boiling water
- 2 cups cold water
- Popsicle molds (6-8 molds, depending on size)
- Popsicle sticks
- Optional: Fresh fruit (berries, sliced kiwi, chopped mango, etc.)
- Optional: Gummy candies (small bears, worms, etc.)
Preparing the Jell-O Mixture:
- Boil the Water: First things first, let’s get that water boiling! In a saucepan, bring 2 cups of water to a rolling boil. You can use a kettle or microwave, but a saucepan gives you more control. Make sure you’re using a heat-safe container, of course!
- Dissolve the Jell-O: Once the water is boiling, carefully pour it into a large bowl. Now, add the 6 oz box of Jell-O powder to the boiling water. Stir continuously with a whisk or spoon until all the Jell-O powder is completely dissolved. This is crucial! You don’t want any grainy bits in your popsicles. Keep stirring for about 2 minutes to ensure it’s perfectly smooth.
- Add Cold Water: Now, pour in the 2 cups of cold water. This will help cool down the mixture and bring it to the right consistency for freezing. Stir well to combine the cold water with the Jell-O mixture.
- Check for Clarity: Give the mixture one last look to make sure there are no undissolved granules. The mixture should be clear and vibrant in color. If you see any lingering powder, keep stirring!
Adding Optional Ingredients:
This is where the fun begins! You can customize your Jell-O popsicles with all sorts of goodies. Here are a few ideas:
- Fresh Fruit: If you’re using fresh fruit, now’s the time to add it. Small berries like blueberries, raspberries, and sliced strawberries work great. You can also use sliced kiwi, chopped mango, or even small pieces of pineapple. Distribute the fruit evenly among the popsicle molds.
- Gummy Candies: For a fun and playful treat, add some gummy candies. Small gummy bears or worms are perfect. Just be mindful of the size, as you want them to fit comfortably in the molds. Again, distribute them evenly.
- Layering Flavors: Want to get really fancy? You can layer different Jell-O flavors! Pour a layer of one flavor into the molds, let it partially set in the refrigerator for about 30-45 minutes, and then pour another flavor on top. Repeat as desired for a colorful and flavorful layered popsicle.
Filling the Popsicle Molds:
- Prepare the Molds: Make sure your popsicle molds are clean and dry. If you’re using molds with reusable sticks, ensure they are properly inserted.
- Pour the Mixture: Carefully pour the Jell-O mixture into the popsicle molds, leaving a little space at the top for expansion during freezing. If you’ve added fruit or candies, make sure they are distributed evenly in each mold.
- Remove Air Bubbles: Gently tap the molds on the counter to release any trapped air bubbles. This will help create a smoother and more visually appealing popsicle.
- Insert Popsicle Sticks: If your molds don’t have built-in sticks, now’s the time to insert them. Place a popsicle stick in the center of each mold, making sure it’s securely positioned.
Freezing the Popsicles:
- Arrange in Freezer: Carefully transfer the filled popsicle molds to the freezer. Make sure they are placed on a flat surface to prevent them from tipping over and spilling.
- Freeze Completely: Freeze the popsicles for at least 4-6 hours, or preferably overnight, to ensure they are completely frozen solid. The freezing time may vary depending on the size and shape of your molds.
- Check for Solid Freezing: To check if the popsicles are ready, gently press on the top of one. It should feel firm and solid. If it’s still soft, give it some more time in the freezer.
Removing the Popsicles from the Molds:
- Loosen the Popsicles: Once the popsicles are frozen solid, you’ll need to loosen them from the molds. There are a few ways to do this:
- Warm Water Method: The easiest method is to run the molds under warm water for a few seconds. Be careful not to let the water get too hot, as this can melt the popsicles. Just a quick rinse should do the trick.
- Room Temperature Method: Alternatively, you can let the molds sit at room temperature for a few minutes. This will allow the popsicles to soften slightly and release from the molds.
- Gently Pull: Once the popsicles are loosened, gently pull them out of the molds by the stick. If they’re still sticking, try running them under warm water again for a few more seconds.
- Enjoy Immediately or Store: You can enjoy your Jell-O popsicles immediately! If you’re not planning to eat them right away, wrap them individually in plastic wrap or store them in a freezer-safe bag to prevent freezer burn.
Tips and Tricks for Perfect Jell-O Popsicles:
- Use High-Quality Jell-O: The quality of your Jell-O will affect the taste and texture of your popsicles. Choose a brand you trust and that you enjoy the flavor of.
- Don’t Overfill the Molds: Leave a little space at the top of the molds to allow for expansion during freezing. Overfilling can cause the popsicles to crack or break.
- Experiment with Flavors: Don’t be afraid to experiment with different Jell-O flavors and combinations. You can even mix and match different fruits and candies to create your own unique popsicles.
- Add a Touch of Sweetness: If you prefer a sweeter popsicle, you can add a tablespoon or two of sugar or honey to the Jell-O mixture. Just be sure to dissolve it completely before pouring it into the molds.
- For Clearer Popsicles: To get really clear popsicles, let the Jell-O mixture sit for a few minutes after dissolving the powder. This will allow any air bubbles to rise to the surface, which you can then skim off with a spoon.
- Prevent Freezer Burn: To prevent freezer burn, wrap the popsicles individually in plastic wrap or store them in a freezer-safe bag. This will help keep them fresh and flavorful for longer.
- Make Adult Popsicles: For an adult twist, you can add a splash of vodka or rum to the Jell-O mixture before freezing. Just be sure to label them clearly so that kids don’t accidentally eat them!
- Clean Up Quickly: Jell-O can be sticky, so clean up any spills or messes right away. This will make your life much easier in the long run.
- Get Creative with Molds: Use different shaped popsicle molds for added fun! You can find molds in all sorts of shapes and sizes, from stars and hearts to animals and cartoon characters.
- Patience is Key: Don’t rush the freezing process. Make sure the popsicles are completely frozen solid before trying to remove them from the molds. This will help prevent them from breaking or melting.
Troubleshooting:
- Popsicles are too hard: If your popsicles are too hard, try adding a little more water to the Jell-O mixture. This will help create a softer texture.
- Popsicles are too soft: If your popsicles are too soft, try freezing them for a longer period of time. You can also add a little less water to the Jell-O mixture.
- Popsicles are sticking to the molds: If your popsicles are sticking to the molds, try running them under warm water for a few seconds. You can also let the molds sit at room temperature for a few minutes.
- Popsicles are breaking: If your popsicles are breaking, try being more gentle when removing them from the molds. You can also try running them under warm water for a shorter period of time.
- Popsicles are melting too quickly: If your popsicles are melting too quickly, try storing them in the freezer until you’re ready to eat them. You can also wrap them in plastic wrap to help keep them cold.
Variations:
- Yogurt Popsicles: Replace half of the cold water with yogurt for a creamy and tangy popsicle.
- Juice Popsicles
Conclusion:
And there you have it! These Jello Popsicles are more than just a frozen treat; they’re a burst of childhood nostalgia, a vibrant splash of color on a hot day, and a ridiculously easy way to create something truly special. I genuinely believe this recipe is a must-try for anyone looking for a fun, refreshing, and customizable dessert. The simplicity is deceptive – the flavor payoff is huge!
Think about it: you can whip up a batch of these in mere minutes, and the hardest part is waiting for them to freeze. That’s it! No complicated techniques, no fancy ingredients, just pure, unadulterated popsicle perfection. And the best part? You can tailor them to your exact preferences.
Why are these Jello Popsicles a must-try? Because they’re:
- Incredibly easy and quick to make.
- Completely customizable with your favorite Jello flavors.
- A guaranteed crowd-pleaser for kids and adults alike.
- A refreshing and healthy-ish alternative to store-bought popsicles.
- A fantastic way to use up leftover Jello.
But the fun doesn’t stop there! Let’s talk serving suggestions and variations. For a truly decadent treat, try dipping your finished popsicles in melted chocolate and then sprinkling them with chopped nuts or sprinkles. Or, for a more sophisticated twist, consider layering different Jello flavors in each popsicle mold to create a rainbow effect. You could even add small pieces of fruit, like berries or sliced peaches, to the Jello mixture before freezing for an extra burst of flavor and texture.
Another fantastic variation is to use sugar-free Jello for a guilt-free treat. This is a great option for those watching their sugar intake or for anyone who simply prefers a less sweet popsicle. You can also experiment with different liquid bases, such as coconut water or fruit juice, instead of plain water to add another layer of flavor complexity. Imagine a tropical-flavored Jello popsicle made with coconut water – pure bliss!
For the adults, consider adding a splash of your favorite liqueur to the Jello mixture before freezing. A little vodka or rum can transform these popsicles into a fun and festive cocktail treat. Just be sure to label them clearly so the kids don’t accidentally grab one!
I’m so excited for you to try this recipe and discover the endless possibilities of Jello Popsicles. I truly believe you’ll be amazed at how simple and satisfying they are. They are the perfect treat for hot summer days, birthday parties, or just a fun afternoon snack.
So, what are you waiting for? Grab your favorite Jello flavors, dust off those popsicle molds, and get ready to create some frozen magic! I can’t wait to hear about your creations. Please, please, please come back and share your experiences in the comments below. Let me know what flavors you tried, what variations you came up with, and how much everyone loved them. Did you add fruit? Did you try a layered effect? Did you make them boozy? I want to hear it all! Your feedback is invaluable, and it helps inspire others to try this recipe and create their own unique Jello Popsicle masterpieces. Happy popsicle-making!
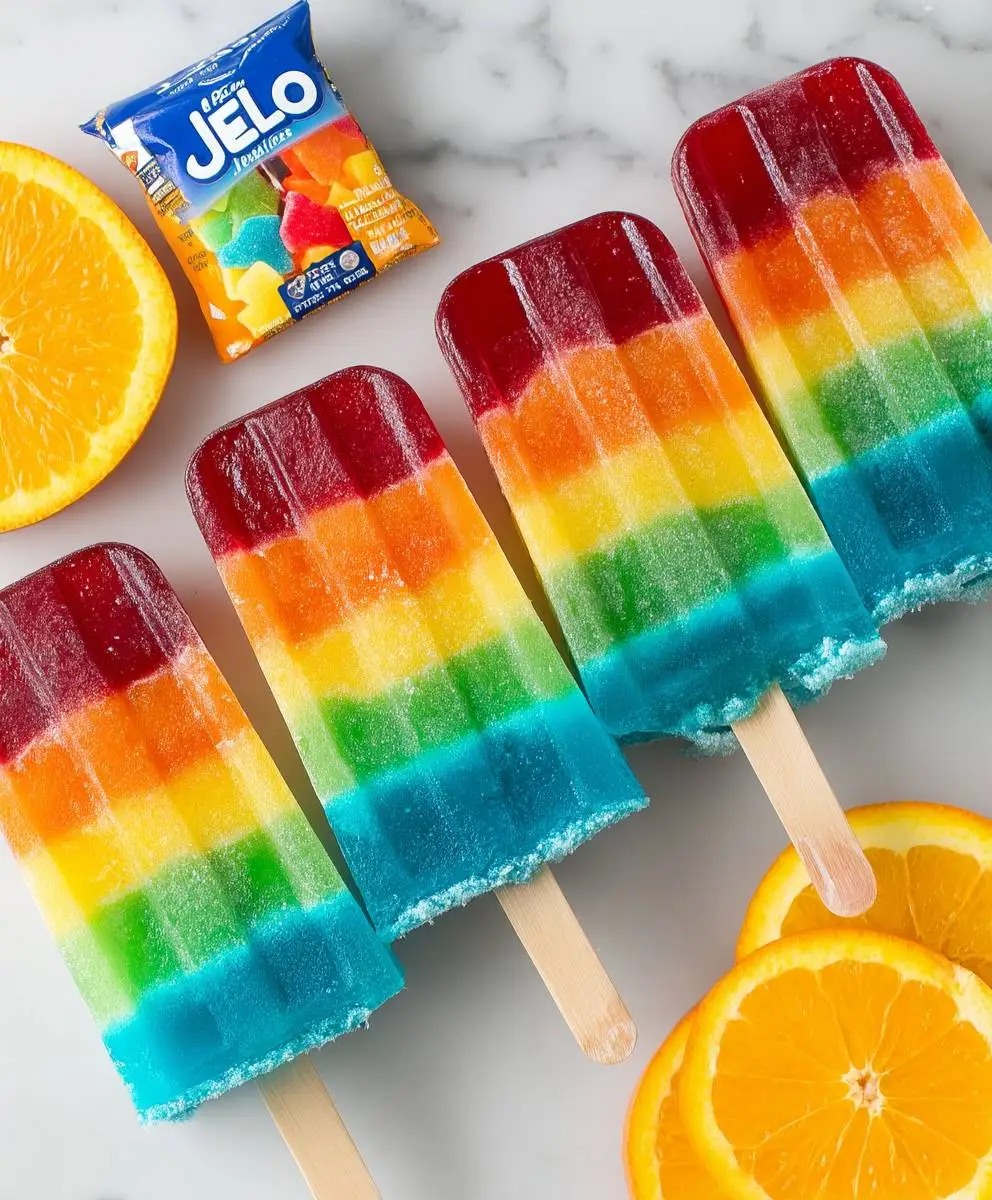
Jello Popsicles: The Ultimate Guide to Making Refreshing Summer Treats
Cool down with these fun and easy Jell-O popsicles! Customize them with your favorite fruits, gummy candies, or even layer different Jell-O flavors for a refreshing treat.
By: LanaCategory: DessertDifficulty: EasyCuisine: AmericanYield: 6-8 popsiclesDietary: VegetarianIngredients
Instructions
Recipe Notes
- Use high-quality Jell-O for the best taste and texture.
- Don’t overfill the molds to prevent cracking.
- Experiment with different Jell-O flavors and combinations.
- Add a tablespoon or two of sugar or honey to the Jell-O mixture for a sweeter popsicle.
- Let the Jell-O mixture sit for a few minutes after dissolving the powder for clearer popsicles.
- Wrap the popsicles individually in plastic wrap or store them in a freezer-safe bag to prevent freezer burn.
- Add a splash of vodka or rum to the Jell-O mixture before freezing for an adult twist.
- Clean up any spills or messes right away.
- Use different shaped popsicle molds for added fun.
- Make sure the popsicles are completely frozen solid before trying to remove them from the molds.
Frequently Asked Questions
→ How do I ensure the bread stays moist?Use fresh, ripe ingredients and avoid overmixing the batter. Store in an airtight container.→ Can I substitute ingredients?Yes, you can substitute similar ingredients while maintaining the basic ratios for best results.→ How long does this bread keep?Store tightly wrapped at room temperature for 2-3 days, or refrigerate for up to a week.→ What if I don't have all the spices?You can adjust spices to taste or substitute with similar warming spices.→ Can I freeze this bread?Yes, wrap individual slices and freeze for up to 3 months. Thaw at room temperature before serving.