Jalapeno Salt is more than just a seasoning; it’s a culinary revelation that promises to elevate your dishes from ordinary to absolutely unforgettable. Have you ever yearned for that perfect blend of savory goodness punctuated by a vibrant, zesty kick that lingers delightfully on the palate? This unique condiment isn’t merely about adding heat; it’s about infusing a bright, verdant pepper essence into your culinary creations, offering a depth of flavor that is both intriguing and utterly addictive. While the specific blend of Jalapeno Salt might represent a modern gourmet innovation, its roots tap into centuries of global culinary traditions where the indispensable partnership of chiles and salt has shaped flavors, from the ancient kitchens of Mesoamerica to the bustling spice markets of Asia. I’ve discovered that people genuinely adore this simple yet profound seasoning because of its incredible versatility and the remarkable way it effortlessly transforms a wide array of foods. Imagine rimming a margarita glass with it, sprinkling it over grilled corn, perfectly seasoned scrambled eggs, or even a humble avocado toast – its unique taste profile and subtle crunch provide an irresistible burst of flavor. It’s truly a secret weapon in the kitchen, guaranteed to awaken your taste buds and add an unforgettable zest and a delightful warmth to every meal.

Ingredients:
-
For the Crispy Chicken:
- 4 large (8-10 oz each) boneless, skinless chicken thighs, pounded to even thickness
- 2 cups buttermilk
- 1/4 cup hot sauce (such as Frank’s RedHot or your favorite medium-spicy sauce)
- 1 tablespoon Jalapeno Salt, plus more for seasoning after frying
- 1 teaspoon garlic powder
- 1 teaspoon onion powder
- 1 teaspoon smoked paprika (or regular paprika if preferred)
- 1/2 teaspoon freshly ground black pepper
- 2 cups all-purpose flour
- 1/2 cup cornstarch
- 1 tablespoon baking powder
- 1 tablespoon cayenne pepper (adjust to your spice preference)
- 1 teaspoon fine sea salt
- Vegetable oil, canola oil, or peanut oil, for deep frying (about 6-8 cups, or enough to fill your pot to a safe depth)
-
For the Creamy Chipotle Aioli:
- 1 cup good quality mayonnaise
- 1-2 chipotle peppers in adobo sauce (start with one, add more for extra heat and smoky flavor), finely minced
- 1 tablespoon adobo sauce from the can of chipotles
- 1 tablespoon fresh lime juice
- 1 small clove garlic, minced very finely or grated
- 1 teaspoon honey or maple syrup (optional, for balance)
- 1/4 teaspoon salt
- 1/8 teaspoon black pepper
-
For the Tangy Herb Slaw:
- 3 cups finely shredded green cabbage (about half a small head)
- 1 cup finely shredded red cabbage (about a quarter of a small head)
- 1 large carrot, peeled and grated
- 1/2 cup mayonnaise
- 2 tablespoons apple cider vinegar
- 1 tablespoon Dijon mustard
- 1 tablespoon honey or granulated sugar
- 1/2 teaspoon celery seeds (optional, but highly recommended for classic slaw flavor)
- 1/4 teaspoon salt, or to taste
- 1/8 teaspoon black pepper, or to taste
- 2 tablespoons chopped fresh cilantro or parsley (optional, for freshness)
-
For Assembly:
- 4 brioche buns or potato rolls, split
- 2 tablespoons unsalted butter, softened
- Dill pickle slices, for serving
Instructions:
Preparing the Creamy Chipotle Aioli (Can be made ahead):
- Combine Ingredients: In a medium bowl, combine the mayonnaise, minced chipotle peppers, adobo sauce, fresh lime juice, finely minced garlic, honey (if using), salt, and black pepper.
- Mix Thoroughly: Whisk all the ingredients together until they are completely smooth and well-combined. Make sure there are no lumps of garlic or chipotle. Taste and adjust seasoning as needed – you might want more lime juice for tang, more honey for sweetness, or additional salt and pepper. If you prefer a very smooth aioli, you can use a mini food processor or immersion blender, but thorough whisking works perfectly well.
- Chill for Flavor Development: Cover the bowl with plastic wrap and refrigerate for at least 30 minutes, or ideally for several hours, to allow the flavors to meld and deepen. This aioli can be made up to 2-3 days in advance, stored in an airtight container in the refrigerator. The longer it chills, the more pronounced and harmonious the smoky, spicy, and tangy notes will become.
Crafting the Tangy Herb Slaw (Can be made ahead):
- Prepare the Vegetables: In a large mixing bowl, combine the finely shredded green cabbage, red cabbage, and grated carrot. Ensuring the cabbage is thinly shredded is key for a tender, easy-to-eat slaw. A mandoline slicer can achieve this quickly, or a sharp chef’s knife.
- Whisk the Dressing: In a separate small bowl, whisk together the mayonnaise, apple cider vinegar, Dijon mustard, honey (or sugar), celery seeds (if using), salt, and black pepper until the dressing is completely smooth and creamy. Taste the dressing – it should be tangy, slightly sweet, and well-seasoned. Adjust any components to suit your preference.
- Combine and Toss: Pour the prepared dressing over the shredded vegetables. Using tongs or your hands, gently toss the vegetables until they are thoroughly coated with the dressing.
- Add Fresh Herbs (Optional) and Chill: If using, fold in the chopped fresh cilantro or parsley. Cover the bowl and refrigerate the slaw for at least 1 hour before serving. This chilling time allows the flavors to marry and the cabbage to slightly soften, making it more enjoyable. While it can be made a few hours ahead, I find that for optimal crispness, it’s best not to make it too far in advance, as the cabbage can release too much water and make the slaw watery.
The Ultimate Chicken Brine and Marinade:
- Prepare the Chicken: Lay each chicken thigh between two sheets of plastic wrap. Using a meat mallet or a heavy rolling pin, gently pound the thicker parts of the chicken until they are of even thickness, about 1/2 to 3/4 inch. This ensures even cooking and helps tenderize the meat.
-
Mix the Brine: In a large bowl or a resealable freezer bag, combine the buttermilk, hot sauce, Jalapeno Salt, garlic powder, onion powder, smoked paprika, and black pepper. Whisk everything together thoroughly until the Jalapeno Salt and other spices are fully dissolved and evenly distributed.
A Note on Jalapeno Salt:
Using Jalapeno Salt in the brine not only seasons the chicken but also infuses it with a subtle, zesty heat that permeates every fiber of the meat. It’s far superior to just regular salt here, adding a layer of complex, bright spiciness that truly makes a difference in the final flavor profile of our crispy chicken.
- Marinate the Chicken: Add the pounded chicken thighs to the buttermilk mixture, ensuring each piece is fully submerged. If using a bowl, cover it tightly with plastic wrap. If using a bag, press out any excess air and seal it. Refrigerate the chicken for at least 4 hours, or ideally overnight (up to 12-18 hours) for maximum tenderness and flavor. Do not marinate for more than 24 hours, as the acidity can start to break down the chicken too much.
- Prepare for Dredging: When ready to cook, remove the chicken from the refrigerator. Allow it to sit at room temperature for about 20-30 minutes while you prepare your dredging station and frying oil. This helps the chicken cook more evenly.
The Crispy Dredge: Two-Stage Perfection:
- Set Up Your Dredging Station: Prepare two shallow dishes or pie plates. In the first dish, place the chicken thighs directly from the buttermilk marinade – do not shake off too much excess liquid; we want it to cling to the chicken.
-
Prepare the Dry Dredge: In the second shallow dish, whisk together the all-purpose flour, cornstarch, baking powder, cayenne pepper, and fine sea salt. This blend of ingredients is crucial for achieving that incredibly crispy, craggy coating. The cornstarch helps with crispness, and the baking powder contributes to a lighter, airier texture, creating those coveted “nooks and crannies.”
Enhancing Flavor with Jalapeno Salt:
Consider adding another teaspoon of Jalapeno Salt to this dry dredge mixture. This provides a second layer of that distinctive spicy, zesty flavor directly into the coating, which will create an amazing burst of flavor with every crispy bite. This is where you can really build up that signature Jalapeno Salt profile.
- First Dredge: Take one chicken thigh from the buttermilk mixture and place it into the dry flour mixture. Generously coat the chicken, pressing the flour mixture onto all sides. Ensure every part of the chicken is covered.
- The Wet Dip: Now, dip the fully floured chicken thigh back into the buttermilk marinade for just a few seconds. Allow any excess buttermilk to drip off. This second wet dip is what creates the extra crispy, craggy texture.
- Second Dredge for Maximum Crisp: Immediately place the chicken back into the dry flour mixture. Once again, generously coat the chicken, pressing the flour mixture firmly onto the surface. You’ll notice the coating will be thicker and more textured this time. This double-dredging technique is the secret to an extra-crispy exterior.
- Rest the Breaded Chicken: Transfer the double-dredged chicken thigh to a wire rack set over a baking sheet. Repeat the dredging process for the remaining chicken thighs. Allow the breaded chicken to rest on the wire rack for at least 15-20 minutes at room temperature. This resting period allows the flour mixture to absorb moisture and adhere better to the chicken, preventing the coating from falling off during frying. This step is critical for a truly successful crispy fried chicken.
Frying for Golden Crispiness:
- Preheat the Oil: Pour the vegetable, canola, or peanut oil into a large heavy-bottomed pot, Dutch oven, or deep fryer. The oil should be at least 3-4 inches deep. Attach a deep-fry thermometer to the side of the pot. Heat the oil over medium-high heat until it reaches a stable temperature of 350°F (175°C). Safety Note: Never fill your pot more than halfway with oil, and always be cautious when working with hot oil. Have a lid nearby in case of a grease fire.
- Fry the Chicken: Carefully lower 1-2 chicken thighs into the hot oil using tongs. Do not overcrowd the pot, as this will lower the oil temperature too quickly and result in greasy, less crispy chicken. Maintain the oil temperature as close to 325-350°F (160-175°C) as possible by adjusting the heat as needed.
- Cook to Perfection: Fry the chicken for approximately 6-8 minutes per side, or until it is a deep golden brown, exceptionally crispy, and the internal temperature reaches 165°F (74°C) when measured with an instant-read thermometer inserted into the thickest part of the thigh. The exact time will depend on the thickness of your chicken and the consistency of your oil temperature.
-
Drain and Season: Once cooked, carefully remove the chicken from the oil and transfer it to a clean wire rack set over a baking sheet lined with paper towels to drain excess oil. Immediately after removing it from the oil, while it’s still hot, sprinkle generously with more Jalapeno Salt. This final seasoning step locks in incredible flavor and heat right into the crispy crust.
The Magic of Post-Frying Seasoning:
Seasoning with Jalapeno Salt immediately after frying is crucial. The residual heat from the chicken helps the salt adhere and its flavors bloom, enhancing the overall taste with its bright, spicy, and tangy notes. It’s the perfect finishing touch to emphasize that signature Jalapeno Salt kick.
- Keep Warm: If frying in batches, you can keep the finished chicken warm in an oven preheated to 200°F (95°C) while you fry the remaining pieces.
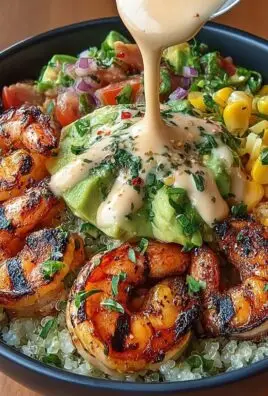
Assembling Your Masterpiece Sandwich:
- Toast the Buns: Melt the softened butter in a large skillet over medium heat. Place the split brioche buns, cut-side down, in the melted butter and toast for 1-2 minutes until golden brown and slightly crispy. Remove from the skillet. Toasted buns are essential for preventing sogginess and adding textural contrast.
-
Build Your Sandwich:
- Spread a generous layer of the creamy Chipotle Aioli on both the top and bottom halves of each toasted bun. Don’t be shy!
- Place a perfectly crispy, freshly fried chicken thigh (still warm and seasoned with Jalapeno Salt!) onto the bottom bun.
- Top the chicken with a generous mound of the Tangy Herb Slaw. The cool, crisp slaw provides a wonderful counterpoint to the hot, spicy chicken.
- Arrange several dill pickle slices on top of the slaw. The briney, acidic crunch of the pickles is a non-negotiable component that cuts through the richness beautifully.
- Place the top bun on your glorious creation.
- Serve Immediately: Serve your Crispy Spicy Chicken Sandwiches hot and fresh, perhaps with some extra pickle spears on the side. Enjoy the symphony of textures and flavors – the crunchy chicken, creamy aioli, tangy slaw, and zesty pickles, all enhanced by the unique kick of Jalapeno Salt. Each bite is a journey!

Conclusion:
Well, my friends, we’ve reached the exciting end of our culinary journey together, and I truly hope you’re feeling as inspired as I am to get into the kitchen and create something truly special. This isn’t just another recipe; it’s an invitation to elevate your everyday meals from simply good to absolutely unforgettable. What we’ve discussed today isn’t just about following steps; it’s about embracing a philosophy of flavor, a commitment to fresh ingredients, and the sheer joy of transforming simple components into a taste sensation that will have everyone asking for your secret. I believe that cooking should be an adventure, a creative outlet that rewards you with incredible flavors, and this recipe is a perfect testament to that belief.
Why This Recipe is an Absolute Must-Try:
First and foremost, the sheer impact this homemade seasoning brings to the table is unparalleled. It’s a game-changer for so many dishes. Imagine infusing every bite with that perfect balance of vibrant heat, savory depth, and an aromatic whisper that dances on your palate. It’s a flavor profile that manages to be both comforting and exciting, familiar yet refreshingly new. Beyond the taste, there’s the incredible satisfaction of making something so profoundly delicious from scratch. You know exactly what’s going into it, ensuring quality and freshness that store-bought alternatives simply can’t match. This particular recipe is surprisingly straightforward, even for those who might feel a bit intimidated by ambitious kitchen projects. The steps are clear, the process is rewarding, and the outcome is consistently spectacular. This recipe empowers you to become a flavor alchemist, adding your personal touch to countless dishes and making them uniquely yours, truly setting your culinary creations apart.
Endless Serving Suggestions & Creative Variations:
Now, let’s talk about the fun part: how to unleash this flavor powerhouse! The possibilities are genuinely boundless when you have a jar of this incredible Jalapeno Salt in your pantry. Prepare to have your mind blown by its versatility. Sprinkle it generously over your morning scrambled eggs or a creamy avocado toast for a breakfast kick that wakes up your senses. It’s magnificent on grilled corn on the cob, adding a smoky, spicy zing that will make it an instant BBQ favorite. Think about rimming a margarita glass with it – a spicy, salty edge that perfectly complements the tequila and lime for an unforgettable cocktail experience. It’s phenomenal on roasted vegetables like Brussels sprouts, asparagus, or sweet potatoes, bringing out their natural sweetness with a fiery counterpoint. You can even mix it into a compound butter for steaks, seafood, or fresh-baked bread, or stir it into a simple Greek yogurt or sour cream dip for an instant party pleaser that everyone will rave about. For variations, consider adjusting the heat level by removing more or less of the jalapeno seeds and membranes before dehydrating. You could also experiment with adding other dried herbs, like cilantro or lime zest, to the blend for an even more complex flavor profile. Imagine a smoky version using chipotle peppers instead of fresh jalapenos, or a vibrant, citrusy blend with dehydrated lemon or orange zest added in. The canvas is yours to paint with flavor!
Your Culinary Adventure Awaits – Share Your Success!
So, what are you waiting for? This is your moment to transform your cooking and impress everyone around your table. I wholeheartedly encourage you to roll up your sleeves, gather your ingredients, and give this recipe a try. You’ll be amazed at how simple it is to achieve such extraordinary results, and how much joy it brings to your kitchen. Don’t be afraid to experiment, to tweak it to your personal taste, or to invent new ways to enjoy it. Cooking is, after all, an art form, and you are the artist. Once you’ve experienced the magic, I would absolutely love to hear about it! Did you serve it on a new dish? Did you surprise your family with a unique twist? Did you use it to elevate a classic recipe? Share your culinary adventures, your photos, and your feedback in the comments section below. Your insights and experiences not only inspire me but also help our growing community of food lovers discover even more delightful ways to enjoy delicious food. Let’s build a vibrant space where we can all share our passion for incredible flavors and fantastic homemade creations!
Frequently Asked Questions (FAQs)
Q: How long does homemade Jalapeno Salt last?
A: When stored in an airtight container in a cool, dark place, homemade Jalapeno Salt can last for several months, typically 3-6 months. The key is ensuring the jalapenos are completely dehydrated before grinding to prevent mold growth and preserve freshness. If you notice any changes in color, smell, or texture, it’s best to discard it.
Q: Can I use dried jalapenos instead of fresh ones?
A: Absolutely! Using dried jalapenos (sometimes called "dried green chiles" or "chipotle peppers" if smoked and dried) can be a convenient alternative. If they are already dried, you might just need to toast them lightly before grinding with the salt to enhance their flavor. Adjust quantities to your taste, as dried peppers can be more concentrated in flavor and heat than fresh ones.
Q: How can I adjust the heat level of the Jalapeno Salt?
A: The heat in jalapenos is primarily concentrated in the seeds and the white pith (placenta) inside. To reduce the heat, you can remove more of the seeds and pith before dehydrating. For a spicier salt, leave some or all of them in. You can also experiment with using other peppers – a milder poblano for less heat, or a hotter serrano for more kick!
Q: What are some unique ways to use Jalapeno Salt that aren’t obvious?
A: Beyond the common uses on eggs or grilled meats, try sprinkling Jalapeno Salt on fresh fruit like mango or pineapple for a sweet and spicy treat. It’s fantastic rimming a Bloody Mary or a Paloma. You can also knead a small amount into homemade bread dough, mix it into your popcorn seasoning, or even use it to season the water when boiling pasta for a subtle underlying flavor!
Q: Do I need any special equipment to make Jalapeno Salt?
A: While a dehydrator makes the drying process very efficient, it’s not strictly necessary. You can also dehydrate jalapenos in a low-temperature oven (around 150-200°F or 65-95°C) with the door slightly ajar to allow moisture to escape, or even air-dry them in a warm, well-ventilated area. For grinding, a spice grinder, coffee grinder (dedicated to spices!), or a mortar and pestle will work perfectly to turn your dried jalapenos and salt into a fine blend.
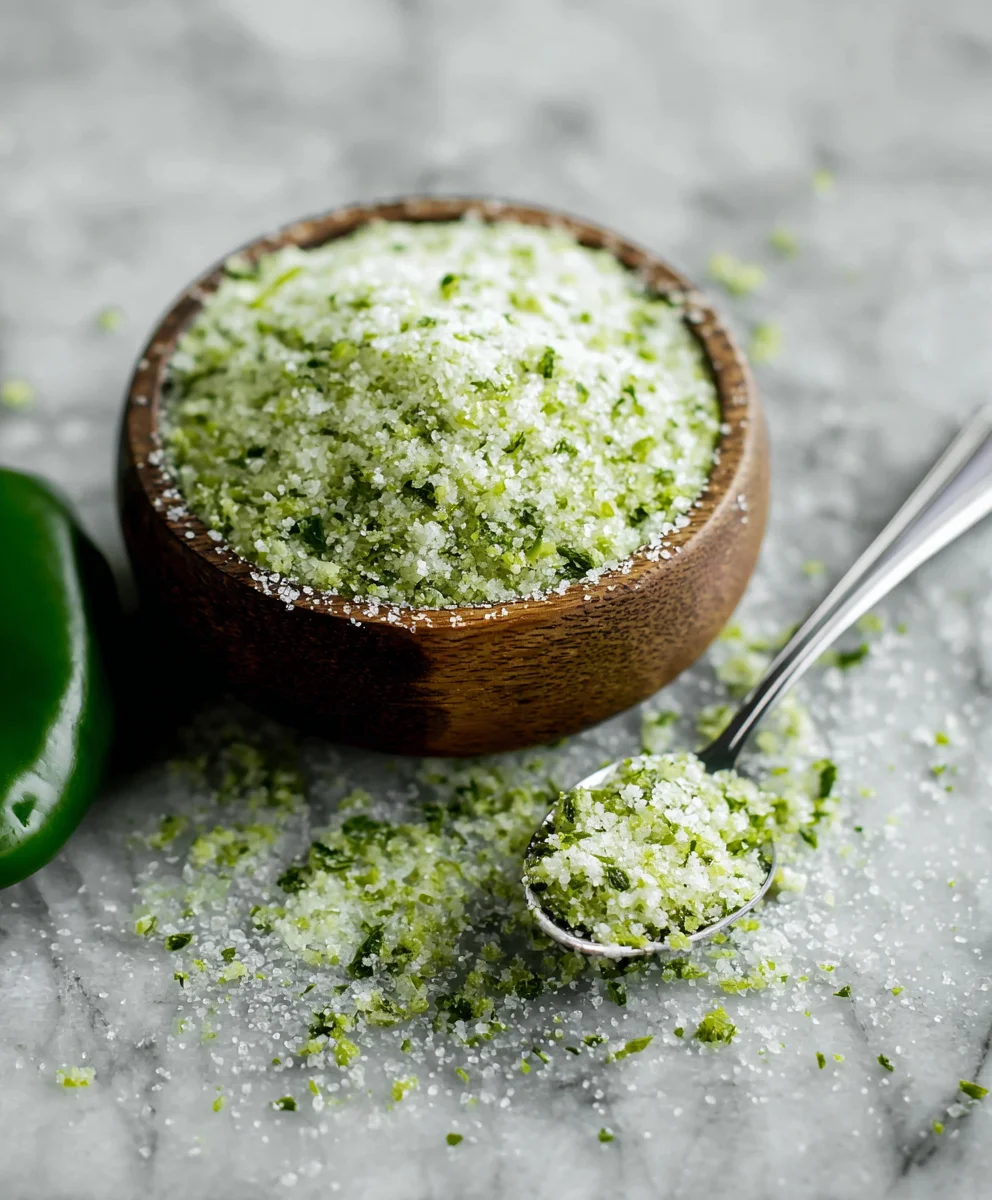
Jalapeno Salt
Jalapeno Salt is a vibrant, zesty seasoning that promises to elevate your dishes. It infuses a bright, verdant pepper essence, offering a depth of flavor that is both intriguing and utterly addictive. Perfect for rimming margaritas, seasoning grilled corn, eggs, or avocado toast, it’s a versatile condiment that adds an unforgettable zest and warmth.
Ingredients
-
10-12 medium fresh jalapenos
-
1 cup coarse sea salt (or preferred salt)
Instructions
-
Step 1
Wearing gloves, wash and dry jalapenos. Remove stems, de-seed, and finely dice the peppers. -
Step 2
Spread diced jalapenos on a dehydrator tray. Dehydrate for 6-10 hours at 125°F (52°C), or until completely brittle. -
Step 3
Transfer brittle dried jalapenos to a food processor. Pulse 2-3 times to break into small pieces, similar to salt grains. Process further for finer texture. -
Step 4
Combine the processed dried jalapeno pieces with the coarse sea salt. Mix thoroughly. Store in an airtight container.
Important Information
Nutrition Facts (Per Serving)
It is important to consider this information as approximate and not to use it as definitive health advice.
Allergy Information
Please check ingredients for potential allergens and consult a health professional if in doubt.