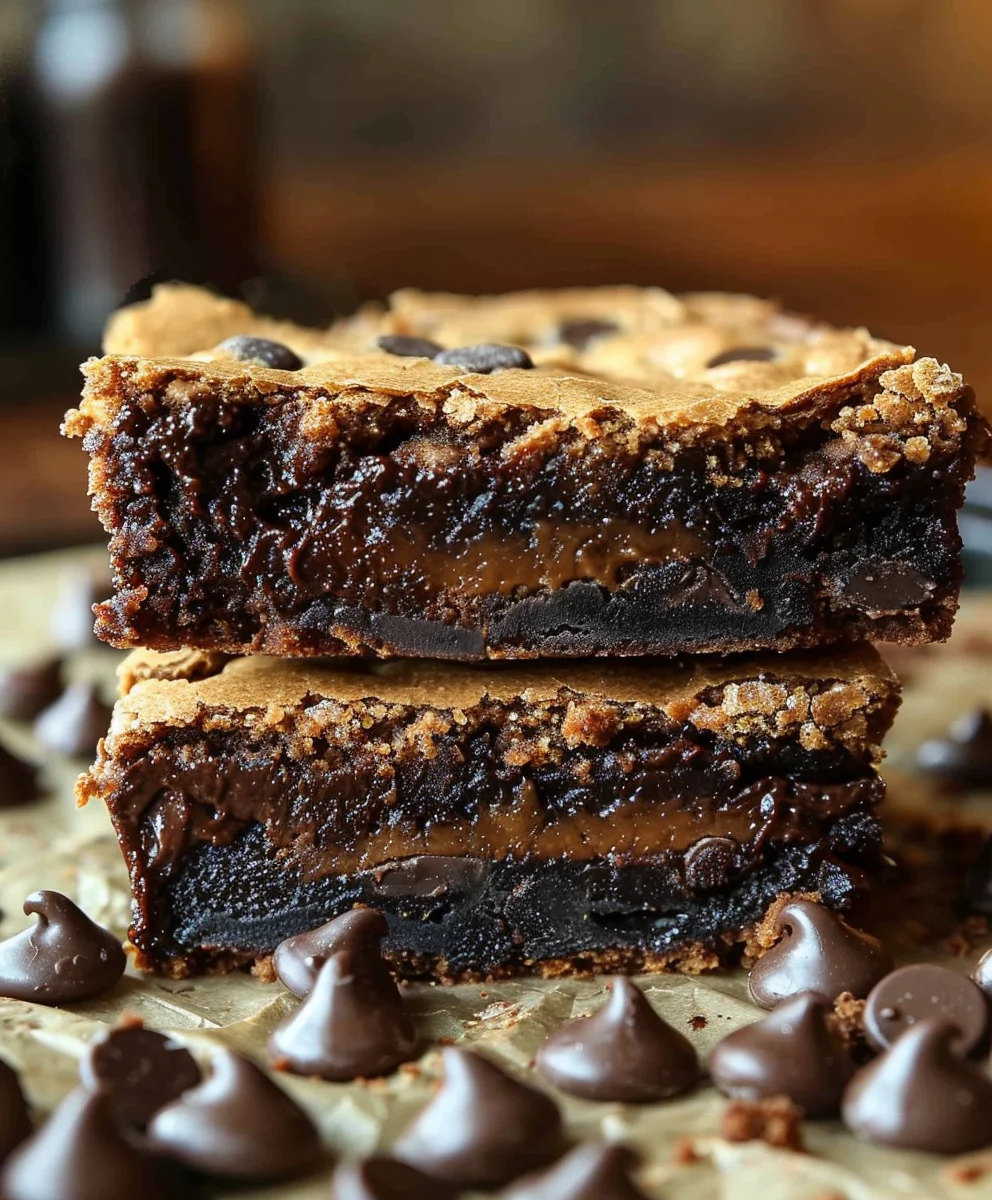
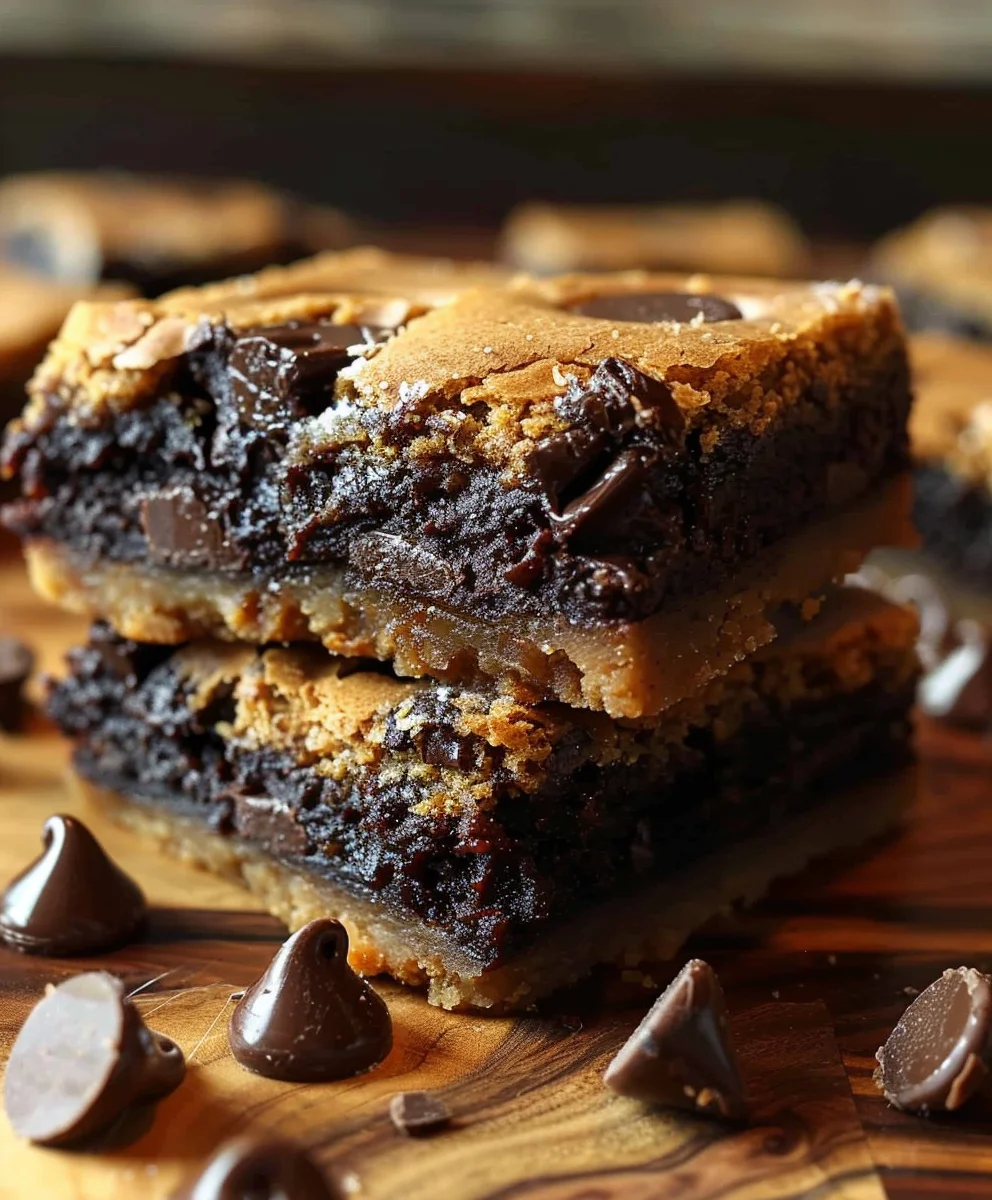
Slutty Brownies Cookie Dough represents the pinnacle of indulgent baking, a dessert that truly has it all. Imagine sinking your teeth into layers of chewy chocolate chip cookie, a satisfying crunch of rich OREO cookies, and finally, a blanket of intensely fudgy brownie, all crowned with more delightful cookie dough. It’s a symphony of textures and flavors that promises an unforgettable experience with every single bite, making it the ultimate showstopper for any occasion.
The intriguing name, “Slutty Brownies,” emerged from the internet’s love for over-the-top, unabashedly decadent desserts. It’s a playful nod to the sheer extravagance of combining three beloved treats – cookies, OREOs, and brownies – into one irresistible package. This layered marvel quickly became a viral sensation, a testament to its undeniable appeal and the simple joy of having all your favorite dessert elements in one glorious square, ready to impress.
Why Everyone Adore This Decadent Dessert
I find that people absolutely adore this creation not just for its novelty, but for the perfect harmony of its components. The distinct chewiness of the cookie base contrasts beautifully with the creamy filling of the OREOs and the moist, dense richness of the brownie, creating a textural masterpiece. Whether you’re a seasoned baker or just looking for a show-stopping treat that’s surprisingly straightforward to assemble, preparing these Slutty Brownies Cookie Dough is an incredibly rewarding process that culminates in pure bliss. It’s the ultimate dessert for potlucks, parties, or simply satisfying that intense craving for something truly extraordinary, proving that sometimes, more is indeed more when it comes to dessert!

Ingredients:
-
For the Chocolate Chip Cookie Dough Layer:
- 2 ½ cups (300g) all-purpose flour: I always make sure to use unbleached for the best texture in my cookies.
- 1 teaspoon baking soda: This gives our cookies that perfect lift and slight chewiness.
- 1 teaspoon salt: Crucial for balancing the sweetness and enhancing all the flavors.
- 1 cup (226g) unsalted butter, softened: Make sure it’s truly softened, not melted, for proper creaming. If it’s too cold, it won’t cream properly; if it’s too warm, the dough might be greasy.
- ¾ cup (150g) granulated sugar: Provides sweetness and helps with spreading.
- ¾ cup (150g) packed light brown sugar: The molasses in brown sugar adds moisture, chewiness, and a lovely caramel note to our cookie layer.
- 2 large eggs: Room temperature eggs incorporate better into the batter.
- 1 teaspoon vanilla extract: A good quality vanilla makes a huge difference in the overall flavor.
- 1 ½ cups (255g) semi-sweet chocolate chips: Or your favorite kind! I sometimes use a mix of milk and dark chocolate chips for more complex flavor.
-
For the Oreo Layer:
- Approximately 1 ½ packages (about 36-40 cookies) Oreo cookies: You’ll need enough to cover the bottom of your baking dish in a single layer. Double-stuff works wonderfully for extra creaminess!
-
For the Fudgy Brownie Layer:
- 1 cup (226g) unsalted butter: This forms the rich, foundational fat of our brownies.
- 1 ¾ cups (350g) granulated sugar: Sweetness and contributes to that desirable crackly top.
- 4 large eggs: Room temperature, they bind everything together and add richness.
- 1 teaspoon vanilla extract: Essential for a classic brownie flavor.
- 1 cup (100g) unsweetened cocoa powder: I prefer a good quality Dutch-processed cocoa powder for a deep, dark chocolate color and less acidity.
- ¾ cup (90g) all-purpose flour: Just enough to give the brownies structure without making them cakey.
- ½ teaspoon baking powder: Provides a little lift but keeps the brownies dense and fudgy.
- ¼ teaspoon salt: Crucial for cutting through the richness and enhancing the chocolate flavor.
- 1 cup (170g) chocolate chips: Optional, but I love adding extra chocolate chips into the brownie batter for pockets of melted chocolate. You can use semi-sweet, milk, or dark.
-
Miscellaneous:
- 9×13 inch baking dish: A sturdy metal or ceramic dish works best.
- Parchment paper: For easy removal and cleanup.
- Non-stick cooking spray or butter: To prevent sticking.
Preparing the Chocolate Chip Cookie Dough Layer:
Gather Your Tools and Preheat Oven:
- First things first, let’s get our oven ready. Preheat your oven to 350°F (175°C). This ensures a consistent baking temperature from the moment your magnificent creation enters the oven.
- Prepare your 9×13 inch baking dish. I always line mine with parchment paper, leaving an overhang on the longer sides. This creates a convenient “sling” that makes it super easy to lift the entire slab of brownies out of the pan once it’s cooled. Lightly grease the parchment paper and the exposed sides of the pan with non-stick cooking spray or a little butter. Trust me, this step is a lifesaver for clean cuts and easy serving.
- In a medium bowl, whisk together the 2 ½ cups all-purpose flour, 1 teaspoon baking soda, and 1 teaspoon salt. Make sure these dry ingredients are well combined. This ensures even distribution of the leavening agent and salt throughout the cookie dough. Set this bowl aside for a moment.
- Now, in a large mixing bowl (or the bowl of your stand mixer fitted with the paddle attachment), cream together the 1 cup (226g) softened unsalted butter, ¾ cup (150g) granulated sugar, and ¾ cup (150g) packed light brown sugar. Beat on medium speed for about 2-3 minutes, or until the mixture is light, fluffy, and pale in color. This creaming process is vital as it incorporates air, which contributes to the cookies’ texture. Scrape down the sides of the bowl as needed to ensure everything is evenly mixed.
- Add the 2 large eggs, one at a time, beating well after each addition until fully incorporated. Then, stir in the 1 teaspoon vanilla extract. The mixture might look a little curdled at this point, but don’t worry, it will come together once the dry ingredients are added.
- Gradually add the dry ingredient mixture (flour, baking soda, salt) to the wet ingredients. Mix on low speed until just combined. Be careful not to overmix! Overmixing develops the gluten in the flour too much, which can lead to tough cookies. As soon as you see no more streaks of flour, stop mixing.
- Gently fold in the 1 ½ cups semi-sweet chocolate chips using a spatula. You want them evenly distributed throughout the dough.
- Press the cookie dough evenly into the bottom of your prepared 9×13 inch baking dish. This layer doesn’t need to be perfectly smooth, but try to get it as uniform as possible so it bakes evenly. I find that lightly flouring my hands or using the back of a measuring cup helps prevent sticking when pressing the dough. You want a solid, compact base for our layers.
Assembling the Oreo Layer:
The Simplest Layer with Maximum Impact:
- Once your chocolate chip cookie dough is pressed firmly into the bottom of the pan, it’s time for the Oreo layer. This is perhaps the easiest step but adds an incredible textural contrast and a burst of classic cookie flavor.
- Arrange the Oreo cookies in a single layer directly over the unbaked cookie dough. You’ll likely need about 36-40 cookies to cover the entire surface, depending on how tightly you pack them. Don’t leave any gaps if you can help it! Some people like to gently press them down into the cookie dough slightly, but it’s not strictly necessary as the brownie batter will hold them in place.
- There’s no need to break them up unless you have a small space to fill. I like the look and bite of whole Oreos, providing that satisfying crunch when you get to this layer.
- Set the pan aside while we prepare our fudgy brownie batter.
Crafting the Fudgy Brownie Layer:
Melt and Mix the Wet Ingredients:
This brownie recipe yields a wonderfully rich and fudgy brownie that perfectly complements the cookie and Oreo layers. The key here is not to overbake!
- In a large, microwave-safe bowl or a saucepan over low heat, melt the 1 cup (226g) unsalted butter. Once melted, remove it from the heat if using a saucepan.
- Stir in the 1 ¾ cups (350g) granulated sugar into the melted butter. Whisk vigorously for about 1-2 minutes until the mixture is well combined and slightly cooled. This helps to dissolve the sugar and starts the process of creating that desirable crackly brownie top.
- Add the 4 large eggs, one at a time, beating well after each addition. Continue whisking for another minute or two until the mixture is thick, glossy, and light in color. This vigorous whisking here is crucial for emulsifying the eggs into the butter-sugar mixture, contributing to the fudgy texture and shiny top.
- Stir in the 1 teaspoon vanilla extract until fully incorporated.
Incorporate the Dry Ingredients:
- In a separate medium bowl, whisk together the 1 cup (100g) unsweetened cocoa powder, ¾ cup (90g) all-purpose flour, ½ teaspoon baking powder, and ¼ teaspoon salt. Ensure there are no lumps of cocoa powder.
- Gradually add the dry ingredients to the wet ingredients in the large bowl. Using a spatula, fold them in gently until just combined. Again, do not overmix! Overmixing develops gluten, which can make your brownies cakey instead of fudgy. A few streaks of flour are perfectly fine; they’ll disappear during baking.
- If you’re using them, gently fold in the 1 cup (170g) of extra chocolate chips into the brownie batter now. They add an extra boost of chocolatey goodness.
- Carefully pour the brownie batter over the Oreo layer in your prepared baking dish. Use an offset spatula or the back of a spoon to gently spread the batter evenly, making sure it covers all the Oreos from edge to edge. Be gentle not to disturb the Oreos or the cookie dough beneath too much. You want a smooth, even top for baking.
Baking the “Slutty Brownies Cookie Dough”:
The Moment of Truth!
- Place the baking dish into your preheated 350°F (175°C) oven.
- Bake for approximately 45-60 minutes. Baking times can vary significantly depending on your oven, so it’s important to keep an eye on them.
- How to check for doneness: The edges of the brownies should look set, and the center might still have a slight jiggle. If you insert a toothpick into the center of the brownies, it should come out with moist crumbs attached, but not wet batter. If it comes out completely clean, your brownies are likely overbaked and will be dry. A few moist crumbs signal fudginess! Remember, there’s a cookie layer and an Oreo layer underneath, so the brownie batter isn’t as deep as a regular pan of brownies.
- Once baked to perfection, carefully remove the baking dish from the oven.
Cooling and Serving:
Patience is a Virtue (Especially Here!):
- This is arguably the hardest part of the entire process: letting them cool completely. Allow the Slutty Brownies Cookie Dough to cool in the pan on a wire rack for at least 2-3 hours, but ideally, even longer, or even overnight. This extended cooling period is absolutely crucial. As they cool, the brownies will continue to set and firm up, making them much easier to cut into clean, perfect squares. If you try to cut them warm, they will be a glorious, delicious mess, but a mess nonetheless.
- Once thoroughly cooled, use the parchment paper overhang as handles to gently lift the entire slab of brownies out of the baking dish and transfer it to a cutting board.
- Using a large, sharp knife, cut the brownies into your desired size squares. I recommend wiping your knife with a warm, damp cloth between cuts for the cleanest edges, especially for that beautiful layered effect.
- Serve your incredible Slutty Brownies Cookie Dough as is, or with a scoop of vanilla bean ice cream and a drizzle of chocolate sauce for an extra decadent treat. They are incredibly rich and satisfying on their own, but a little something extra never hurt anyone, right?
- Store any leftover brownies in an airtight container at room temperature for up to 3-4 days, or in the refrigerator for up to a week. They tend to get even fudgier on the second day!
Conclusion:
And there you have it, my friends! We’ve journeyed through the creation of what I truly believe is one of the most magnificent, audacious, and utterly delightful desserts you will ever encounter. This isn’t just a recipe; it’s an invitation to pure, unadulterated joy, a testament to the fact that sometimes, more truly is more. If you’re looking for a dessert that consistently steals the show, that evokes gasps of delight and murmurs of satisfaction, then this is unequivocally your go-to. The genius lies in its masterful layering: the foundation of a rich, fudgy brownie, followed by the irresistible crunch of whole Oreos, all crowned with a generous, chewy layer of golden cookie dough. Each bite is a symphony of textures and flavors – the deep cocoa notes, the creamy filling, the buttery sweetness – converging into a single, blissful experience. It’s truly a must-try for any dessert enthusiast seeking to elevate their baking game and impress even the most discerning palate. I promise you, making these Slutty Brownies Cookie Dough will be one of the best decisions you make in your kitchen this year.
The beauty of this creation isn’t just in its incredible taste, but in the sheer happiness it brings. It’s the kind of dessert that makes a regular Tuesday feel like a celebration, or transforms a simple gathering into a memorable feast. Think about the impact: you slice into these magnificent squares, revealing those distinct, mouth-watering layers, and the room goes silent as everyone savors their first bite. It’s an instant crowd-pleaser, perfect for potlucks, birthday parties, or simply a decadent treat for a cozy night in. I’ve personally witnessed the sheer delight these bring to people’s faces, and that, for me, is the ultimate reward. It’s more than just a sweet treat; it’s an experience, a moment of pure, blissful indulgence that you deserve to savor.
When it comes to serving these beauties, the possibilities are deliciously endless. While they are absolutely phenomenal on their own, especially when slightly warm, I love to elevate them further. My absolute favorite way to serve a warm slice is with a scoop of premium vanilla bean ice cream, allowing it to slowly melt and mingle with the fudgy brownie and soft cookie dough. A drizzle of warm caramel sauce or a rich chocolate fudge sauce also works wonders, adding another layer of luxurious sweetness. For a delightful contrast, consider a dollop of freshly whipped cream, perhaps with a touch of espresso powder mixed in. For a simpler touch, a light dusting of powdered sugar makes for an elegant presentation, especially if you’re serving them after they’ve completely cooled. Pair them with a tall glass of cold milk, a hot cup of coffee, or even a shot of strong espresso for the ultimate dessert pairing. Each serving suggestion only enhances the already incredible experience, turning a great dessert into an unforgettable one.
And the fun doesn’t stop there! While the classic rendition is perfection, don’t hesitate to experiment with variations to truly make this recipe your own. Imagine swapping the original Oreos for Mint Oreos for a refreshing twist, or perhaps Golden Oreos for a vanilla-centric delight. You could even incorporate other crunchy elements like crushed pretzels for a salty-sweet contrast, or chopped nuts like pecans or walnuts for an added texture in the brownie layer. For the cookie dough, consider using a peanut butter cookie dough for a nutty depth, or adding white chocolate chips and macadamia nuts for a different kind of sweetness. You can even fold in mini chocolate candies, toffee bits, or chopped candy bars into the cookie dough layer for an extra burst of flavor and color. The beauty of this recipe is its flexibility; it’s a fantastic canvas for your culinary creativity. Don’t be afraid to try different combinations – you might just discover your next favorite iteration!
So, my dear readers, I sincerely hope I’ve convinced you to give this truly spectacular recipe a try. Don’t be intimidated by the layers; I promise you, the process is straightforward, and the reward is immeasurable. The joy of creating something so utterly delicious, something that brings smiles and satisfaction, is a feeling I wish for all of you. Once you pull these magnificent bars from the oven, their rich aroma filling your kitchen, you’ll know exactly what I mean. Take the plunge, indulge your sweet tooth, and create a batch of these unforgettable treats. And when you do, please, I’d absolutely love to hear about your experience! Share your photos, your triumphs, and any delicious variations you come up with. Your feedback and stories are what truly bring this culinary community to life. Happy baking, and get ready to fall head over heels for this dessert sensation!
Slutty Brownies Cookie Dough
Slutty Brownies Cookie Dough represents the pinnacle of indulgent baking, a dessert that truly has it all. Layers of chewy chocolate chip cookie, a satisfying crunch of rich OREO cookies, and intensely fudgy brownie, all crowned with more delightful cookie dough, promise an unforgettable experience with every single bite.
Ingredients
-
1 (17.5 ounce) package chocolate chip cookie dough
-
1 (14.3 ounce) package Oreo cookies
-
1 (18.3 ounce) package brownie mix, plus ingredients called for on package (e.g., eggs, oil, water)
Instructions
-
Step 1
Preheat oven to 350°F (175°C). Line a 9×13 inch baking dish with parchment paper, leaving an overhang, then lightly grease. -
Step 2
Press the entire package of chocolate chip cookie dough evenly into the bottom of the prepared baking dish. -
Step 3
Arrange Oreo cookies in a single layer directly over the unbaked cookie dough, covering the surface completely. -
Step 4
Prepare the brownie mix according to the package directions. Gently pour the prepared brownie batter over the Oreo layer and spread evenly to cover all cookies. -
Step 5
Bake for approximately 45-60 minutes. The edges should be set, and the center might have a slight jiggle. A toothpick inserted into the center should come out with moist crumbs, not wet batter. -
Step 6
Remove from oven and cool completely in the pan on a wire rack for at least 2-3 hours, or ideally, overnight. This is crucial for clean cuts. -
Step 7
Once thoroughly cooled, use the parchment paper overhang to lift the entire slab onto a cutting board. Cut into desired squares using a sharp knife. Serve and enjoy! -
Step 8
Store leftover brownies in an airtight container at room temperature for 3-4 days, or in the refrigerator for up to a week.
Important Information
Nutrition Facts (Per Serving)
It is important to consider this information as approximate and not to use it as definitive health advice.
Allergy Information
Please check ingredients for potential allergens and consult a health professional if in doubt.