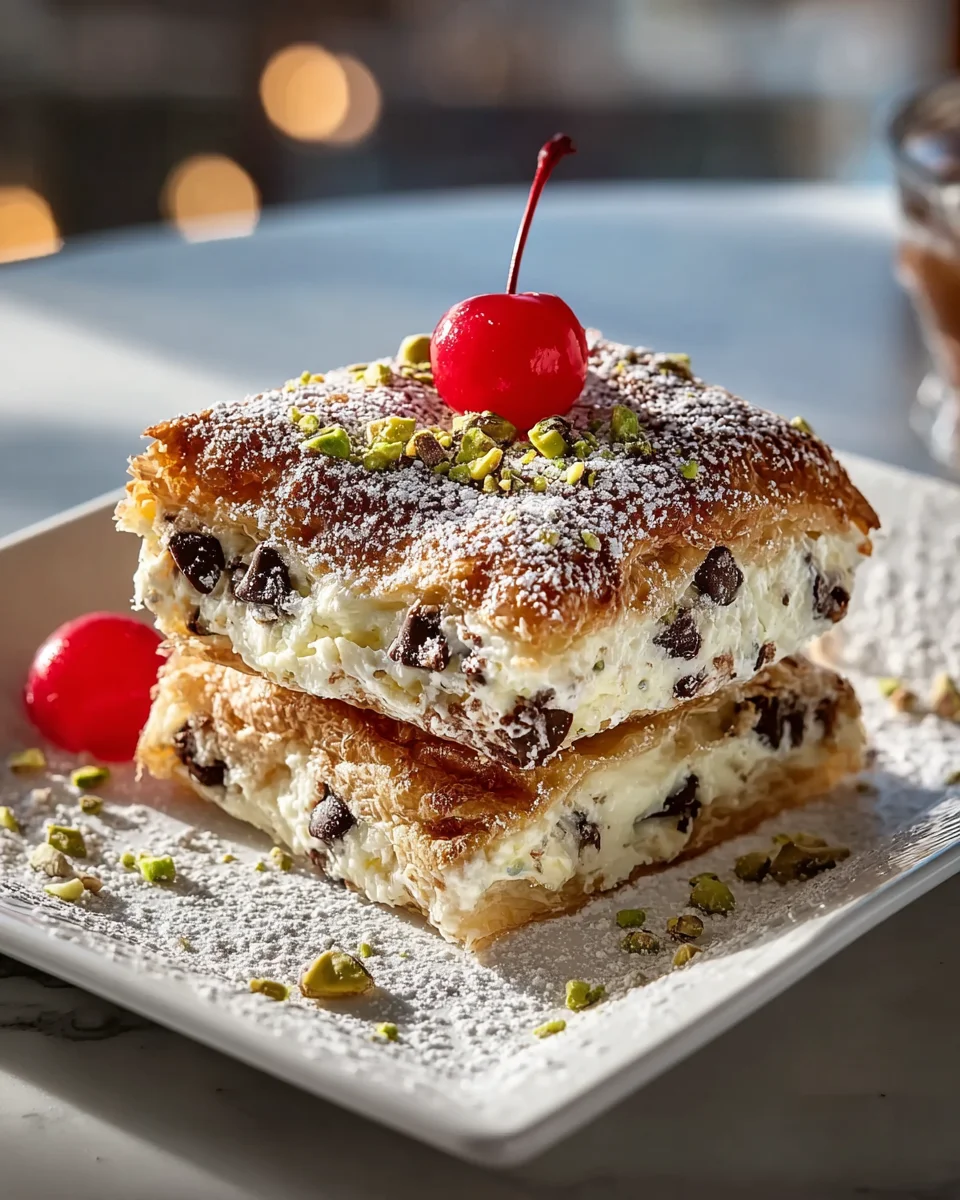
Classic Cannoli Squares
Oh boy, have I got a treat for you! We all adore the classic cannoli, right? That crisp shell, the sweet, creamy ricotta filling… pure bliss! But let’s be honest, making traditional cannoli with individual fried shells can feel a little intimidating for a casual baking session. That’s exactly why I’m so excited to share my recipe for Classic Cannoli Squares with you!
What makes this recipe so special, you ask? Well, it takes all the iconic flavors and textures of your favorite Italian pastry and transforms them into a delightful, shareable square. Imagine: a sturdy, buttery crust that provides that perfect crisp counterpoint, topped with a lusciously rich and sweet ricotta filling, generously studded with mini chocolate chips and a hint of bright orange zest. It’s everything you love about cannoli, deconstructed and made incredibly approachable for the home baker.
You are going to absolutely love these squares because they deliver that authentic cannoli experience without any of the fuss of frying. They’re perfect for bringing to a party, serving after a family dinner, or simply treating yourself to a taste of Italy right from your kitchen. It’s an elegant dessert that looks impressive but is surprisingly simple to put together, promising a little bite of heaven with every square. Get ready to fall in love with your new favorite way to enjoy cannoli!

Ingredient Notes
Crafting the perfect Classic Cannoli Squares begins with understanding the core ingredients. Each component plays a crucial role in replicating that beloved cannoli taste and texture in a convenient square form. I’ve carefully chosen these to ensure an authentic experience, but I also have some thoughts on what you can swap if needed!
- Ricotta Cheese: This is the heart and soul of our cannoli squares. I insist on using full-fat ricotta for the absolute best texture and flavor. It yields a wonderfully creamy, rich filling that won’t be watery or grainy. Make sure to drain it thoroughly! I usually let it sit in a fine-mesh sieve lined with cheesecloth in the fridge overnight to remove excess moisture. This step is non-negotiable for that authentic, thick cannoli filling. While low-fat ricotta might seem tempting, it just doesn’t deliver the same luxurious mouthfeel, and often has more water, which could affect the final consistency of your squares.
- Powdered Sugar: Also known as confectioners’ sugar, this is what sweetens our ricotta filling. Its fine texture dissolves smoothly, ensuring a silky, lump-free cream. Granulated sugar can leave a gritty texture, so I highly recommend sticking with powdered sugar for the best results. You can adjust the amount slightly to your personal sweetness preference, but I find my suggested quantity hits that perfect balance.
- Vanilla Extract: A touch of pure vanilla extract enhances all the other flavors in the filling. It adds warmth and depth. If you have vanilla bean paste, that’s an even more luxurious alternative, offering those beautiful specks of vanilla bean.
- Orange Zest & Cinnamon: These are the secret weapons that truly make this taste like classic cannoli. Freshly grated orange zest provides that essential bright, citrusy note that balances the richness of the ricotta. Don’t skip it! A pinch of cinnamon adds a subtle warmth and traditional spice. I wouldn’t recommend substituting these, as they are key to the “classic” flavor profile.
- Mini Chocolate Chips: What’s cannoli without chocolate? Mini chips are perfect for this application as they distribute evenly throughout the filling and provide delightful bursts of chocolate without being overwhelming. You can use dark, semi-sweet, or milk chocolate according to your preference. If you’re feeling adventurous, finely chopped bittersweet chocolate can also be wonderful.
- Pistachios: Finely chopped pistachios add a lovely color, texture, and nutty flavor that is classic to cannoli. I recommend unsalted, roasted pistachios for the best taste. If you can’t find pistachios, or have an allergy, you could omit them or use another finely chopped nut like almonds, though the flavor profile would shift slightly.
- Candied Orange Peel: These vibrant little pieces contribute a chewy texture and intense citrus flavor that truly elevates the cannoli experience. While optional, I highly recommend including them for authenticity. If you can’t find them, a bit more orange zest could offer a hint of the flavor, but not the texture.
- Cannoli Shells or Waffle Cones (for the crust): This is where we get creative for our “squares”! To mimic the crunchy cannoli shell, I crush up actual cannoli shells or, more commonly, plain waffle cones. They provide that distinct flavor and texture for the base. If you can’t find either, a simple graham cracker crust works beautifully as a substitute, giving you a delicious, buttery base that complements the filling well. Ensure they’re finely crushed for a cohesive crust.
- Melted Butter: This binds our crushed crust together. Unsalted butter is my go-to. You’ll want to make sure it’s fully melted but not boiling hot when you mix it with the crumbs.
Step-by-Step Instructions
Let’s get started on transforming those classic cannoli flavors into delightful squares! Follow these steps carefully, and you’ll be enjoying these treats in no time.
-
Prepare the Ricotta Filling (Ideally Overnight):
The secret to a luscious cannoli filling is dry ricotta! Place your full-fat ricotta cheese in a fine-mesh sieve lined with several layers of cheesecloth. Set this sieve over a bowl and refrigerate overnight (or for at least 6-8 hours). This crucial step allows excess moisture to drain, ensuring your filling is thick, creamy, and not watery, which would make your squares soggy. After draining, discard the liquid and transfer the drained ricotta to a large mixing bowl.
-
Make the Crust:
Preheat your oven to 350°F (175°C). Lightly grease an 8×8-inch or 9×9-inch baking pan, then line it with parchment paper, leaving an overhang on two sides. This will make lifting the squares out much easier later. In a medium bowl, combine your finely crushed cannoli shells or waffle cones with the melted unsalted butter. Stir until all the crumbs are evenly moistened. Press this mixture firmly and evenly into the bottom of your prepared baking pan. I like to use the bottom of a flat glass or a measuring cup to really compact it. Bake the crust for 8-10 minutes, just until lightly golden and fragrant. Remove from the oven and let it cool slightly while you prepare the filling.
-
Assemble the Cannoli Filling:
To your drained ricotta in the large mixing bowl, add the powdered sugar, vanilla extract, orange zest, and cinnamon. Using a rubber spatula or a sturdy spoon, gently fold everything together until well combined and smooth. Be careful not to overmix, as this can make the ricotta grainy. Once combined, gently fold in the mini chocolate chips, chopped pistachios, and candied orange peel (if using). Again, mix just until everything is evenly distributed. Give it a quick taste and adjust sweetness or zest if you feel it needs a little more.
-
Bake the Squares:
Pour the cannoli filling evenly over the partially baked crust in your prepared pan. Use an offset spatula or the back of a spoon to spread it out smoothly. Place the pan back into the preheated oven. Bake for 30-35 minutes, or until the edges of the filling are set, and the center is just slightly jiggly. You don’t want to overbake it, as it will continue to set as it cools.
-
Cool and Chill:
Once baked, remove the pan from the oven and let it cool completely on a wire rack at room temperature. This can take 1-2 hours. Once it’s at room temperature, transfer the pan to the refrigerator and chill for at least 4 hours, but preferably overnight. Chilling is absolutely crucial for the squares to firm up properly and for the flavors to meld beautifully. Resist the urge to cut them sooner!
-
Slice and Serve:
Once thoroughly chilled, use the parchment paper overhang to carefully lift the entire slab out of the baking pan onto a cutting board. Use a sharp knife, wiping the blade clean between each cut, to slice the cannoli squares into your desired size. I usually aim for 9 or 16 squares, depending on how generous I’m feeling. For an extra touch, you can garnish each square with a sprinkle of extra pistachios, mini chocolate chips, or a tiny piece of candied orange peel just before serving. Enjoy your delicious Classic Cannoli Squares!
Tips & Suggestions
Making these Classic Cannoli Squares is a real joy, and I’ve picked up a few tricks along the way to make them even more special. Here are my favorite tips to ensure your squares are absolutely perfect, plus some ideas for serving them up!
- Don’t Skimp on Draining the Ricotta: I cannot stress this enough – proper draining is the most important step for a successful cannoli filling. If your ricotta is too wet, your filling will be runny and might not set properly, leading to soggy squares. Plan ahead and drain it overnight. You’ll see a surprising amount of liquid, and removing it is key to that dense, creamy texture we’re after.
- Chill Thoroughly for Clean Cuts: Patience is a virtue, especially when it comes to chilling these squares. A minimum of 4 hours in the fridge is necessary, but overnight is truly best. This allows the filling to fully set and the flavors to deepen. If you try to cut them too soon, you’ll end up with a messy, crumbly experience. Use a hot, sharp knife, wiping it clean between each cut, for the neatest squares. Run your knife under hot water, dry it, then slice. Repeat for each cut.
- Consider Your Crust: While I suggest crushed waffle cones or cannoli shells for an authentic flavor, a good quality graham cracker crust is a fantastic, readily available alternative. If you’re feeling adventurous, you could even try a thin shortbread crust for a different kind of buttery crunch. Just ensure whatever crust you choose is firmly packed and pre-baked slightly to prevent sogginess.
-
Flavor Variations: While these are “Classic” Cannoli Squares, you can absolutely play with the mix-ins!
- Lemon Zest: If you love a brighter citrus note, a touch of lemon zest alongside the orange zest can be delightful.
- Espresso Powder: A tiny pinch (1/4 teaspoon) of instant espresso powder mixed into the filling can deepen the chocolate flavor beautifully without making it taste like coffee.
- Nutty Alternative: If you’re not a fan of pistachios, finely chopped almonds or even pecans could be a tasty substitute, though they would alter the traditional cannoli essence a bit.
- Fruit Additions: A very small amount of finely diced dried cherries or apricots could add a lovely chew and tartness if you’re looking to experiment.
- Presentation Matters: To make your squares truly shine, consider garnishing them right before serving. A light dusting of powdered sugar (using a small sieve) gives them a polished look. A few extra mini chocolate chips, a sprinkle of bright green pistachios, or a sliver of candied orange peel on top of each square adds a professional and appealing finish.
- Serving Temperature: These squares are best served chilled, straight from the refrigerator. The cool, creamy texture is part of their charm, especially on a warm day.
- Non-Alcoholic Enhancements: If you sometimes see traditional cannoli recipes call for a splash of Marsala wine, I personally find it unnecessary for the squares, as the orange zest provides plenty of brightness. However, if you wanted to mimic that depth, a tiny splash of non-alcoholic grape juice could be considered, but I truly believe the classic flavors shine on their own here!
Storage
Proper storage is essential to keep your Classic Cannoli Squares fresh, delicious, and safe to eat. Given their dairy-rich filling, refrigeration is key!
- In the Refrigerator: Your cannoli squares must be stored in an airtight container in the refrigerator. This will keep them fresh and prevent them from absorbing other odors from your fridge. They will maintain their best quality for up to 3-4 days. After this time, the crust may start to soften, and the filling might lose a bit of its freshness, though they’ll likely still be edible for a day or two more.
- Freezing (Not Recommended): While technically possible, I generally don’t recommend freezing these cannoli squares. The ricotta-based filling can sometimes develop a grainy or watery texture upon thawing due to changes in the cheese’s structure. The crust can also become very soft and lose its crispness. If you absolutely must freeze them, wrap individual squares tightly in plastic wrap, then place them in an airtight freezer-safe container for up to one month. Thaw overnight in the refrigerator before serving. Be prepared for a slight change in texture.
- Serving Leftovers: Always serve the squares directly from the refrigerator. They are best when thoroughly chilled, both for flavor and food safety. Avoid leaving them at room temperature for extended periods, especially on warm days, as the dairy filling can spoil quickly.
Final Thoughts
And there you have it! My hope is that these Classic Cannoli Squares become a new favorite in your baking repertoire. I truly believe this recipe offers all the beloved flavors of traditional cannoli, but with an approachable and stress-free twist. No need for tricky frying or special equipment – just pure, delicious indulgence in a convenient square form.
I absolutely love how the crispy crust perfectly complements the creamy, sweet filling, making every bite of these Classic Cannoli Squares a delightful experience. Whether you’re a seasoned baker or just starting out, I’m confident you’ll find joy in creating and sharing this unique dessert. They’re truly a must-try for anyone craving that iconic Italian flavor without all the fuss. Enjoy!