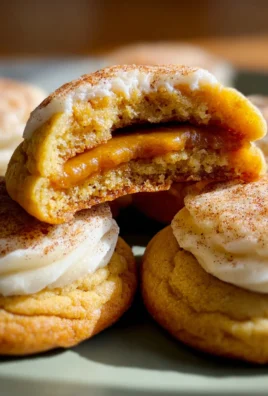
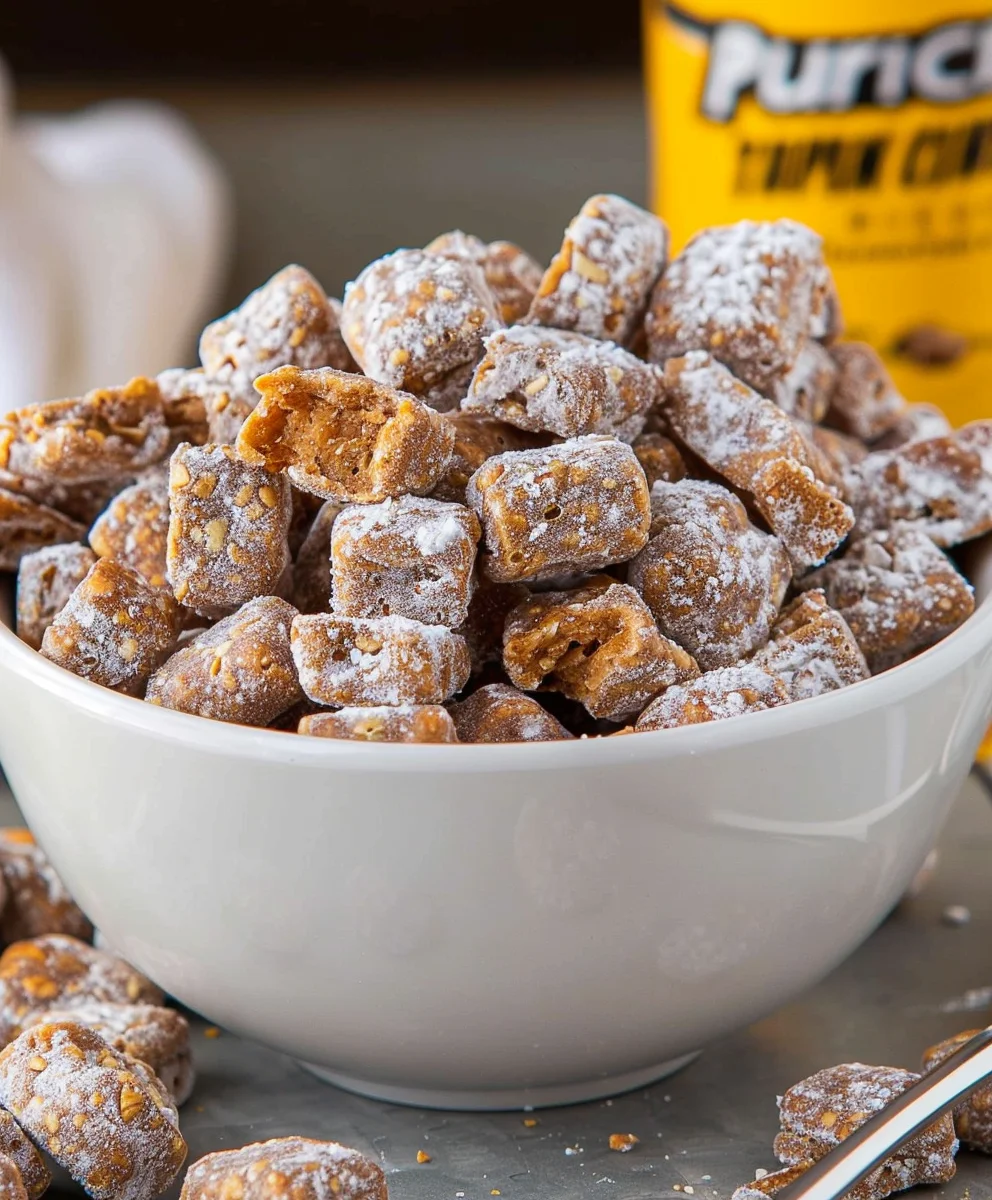
Butterfinger Puppy Chow is not just a snack; it’s an absolute game-changer in the world of sweet treats, bringing a fresh, exciting twist to a beloved classic. I remember the pure joy of making traditional Puppy Chow, often called Muddy Buddies, as a child – a simple yet incredibly satisfying confection that always brought smiles and sticky fingers. This particular iteration, however, takes that cherished nostalgic favorite and elevates it to an entirely new level of deliciousness, blending the familiar comfort with an exciting burst of candy bar magic. The delightful combination of crisp cereal, rich melted chocolate, creamy peanut butter, and now the unmistakable crunch and buttery, peanut-infused flavor of Butterfinger candy bars creates an absolutely irresistible symphony for your taste buds. It’s a testament to how simple ingredients, combined with a touch of ingenuity, can lead to maximum impact and pure culinary bliss. Perfect for potlucks, movie nights, holiday gatherings, or simply satisfying that insistent sweet craving, this no-bake wonder is a guaranteed crowd-pleaser that requires minimal effort for maximum reward. Get ready to discover your new favorite way to enjoy a classic, because this Butterfinger Puppy Chow recipe promises pure delight from the very first bite to the last.

Ingredients:
- 9 cups Chex Cereal (a mix of Rice Chex and Corn Chex works wonderfully, or stick to your favorite single variety. I personally love the slight variation in texture a mix offers!)
- 1 cup creamy peanut butter (the smoother, the better for coating. Avoid chunky peanut butter for this recipe, as the chunks can make it difficult to achieve that signature smooth, even chocolate coating on your Butterfinger Puppy Chow.)
- 1/2 cup (1 stick) unsalted butter (I prefer unsalted so I can control the saltiness myself, but if salted is all you have, just omit the pinch of salt later.)
- 1 cup semi-sweet chocolate chips (good quality chocolate chips will make a noticeable difference in the flavor of your Butterfinger Puppy Chow. You can also use milk chocolate chips if you prefer a sweeter, milder chocolate flavor.)
- 1 teaspoon vanilla extract (pure vanilla extract really enhances all the other flavors, bringing a warmth and depth to the overall profile of this delightful snack.)
- Pinch of salt (just a tiny bit to balance out all the sweetness and make the chocolate and peanut butter flavors really sing.)
- 2 cups powdered sugar (also known as confectioners’ sugar. This is what gives your Butterfinger Puppy Chow its iconic “dusty” appearance and adds an extra layer of sweetness.)
- 10.7 ounces Butterfinger candy bars (approximately 6-8 regular size bars, or 2 large bags of fun-size bars. This is the star ingredient that makes this particular puppy chow so special and gives it that irresistible crunch and unique flavor profile. Make sure they are nice and fresh for the best texture!)
Gathering Your Tools and Setting the Stage for Perfect Butterfinger Puppy Chow
Before we dive into the delicious magic of creating this Butterfinger Puppy Chow, let’s make sure we have all our equipment ready. Having everything at hand will make the process smooth and enjoyable. You’ll need a very large mixing bowl – and I mean really large – one that can comfortably hold 9 cups of cereal with plenty of room to spare for tossing. A sturdy wooden spoon or a heat-resistant rubber spatula will be essential for stirring our warm chocolate mixture. For melting the chocolate, you’ll want a medium microwave-safe bowl. If you prefer the stovetop, a saucepan and a heat-safe bowl for a double boiler setup will be needed. We’ll also require a large resealable plastic bag, preferably a 2-gallon size, or two 1-gallon bags, which is where the magic of coating the cereal in powdered sugar happens. For crushing our Butterfinger candy bars, a rolling pin and another sturdy plastic bag will come in handy. Finally, prepare a few baking sheets lined with parchment paper or wax paper. This provides a non-stick surface for cooling your finished Butterfinger Puppy Chow and makes cleanup a breeze. Trust me, the parchment paper is a lifesaver here!
Melting the Irresistible Chocolate-Peanut Butter Mixture
- First things first, let’s prepare the star coating for our Butterfinger Puppy Chow. In your medium microwave-safe bowl, combine the creamy peanut butter, the unsalted butter (cut into a few pieces to help it melt evenly), and the semi-sweet chocolate chips. I always recommend using a good quality chocolate chip here; it truly makes a difference in the final taste and texture of your treat.
- Now, it’s time to melt these ingredients into a silky-smooth concoction. Place the bowl in the microwave and heat it on high in 30-second intervals. After each interval, take the bowl out and give it a good stir with your wooden spoon or spatula. Stirring is crucial here! It helps distribute the heat evenly, prevents the chocolate from scorching, and ensures everything melts together beautifully. You’re looking for a completely smooth, glossy mixture with no lumps of butter or chocolate remaining. This usually takes about 1.5 to 2 minutes in total, depending on the power of your microwave. Alternatively, if you prefer the stovetop, you can create a double boiler by placing the ingredients in a heat-safe bowl set over a saucepan of simmering water, stirring until smooth. This method offers gentler, more controlled heating, which can be great for preventing any risk of scorching.
- Once your chocolate-peanut butter mixture is perfectly smooth and melted, carefully remove it from the microwave or off the heat. Stir in the vanilla extract and that tiny pinch of salt. The vanilla adds a wonderful aromatic depth, and the salt is a secret weapon that really helps to balance the sweetness and intensify the chocolate and peanut butter flavors. Give it one last good stir to ensure everything is thoroughly combined. The aroma wafting from the bowl right now should be absolutely heavenly!
Coating the Chex Cereal: The Art of Gentle Tossing
- Now for the fun part where our Butterfinger Puppy Chow starts to take shape! Carefully measure out your 9 cups of Chex cereal and place them into your very large mixing bowl. It’s important to use a big bowl so you have ample room to gently toss the cereal without crushing it. This is key to maintaining the delightful crunch of the Chex.
- Pour the warm, melted chocolate-peanut butter mixture evenly over the cereal in the large bowl. Don’t just dump it all in one spot; try to drizzle it over as much surface area as possible. This helps immensely with even coating.
- Now, using your sturdy wooden spoon or rubber spatula, gently fold and stir the cereal until every single piece is coated with that glorious chocolate mixture. This step requires patience and a light touch. Avoid mashing or vigorously stirring, as this can break up the delicate Chex pieces. Think of it as carefully turning the cereal over and over, lifting from the bottom to bring the uncoated pieces to the top. Keep going until you can’t see any dry, uncoated cereal. It might seem like a lot of stirring, but it’s essential for that perfect, uniform coating that defines a great Butterfinger Puppy Chow. This stage can take a few minutes, so be patient and thorough.
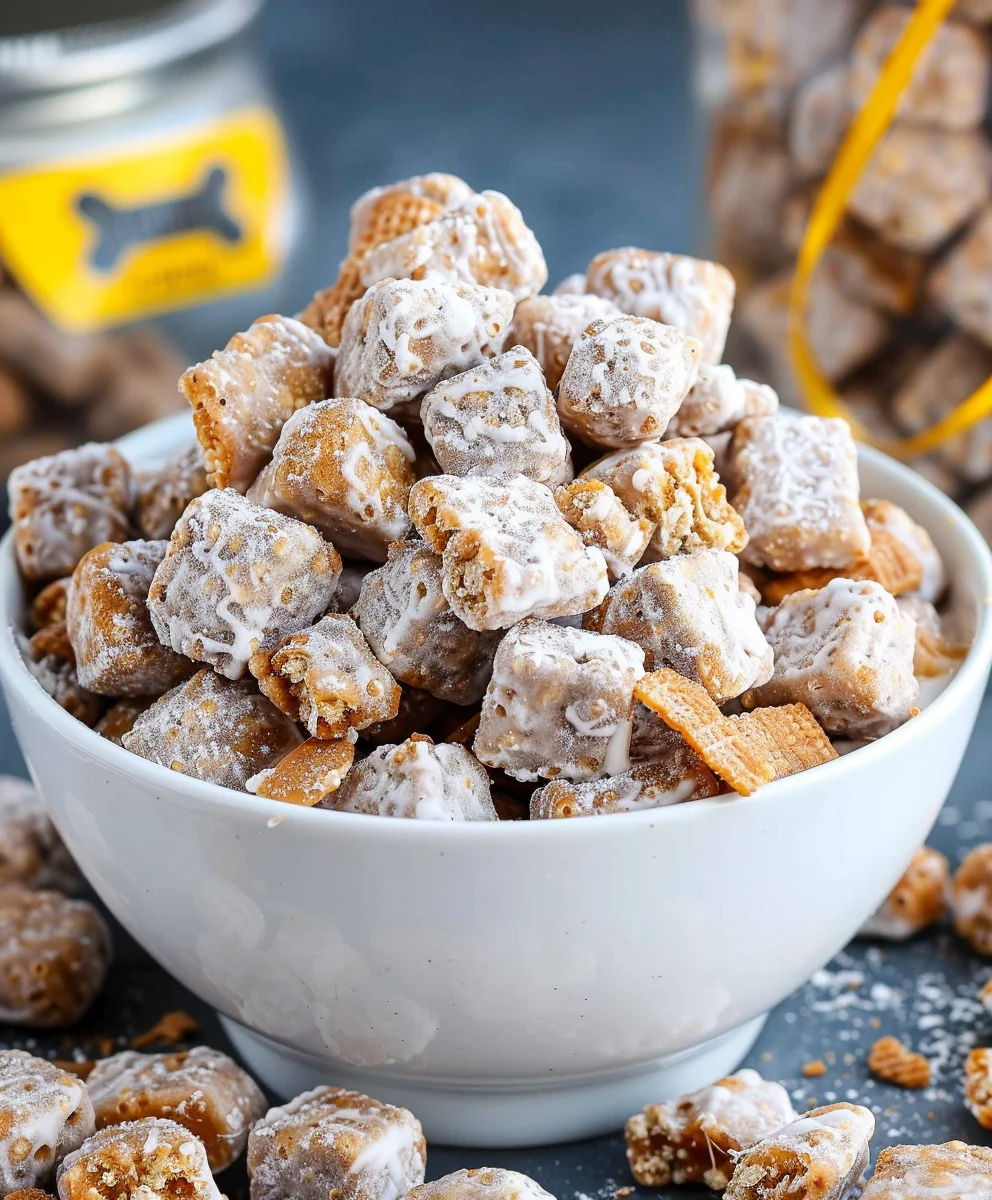
The Signature Powdered Sugar Shake: Giving Our Butterfinger Puppy Chow Its Classic Look
- Once your chocolate-coated cereal is ready, it’s time for the signature puppy chow powdered sugar bath. Carefully transfer the entire batch of coated cereal into your large resealable plastic bag. If you only have 1-gallon bags, you might need to divide the cereal equally between two bags to avoid overcrowding. Overcrowding can lead to uneven coating and can make it harder to shake effectively.
- Add the 2 cups of powdered sugar into the bag with the cereal. I like to sift the powdered sugar beforehand if it looks clumpy, but it’s not strictly necessary as the shaking motion will help break up most lumps.
- Seal the bag tightly, making sure to remove as much air as possible to create a good “shaking” environment. Now for the fun! Shake, shake, shake! Gently but firmly shake the bag, tossing the cereal around within the powdered sugar. You want to ensure every single piece of chocolate-coated cereal gets thoroughly dusted. Continue shaking for several minutes, flipping the bag, rolling it, and gently agitating it until the cereal is completely covered in a beautiful, even layer of powdered sugar. There shouldn’t be any sticky, shiny spots left. This creates that characteristic “puppy chow” or “muddy buddies” look that everyone loves. Feel free to peek inside the bag to check your progress and redistribute the contents if needed. This step is incredibly satisfying!
Crushing and Incorporating the Butterfinger Goodness
- While your powdered sugar-coated cereal is setting slightly, let’s prepare our special Butterfinger candy bars. Unwrap all your Butterfinger bars and place them into a separate sturdy resealable plastic bag. You want to crush them into small, irregular pieces – not a fine powder, but definitely small enough to be easily mixed in and enjoyed in each bite of our Butterfinger Puppy Chow. I find that using a rolling pin is the most effective and therapeutic way to do this. Simply lay the bag on a sturdy surface and gently but firmly roll over the candy bars until they are broken into your desired size. You can also give them a few whacks with a meat tenderizer or the bottom of a heavy pan. If you have a food processor, a few quick pulses will also do the trick, but be careful not to over-process and turn them into dust!
- Once the cereal is beautifully coated with powdered sugar, open the bag and pour the crushed Butterfinger pieces directly into it. Reseal the bag, again trying to remove most of the air.
- Gently shake the bag once more, but this time with a lighter hand. The goal here is not to coat the Butterfingers with powdered sugar, but to evenly distribute them throughout the puppy chow. You want those vibrant orange bits of Butterfinger to stand out. Shake just enough so that the candy pieces are thoroughly mixed in with the cereal, creating a delightful blend of textures and flavors in every handful.
Cooling, Serving, and Storing Your Amazing Butterfinger Puppy Chow
- After your Butterfinger Puppy Chow is perfectly mixed with its special candy additions, carefully pour the entire batch out onto your prepared baking sheets lined with parchment or wax paper. Spread it out into a single layer. This allows the puppy chow to cool completely and for the chocolate coating to firm up. You can let it cool at room temperature, which usually takes about 15-30 minutes, or you can speed up the process by placing the baking sheets in the refrigerator for about 10-15 minutes. Cooling is important because it prevents the puppy chow from sticking together too much and helps maintain that satisfying crunch.
- Once cooled and set, your delightful Butterfinger Puppy Chow is ready to be devoured! You can serve it immediately in a large bowl, letting everyone dig in. This makes a fantastic snack for parties, movie nights, or just a treat to enjoy at home. It’s always a crowd-pleaser and disappears quickly, so be prepared to make a double batch if you’re serving a larger group!
- To store any leftovers (if there are any!), transfer the Butterfinger Puppy Chow to an airtight container. It will keep well at room temperature for up to a week. For an even longer shelf life, you can store it in the refrigerator for up to two weeks, though the texture might become a little firmer. I find that keeping it in the fridge can actually enhance the crunchiness of the Chex and the Butterfinger pieces, which is a bonus in my book! Just make sure the container is truly airtight to prevent it from getting stale. Enjoy every crunchy, peanut buttery, chocolatey, and Butterfinger-filled bite!
Conclusion:
Well, friends, we’ve reached the end of our delightful journey, and I genuinely hope you’re feeling as excited as I am about this incredible recipe. If there’s one snack you absolutely have to add to your repertoire, this is it. It’s more than just a sweet treat; it’s an experience. The irresistible combination of crispy cereal, rich chocolate, creamy peanut butter, and those glorious, crunchy bits of Butterfinger candy creates a symphony of textures and flavors that is truly unmatched. This isn’t just any snack; it’s the ultimate party pleaser, a delightful treat that will disappear faster than you can say its full name: Butterfinger Puppy Chow. What makes it a true champion in my kitchen, and soon to be in yours, is not just its phenomenal taste, but also its incredible simplicity. Seriously, you don’t need to be a culinary wizard to whip up a batch of this magic. It’s a foolproof recipe perfect for a quick indulgence, a last-minute party contribution, or simply to satisfy that insistent sweet craving that creeps up on all of us.
I’ve lost count of the times I’ve brought a bowl of this to a gathering and watched, delighted, as it vanished completely within minutes. People always ask for the recipe, and their eyes light up when they realize how easy it is to recreate that unique blend of salty-sweet goodness with that satisfying candy crunch. It’s the kind of snack that sparks joy, evokes nostalgia, and brings smiles to faces young and old. The initial bite offers a delightful sweetness, quickly followed by the familiar warmth of peanut butter, all culminating in that distinct, buttery, crunchy caramel and peanut flavor from the Butterfinger pieces. It’s a sensory explosion that keeps you reaching for just one more handful, and then another, until you suddenly realize the bowl is empty. Trust me when I say, this recipe is a game-changer for anyone looking for a crowd-pleasing snack that consistently delivers on flavor and fun without demanding hours in the kitchen.
Serving Suggestions and Creative Twists
Now that you’re convinced (I hope!) to try this marvelous creation, let’s talk about how to make the most of it. While a big bowl on the counter is always a welcome sight, there are so many ways to enjoy your homemade Puppy Chow. For parties, I love dividing it into small, individual decorative paper cups or cellophane bags; it makes for easy grabbing and less communal dipping. It also works wonderfully as a unique topping for vanilla ice cream, adding a delightful crunch and an extra layer of chocolate-peanut butter bliss to a simple dessert. Imagine sprinkling it over a yogurt parfait for a surprising breakfast treat, or even packing small portions in lunchboxes for a special mid-day pick-me-up. But don’t stop there with the imagination! This recipe is also incredibly versatile, lending itself beautifully to a myriad of variations. Feel free to experiment with different types of chocolate – dark chocolate for a richer, less sweet profile, or even white chocolate for a creamier, milder flavor. You could swap out the Butterfinger for other candy bar favorites like chopped Reese’s Peanut Butter Cups for an even more intense peanut butter hit, or M&M’s for a burst of colorful chocolate. A sprinkle of sea salt after coating adds a fantastic savory counterpoint, enhancing all those sweet flavors. For an extra textural dimension, consider adding crushed pretzels for a salty crunch, or perhaps mini marshmallows for a chewy element. The possibilities are truly endless, allowing you to tailor this treat precisely to your taste.
Your Turn: Make It, Share It, Love It!
So, what are you waiting for? I wholeheartedly encourage you to roll up your sleeves, gather your ingredients, and dive into making this incredible snack. You’ll be amazed at how quickly and effortlessly it comes together, and even more impressed by the rave reviews it’s bound to receive. This recipe isn’t just about following steps; it’s about creating moments of joy, whether you’re sharing it with loved ones, gifting it to a friend, or simply treating yourself to a well-deserved indulgence. I genuinely believe that food tastes better when shared, and I would absolutely love to hear about your adventures in making this Puppy Chow. Did you try a fun variation? Did it disappear in record time at your gathering? What was your favorite part of the recipe? Please, don’t be shy! Share your experiences, your successes, and even your creative twists in the comments below. Your feedback and stories inspire me and enrich our shared culinary journey. Go forth and create some delicious memories! Happy snacking, my friends!
Irresistible Butterfinger Puppy Chow
Butterfinger Puppy Chow is an absolute game-changer in the world of sweet treats, bringing a fresh, exciting twist to a beloved classic. This iteration takes that cherished nostalgic favorite and elevates it to an entirely new level of deliciousness, blending familiar comfort with an exciting burst of candy bar magic.
Ingredients
-
7 cups Rice Chex Cereal
-
1 cup semi-sweet chocolate chips
-
½ cup creamy peanut butter
-
¼ cup salted butter
-
1 teaspoon pure vanilla extract
-
18 fun size Butterfinger candy bars (15 crushed, 3 roughly chopped for garnish)
-
1 ¼ cups powdered sugar, sifted
Instructions
- Step 1
In a microwave-safe bowl, combine peanut butter, butter, and chocolate chips. Microwave in 30-second intervals, stirring after each, until smooth. Stir in vanilla extract. - Step 2
Place 7 cups Rice Chex cereal in a very large mixing bowl. Pour melted chocolate mixture over cereal and gently fold until evenly coated. - Step 3
Transfer coated cereal to a large resealable bag. Add 1 ¼ cups sifted powdered sugar. Seal and shake gently but firmly until cereal is fully dusted. - Step 4
Crush 15 fun size Butterfinger bars. Add to the bag with the cereal. Reseal and gently shake to distribute candy pieces evenly throughout the puppy chow. - Step 5
Spread puppy chow onto parchment-lined baking sheets to cool completely (15-30 minutes). Garnish with 3 roughly chopped Butterfinger bars if desired. Serve immediately or store in an airtight container at room temperature for up to 1 week, or in the refrigerator for up to 2 weeks.
Important Information
Nutrition Facts (Per Serving)
It is important to consider this information as approximate and not to use it as definitive health advice.
Allergy Information
Please check ingredients for potential allergens and consult a health professional if in doubt.