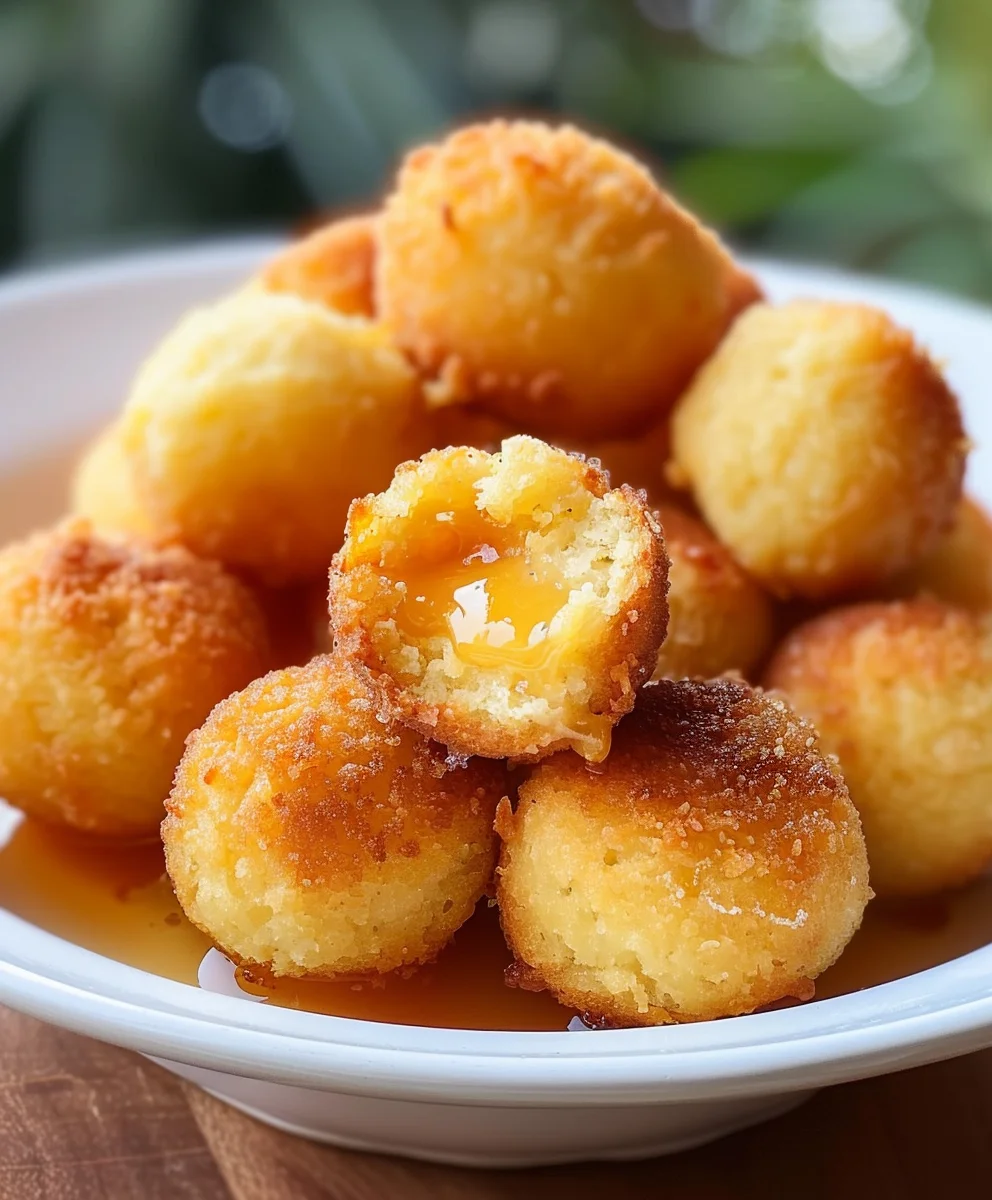
Honey Butter Cornbread Poppers are about to become your new favorite obsession, transforming a classic comfort food into an irresistible, bite-sized delight. Imagine sinking your teeth into a perfectly golden, mini cornbread nugget, boasting a tender, moist crumb that’s wonderfully infused with the delicate sweetness of honey and the rich, comforting creaminess of butter. It’s a culinary experience that elevates the humble cornbread to an extraordinary treat!
Cornbread itself carries a profound history, deeply woven into the fabric of American Southern cooking, evolving from a simple, hearty staple to a beloved comfort food passed down through generations. While traditional cornbread often serves as a sturdy accompaniment, these delightful poppers transform it into a whimsical, pop-in-your-mouth sensation, perfect for any occasion.
Why do people absolutely adore these Honey Butter Cornbread Poppers?
Beyond their undeniable deliciousness, it’s their incredible versatility and convenience. They offer that iconic sweet and savory flavor profile, with a satisfyingly soft interior and lightly crisp edges, making them a fantastic side for chili, a barbecue spread, or even a standalone snack. I guarantee you’ll find yourself reaching for ‘just one more’ repeatedly. They are simply irresistible!

Ingredients:
- For the Cornbread Poppers:
- 1 ½ cups (180g) all-purpose flour
- 1 cup (160g) yellow cornmeal (medium grind is my preference for a nice texture!)
- ½ cup (100g) granulated sugar
- 1 tablespoon baking powder
- ½ teaspoon baking soda
- ½ teaspoon salt
- 1 cup (240ml) buttermilk, at room temperature (if you don’t have buttermilk, you can make your own by adding 1 tablespoon of white vinegar or lemon juice to regular milk and letting it sit for 5 minutes)
- ½ cup (120ml) whole milk, at room temperature
- 2 large eggs, at room temperature, lightly beaten
- ¼ cup (60ml) unsalted butter, melted and slightly cooled, plus extra for greasing the pans
- For the Honey Butter Glaze:
- ½ cup (113g) unsalted butter, melted
- ¼ cup (60ml) honey (local honey is always a fantastic choice if you can get it!)
- ½ teaspoon vanilla extract
- Pinch of salt
Preparing the Dry Ingredients:
1. First things first, let’s get our oven preheating. You’ll want it nice and hot for these delicious Honey Butter Cornbread Poppers! Set your oven to 400°F (200°C). This higher temperature helps create that beautiful golden crust we’re aiming for.
2. Next, prepare your mini muffin tins. For truly non-stick results, I like to spray them generously with a non-stick cooking spray, and then, for extra insurance, lightly dust them with flour. This prevents any sticking and ensures your cornbread poppers pop right out effortlessly. You could also use mini paper liners, but for that classic cornbread texture on the outside, baking directly in the greased tin is my top recommendation.
3. In a large mixing bowl, we’re going to combine all of our dry ingredients. This step is super important for an even bake. Grab your all-purpose flour, yellow cornmeal, granulated sugar, baking powder, baking soda, and salt.
4. Using a whisk, gently combine these dry ingredients. You want to make sure everything is thoroughly incorporated, with no lumps of baking powder or clumps of sugar. Whisking ensures that the leavening agents (baking powder and baking soda) are evenly distributed, which is key for a consistent rise and tender texture in your finished Honey Butter Cornbread Poppers. Spend a good minute or two on this, really making sure it’s all uniform. This little effort here makes a big difference in the final product!
Preparing the Wet Ingredients:
5. Now, in a separate medium-sized bowl, it’s time to bring our wet ingredients together. This segregation helps prevent overmixing when everything finally comes together. Pour in your room temperature buttermilk and whole milk.
6. Add the two lightly beaten eggs. Using room temperature dairy and eggs is a trick that professional bakers swear by! It allows the ingredients to combine more smoothly and creates a more emulsified batter, leading to a lighter, more tender crumb in your cornbread poppers. If your eggs or milk are cold, you can quickly warm them by placing the eggs in a bowl of warm water for 5-10 minutes, and the milk in the microwave for 10-15 seconds.
7. Finally, pour in the melted and slightly cooled unsalted butter. It’s crucial that the butter isn’t piping hot when you add it to the eggs, as you don’t want to scramble them! Just let it cool down for a few minutes after melting until it’s warm to the touch, not hot. Give this mixture a good whisk until everything is well combined and looks smooth.
Why room temperature ingredients are essential:
When dairy and eggs are at room temperature, they form an emulsion more easily with the melted butter. This emulsion traps air, which contributes to the fluffiness of your cornbread. Cold ingredients, on the other hand, can cause the butter to solidify, leading to a lumpy batter and a denser, less tender end product. So, a little planning ahead here pays off big time in the texture of your Honey Butter Cornbread Poppers!
Combining and Mixing the Batter:
8. Now for the exciting part – bringing it all together! Make a well in the center of your dry ingredients using your whisk or a spoon.
9. Pour the entire wet ingredient mixture into the well of the dry ingredients.
10. Using a rubber spatula or a large spoon, begin to gently fold the wet ingredients into the dry. The key here is to mix just until combined. This is perhaps the most important instruction for achieving perfectly tender cornbread. You’ll see some lumps, and that’s perfectly okay – in fact, it’s desirable! Overmixing develops the gluten in the flour, which will result in tough, chewy cornbread instead of the light, fluffy texture we’re after for our Honey Butter Cornbread Poppers. As soon as you no longer see streaks of dry flour, stop mixing. A few small lumps are a sign of a well-mixed batter.
Understanding the “Just Combined” Rule:
When baking, especially with quick breads like cornbread, overmixing is the enemy of tenderness. The flour contains gluten proteins which, when hydrated and agitated, form an elastic network. While this is great for chewy breads like sourdough, for a delicate treat like cornbread poppers, we want to minimize gluten development. So, resist the urge to keep mixing until the batter is perfectly smooth. Trust me on this one; a slightly lumpy batter makes for a wonderfully soft and tender bite!
Baking the Honey Butter Cornbread Poppers:
11. With your perfectly mixed batter ready, it’s time to fill those prepared mini muffin tins. I find using a small cookie scoop (about 1.5 tablespoons capacity) or two spoons works best for this. Fill each mini muffin cup about two-thirds full. Remember, these little guys are going to rise, so don’t overfill them, or they might spill over and lose their adorable popper shape. This recipe should yield approximately 36-40 mini cornbread poppers, depending on how full you fill each cup.
12. Carefully transfer the filled muffin tins to your preheated 400°F (200°C) oven.
13. Bake for 10-14 minutes. Baking time can vary slightly depending on your oven, so keep an eye on them. You’re looking for the poppers to be beautifully golden brown around the edges and on top. To test for doneness, you can gently press the top of a popper – it should spring back. Alternatively, insert a wooden skewer or toothpick into the center of one; if it comes out clean, they are perfectly baked.
14. Once baked to perfection, remove the tins from the oven. Let the Honey Butter Cornbread Poppers cool in the tins for about 5 minutes. This cooling period is important because it allows them to firm up slightly, making them easier to remove without breaking.
15. After 5 minutes, carefully invert the muffin tin over a wire rack or use a small offset spatula to gently remove each popper. Transfer them to the wire rack to cool completely, or at least until they are just warm, as we’ll be glazing them shortly!
Making the Honey Butter Glaze:
16. While your cornbread poppers are baking or cooling, let’s whip up that irresistible honey butter glaze. This glaze is what truly elevates these from simple cornbread bites to sensational Honey Butter Cornbread Poppers!
17. In a small saucepan, gently melt the ½ cup of unsalted butter over low heat. You don’t want to brown the butter, just melt it until it’s completely liquid.
18. Once melted, remove the saucepan from the heat. Stir in the ¼ cup of honey. I adore using a local wildflower honey for this; the nuances of its flavor really shine through.
19. Add the ½ teaspoon of vanilla extract and a tiny pinch of salt. The vanilla adds a lovely warmth and depth, while the salt balances the sweetness of the honey, making the flavors pop even more. Whisk everything together until it’s thoroughly combined and smooth. Keep this glaze warm, as it will be much easier to apply to the poppers. If it starts to cool and thicken, you can gently reheat it over very low heat for a few seconds.
The Magic of Honey Butter:
Honey butter is a classic companion to cornbread for a reason. The sweetness of the honey perfectly complements the savory, slightly gritty texture of the cornmeal, while the richness of the butter adds an unparalleled moistness and flavor. When applied to warm cornbread, it soaks in just enough to infuse every bite with its deliciousness without making the popper soggy. It’s truly a match made in culinary heaven!
Glazing and Finishing the Poppers:
20. Now for the grand finale! Once your Honey Butter Cornbread Poppers are either warm or fully cooled on the wire rack, it’s time to glaze them. You have a couple of options here, depending on how much glaze you want on each popper.
21. Method 1: Brushing (my preferred method for a lighter, even coat). Place your wire rack with the poppers over a baking sheet (to catch any drips – cleanup will thank you!). Using a pastry brush, gently brush the warm honey butter glaze over the tops and sides of each cornbread popper. You can do one generous coat, or for extra decadence, let the first coat set for a minute and then apply a second. This method gives you excellent control and a beautiful sheen.
22. Method 2: Dipping (for maximum glaze!). If you prefer a more heavily coated, intensely flavored popper, you can gently dip each warm cornbread popper into the bowl of warm honey butter glaze. Ensure you let any excess drip off before returning it to the wire rack. Be gentle, as warm cornbread can be delicate!
23. Allow the glazed Honey Butter Cornbread Poppers to rest on the wire rack for a few minutes to let the glaze set slightly. This also allows the flavors to truly meld and penetrate the cornbread. The aroma in your kitchen right now will be absolutely intoxicating!
Serving Your Irresistible Honey Butter Cornbread Poppers:
These poppers are best enjoyed warm, shortly after glazing. They are an incredibly versatile treat!
- Serve them as a delightful side dish with chili, stews, or barbecue.
- They make an amazing addition to a brunch spread.
- Pack them in lunchboxes for a sweet and savory surprise.
- And of course, they are perfect on their own as a sweet snack or a comforting dessert with a cup of coffee or tea.
Storage: If you happen to have any leftovers (which I highly doubt!), store your Honey Butter Cornbread Poppers in an airtight container at room temperature for up to 2-3 days. While they are best fresh, a quick zap in the microwave for 10-15 seconds can bring them back to a wonderfully warm and tender state.
Tips for Perfect Honey Butter Cornbread Poppers:
24. Don’t Substitute Cornmeal: For true cornbread flavor and texture, stick with yellow cornmeal. Polenta is too coarse, and cornstarch is not the same thing at all. A medium grind cornmeal offers the best balance of texture – not too gritty, not too fine.
25. The Buttermilk Secret: Buttermilk is essential here. Its acidity reacts with the baking soda to create a light and tender crumb. If you don’t have it, remember my trick: 1 tablespoon of white vinegar or lemon juice mixed with regular milk, allowed to sit for 5 minutes. The slight tang it imparts also adds another layer of flavor that complements the sweetness of the honey butter beautifully.
26. Muffin Tin Maintenance: Always grease and flour your muffin tins thoroughly, especially for mini muffins. The extra surface area of smaller muffins means more potential for sticking. A well-greased tin is your best friend for easy release.
27. Customize Your Glaze: Feel free to experiment with the honey butter glaze! A tiny pinch of cinnamon or nutmeg could add a lovely autumnal twist. Or, if you’re feeling adventurous, a very small splash of bourbon could give it an adult kick.
28. Batch Baking: These Honey Butter Cornbread Poppers freeze surprisingly well! Once they are completely cooled and the glaze has set, you can freeze them in a single layer on a baking sheet until solid, then transfer them to a freezer-safe bag or container for up to 2 months. Thaw at room temperature or warm gently in the microwave or oven.
I truly hope you enjoy making and devouring these delightful Honey Butter Cornbread Poppers as much as I do. They are such a comforting and satisfying treat, perfect for any occasion!
Conclusion:
And there you have it, my friends! We’ve reached the delicious culmination of our culinary journey. I genuinely believe that these aren’t just any cornbread bites; they are the ultimate expression of comfort and flavor, perfectly portioned and utterly irresistible. The magic truly lies in that golden, slightly crisp exterior giving way to a tender, fluffy interior, all kissed by the sweet, savory, and incredibly fragrant honey butter glaze. It’s a symphony of textures and tastes that elevates a simple side dish into a star player at any meal or gathering. I promise you, the moment you pull these beauties from the oven, golden brown and glistening, the aroma alone will have everyone asking for more. They’re a testament to how humble ingredients, with a little love and a perfect glaze, can create something truly extraordinary. These Honey Butter Cornbread Poppers are more than just a recipe; they are an experience, a delightful bite-sized piece of heaven that you’ll want to make again and again.
Serving Suggestions to Savor Every Bite:
One of the many reasons I adore these poppers is their incredible versatility. They are not merely relegated to being a side dish; they can shine in so many different roles! Naturally, they are an absolute dream alongside hearty stews, a steaming bowl of chili, or a plate of smoky BBQ pulled pork. The sweet and savory notes cut through richness beautifully. Imagine them perched next to a perfectly roasted chicken or a rustic pot roast – pure comfort food perfection. But don’t stop there! For breakfast or brunch, they can be an unexpected and delightful addition, served alongside scrambled eggs, crispy bacon, and a fresh fruit salad. They also make for a fantastic, easy-to-handle appetizer at parties; just arrange them on a platter, and watch them disappear. I sometimes even enjoy them as a standalone snack with a cup of coffee or tea, especially on a cozy afternoon. The individual portions make them incredibly convenient for sharing, or, let’s be honest, for keeping all to yourself!
Exciting Variations to Experiment With:
While the classic recipe for these Honey Butter Cornbread Poppers is perfection in itself, I always encourage you to get creative in the kitchen. There are so many ways to customize these little gems to suit your preferences! If you’re a fan of a little heat, try folding in a couple of tablespoons of finely diced pickled jalapeños (seeded, if you prefer less heat) into the batter before baking. The spicy kick with the sweet glaze is an absolute winner. For a cheesy twist, half a cup of shredded sharp cheddar cheese mixed into the batter adds a wonderful savory depth. You could also experiment with different herbs in your honey butter glaze; a pinch of dried thyme or a hint of rosemary could add an intriguing herbaceous note. For those with a sweet tooth looking for an extra layer of sweetness, a tiny drizzle of maple syrup over the warm poppers before serving is simply divine. Or, consider incorporating a handful of fresh corn kernels into the batter for an added burst of sweetness and texture. Don’t be afraid to make them your own!
Now, it’s your turn! I’ve shared my secrets, my tips, and my enthusiasm for these truly exceptional treats. My hope is that you’re feeling inspired to roll up your sleeves and get baking. Don’t just dream about that golden, honey-kissed perfection; go make it a reality in your own kitchen! I’m genuinely excited for you to experience the warmth, the flavor, and the sheer joy that comes from making and sharing something so utterly delicious. Once you’ve whipped up your batch of Honey Butter Cornbread Poppers, I would absolutely love to hear all about it. Did you try a fun variation? What did you serve them with? Did they vanish as quickly in your home as they do in mine? Please, share your experiences, your photos, and your feedback. Let’s celebrate the joy of home cooking together. Happy baking, my friends!

Honey Butter Cornbread Poppers
Transform classic cornbread into irresistible, bite-sized poppers with a tender, moist crumb infused with sweet honey and rich butter. Perfect as a side, snack, or brunch treat.
Ingredients
-
1 cup yellow cornmeal
-
1 cup all-purpose flour
-
1/4 cup granulated sugar
-
1 tablespoon baking powder
-
1/2 teaspoon salt
-
1 cup buttermilk
-
2 large eggs
-
1/4 cup unsalted butter, melted (for batter)
-
1/4 cup unsalted butter, melted (for glaze)
-
1/4 cup honey
Instructions
-
Step 1
Preheat oven to 400°F (200°C). Generously grease and lightly flour mini muffin tins. -
Step 2
In a large bowl, whisk together 1 cup all-purpose flour, 1 cup yellow cornmeal, 1/4 cup granulated sugar, 1 tablespoon baking powder, and 1/2 teaspoon salt until well combined. -
Step 3
In a separate medium bowl, whisk together 1 cup room temperature buttermilk, 2 lightly beaten room temperature large eggs, and 1/4 cup melted, slightly cooled unsalted butter (for batter) until smooth. -
Step 4
Pour the wet ingredients into the well of the dry ingredients. Gently fold with a rubber spatula just until combined. Do not overmix; a few lumps are desired for tender cornbread. -
Step 5
Fill each mini muffin cup about two-thirds full. Bake for 10-14 minutes, or until golden brown. Let cool in tins for 5 minutes, then transfer to a wire rack. -
Step 6
While poppers cool, melt 1/4 cup unsalted butter (for glaze) in a small saucepan over low heat. Remove from heat, then stir in 1/4 cup honey. Whisk until smooth and keep warm. -
Step 7
Brush or dip warm cornbread poppers in the honey butter glaze. Let set on a wire rack for a few minutes. Serve warm. Store leftovers in an airtight container at room temperature for up to 3 days.
Important Information
Nutrition Facts (Per Serving)
It is important to consider this information as approximate and not to use it as definitive health advice.
Allergy Information
Please check ingredients for potential allergens and consult a health professional if in doubt.