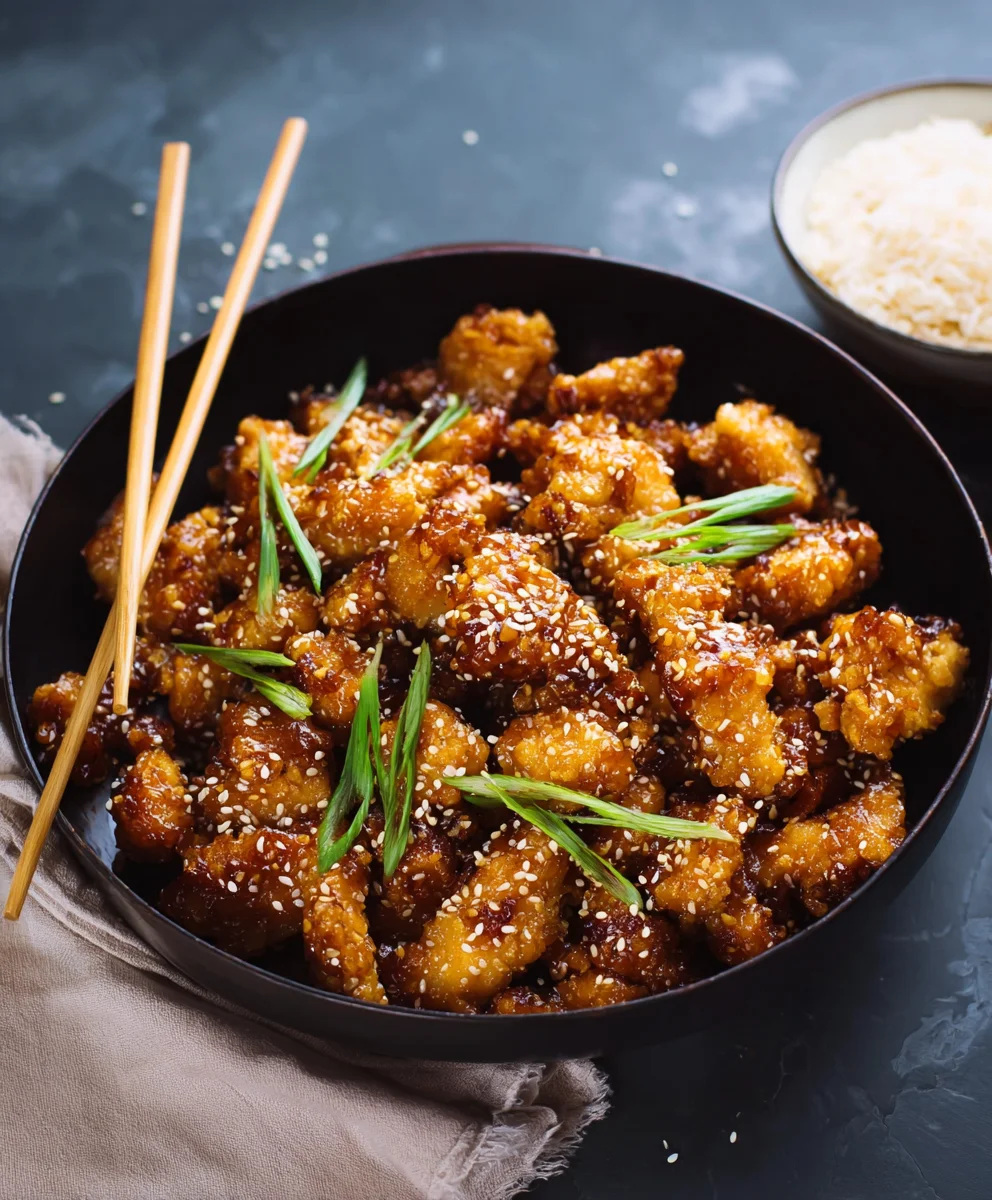
Crispy Sesame Chicken is more than just a dish; it’s a culinary experience that brings the excitement of your favorite takeout right into your kitchen, elevated to homemade perfection. Imagine sinking your teeth into succulent pieces of chicken, each bite offering an incredible crunch, followed by tender, juicy meat, all enveloped in a rich, glossy, sweet, and savory sesame sauce. It’s a symphony of textures and flavors that consistently tops the list of comfort foods for countless families.
A Beloved Classic, Reimagined at Home
While its roots lie in adapting traditional Chinese cooking for American tastes, this dish has undeniably carved its own niche as a beloved staple of American Chinese cuisine. I often find myself craving that perfect balance—the nutty aroma of toasted sesame, the zing of fresh ginger, and the undeniable satisfaction of a perfectly golden, crispy exterior. It’s this remarkable combination that makes Crispy Sesame Chicken an absolute star, transforming an ordinary weeknight dinner into something truly special. Get ready to discover how simple it can be to achieve restaurant-quality results at home, dazzling your taste buds with every delightful mouthful.

Ingredients:
- For the Chicken:
- 2 lbs boneless, skinless chicken thighs (my personal preference for their juiciness and flavor, but boneless, skinless chicken breasts cut into similar pieces work wonderfully too if you prefer a leaner option), cut into uniform 1-inch bite-sized pieces.
- For the Marinade:
- 2 tablespoons light soy sauce (or tamari for a gluten-free option)
- 1 tablespoon rice vinegar (ensure it’s unseasoned for best flavor balance)
- 1 tablespoon fresh ginger, peeled and finely grated (about a 1-inch piece)
- 2 cloves garlic, minced (fresh is always best for maximum aromatic impact)
- 1 teaspoon toasted sesame oil (for a foundational nutty aroma)
- 1 large egg, whisked (acts as a crucial binder for our coating)
- 2 tablespoons cornstarch (key for tenderizing and initial crispiness)
- For the Crispy Coating:
- 1 cup all-purpose flour (plain flour will do the trick)
- ½ cup cornstarch (the secret weapon for an extra-crispy exterior)
- 1 teaspoon baking powder (adds a lovely lightness and aeration to the crust)
- ½ teaspoon salt (enhances all the flavors)
- ¼ teaspoon black pepper (freshly ground, if possible, for a bit of warmth)
- About 4-6 cups neutral oil for deep frying (vegetable, canola, or peanut oil are excellent choices, offering a high smoke point and mild flavor, crucial for achieving the perfect crispy texture for your Crispy Sesame Chicken).
- For the Sesame Sauce:
- ½ cup light soy sauce
- ½ cup honey (for a touch of natural sweetness and a beautiful glaze)
- ¼ cup brown sugar, packed (adds a deeper, molasses-rich sweetness)
- ¼ cup rice vinegar (again, unseasoned, to provide that essential tangy counterpoint)
- 2 tablespoons toasted sesame oil (don’t skimp here, it’s a star flavor!)
- 1 tablespoon fresh ginger, peeled and finely grated
- 4 cloves garlic, minced
- ½ cup water or chicken broth (to thin the sauce to the right consistency)
- 2 tablespoons cornstarch (for the slurry)
- 4 tablespoons cold water (for the slurry)
- 3 tablespoons toasted sesame seeds (plus more for garnish, these are integral to the dish’s namesake flavor)
- For Garnish (Optional but Recommended):
- 2-3 green onions, thinly sliced (for freshness and a pop of color)
- Extra toasted sesame seeds (for an appealing finish and added texture)
Preparing the Chicken:
- Prepare the Chicken: Our journey to incredible Crispy Sesame Chicken begins with careful chicken preparation. Take your boneless, skinless chicken thighs (or breasts) and pat them absolutely dry with paper towels. This step might seem minor, but it’s tremendously important for ensuring your coating adheres properly and crisps up beautifully, preventing any sogginess. Once dry, proceed to cut the chicken into uniform 1-inch bite-sized pieces. Aim for consistency here; uniform pieces will cook at the same rate, guaranteeing that every bite of your Crispy Sesame Chicken is perfectly tender inside and delightfully crisp outside. Place all these precisely cut pieces into a large, sturdy mixing bowl, ready for their flavor infusion.
- Marinate the Chicken for Depth: Now it’s time to build the foundational flavors for our Crispy Sesame Chicken. To the bowl containing your chicken pieces, pour in the marinade ingredients: 2 tablespoons of light soy sauce, which provides that essential umami depth and a savory base; 1 tablespoon of unseasoned rice vinegar, offering a subtle tang that balances the richness; 1 tablespoon of freshly grated ginger, imparting a warm, zesty aroma and flavor; and 2 cloves of freshly minced garlic, for its pungent and aromatic qualities. Next, drizzle in 1 teaspoon of toasted sesame oil, which immediately introduces a wonderful, nutty fragrance that is integral to the entire dish. Then, whisk in one large egg; this acts as a crucial binder, helping our crispy coating stick to the chicken like a dream. Finally, add 2 tablespoons of cornstarch – this ingredient is a multi-tasker, not only tenderizing the chicken but also playing a significant role in achieving that sought-after crispy texture. Mix everything thoroughly with a spoon or your hands until each and every piece of chicken is completely and evenly coated in this flavorful concoction. Cover the bowl securely and transfer it to the refrigerator. Allow the chicken to marinate for a minimum of 30 minutes. If you have the luxury of time, letting it marinate for up to 2 hours, or even overnight, will reward you with even deeper flavors and more tender chicken, setting the stage for the most exquisite Crispy Sesame Chicken you’ve ever tasted.
Making the Crispy Coating:
- Prepare the Dry Dredge: While your chicken is patiently soaking up all those delicious marinade flavors, let’s prepare the magic mixture that will transform it into truly Crispy Sesame Chicken. In a large, shallow dish or a wide, sturdy bowl (something that provides ample space for tossing), combine the dry coating ingredients: 1 cup of all-purpose flour, ½ cup of cornstarch (this is a key player for that extra-crisp texture!), 1 teaspoon of baking powder (which helps create an airy, light, and almost puffy crunch), ½ teaspoon of salt to season the coating itself, and ¼ teaspoon of freshly ground black pepper for a touch of subtle spice. Using a whisk, thoroughly combine these dry ingredients. It’s important to ensure they are uniformly mixed so that every part of your chicken receives an even distribution of this fantastic crispy blend. This well-balanced dry dredge is half the battle won in creating the perfect exterior for your Crispy Sesame Chicken.
- Dredge the Chicken for Maximum Crispiness: Remove your marinated chicken from the refrigerator, where it has been tenderizing and soaking up flavor. Now comes the critical step of coating each piece for ultimate crispiness. Take one piece of marinated chicken at a time, allowing any significant excess marinade to drip off, but don’t worry if it’s still a bit wet – that moisture is what helps our dry coating adhere so effectively. Carefully place the chicken piece directly into the dry dredge mixture. Using your hands, tongs, or a fork, toss and press each chicken piece firmly into the flour mixture, ensuring it is completely and thoroughly coated on all sides. For an absolutely phenomenal, restaurant-quality Crispy Sesame Chicken, I cannot stress enough the benefits of a double-dredge technique. After the first thorough coating, gently shake off any excess flour, then briefly return the chicken piece to the marinade bowl for a very quick, light re-dip (the marinade will be slightly thinner now, which is perfect for this purpose). Immediately after this second dip, return the chicken to the dry mixture for a second, equally thorough coating. This double layer is a game-changer; it creates an incredible amount of surface area, allowing for maximum crisping, and simultaneously helps to lock in the chicken’s natural juices, resulting in an unbelievably crunchy exterior that maintains its crispness longer. As you complete the coating for each piece of chicken, transfer the dredged pieces to a wire rack that has been placed over a baking sheet. This setup is crucial because it allows air to circulate around all sides of the chicken, preventing the bottom from becoming soggy and further aiding the coating to adhere perfectly. Once all the chicken is coated and arranged on the rack, let it rest at room temperature for about 10-15 minutes before frying. This brief rest period is a small but mighty step; it gives the coating time to properly hydrate and bond with the chicken, which is a key factor in achieving that superior, long-lasting crispiness that defines truly great Crispy Sesame Chicken.
Frying the Chicken to Golden Perfection:
- Heat the Oil to the Right Temperature: The success of your Crispy Sesame Chicken hinges significantly on the oil temperature. Pour about 4-6 cups of a neutral oil (like vegetable, canola, or peanut oil) into a large, heavy-bottomed pot, a sturdy Dutch oven, or your dedicated deep fryer. We want the oil to be at least 3-4 inches deep to ensure the chicken pieces can be submerged and fry evenly. Place the pot over medium-high heat and allow the oil to heat up until it reaches a consistent temperature of 350°F (175°C). A reliable thermometer is truly your best friend here; maintaining this precise oil temperature is paramount for achieving that signature crispiness without burning the exterior or leaving the inside undercooked. If you don’t have a thermometer, a quick test is to drop a tiny pinch of the flour mixture into the hot oil; it should sizzle immediately and float to the surface. Remember, avoid overcrowding the pot at all costs – this is arguably the single most important rule for truly spectacular Crispy Sesame Chicken.
- The First Fry for Initial Crispness and Cooking: Once your oil is at 350°F (175°C), carefully lower about 8-10 pieces of your perfectly coated chicken into the hot oil. It’s crucial not to overcrowd the pot. Frying in small batches is absolutely essential because adding too much chicken at once will rapidly drop the oil temperature. A lower oil temperature leads to greasy, soggy chicken, which is the exact opposite of the light, airy crispness we’re striving for with our Crispy Sesame Chicken. Fry each batch for about 3-4 minutes, or until the chicken is a lovely light golden brown and fully cooked through. If you’re unsure, the internal temperature of the chicken should reach 165°F (74°C). During this initial fry, the chicken cooks through completely, and its magnificent coating sets to a beautiful, initial crispness. Use a slotted spoon or a spider to carefully remove the chicken from the oil, allowing any excess oil to drip back into the pot, and transfer it back to the wire rack set over your baking sheet. Let these pieces rest while you fry the remaining batches. Don’t worry if they don’t look intensely golden brown yet; this is just the first stage, and the real magic is about to happen!
- The Crucial Second Fry for Ultimate Crispiness: Once all of your chicken has completed its first fry and is resting on the wire rack, it’s time for the secret weapon to achieving that truly exceptional Crispy Sesame Chicken: the second fry! Increase your oil temperature slightly, aiming for 375°F (190°C). This higher temperature is precisely what will create that incredibly crunchy, shatteringly crisp exterior that makes this dish so irresistible. Return the chicken, again in small batches, to the hotter oil. Fry for an additional 1-2 minutes, or until the chicken pieces have transformed into a deep, glorious golden brown and have reached their peak, irresistible crispiness. This quick, high-heat fry works by driving out any remaining moisture from the coating, solidifying its structure and creating that unmistakable, satisfying crunch. As soon as each batch reaches this perfect state of golden crispness, promptly remove it from the oil and, you guessed it, place it back on the wire rack. The wire rack continues to be important here; it allows air to circulate around the entire surface of the chicken, preventing it from steaming and preserving its hard-won crispness. Let me emphasize this: this double-frying method is the absolute, non-negotiable key to making your Crispy Sesame Chicken truly live up to its name and deliver that incredible, lasting crunch you crave.
- Drain Excess Oil: As your perfectly fried chicken rests on the wire rack, any remaining excess oil will naturally drip away, leaving you with wonderfully crisp, non-greasy pieces. If you wish, you can also gently blot them with a paper towel, but often, the wire rack does a fantastic job on its own. Now you have a batch of truly crispy chicken, ready for its flavorful coating!
Crafting the Luscious Sesame Sauce:
- Combine Sesame Sauce Ingredients: While your beautiful crispy chicken is resting and cooling slightly, let’s bring together the star of the show – our rich, sweet, savory, and aromatic sesame sauce. In a medium-sized saucepan, combine all the sauce ingredients: ½ cup of light soy sauce for the primary savory base; ½ cup of honey, which not only adds a lovely natural sweetness but also contributes to that desirable glossy glaze; ¼ cup of packed brown sugar, which provides a deeper, more caramelized sweetness profile; ¼ cup of unseasoned rice vinegar, essential for its tangy brightness that cuts through the richness; and 2 tablespoons of toasted sesame oil, which is foundational for that deep, nutty essence that defines this Crispy Sesame Chicken. Add 1 tablespoon of freshly grated ginger and 4 cloves of freshly minced garlic – these aromatics are truly non-negotiable for an authentic and vibrant flavor profile. Finally, pour in ½ cup of water or chicken broth, which will serve as the liquid base for our sauce. Whisk all these ingredients together thoroughly until they are well combined and you can see the sugars starting to dissolve.
- Simmer the Sauce to Meld Flavors: Place the saucepan over medium heat. Bring the mixture to a gentle simmer, stirring occasionally to ensure everything is well incorporated and the sugars don’t stick to the bottom. Allow it to simmer gently for about 3-5 minutes. This simmering time is incredibly important; it gives all the individual flavors a chance to meld beautifully, deepen, and intensify, creating a complex and harmonious foundation for your Crispy Sesame Chicken. You’ll notice your kitchen filling with a truly wonderful aroma as the sauce cooks, a testament to the deliciousness that’s about to unfold.
- Thicken with Cornstarch Slurry: While the sauce is happily simmering, prepare your cornstarch slurry, which is our trusty thickening agent. In a small separate bowl, whisk together 2 tablespoons of cornstarch with 4 tablespoons of cold water until you have a smooth mixture with absolutely no lumps remaining. Once your sauce has simmered for the recommended few minutes and its flavors have deepened, give the slurry another quick whisk (cornstarch tends to settle) and then slowly pour it into the simmering sauce, stirring continuously with a whisk or spoon. As you stir, you will literally see the sauce begin to miraculously transform, thickening into a glossy, luscious, and irresistible glaze right before your eyes. Continue to stir and cook for another 1-2 minutes until the sauce reaches your desired consistency – it should be thick enough to beautifully coat the back of a spoon, yet still pourable and wonderfully sticky. If by chance it becomes too thick, don’t despair; you can easily add a tablespoon or two more water or broth to thin it out to perfection.
- Infuse with Toasted Sesame Seeds: Once your sauce has reached its ideal thickness and rich sheen, remove the saucepan from the heat. Now, stir in 3 generous tablespoons of toasted sesame seeds. These seeds are more than just a garnish here; they add not only a lovely, subtle textural contrast but also a further boost of that essential nutty sesame flavor, truly enhancing the authentic character of our Crispy Sesame Chicken sauce. Give the sauce a final taste test and adjust the seasonings if necessary. You might find you prefer a pinch more salt to brighten the flavors, a dash more vinegar for an extra tang, or a touch more honey for added sweetness, depending entirely on your personal preference. This sauce is now ready to coat our magnificent crispy chicken!
Assembling Your Crispy Sesame Chicken:
- Toss the Chicken in Sauce: This is the moment where all your hard work comes together in a symphony of flavor and texture! In a large mixing bowl (ensure it’s spacious enough for easy tossing), gently add your perfectly fried, incredibly crispy chicken pieces. Now, pour that warm, luscious, and fragrant sesame sauce you just crafted over the chicken. Using a spatula or a pair of tongs, toss the chicken gently but very quickly until every single piece is beautifully coated in the sticky, flavorful sauce. The key here is to work efficiently; you want to coat the chicken thoroughly, but without letting it sit in the sauce for too long, as this can unfortunately compromise its hard-won crispiness. An immediate toss and serve approach is absolutely essential for the best, most satisfying Crispy Sesame Chicken experience. The goal is to get that glorious sauce on every piece, but to keep that delightful crunch intact!
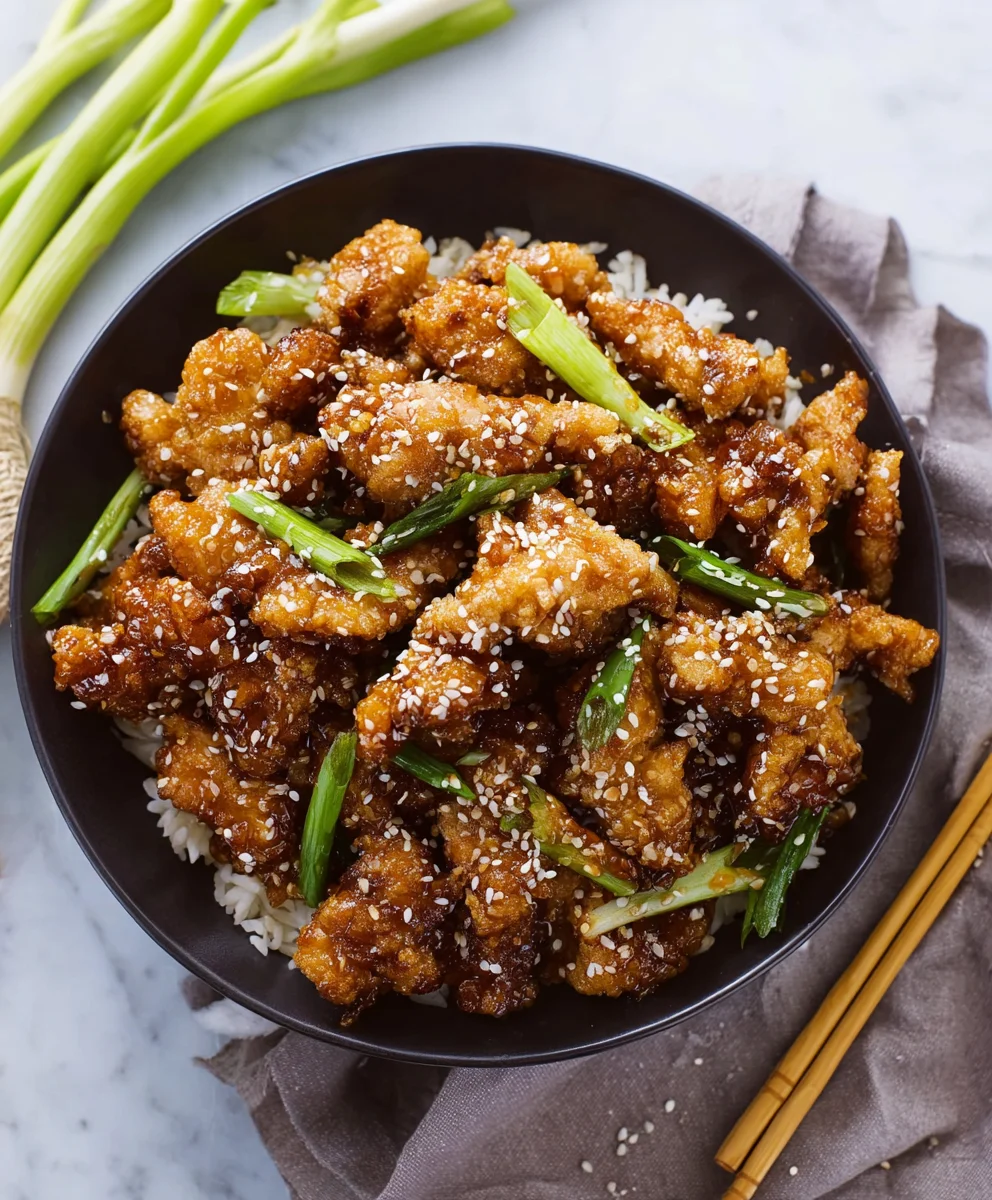
- Garnish and Serve Immediately: Once your chicken is perfectly coated, transfer your glorious Crispy Sesame Chicken directly to a beautiful serving platter. To elevate its presentation and add another layer of flavor, garnish generously with thinly sliced green onions. These provide a fresh, vibrant pop of color and a subtle, refreshing oniony bite that contrasts wonderfully with the richness of the chicken and sauce. For an extra touch of elegance and an even more pronounced nutty flavor, don’t forget to sprinkle with additional toasted sesame seeds. Serve this irresistible dish immediately to your eager diners. The sublime contrast between the unbelievably crispy chicken exterior and the sweet, savory, and tangy sesame sauce is truly divine and utterly addictive.
- Serving Suggestions for Your Feast: This magnificent Crispy Sesame Chicken pairs wonderfully with a side of fluffy white rice or steamed brown rice; it’s perfect for soaking up every last drop of that amazing, sticky sauce. For a complete and balanced meal, consider adding a side of vibrant steamed vegetables such as broccoli florets, tender asparagus spears, or a simple, crisp side salad. Enjoy the fruits of your labor – you’ve just created a truly homemade, restaurant-quality Crispy Sesame Chicken that will undoubtedly become a cherished favorite in your culinary repertoire!
Conclusion:
Well, there you have it, friends! We’ve journeyed through the steps to create something truly magical in your own kitchen. This isn’t just another weeknight meal; it’s an experience, a symphony of flavors and textures designed to delight. I’m genuinely excited for you to try this one because it consistently delivers on its promise of incredible taste and satisfying crunch.
What makes this particular recipe an absolute showstopper, a dish you simply must add to your culinary repertoire? It’s the exquisite balance, the careful harmony between the savory, slightly sweet sauce and the utterly perfect texture of the chicken. We’re talking about chicken pieces that are not just coated, but lovingly embraced by a light, airy, and incredibly crispy batter. The secret lies in a few simple techniques that, once mastered, will elevate all your fried dishes. Imagine biting into that golden-brown exterior, hearing that delightful crunch, and then savoring the tender, juicy chicken within, all enveloped in a sticky, glossy sauce that clings to every morsel. This isn’t just a fleeting moment of flavor; it’s a lasting impression that will have everyone at your table asking for seconds, and probably, the recipe!
This Crispy Sesame Chicken recipe isn’t just about deliciousness; it’s about the joy of creating something spectacular with your own hands. It’s about that moment of triumph when you pull a perfectly golden piece of chicken from the pan, knowing you’ve achieved restaurant-quality results right at home. The sesame adds a wonderful, nutty depth, a final flourish that ties all the vibrant flavors together. It’s truly a testament to how simple ingredients, when treated with a little love and attention, can transform into an unforgettable feast. Trust me, once you experience the crispy exterior giving way to tender chicken, all coated in that irresistible sesame glaze, you’ll understand why I’m so passionate about this dish. It’s an instant classic, a guaranteed crowd-pleaser that will earn you rave reviews and solidify your reputation as a kitchen wizard among your family and friends.
Serving Suggestions for Your Crispy Sesame Chicken:
Now that you’ve mastered the main event, let’s talk about how to complete your culinary masterpiece. While this dish is certainly delicious enough to stand on its own, pairing it with the right sides truly elevates the entire meal. My go-to suggestion is a generous bed of fluffy white rice, which acts as a perfect canvas to soak up every last drop of that glorious, sticky sauce. For a healthier touch, brown rice or quinoa also work beautifully, offering a nutty counterpoint to the sweetness. Don’t forget your greens! A simple stir-fry of broccoli florets, snap peas, or asparagus with a touch of garlic and a dash of soy sauce makes for a vibrant and nutritious accompaniment. If you’re looking for something a bit more adventurous, consider a side of quick-pickled cucumber or a light Asian-inspired coleslaw to add a refreshing crunch and cut through the richness of the chicken. And for those special occasions, some crispy spring rolls or savory potstickers would round out your homemade takeout feast perfectly, creating a spread that rivals any restaurant.
Get Creative with Your Crispy Sesame Chicken!
One of the things I love most about cooking is the freedom to experiment, and this recipe is wonderfully adaptable. While the classic version is undeniably fantastic, feel free to put your own spin on it! If you prefer a bit more heat, a pinch of red pepper flakes or a dash of sriracha in the sauce will give it a fiery kick that awakens the palate. For a brighter, tangier profile, a squeeze of fresh lime juice right before serving can really make the flavors pop, adding a zesty counterpoint to the sweet and savory notes. Don’t have chicken? This technique works beautifully with firm tofu or even shrimp for a fantastic seafood twist, offering different textures and flavors without compromising the delicious sauce. You could also introduce different vegetables directly into the sauce or serve them alongside, like julienned bell peppers, sliced mushrooms, or crunchy water chestnuts, for added texture and nutrition. Swap out the white sesame seeds for black sesame seeds for a striking visual contrast, or try a mix of sesame and poppy seeds for a unique crunch and a slightly different nutty aroma. The possibilities are truly endless, so don’t be afraid to make this recipe uniquely yours and tailor it to your personal preferences or whatever ingredients you have on hand!
Your Culinary Adventure Awaits!
So, what are you waiting for? I wholeheartedly encourage you to roll up your sleeves, gather your ingredients, and dive into making this incredible dish. You’ll be amazed at how achievable restaurant-quality results are in your very own kitchen, and the pride you’ll feel after serving it is immense. And once you’ve experienced the magic, I would absolutely love to hear about it! Please, come back and share your cooking journey, your personal twists, and the reactions of your family and friends in the comments section below. Your feedback and experiences inspire me, and they help other home cooks on their journey to culinary greatness. Happy cooking, and prepare to fall in love with your new favorite homemade meal that brings so much joy and flavor to your table!
Homemade Crispy Sesame Chicken – So Flavorful & Simple!
Crispy Sesame Chicken is more than just a dish; it’s a culinary experience that brings the excitement of your favorite takeout right into your kitchen, elevated to homemade perfection. Imagine sinking your teeth into succulent pieces of chicken, each bite offering an incredible crunch, followed by tender, juicy meat, all enveloped in a rich, glossy, sweet, and savory sesame sauce. It’s a symphony of textures and flavors that consistently tops the list of comfort foods for countless families.
Ingredients
-
2 lbs boneless, skinless chicken thighs or breasts, cut into 1-inch pieces
-
2 tbsp light soy sauce (or tamari for gluten-free)
-
1 tbsp rice vinegar (unseasoned)
-
1 tbsp fresh ginger, grated
-
2 cloves garlic, minced
-
1 tsp toasted sesame oil
-
1 large egg, whisked
-
2 tbsp cornstarch
-
1 cup all-purpose flour
-
½ cup cornstarch
-
1 tsp baking powder
-
½ tsp salt
-
¼ tsp black pepper
-
4-6 cups neutral oil for deep frying (vegetable, canola, or peanut oil)
-
½ cup light soy sauce
-
½ cup honey
-
¼ cup brown sugar, packed
-
¼ cup rice vinegar (unseasoned)
-
2 tbsp toasted sesame oil
-
1 tbsp fresh ginger, grated
-
4 cloves garlic, minced
-
½ cup water or chicken broth
-
2 tbsp cornstarch (for slurry)
-
4 tbsp cold water (for slurry)
-
3 tbsp toasted sesame seeds (plus more for garnish)
-
2-3 green onions, thinly sliced (for garnish)
Instructions
-
Step 1
Pat chicken pieces dry. Cut into uniform 1-inch bite-sized pieces. Place in a large mixing bowl. -
Step 2
Add 2 tbsp light soy sauce, 1 tbsp rice vinegar, 1 tbsp grated ginger, 2 minced garlic cloves, 1 tsp toasted sesame oil, 1 whisked egg, and 2 tbsp cornstarch to the chicken. Mix well, cover, and marinate in the refrigerator for at least 30 minutes (up to 2 hours). -
Step 3
In a shallow dish, whisk together 1 cup all-purpose flour, ½ cup cornstarch, 1 tsp baking powder, ½ tsp salt, and ¼ tsp black pepper. -
Step 4
Dredge chicken pieces thoroughly in the dry coating mixture. For maximum crispiness, double-dredge by briefly re-dipping chicken in marinade, then dredging again. Place coated chicken on a wire rack over a baking sheet; let rest for 10-15 minutes at room temperature. -
Step 5
Pour 4-6 cups neutral oil into a large heavy-bottomed pot or deep fryer. Heat to a consistent temperature of 350°F (175°C). Avoid overcrowding the pot when frying. -
Step 6
Carefully lower chicken (8-10 pieces at a time) into the hot oil. Fry in batches for 3-4 minutes until light golden brown and cooked through (internal temperature 165°F/74°C). Remove to a wire rack. -
Step 7
Increase oil temperature to 375°F (190°C). Return chicken to the hotter oil in small batches for an additional 1-2 minutes until deep golden brown and exceptionally crispy. Remove and place back on the wire rack to drain excess oil. -
Step 8
In a medium saucepan, whisk together ½ cup light soy sauce, ½ cup honey, ¼ cup packed brown sugar, ¼ cup rice vinegar, 2 tbsp toasted sesame oil, 1 tbsp grated ginger, 4 minced garlic cloves, and ½ cup water or chicken broth. -
Step 9
Bring the sauce mixture to a gentle simmer over medium heat, stirring occasionally, for 3-5 minutes. In a small bowl, whisk 2 tbsp cornstarch with 4 tbsp cold water until smooth. Slowly pour the slurry into the simmering sauce, stirring continuously until the sauce thickens to a glossy, pourable consistency (1-2 minutes). -
Step 10
Remove the saucepan from heat. Stir in 3 tbsp toasted sesame seeds. Taste and adjust seasonings as desired. -
Step 11
In a large mixing bowl, add the perfectly fried crispy chicken. Pour the warm sesame sauce over the chicken and quickly toss with a spatula or tongs until every piece is coated. Transfer immediately to a serving platter. Garnish with thinly sliced green onions and extra toasted sesame seeds. Serve piping hot with white rice and steamed vegetables.
Important Information
Nutrition Facts (Per Serving)
It is important to consider this information as approximate and not to use it as definitive health advice.
Allergy Information
Please check ingredients for potential allergens and consult a health professional if in doubt.