Homemade bubble gum, a nostalgic treat from childhood, is surprisingly easy and fun to make in your own kitchen! Forget the store-bought stuff packed with artificial flavors and questionable ingredients. Imagine the satisfaction of creating your very own chewy, flavorful bubble gum, customized to your exact taste preferences.
While the history of chewing gum dates back centuries, the invention of bubble gum as we know it is credited to Walter Diemer in 1928. He stumbled upon a formula that was less sticky and more elastic than regular chewing gum, allowing for the creation of those satisfying, enormous bubbles we all love.
But why make homemade bubble gum when you can simply buy it? The answer is simple: control and customization! You get to choose the ingredients, ensuring a healthier and more natural treat. Plus, the process itself is a fantastic activity to share with kids, sparking their creativity and teaching them about the science of food. People adore bubble gum for its playful texture, sweet flavor, and the sheer joy of blowing bubbles. Get ready to experience a burst of flavor and a whole lot of fun with this easy-to-follow recipe!

Ingredients:
- 1/2 cup Gum Base (Chicle or Synthetic)
- 1/4 cup Powdered Sugar (Confectioners’ Sugar)
- 2 tablespoons Corn Syrup (Light or Dark)
- 1 tablespoon Glycerin (Vegetable Glycerin)
- 1/2 teaspoon Citric Acid (Optional, for tartness)
- 1/2 teaspoon Flavoring Extract (e.g., Bubble Gum, Strawberry, Mint)
- 1/4 teaspoon Coloring (Gel food coloring preferred)
- 1 tablespoon Water (Adjust as needed)
- Optional: Additional powdered sugar for dusting
Preparing the Gum Base:
The gum base is the foundation of our bubble gum, so we need to make sure it’s ready to accept all the other delicious flavors and ingredients. This part requires a little patience and some elbow grease, but trust me, it’s worth it!
- Soften the Gum Base: The gum base usually comes in hard chunks or pellets. We need to soften it to make it pliable. There are a few ways to do this. My preferred method is to use a double boiler. If you don’t have one, you can create one by placing a heat-safe bowl over a pot of simmering water, making sure the bottom of the bowl doesn’t touch the water. Place the gum base in the top of the double boiler and let it melt slowly. Stir occasionally with a heat-resistant spatula. This can take anywhere from 15 to 30 minutes, depending on the type of gum base you’re using. You can also use a microwave, but be very careful! Microwave in 15-second intervals, stirring in between, until softened but not completely melted. Overheating can make the gum base brittle.
- Check for Consistency: The gum base should be soft and pliable, like modeling clay. It should be easy to stretch and mold. If it’s still hard or crumbly, continue heating it gently until it reaches the right consistency. Be patient; slow and steady wins the race here!
Mixing the Ingredients:
Now comes the fun part – adding all the flavors and sweetness that make bubble gum, well, bubble gum! This is where you can really get creative and experiment with different flavor combinations.
- Combine Wet Ingredients: In a separate small bowl, whisk together the corn syrup, glycerin, and water. The glycerin helps keep the gum soft and pliable, while the corn syrup adds sweetness and helps bind the ingredients together.
- Add to Gum Base: Once the gum base is softened, remove it from the heat (if using a double boiler) or microwave. Add the wet ingredients to the softened gum base. Stir vigorously with a spatula or wooden spoon. This can be a bit challenging at first, as the gum base will want to stick to everything. Keep stirring until the wet ingredients are fully incorporated.
- Incorporate Powdered Sugar: Gradually add the powdered sugar, a little at a time, while continuing to stir. The powdered sugar will help to thicken the mixture and give it that classic bubble gum texture. Be sure to mix well after each addition to avoid lumps. This step is crucial for achieving the right consistency.
- Add Citric Acid (Optional): If you want a slightly tart flavor, add the citric acid now. Be careful not to add too much, as it can make the gum too sour. Start with a small amount and taste as you go.
- Incorporate Flavoring and Coloring: Add the flavoring extract and gel food coloring. Start with a small amount of flavoring and coloring, and then add more to taste and achieve your desired color. Remember, a little goes a long way with gel food coloring! Mix thoroughly until the color and flavor are evenly distributed.
Kneading and Shaping:
This is where we transform the sticky mixture into actual bubble gum! Kneading helps to develop the gum’s texture and make it smooth and elastic.
- Dust with Powdered Sugar: Lightly dust a clean, flat surface with powdered sugar. This will prevent the gum from sticking to the surface while you knead it.
- Knead the Gum: Turn the gum mixture out onto the prepared surface. Knead the gum for about 5-10 minutes, or until it becomes smooth and elastic. If the gum is too sticky, add a little more powdered sugar, a teaspoon at a time, until it reaches the right consistency. If it’s too dry, add a tiny drop of water. Kneading is essential for developing the right texture.
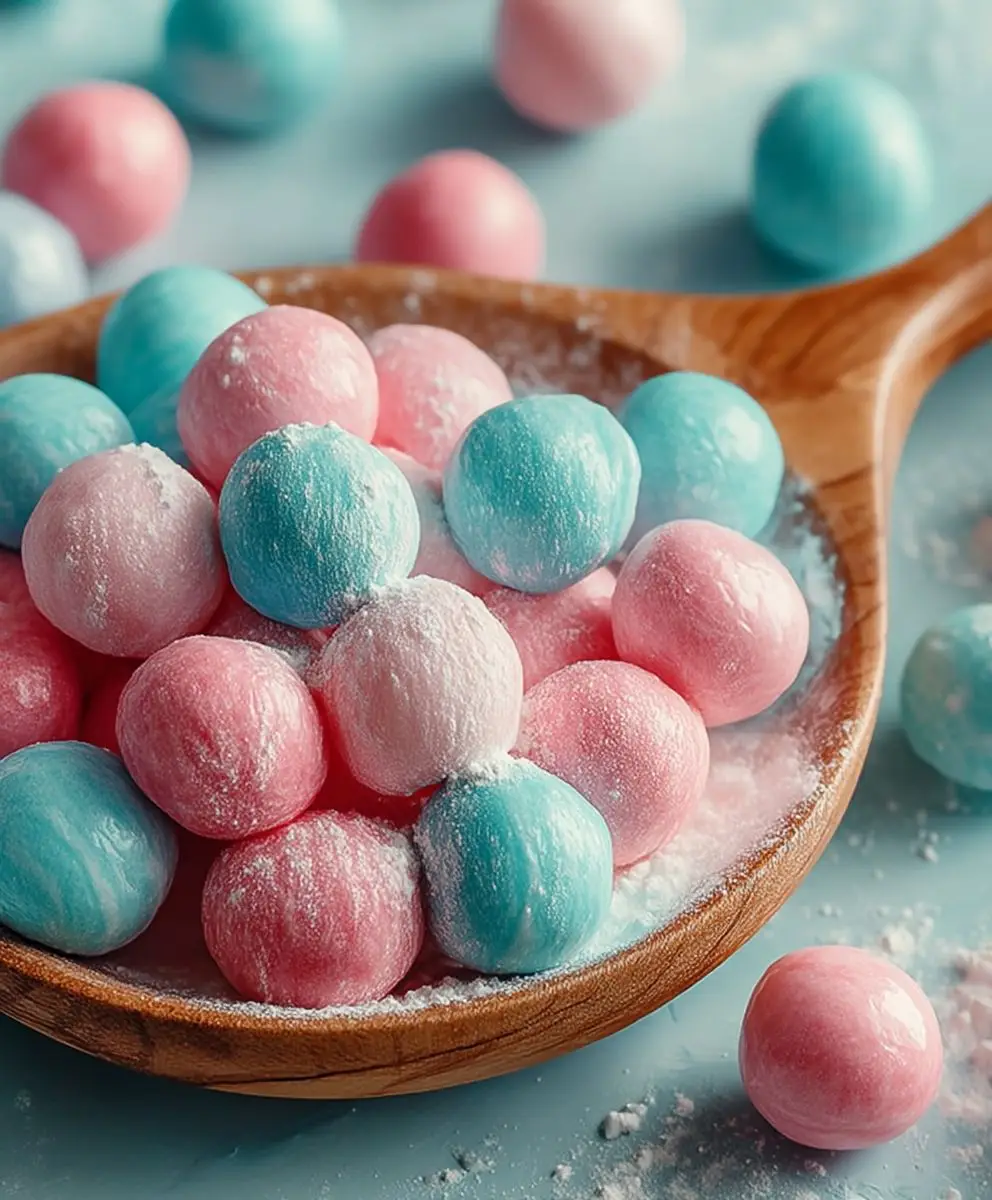
- Shape the Gum: Once the gum is kneaded, you can shape it into your desired form. You can roll it out and cut it into squares, or you can roll it into small balls. Get creative!
Resting and Curing (Important!):
This is a crucial step that many homemade bubble gum recipes skip, but it makes a HUGE difference in the final product. Resting allows the flavors to meld together and the gum to firm up properly.
- Wrap Individually: Wrap each piece of gum individually in wax paper or parchment paper. This will prevent the pieces from sticking together and help them retain their shape.
- Refrigerate: Place the wrapped gum in an airtight container and refrigerate for at least 24 hours, or preferably 48 hours. This allows the gum to firm up and the flavors to fully develop. Don’t skip this step! The longer it rests, the better the texture and flavor will be.
Enjoying Your Homemade Bubble Gum:
After the resting period, your homemade bubble gum is ready to enjoy! Store it in an airtight container in the refrigerator to keep it fresh.
- Remove from Refrigerator: Take the gum out of the refrigerator a few minutes before you want to chew it, to allow it to soften slightly.
- Unwrap and Chew: Unwrap a piece of gum and start chewing! Enjoy the delicious flavor and the satisfaction of knowing you made it yourself.
- Storage: Store any remaining gum in an airtight container in the refrigerator for up to a week.
Troubleshooting Tips:
- Gum is too sticky: Add more powdered sugar, a teaspoon at a time, while kneading.
- Gum is too hard: Add a tiny drop of water while kneading.
- Flavor is too weak: Add more flavoring extract, a few drops at a time.
- Gum is not bubbling well: This can be due to the type of gum base used. Some gum bases are better for blowing bubbles than others. Experiment with different brands. Also, make sure you’ve kneaded the gum thoroughly.
Flavor Variations:
Don’t be afraid to experiment with different flavors! Here are a few ideas to get you started:
- Strawberry: Use strawberry flavoring extract and pink food coloring.
- Mint: Use peppermint or spearmint flavoring extract and green food coloring.
- Watermelon: Use watermelon flavoring extract and pink or red food coloring.
- Grape: Use grape flavoring extract and purple food coloring.
- Cinnamon: Add a pinch of ground cinnamon to the mixture.
Important Notes:
Making homemade bubble gum can be a bit messy, so be sure to protect your work surface and wear an apron. Also, be aware that some flavoring extracts and food colorings can stain, so use caution. Always supervise children when making this recipe.
Have fun experimenting and creating your own unique bubble gum flavors! With a little practice, you’ll be a bubble gum-making pro in no time.
Conclusion:
So there you have it! This homemade bubble gum recipe is more than just a fun project; it’s a delicious and rewarding experience that will transport you back to childhood while allowing you to create something truly unique. The vibrant flavor, the satisfying chew, and the sheer novelty of making your own gum from scratch make this a must-try for anyone who loves to experiment in the kitchen. Forget the store-bought stuff filled with artificial ingredients – this is the real deal!
Why is this bubble gum a must-try? Because it’s customizable, surprisingly easy, and unbelievably fun! You control the ingredients, ensuring a gum that’s free from unwanted additives and bursting with the flavors you love. Plus, the process itself is a fantastic activity to share with kids, friends, or even just enjoy on your own as a creative outlet. It’s a conversation starter, a taste sensation, and a guaranteed smile-inducer.
But the fun doesn’t stop there! Think of this recipe as a starting point for your own bubble gum adventures.
Serving Suggestions and Variations:
* Flavor Fiesta: Experiment with different flavor extracts! Strawberry, watermelon, grape, or even a hint of mint can transform your gum into something truly special. Consider using natural fruit purees for a more subtle and authentic flavor. Just be mindful of the moisture content and adjust the powdered sugar accordingly.
* Color Crazy: Add a few drops of food coloring to create vibrant and eye-catching gum. Think pastel shades for a delicate touch or bold hues for a playful pop.
* Chew On This: For a softer chew, add a touch more glycerin. For a firmer chew, reduce the glycerin slightly. Finding the perfect balance is part of the fun!
* Bubble Boost: A tiny pinch of citric acid can enhance the tartness and make your bubbles even bigger!
* Gift Giving: Package your homemade bubble gum in small, airtight containers or wrap individual pieces in wax paper for a charming and personalized gift.
I truly believe that once you try this recipe, you’ll be hooked. The satisfaction of creating something so familiar and enjoyable from scratch is simply unmatched. It’s a chance to unleash your inner confectioner and impress your friends and family with your newfound bubble gum-making skills.
Don’t be intimidated by the process. It’s simpler than you might think, and the results are well worth the effort. Remember to be patient, follow the instructions carefully, and most importantly, have fun!
So, what are you waiting for? Gather your ingredients, put on your apron, and get ready to embark on a bubble gum-making adventure. I’m confident that you’ll be delighted with the results.
And now for the most important part: I want to hear about your experience! Did you try this recipe? What flavors did you experiment with? Did you manage to blow any record-breaking bubbles? Share your photos, stories, and tips in the comments below. I can’t wait to see what you create! Let’s spread the joy of homemade bubble gum far and wide! Happy chewing!
Homemade Bubble Gum: The Ultimate Guide to Making Your Own
Make your own delicious and chewy bubble gum at home! This recipe uses simple ingredients and allows for endless flavor combinations.
Ingredients
Instructions
Recipe Notes
- Gum is too sticky: Add more powdered sugar, a teaspoon at a time, while kneading.
- Gum is too hard: Add a tiny drop of water while kneading.
- Flavor is too weak: Add more flavoring extract, a few drops at a time.
- Gum is not bubbling well: This can be due to the type of gum base used. Some gum bases are better for blowing bubbles than others. Experiment with different brands. Also, make sure you’ve kneaded the gum thoroughly.
- Resting the gum in the refrigerator for at least 24 hours is crucial for the best texture and flavor.
- Experiment with different flavor extracts and food colorings to create your own unique bubble gum flavors.