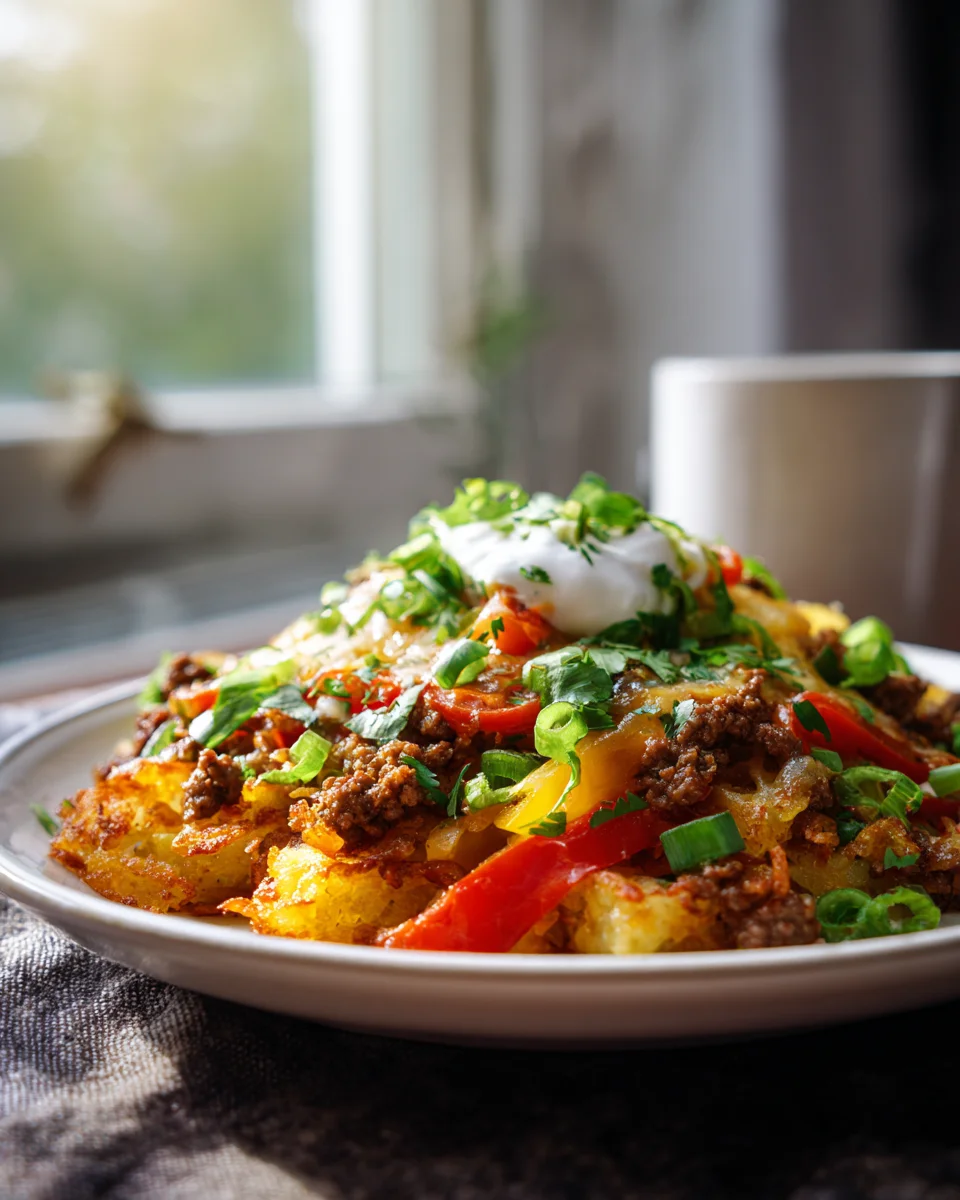
Hash Brown Taco Skillet
Oh my goodness, I’ve got something truly fantastic for you today that I just know you’re going to adore: the Hash Brown Taco Skillet! If you’re anything like me, you appreciate a meal that’s both ridiculously delicious and incredibly easy to whip up, especially when it packs a punch of flavor. This recipe is an absolute game-changer because it takes the crispy, comforting goodness of hash browns and marries it with all the zesty, savory fun of your favorite tacos, all in one glorious skillet.
What makes this dish so special? Well, for starters, it’s a brilliant fusion of two beloved comfort foods, designed to satisfy those cravings for something hearty and exciting. Forget about choosing between breakfast and dinner—this skillet lets you have the best of both worlds! You’ll love it because it’s a perfect weeknight warrior, minimizing cleanup thanks to its one-pan magic, and it’s incredibly versatile for customizing with your favorite toppings. Get ready for a delicious adventure where golden, crunchy hash browns form the irresistible base for perfectly seasoned ground beef, all ready for a fiesta of cheese, salsa, and whatever your heart desires. It’s truly a dish the whole family will ask for again and again!

Ingredient Notes
For my Hash Brown Taco Skillet, I focus on a blend of simple, hearty ingredients that come together to create a satisfying and flavorful meal. The beauty of this dish lies in its versatility, allowing for easy substitutions to fit your pantry and preferences.
- Frozen Shredded Hash Browns: These are the star of the show, providing that incredible crispy base. I always opt for the shredded variety, not the patties, for better texture in the skillet. Make sure they are thawed slightly or separated if they are a solid block, though cooking them from frozen directly in the skillet works too!
Substitution: If you’re feeling ambitious, you can grate fresh potatoes (russet or Yukon Gold work best). Just be sure to squeeze out as much moisture as possible using a clean kitchen towel to ensure they get crispy. - Ground Beef: This forms the savory “taco” heart of the dish. I typically use a lean ground beef (85/15 or 90/10) to minimize excess grease.
Substitution: Ground turkey, ground chicken, or a plant-based crumble are all excellent alternatives if you prefer. Just be aware that leaner meats might need a touch more oil when browning. - Taco Seasoning: This is where all that classic taco flavor comes from! A store-bought packet is convenient, but I often make my own.
Substitution: To make your own, combine chili powder, ground cumin, smoked paprika, garlic powder, onion powder, dried oregano, a pinch of cayenne (if you like heat), salt, and black pepper. Adjust to your taste! - Onion & Garlic: The foundational aromatics that build depth of flavor in the beef mixture. Fresh is always best here.
- Diced Tomatoes with Green Chiles (Rotel): This adds a fantastic zesty kick and a bit of moisture to the taco meat. I usually go for the mild or original variety.
Substitution: If you can’t find them, use regular canned diced tomatoes and a small can of mild green chiles, or a pinch of red pepper flakes for some warmth. - Shredded Cheese: A generous blanket of melted cheese over the top is non-negotiable in my book! Monterey Jack, sharp cheddar, a Mexican blend, or even a Colby Jack all work wonderfully.
- Oil: A neutral oil like vegetable, canola, or even olive oil for browning the hash browns and beef.
- Toppings (Optional but highly recommended!): Sour cream or plain Greek yogurt, fresh salsa, diced avocado or guacamole, fresh cilantro, sliced jalapeños (fresh or pickled), and a squeeze of lime juice always complete the taco experience for me.
Step-by-Step Instructions
This Hash Brown Taco Skillet is designed to be cooked primarily in one pan, making for easy cleanup and a satisfying, layered meal. Here’s how I bring it all together:
1. Crisp Up the Hash Browns
- Grab your largest oven-safe skillet (a 10-12 inch cast iron skillet is ideal for this recipe). Add about 2 tablespoons of oil and heat it over medium-high heat until shimmering.
- Add the frozen shredded hash browns to the hot skillet, spreading them out evenly into a single layer. Don’t stir them too much initially! Let them cook undisturbed for about 5-7 minutes until the bottom is golden brown and crispy.
- Using a large spatula, carefully flip the hash browns. You can flip them in sections or try to do it all at once if you’re feeling brave! Continue cooking for another 5-7 minutes on the other side until uniformly golden and crispy. Once done, transfer the crispy hash browns to a plate and set aside. You can lightly salt them at this point.
2. Brown the Beef & Build the Taco Flavor
- Return the same skillet to medium-high heat. If needed, add another teaspoon of oil. Add the ground beef and break it up with your spatula. Cook for 5-7 minutes until it’s fully browned.
- Drain any excess fat from the skillet. This step is important for preventing a greasy final dish.
- Add the diced onion to the beef and cook for another 3-4 minutes until softened. Then, stir in the minced garlic and cook for about 1 minute more until fragrant, being careful not to burn it.
- Stir in the taco seasoning and the can of diced tomatoes with green chiles (undrained). If the mixture seems too dry, you can add a splash (about 1/4 cup) of beef broth or even a non-alcoholic lager for an extra layer of flavor. Bring the mixture to a simmer and let it cook for 5 minutes, allowing the flavors to meld and the sauce to thicken slightly. Taste and adjust seasoning if needed.
3. Assemble, Melt, & Serve
- Preheat your broiler if you plan to melt the cheese that way. Otherwise, have a lid ready for your skillet.
- Evenly spread the crispy hash browns back into the bottom of the skillet, forming a layer. Then, spoon the seasoned ground beef mixture over the hash browns, spreading it out.
- Generously sprinkle the shredded cheese over the beef layer. If using the broiler, place the skillet under the broiler for 1-2 minutes, watching carefully, until the cheese is bubbly and lightly golden. If not using a broiler, cover the skillet with a lid and cook on low heat for 3-5 minutes, or until the cheese is fully melted.
- Remove the skillet from the heat. I like to garnish right in the pan for a beautiful presentation. Top with your favorite taco fixings like sour cream, salsa, fresh cilantro, or diced avocado.
- Serve directly from the skillet, allowing everyone to scoop out a hearty portion of this incredible Hash Brown Taco Skillet!
Tips & Suggestions
To truly master your Hash Brown Taco Skillet and make it your own, I’ve gathered a few extra tips and suggestions based on my own cooking adventures:
- Achieving Maximum Hash Brown Crispness: This is key! Don’t overcrowd your skillet when cooking the hash browns. If you have a smaller skillet, it’s better to cook them in two batches. Also, make sure your oil is hot enough before adding them, and resist the urge to stir constantly. Let them sit and develop that beautiful crust.
- Spice It Up: If you love heat, feel free to add an extra pinch of cayenne pepper or red pepper flakes to your taco seasoning. Sliced fresh or pickled jalapeños are also fantastic additions, either cooked into the beef mixture or as a topping.
- Add Veggies: Feel free to stir in some extra vegetables with your ground beef. Diced bell peppers (any color), corn kernels, or even black beans (rinsed and drained) would be delicious additions, adding more texture and nutrients.
- Flavor Boost for Beef: For an extra layer of savory depth in your taco meat, I sometimes deglaze the pan after browning the beef with a splash of beef broth or a non-alcoholic beer alternative (like an alcohol-free lager) before adding the taco seasoning and tomatoes. This helps scrape up any delicious browned bits from the bottom of the pan.
- Lime Finish: A final squeeze of fresh lime juice over the entire skillet just before serving really brightens up all the flavors and adds that authentic taco zest. Don’t skip it!
- Skillet Choice: While any large oven-safe skillet will work, a cast iron skillet is truly exceptional for this dish. It provides incredibly even heat distribution, which is perfect for crisping the hash browns, and it holds heat beautifully.
Storage
One of the best things about the Hash Brown Taco Skillet is that it makes for fantastic leftovers, perfect for a quick lunch or dinner the next day. Here’s how I handle storage:
- Cooling: Allow the skillet to cool down to room temperature before storing. This prevents condensation and helps maintain food safety.
- Refrigeration: Once cool, transfer any leftover Hash Brown Taco Skillet to an airtight container. It will keep well in the refrigerator for up to 3-4 days.
- Reheating: For best results, I recommend reheating individual portions in the microwave until heated through. If you prefer to reheat in the oven, place the leftovers in an oven-safe dish, cover it with foil, and bake at 350°F (175°C) for about 15-20 minutes, or until warm. For a little crispness on the hash browns again, you can remove the foil for the last 5 minutes. Keep in mind that the hash browns may lose some of their initial crispness after being refrigerated, but the flavor will still be amazing!
- Freezing: While the taco meat mixture would freeze well on its own, I generally do not recommend freezing the entire skillet meal, especially with the hash browns. Potatoes tend to change texture quite a bit after freezing and thawing, often becoming watery or mushy, which would detract from the overall enjoyment of the dish.
Final Thoughts
And there you have it! My absolute favorite, the magnificent Hash Brown Taco Skillet. I genuinely believe this dish is a culinary revelation, bringing together two beloved comfort foods into one irresistible package. The magic truly happens when those perfectly crispy, golden hash browns meet the deeply flavorful, seasoned beef taco filling – it’s a match made in skillet heaven!
What makes the Hash Brown Taco Skillet a must-try, you ask? It’s the ultimate blend of textures and tastes, all in one pan, making cleanup a breeze. It’s hearty, incredibly satisfying, and adapts beautifully to any meal of the day, whether you’re serving it up for a brunch gathering or a weeknight family dinner. Its versatility and family-friendly appeal mean it’s a dish everyone at your table can enjoy. Trust me, once you experience the delicious simplicity and robust flavor of this incredible Hash Brown Taco Skillet, it’s bound to become a regular star in your kitchen rotation. So go ahead, give it a try – you won’t be disappointed!

Hash Brown Taco Skillet: Beefy, Cheesy, One-Pan Meal!
- Total Time: 45 minutes
- Yield: 4 servings
Description
This Hash Brown Taco Skillet combines crispy hash browns with seasoned ground beef for a delicious, one-pan meal. It’s perfect for any time of day and easy to customize with your favorite toppings!
Ingredients
- Frozen Shredded Hash Browns
- Ground Beef
- Taco Seasoning
- Onion
- Garlic
- Diced Tomatoes with Green Chiles (Rotel)
- Shredded Cheese
- Oil
- Sour cream or plain Greek yogurt (optional)
- Fresh salsa (optional)
- Diced avocado or guacamole (optional)
- Fresh cilantro (optional)
- Sliced jalapeños (fresh or pickled, optional)
- Lime juice (optional)
Instructions
- Grab your largest oven-safe skillet (a 10-12 inch cast iron skillet is ideal for this recipe). Add about 2 tablespoons of oil and heat it over medium-high heat until shimmering.
- Add the frozen shredded hash browns to the hot skillet, spreading them out evenly into a single layer. Don't stir them too much initially! Let them cook undisturbed for about 5-7 minutes until the bottom is golden brown and crispy.
- Using a large spatula, carefully flip the hash browns. You can flip them in sections or try to do it all at once if you're feeling brave! Continue cooking for another 5-7 minutes on the other side until uniformly golden and crispy. Once done, transfer the crispy hash browns to a plate and set aside. You can lightly salt them at this point.
- Return the same skillet to medium-high heat. If needed, add another teaspoon of oil. Add the ground beef and break it up with your spatula. Cook for 5-7 minutes until it's fully browned.
- Drain any excess fat from the skillet. This step is important for preventing a greasy final dish.
- Add the diced onion to the beef and cook for another 3-4 minutes until softened. Then, stir in the minced garlic and cook for about 1 minute more until fragrant, being careful not to burn it.
- Stir in the taco seasoning and the can of diced tomatoes with green chiles (undrained). If the mixture seems too dry, you can add a splash (about 1/4 cup) of beef broth or even a non-alcoholic lager for an extra layer of flavor. Bring the mixture to a simmer and let it cook for 5 minutes, allowing the flavors to meld and the sauce to thicken slightly. Taste and adjust seasoning if needed.
- Preheat your broiler if you plan to melt the cheese that way. Otherwise, have a lid ready for your skillet.
- Evenly spread the crispy hash browns back into the bottom of the skillet, forming a layer. Then, spoon the seasoned ground beef mixture over the hash browns, spreading it out.
- Generously sprinkle the shredded cheese over the beef layer. If using the broiler, place the skillet under the broiler for 1-2 minutes, watching carefully, until the cheese is bubbly and lightly golden. If not using a broiler, cover the skillet with a lid and cook on low heat for 3-5 minutes, or until the cheese is fully melted.
- Remove the skillet from the heat. I like to garnish right in the pan for a beautiful presentation. Top with your favorite taco fixings like sour cream, salsa, fresh cilantro, or diced avocado.
- Serve directly from the skillet, allowing everyone to scoop out a hearty portion of this incredible Hash Brown Taco Skillet!
- Prep Time: 15 mins
- Cook Time: 30 mins
- Category: Dinner
- Method: Cooking
- Cuisine: Mexican
Nutrition
- Serving Size: 1 bowl
- Calories: 550
- Sugar: 3 g
- Sodium: 800 mg
- Fat: 30 g
- Saturated Fat: 12 g
- Unsaturated Fat: 15 g
- Trans Fat: 0 g
- Carbohydrates: 45 g
- Fiber: 4 g
- Protein: 30 g
- Cholesterol: 80 mg
Keywords: To achieve maximum hash brown crispness, don't overcrowd your skillet and ensure your oil is hot enough. Feel free to add extra vegetables or spices to customize the dish to your liking.