Muffin Halloween recipes are here to transform your autumn baking into a truly magical experience! As the leaves turn golden and a crisp chill fills the air, our thoughts inevitably drift towards the delightful anticipation of Halloween. It’s a season brimming with enchantment, where imagination takes center stage, and what better way to celebrate than with a batch of freshly baked, festive treats? Forget the store-bought candies for a moment; there’s something uniquely satisfying about creating edible delights that perfectly capture the whimsical and sometimes spooky essence of this beloved holiday.
Historically, communal baking and sharing treats have long been integral to seasonal celebrations, and Halloween is no exception. These delightful muffins offer a wonderful opportunity to infuse your home with the warm, inviting aromas of autumn – think hints of pumpkin spice, rich chocolate, or perhaps a burst of apple cinnamon. They truly embody the festive spirit of the season, making them an ideal addition to any gathering or a cozy night in. People adore these Halloween-themed muffins not just for their incredible taste and delightfully moist texture, but also for their sheer versatility. They are wonderfully convenient, perfect for quick breakfast treats, memorable party favors, or simply as a comforting snack to enjoy during a spooky movie marathon. Our Muffin Halloween creations are designed to be visually appealing, easy to decorate, and utterly delicious, promising smiles all around.

Ingredients:
- For the Decadent Chocolate Orange Muffins:
- 2 cups (240g) all-purpose flour (also known as plain flour), carefully measured
- ½ cup (100g) granulated sugar, plus an extra tablespoon for sprinkling on top
- ¼ cup (50g) light brown sugar, packed, which adds a lovely depth of flavor and moisture
- 2 teaspoons baking powder, ensuring our muffins rise beautifully
- ½ teaspoon baking soda (bicarbonate of soda), for that extra lift and tender crumb
- ½ teaspoon salt, to balance all the sweet flavors
- 1 large orange, zest only (about 1-2 tablespoons), for a vibrant, fresh aroma and taste. Make sure to only grate the bright orange part, avoiding the bitter white pith!
- 1 cup (240ml) buttermilk, at room temperature (if you don’t have buttermilk, you can make your own by adding 1 tablespoon of lemon juice or white vinegar to regular milk and letting it sit for 5-10 minutes)
- ½ cup (120ml) neutral-flavored vegetable oil, like canola or sunflower oil, for a moist texture that stays fresh longer
- 1 large egg, at room temperature, lightly beaten
- 1 teaspoon pure vanilla extract, for that classic, comforting flavor
- ¾ cup (130g) semi-sweet chocolate chips or chunks, for lovely pockets of melted chocolate
- For the Spooky Spiderweb Glaze:
- 1 ½ cups (180g) powdered sugar (confectioners’ sugar), sifted, to ensure a smooth, lump-free glaze
- 2-3 tablespoons milk (any kind will do, but whole milk or cream makes it richer), start with 2 and add more slowly if needed
- ¼ teaspoon pure vanilla extract, enhancing the sweetness
- 1-2 tablespoons unsweetened cocoa powder OR black gel food coloring (for the “web” part – cocoa powder gives a softer, chocolatey web, while gel food coloring provides a starker contrast)
- For the Halloween Decorations:
- Candy eyes (optional, but they add so much character to our “Muffin Halloween” theme!)
- Halloween sprinkles (optional, for an extra festive touch)
Preparing Your Muffin Batter: The Foundation of Your Muffin Halloween Treats
- Preheat and Prepare: My first step, and a crucial one for any baking adventure, is to preheat my oven to 400°F (200°C). While the oven is warming up, I line a 12-cup muffin tin with festive Halloween paper liners. If you don’t have paper liners, you can lightly grease and flour each cup, but liners make for easy cleanup and a beautiful presentation, especially for our “Muffin Halloween” theme. Having everything ready before mixing ensures a smooth process.
- Whisk the Dry Ingredients: In a very large mixing bowl, I combine all the dry ingredients. This includes the 2 cups of all-purpose flour, ½ cup of granulated sugar, ¼ cup of packed light brown sugar, 2 teaspoons of baking powder, ½ teaspoon of baking soda, and ½ teaspoon of salt. I grab a whisk and thoroughly combine these ingredients, making sure there are no clumps of baking powder or soda. This step is vital because it ensures the leavening agents are evenly distributed, leading to a consistent rise in every single muffin.
- Zest the Orange: Now, for the star flavor! I use a microplane grater to carefully zest the large orange directly into the dry ingredients. Grating the zest right into the flour mixture allows the oils from the zest to be absorbed by the flour, distributing that beautiful orange aroma and flavor throughout the muffins more effectively. I make sure to avoid the bitter white pith underneath the orange skin, as that can give an unwanted aftertaste. After zesting, I gently rub the zest into the flour mixture with my fingertips for about 30 seconds. This technique really helps release the orange oils and infuse the flour with maximum citrusy goodness!
- Combine the Wet Ingredients: In a separate, medium-sized bowl, I whisk together the wet ingredients. This includes 1 cup of room-temperature buttermilk, ½ cup of vegetable oil, 1 lightly beaten large egg, and 1 teaspoon of pure vanilla extract. I whisk them together until they are just combined and homogenous. Using room-temperature ingredients is a little baker’s secret; it helps them emulsify better and creates a smoother, more uniform batter, contributing to a lighter texture.
- Gently Merge Wet and Dry: This is where we bring the two worlds together! I pour the wet ingredients into the large bowl with the dry ingredients. Using a rubber spatula or a large spoon, I gently fold them together. The key here is not to overmix! We’re aiming for a batter that is just combined, with a few visible streaks of flour remaining. Overmixing develops the gluten in the flour too much, which can result in tough, dense muffins – and we want our “Muffin Halloween” treats to be wonderfully tender and light. I stir just until the flour is mostly incorporated.
- Fold in the Chocolate Chips: Finally, I gently fold in the ¾ cup of semi-sweet chocolate chips or chunks. If you’re worried about chocolate chips sinking to the bottom of your muffins, a little trick is to toss them with about a tablespoon of the dry flour mixture before adding them to the batter. This light coating helps them stay suspended, distributing those pockets of melty chocolate throughout each and every muffin. I give the batter just a few more folds to evenly distribute the chips.
Baking Your Spooky Muffins: Bringing Your Muffin Halloween Vision to Life
- Fill the Muffin Cups: I evenly divide the batter among the 12 prepared muffin cups. I like to use an ice cream scoop for this, as it helps create consistently sized muffins. Each cup should be about two-thirds to three-quarters full. For an extra touch and a slightly crisp top, I sprinkle a tiny bit of the extra tablespoon of granulated sugar over the top of each unbaked muffin. This gives them a lovely sparkle and a subtle crunch.
- Bake to Perfection: I carefully place the muffin tin into the preheated 400°F (200°C) oven. I bake them for an initial 5 minutes at this higher temperature. This initial burst of high heat helps the muffins rise rapidly, creating those lovely domed tops we all adore. After 5 minutes, without opening the oven door, I reduce the oven temperature to 375°F (190°C) and continue baking for another 15-18 minutes, or until the muffins are golden brown and a wooden skewer or toothpick inserted into the center of a muffin comes out clean. Baking times can vary depending on your oven, so keep an eye on them!
- Cooling Down: Once baked, I carefully remove the muffin tin from the oven. I let the muffins cool in the tin for about 5 minutes. This brief cooling period helps them firm up slightly before you attempt to remove them. After 5 minutes, I gently transfer the muffins from the tin to a wire cooling rack to cool completely. Allowing them to cool completely before glazing is crucial; if they’re warm, your beautiful spiderweb glaze will simply melt and slide off! This step takes patience, but it’s worth it for a perfect finish to our “Muffin Halloween” treats.
Crafting the Spiderweb Glaze: The Artistic Touch for Your Muffin Halloween
- Prepare the Base Glaze: While the muffins are cooling, I begin to prepare our spooky spiderweb glaze. In a medium bowl, I whisk together the 1 ½ cups of sifted powdered sugar, 2 tablespoons of milk, and ¼ teaspoon of vanilla extract. I start with 2 tablespoons of milk and add more, about ½ teaspoon at a time, until I achieve a smooth, pourable but still thick consistency. The glaze should be thick enough to coat the back of a spoon and drip slowly, but not so thick that it won’t spread easily. This will be the main white (or light-colored) part of our spiderweb.
-
Create the Contrasting Glaze: Now we need the “web” color! I take about ¼ to ⅓ cup of the prepared white glaze and transfer it to a separate, smaller bowl. This small portion will become our contrasting color.
- Option A (Chocolate Web): If I’m going for a chocolate web, I whisk in 1-2 tablespoons of unsweetened cocoa powder into this smaller portion of glaze until it’s smooth and dark brown. I might need to add another tiny splash of milk to maintain a similar consistency to the white glaze.
- Option B (Black Gel Web): For a starker, more dramatic black web, I’ll add a tiny drop or two of black gel food coloring to the smaller portion of glaze and stir until it reaches an intense black color. Again, adjust with a tiny bit more powdered sugar or milk if the consistency changes too much.
Once the contrasting glaze is ready, I transfer it to a small piping bag or a sturdy zip-top bag. If using a zip-top bag, I’ll snip a very tiny corner off when I’m ready to pipe, creating a fine line.
- Glaze the Muffins: Once the muffins are completely cool, I place them back on the wire rack, making sure there’s parchment paper or foil underneath to catch any drips – cleanup is always a win! I take a cooled muffin and spoon a generous tablespoon or two of the white (or light-colored) base glaze over the top, letting it gently spread to the edges. I use the back of the spoon to gently guide it if needed, ensuring an even coat. I repeat this for all the muffins, allowing the glaze to set slightly for a minute or two before the next step.
Decorating Your Halloween Masterpiece: The Spiderweb Effect and Finishing Touches
- Pipe the Concentric Circles: With the base glaze still slightly wet (this is important for the web effect to work!), I grab my piping bag filled with the contrasting black or chocolate glaze. Starting from the very center of each glazed muffin, I pipe a small dot. Then, I pipe increasingly larger concentric circles around that center dot, moving outwards towards the edge of the muffin. I aim for about 3-4 circles per muffin, depending on its size. Don’t worry if they’re not perfectly round – a little wobble adds to the spooky charm!
- Create the Spiderweb: Now for the magic! While the contrasting circles are still wet, I take a clean toothpick or the tip of a small knife. Starting from the center dot, I gently drag the toothpick outwards, through the circles, towards the edge of the muffin. I repeat this process, dragging the toothpick from the center outwards, at even intervals around the muffin, usually about 8-10 times, like spokes on a wheel. This action pulls the contrasting glaze through the base glaze, creating that iconic spiderweb pattern. This is truly where your “Muffin Halloween” theme comes alive!
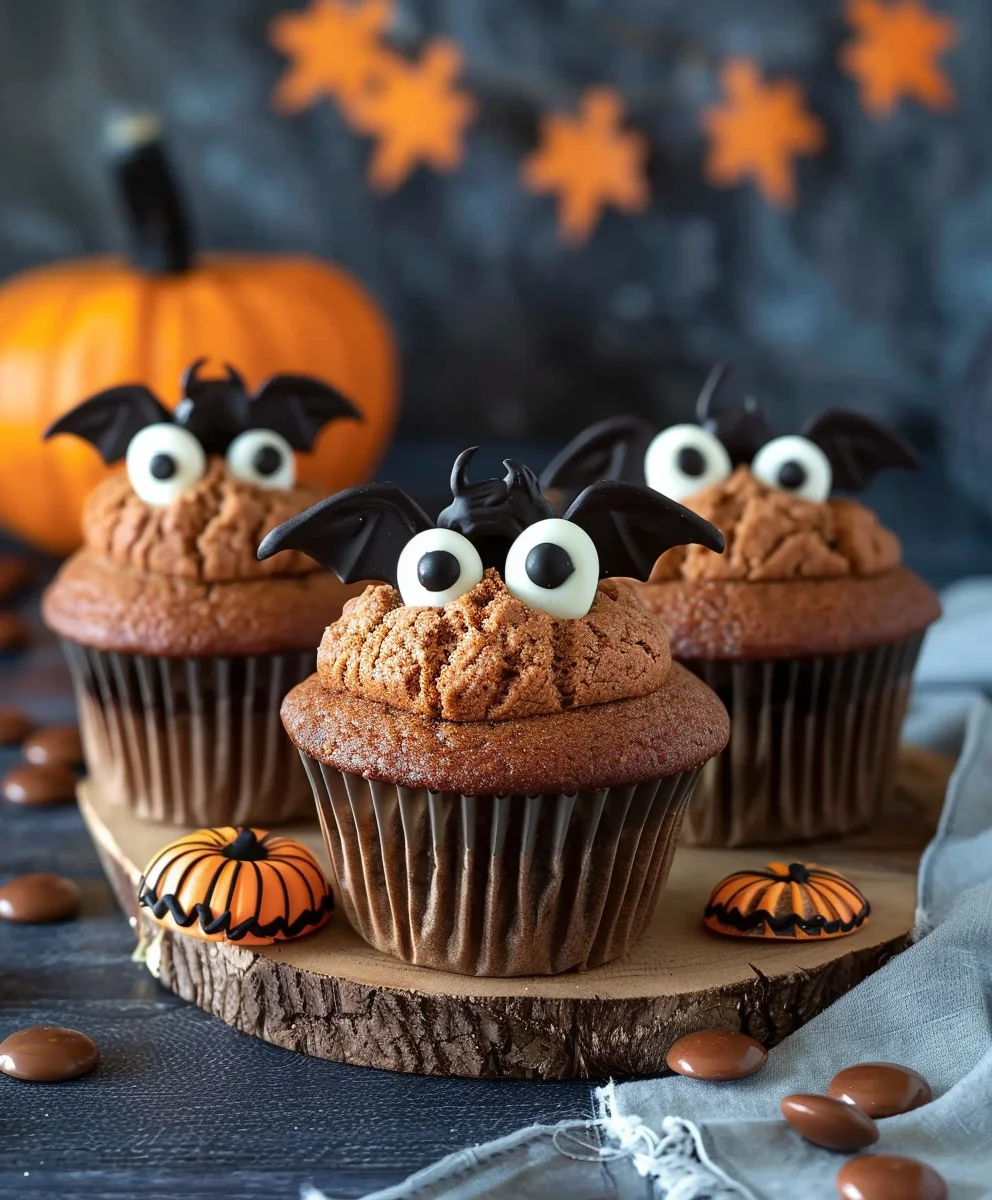
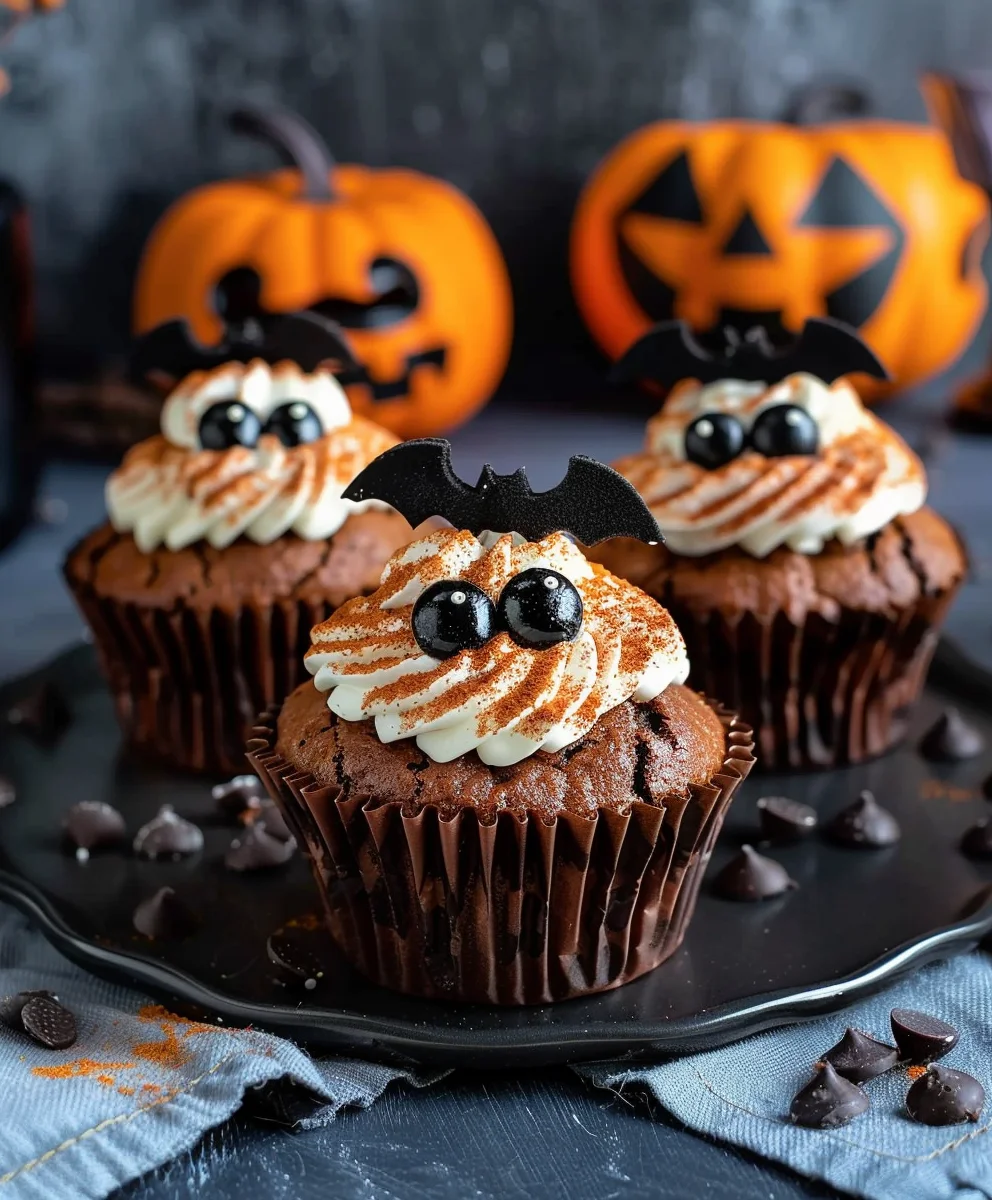
- Add Optional Decorations: For an extra dose of Halloween cuteness (or spookiness!), I like to carefully place candy eyes onto some of the spiderwebs while the glaze is still wet, creating little spider faces looking out from the webs. You can place them near the center or closer to the edge, whatever makes you smile! If you have any Halloween sprinkles, you can also sprinkle a few around the edges of the muffins for extra sparkle before the glaze fully sets.
- Allow to Set: Once all the muffins are glazed and decorated, I let them sit undisturbed on the wire rack for at least 1-2 hours, or until the glaze has fully set and hardened. This ensures your beautiful spiderweb designs are firm and won’t smudge. Once set, these “Muffin Halloween” delights are ready to be served and enjoyed by all your ghoulish guests! They are perfect for parties, trick-or-treaters, or just a fun autumnal treat.
Conclusion:
Wow, what a journey it’s been through this recipe! I truly hope you’re feeling as excited as I am about these incredible muffins. They aren’t just any ordinary baked good; they are a celebration of flavor, fun, and festivity, especially designed to add a special touch to your spooky season. We’ve combined the perfect balance of moist texture, delightful taste, and that irresistible aroma that fills your kitchen, creating something truly magical. This recipe, my friends, is more than just instructions; it’s an invitation to create joy. It’s simple enough for beginners, yet offers a canvas for seasoned bakers to get creative. What makes this particular recipe a must-try is its unique ability to bring smiles and deliciousness together, without any fuss. It’s the perfect blend of easy execution and spectacular results, ensuring that your baking adventure is both stress-free and wonderfully rewarding. The moment you pull these golden, fragrant treats from the oven, you’ll understand exactly why I’m so passionate about them. They are undeniably a game-changer for your Halloween gatherings or simply a delightful snack to enjoy during the autumn months.
Prepare to be amazed by how easily you can transform simple ingredients into something truly extraordinary!
Now, once you’ve mastered the basic recipe, the fun doesn’t have to stop there! One of the things I adore about these muffins is their incredible versatility. For a truly show-stopping presentation, consider whipping up a batch of vibrant orange or spooky purple cream cheese frosting – a simple touch that elevates them from delicious to absolutely divine. You could even go a step further and add a few drops of black food coloring to a portion of the frosting, creating a contrasting swirl or using it to pipe on playful spider webs or spooky messages. Don’t forget the toppings! A sprinkle of Halloween-themed sprinkles instantly adds a festive flair. Think tiny ghosts, pumpkins, or bats! For a bit of crunch, crushed Oreo cookies can mimic ‘dirt’ for a graveyard theme, while edible googly eyes can transform your muffins into friendly (or spooky!) monsters. Mini chocolate chips, a dusting of cocoa powder, or even a drizzle of melted white chocolate dyed orange or green, can also add layers of flavor and visual appeal. If you’re feeling adventurous, try adding a tablespoon of pumpkin puree or a pinch of cinnamon and nutmeg to the batter itself for an extra autumnal twist – though the original recipe is fantastic as is! And don’t forget how wonderfully these pair with a steaming mug of apple cider, a creamy pumpkin spice latte, or even a glass of cold milk after a day of trick-or-treating. These muffins also make absolutely delightful homemade gifts for friends, neighbors, or teachers. Package them in small cellophane bags tied with festive ribbons, and you’ve got a thoughtful, delicious present that truly shows you care. Imagine the smiles on their faces when they receive such a homemade delight!
The possibilities for customization are truly endless, allowing your creativity to shine!
So, there you have it, my fellow bakers! I’ve shared all my secrets, tips, and enthusiasm for what I truly believe will become a staple in your autumn baking repertoire. Now it’s your turn. I truly encourage you to roll up your sleeves, gather your ingredients, and give this fantastic recipe a try. You’ll find that the process is not only straightforward but incredibly satisfying, filling your home with the most wonderful aromas. There’s a special kind of magic in baking something from scratch, especially when the end result is as delightful and crowd-pleasing as these muffins. And once you’ve tasted the magic, I absolutely can’t wait to hear all about your experience! Did you stick to the classic, or did you get creative with the frosting and toppings? Perhaps you discovered a new favorite serving suggestion? Please, share your culinary adventures with me and our wonderful community. Take a photo, leave a comment below, or tag us on social media. Your feedback and creativity inspire us all! Remember, these aren’t just any muffins; they are your invitation to celebrate the season with warmth, flavor, and a touch of homemade charm. Let’s make this the year of truly unforgettable treats. Go forth, bake some incredible Muffin Halloween delights, and share your spooky, sweet success!
Your kitchen is about to become the happiest, most delicious place on earth – don’t miss out on the fun!
Halloween Muffin Recipe
Transform your autumn baking into a magical Halloween experience with these festive muffins! Perfect for any gathering or a cozy night in, these treats embody the spooky spirit of the season. They are easy to decorate, utterly delicious, and sure to bring smiles to all ages, making them ideal for parties, snacks, or party favors.
Ingredients
-
190g All-purpose flour
-
125g Lukewarm milk
-
100g Granulated sugar
-
80g Softened butter
-
20g Unsweetened cocoa powder
-
1 Medium egg
-
8g Baking powder
-
1/2 packet Vanillin
-
1 pinch Salt
-
200g Fresh liquid cream
-
200g Dark chocolate
-
25g Butter
-
80g Apricot jam
-
10 Oreo cookies
-
As needed Sugar eyes
Instructions
-
Step 1
Preheat oven to 200°C (400°F). Line a 12-cup muffin tin. In a large bowl, whisk together 190g all-purpose flour, 100g granulated sugar, 20g unsweetened cocoa powder, 8g baking powder, 1/2 packet vanillin, and 1 pinch salt. In a separate bowl, whisk 1 medium egg, 125g lukewarm milk, and 80g softened butter until combined. Add wet ingredients to dry, mixing until just combined with a few streaks of flour remaining. -
Step 2
Evenly divide the batter among the 12 prepared muffin cups, filling each 2/3 full. Bake for an initial 5 minutes at 200°C (400°F). Reduce oven temperature to 190°C (375°F) and continue baking for another 15-18 minutes, or until muffins are golden brown and a toothpick inserted into the center comes out clean. -
Step 3
Remove muffins from oven and let cool in the tin for 5 minutes. Transfer to a wire rack to cool completely. This is crucial before adding any toppings. -
Step 4
While muffins cool, heat 200g fresh liquid cream in a saucepan until it just begins to simmer. Remove from heat. Add 200g chopped dark chocolate and 25g butter to the hot cream. Let stand for 5 minutes, then stir gently until the mixture is smooth and glossy. Allow the ganache to cool and thicken to a spreadable consistency. -
Step 5
Once muffins are completely cool, spread each with a thin layer of 80g apricot jam. Top with the cooled chocolate ganache. Crush 10 Oreo cookies and sprinkle over some muffins for a ‘dirt’ effect, or place whole/half Oreos on top. Carefully place sugar eyes onto the ganache to create spooky faces or spider designs while it is still wet. Let decorations set for at least 1-2 hours before serving to ensure the ganache is firm.
Important Information
Nutrition Facts (Per Serving)
It is important to consider this information as approximate and not to use it as definitive health advice.
Allergy Information
Please check ingredients for potential allergens and consult a health professional if in doubt.