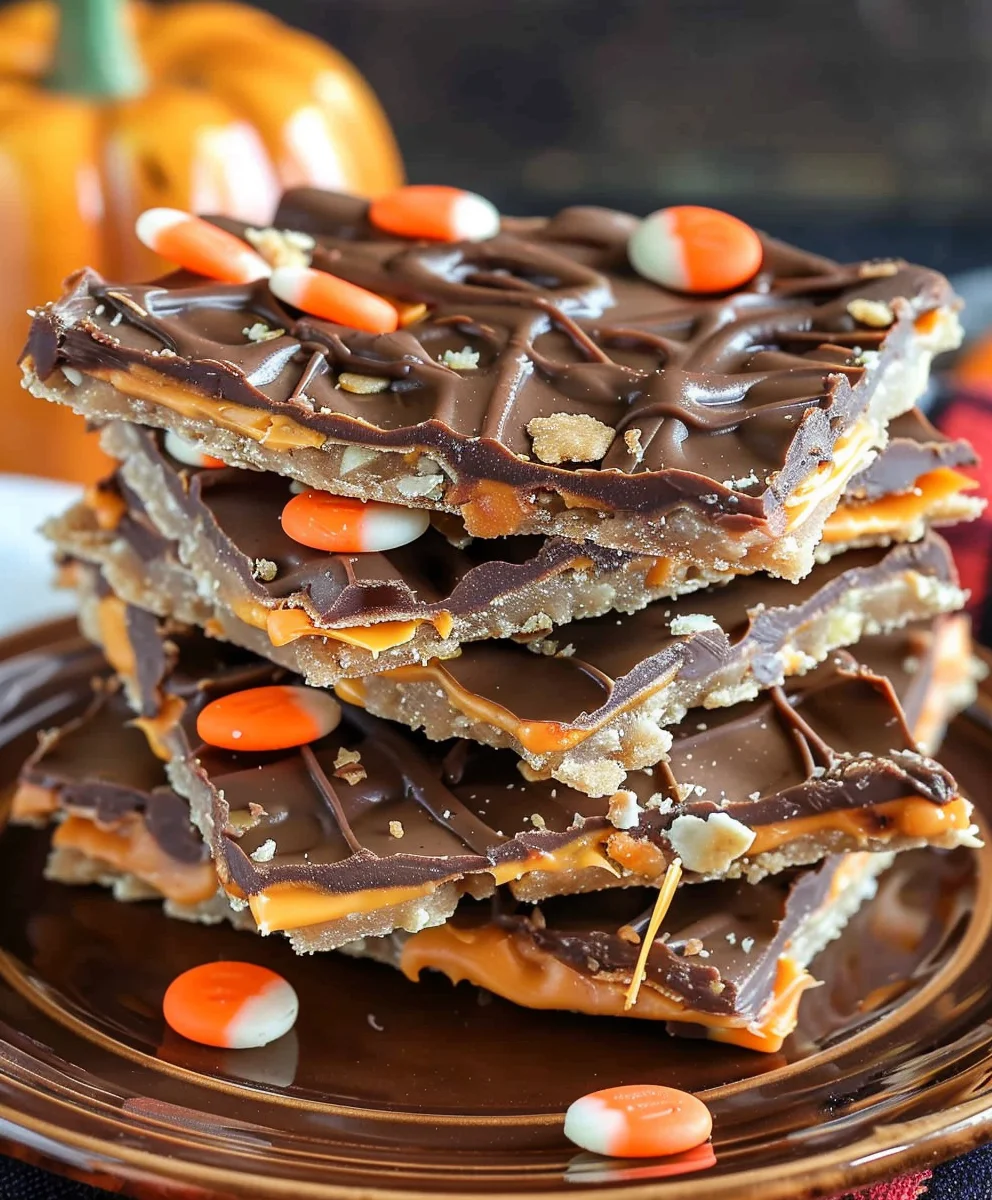
Halloween Crack: Prepare to meet your new favorite spooky season indulgence! As autumn leaves fall and the air grows crisp, signaling the approach of October 31st, our thoughts invariably turn to festive treats. This particular confection has earned its affectionate (and accurate) nickname for a reason – it’s undeniably addictive, dangerously delicious, and incredibly simple to make. Imagine a perfect symphony of sweet and salty, crunchy and decadent, all wrapped up in a spooky, fun package that vanishes from the dessert table faster than a ghost on Halloween night. It’s not just a recipe; it’s an experience that captures the joy and playful spirit of the holiday.
While perhaps not steeped in centuries of folklore, this beloved “crack” recipe has rapidly become a modern Halloween tradition, cherished for its uncanny ability to satisfy every craving. People adore it because it perfectly blends the rich sweetness of chocolate and toffee with a delightful, buttery crunch, often enhanced by festive sprinkles or toppings. It’s the ultimate no-fuss treat that brings smiles to faces of all ages, from tiny trick-or-treaters to seasoned party hosts. The convenience of whipping up a large batch with minimal effort, combined with its irresistible flavor profile, makes it a guaranteed crowd-pleaser for any ghoulish gathering or cozy night in.
This Halloween Crack recipe truly embodies the spirit of easy, festive baking.
I find myself making it year after year, and it never fails to impress. Its unique texture and tantalizing taste make it a staple for anyone looking to add a touch of homemade magic to their Halloween celebrations without spending hours in the kitchen. Get ready to enchant your taste buds and create some delightfully memorable moments with this truly exceptional treat!

Ingredients:
- One Sleeve (approximately 40) Saltine Crackers: For our crunchy, salty base. I always use classic Saltines because they provide that perfect salty counterpoint to the sweet toffee and chocolate. Make sure they are fresh and not stale, as this can affect the overall texture of your Halloween Crack.
- 1 Cup (2 Sticks) Unsalted Butter: Good quality butter is essential here. Using unsalted allows me to control the salt content precisely, though a little extra saltiness from the crackers is exactly what we’re aiming for in this irresistible Halloween Crack recipe.
- 1 Cup Light Brown Sugar, firmly packed: Packing the brown sugar ensures you get the right amount for a rich, chewy toffee. The molasses in light brown sugar gives our toffee a beautiful depth of flavor and a lovely caramel note, which is crucial for the foundation of our amazing Halloween Crack.
- 1 Teaspoon Pure Vanilla Extract: Don’t skimp on the vanilla! A good quality pure vanilla extract really enhances the caramel flavor of the toffee, adding warmth and complexity that elevates this simple treat into something truly special.
- 2 Cups Semi-Sweet Chocolate Chips: I find semi-sweet chips provide the perfect balance – not too bitter, not too sweet. They melt beautifully and create a wonderfully smooth, decadent layer that will hold all our festive decorations. You can certainly use milk chocolate if you prefer a sweeter profile for your Halloween Crack.
- 1/2 Cup White Chocolate Chips (optional, for drizzle): A little white chocolate drizzle can add an extra visual pop and a touch of creamy sweetness. It’s totally optional, but I love the contrast it provides, especially when making something as visually appealing as Halloween Crack.
- Assorted Halloween Sprinkles: As much as your heart desires! Think spooky bats, ghosts, pumpkins, nonpareils in orange, black, and purple. These are key for giving our treat that unmistakable festive look. The more variety, the better the visual impact of your incredible Halloween Crack!
- Halloween Candies (e.g., candy corn, gummy worms, M&Ms, small spooky gummies): These are fantastic for adding texture, extra bursts of flavor, and, most importantly, more Halloween spirit! Arrange them artfully for maximum effect on your homemade Halloween Crack.
Equipment You’ll Need:
Having the right tools ready before you begin will make the process of creating your sensational Halloween Crack smooth and enjoyable. Trust me, a little preparation goes a long way!
- Large Baking Sheet (13×18 inches): A standard half-sheet pan works perfectly. This size ensures your crackers can be spread out in a single layer without overcrowding, allowing the toffee to bake evenly.
- Parchment Paper or Silicone Baking Mat: Absolutely essential! This prevents the sticky toffee from adhering to your pan, making cleanup a breeze and ensuring your Halloween Crack comes off in perfect pieces.
- Heavy-Bottomed Saucepan (2-3 quart): A heavy bottom helps distribute heat evenly, preventing the butter and sugar from burning, which is crucial for a perfectly smooth toffee.
- Whisk: For stirring the butter and sugar as it melts and comes to a boil.
- Heatproof Spatula or Offset Spatula: Ideal for spreading the hot toffee and melted chocolate evenly over the crackers. An offset spatula is particularly helpful for achieving a smooth finish.
- Small Heatproof Bowl (if melting white chocolate separately): For the optional white chocolate drizzle.
Getting Started: Preparation is Key!
- Preheat Your Oven: My first step, always, is to set my oven to 325°F (160°C). Giving your oven ample time to reach and maintain the correct temperature is critical for even baking. If the oven isn’t hot enough, your toffee might not set properly, and we want that perfect crisp, chewy texture for our Halloween Crack.
- Prepare Your Baking Sheet: Line your large baking sheet (13×18 inches) with parchment paper. This isn’t just a suggestion; it’s a non-negotiable step for making this Halloween Crack! The toffee gets incredibly sticky, and parchment paper ensures easy removal and virtually no cleanup. Make sure the paper extends up the sides of the pan a little, just in case of any overflow.
- Arrange the Crackers: Now, carefully arrange your saltine crackers in a single layer on the parchment-lined baking sheet. It’s like creating a mosaic! Try to fit them together as snugly as possible, covering the entire surface without overlapping. This forms the foundational crunchy base for your delightful Halloween Crack. If there are small gaps, that’s perfectly fine; the toffee will fill them in.
The Toffee Magic: Crafting the Golden Goodness
This is where the real magic happens for our Halloween Crack – creating that rich, buttery toffee that makes this treat so addictive!
- Combine Ingredients for Toffee: In your heavy-bottomed saucepan, combine the 1 cup of unsalted butter and 1 cup of firmly packed light brown sugar. Using a heavy-bottomed pan is super important here, as it helps prevent scorching and ensures your toffee cooks evenly.
- Melt and Stir: Place the saucepan over medium heat. Stir the butter and brown sugar constantly with your whisk as it melts. This continuous stirring helps the sugar dissolve properly and prevents it from sticking to the bottom of the pan. You’ll notice it transforming into a rich, caramel-colored liquid. This stage is all about patience and constant attention to achieve the perfect toffee for our Halloween Crack.
- Bring to a Boil: Continue to cook and stir until the mixture comes to a full, rolling boil. A “rolling boil” means it’s bubbling vigorously across the entire surface and doesn’t stop when you stir it.
- Boil Without Stirring: Once it reaches a full boil, stop stirring. Let the mixture boil, undisturbed, for precisely 3 to 5 minutes. This is a critical step for developing the toffee’s flavor and texture. During this time, the sugars will caramelize further. Keep a close eye on it; you’ll see it turn a slightly darker amber color, signaling it’s ready. Don’t let it go much longer than 5 minutes, or it might burn, making your Halloween Crack taste bitter. I usually aim for around 4 minutes for a perfect balance.
- Remove from Heat and Add Vanilla: Carefully remove the saucepan from the heat. Immediately stir in the 1 teaspoon of pure vanilla extract. Be careful, as the mixture might bubble up a bit when the vanilla is added. Give it a good whisk to fully incorporate the vanilla’s wonderful aroma and flavor into your glorious toffee.
Baking the Base: Fusing Crackers and Toffee
Now, let’s bring our crispy cracker base and luscious toffee together, setting the stage for the ultimate Halloween Crack!
- Pour Toffee Over Crackers: Working quickly (the toffee cools and thickens fast!), carefully pour the hot toffee mixture evenly over the entire layer of saltine crackers. Use your heatproof spatula or an offset spatula to gently spread the toffee if needed, ensuring every cracker is coated. You want a consistent layer so each piece of your finished Halloween Crack has that delightful toffee crunch.
- Bake to Perfection: Transfer the baking sheet to your preheated oven. Bake for 12 to 15 minutes. Keep an eye on it! The toffee will bubble vigorously, and the edges of the crackers, where the toffee meets the pan, might start to turn a deeper golden brown. This baking step allows the toffee to really meld with the crackers and achieve that signature crispy-chewy texture.
- Remove from Oven: Once baked, carefully remove the baking sheet from the oven. The toffee will still be very hot and bubbly. This is exactly what we want, as the residual heat is essential for melting our chocolate layer. Place the hot pan on a wire rack while you prepare the next step for your festive Halloween Crack.
The Chocolatey Finish: Spreading Sweetness
This layer adds decadence and provides the perfect canvas for all our spooky decorations. Get ready for a smooth, chocolatey transformation for your Halloween Crack!
- Sprinkle with Chocolate Chips: Immediately and generously sprinkle the 2 cups of semi-sweet chocolate chips over the hot toffee layer. The heat from the freshly baked toffee will start to melt them right away.
- Allow to Melt: Let the chocolate chips sit undisturbed for about 5 minutes. This gives them enough time to soften and melt from the residual heat. Resist the urge to spread them too early, as this can make them seize or create streaks. Patience is key for a smooth, glossy chocolate top for your Halloween Crack.
- Spread Melted Chocolate: After 5 minutes, use your offset spatula or the back of a spoon to gently and evenly spread the melted chocolate over the entire surface of the toffee-coated crackers. Work quickly but carefully to achieve a smooth, consistent layer. You want every inch of your Halloween Crack covered in chocolatey goodness!
- Optional White Chocolate Drizzle: If you’re opting for a white chocolate drizzle, now is the time. In a small heatproof bowl, melt the 1/2 cup of white chocolate chips. You can do this in the microwave in 20-second intervals, stirring in between, or over a double boiler. Once melted and smooth, drizzle it artistically over the semi-sweet chocolate layer. A simple zigzag pattern works wonderfully and adds extra flair to your Halloween Crack.
Halloween Fun: Decorating Your Crack!
This is arguably the most fun part of making your Halloween Crack – bringing it to life with vibrant, spooky decorations!
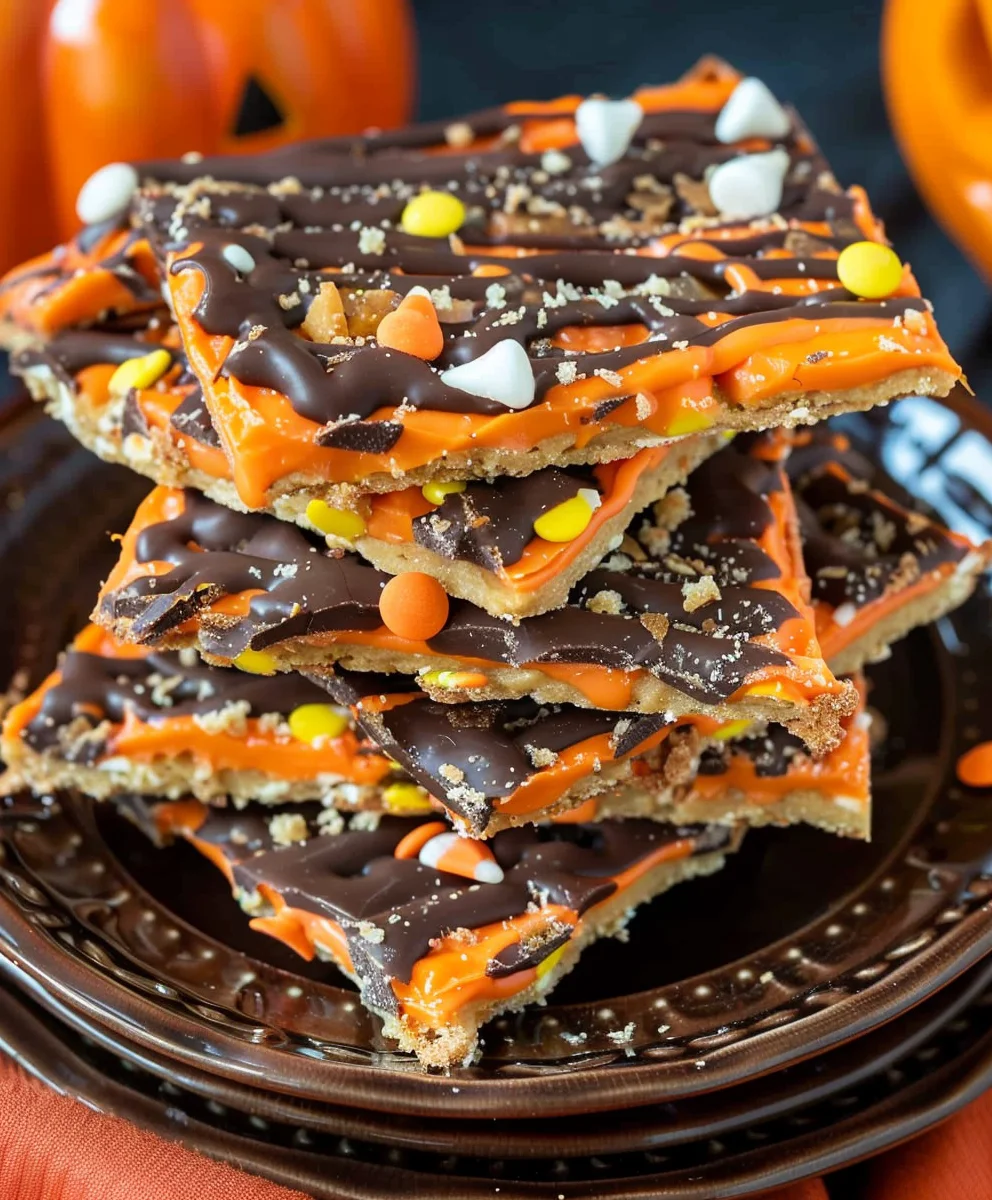
- Shower with Sprinkles: While the chocolate is still warm and melted (this is crucial!), generously shower your Halloween Crack with the assorted Halloween sprinkles. Don’t be shy! The sprinkles will adhere beautifully to the warm chocolate, creating a festive, colorful mosaic.
- Arrange Halloween Candies: Now for the candies! Artfully arrange your candy corn, gummy worms, M&Ms, or any other spooky candies you’ve chosen on top of the sprinkles. You can create little patterns, scatter them randomly, or even make tiny scenes. This is your chance to get creative and personalize your delicious and visually stunning Halloween Crack!
Cooling and Cracking: The Grand Finale
The anticipation builds! Once decorated, your Halloween Crack needs to chill to become truly magnificent.
- Cool Completely: Allow the Halloween Crack to cool and set completely. This can take anywhere from 1 to 2 hours at room temperature, or you can speed up the process by placing the baking sheet in the refrigerator for about 30-60 minutes. Make sure it’s fully hardened; the chocolate should be firm to the touch, and the toffee beneath should be crisp. Don’t rush this step, as it ensures clean breaks later.
- Break into Pieces: Once fully cooled and set, gently lift the parchment paper (with the crack on it) from the baking sheet and transfer it to a clean surface. Now comes the satisfying part: break the large slab of Halloween Crack into irregular, bite-sized pieces. I love the rustic look of uneven pieces; it adds to the charm! You can use your hands or a sharp knife for cleaner breaks if you prefer.
Storage Tips for Your Halloween Crack:
To keep your amazing Halloween Crack fresh and delicious, proper storage is key!
- Airtight Container: Store your broken pieces of Halloween Crack in an airtight container at room temperature. This helps prevent the crackers from getting stale and the toffee from becoming sticky.
- Room Temperature vs. Refrigerator: It will keep well at room temperature for up to one week. If you live in a very warm climate, or if you prefer a firmer crunch, you can store it in the refrigerator. Just be aware that refrigeration can sometimes make the toffee a little harder. Either way, it’s a delightful treat that stays fresh for quite a while!
Troubleshooting Common Issues:
Even seasoned bakers encounter little bumps in the road sometimes. Here are some common issues you might face when making Halloween Crack and how to fix them!
- My Toffee Separated/Looks Oily: This can happen if the butter and sugar don’t emulsify properly or if boiled for too long at too high a heat. Don’t panic! Sometimes a vigorous whisking for a minute or two off the heat can bring it back together. If it separates after pouring, it generally bakes fine, though the texture might be slightly less uniform.
- Chocolate Isn’t Melting Smoothly: If your chocolate chips aren’t melting well after 5 minutes, your toffee might have cooled down too much, or your kitchen might be very cold. You can gently place the baking sheet back into the warm (but turned off) oven for just a minute or two, then try spreading again. Be quick, or the chocolate might scorch!
- Crackers are Sliding Around: This usually happens if they aren’t packed tightly enough on the baking sheet. While it won’t ruin the flavor, it might make pouring the toffee a bit messier. Just try to nudge them back into place as best you can before pouring. Next time, ensure a very snug fit!
- Toffee Burned on the Edges: This indicates the heat was too high during the boiling phase, or it was boiled for too long. Ensure you’re using medium heat and stick to the 3-5 minute boiling window after it reaches a full boil. A heavy-bottomed pan also helps prevent this by distributing heat more evenly.
Tips for the Perfect Halloween Crack:
Want to elevate your Halloween Crack from great to absolutely legendary? Here are my top tips!
- Use a Heavy-Bottomed Pan: I can’t stress this enough! It prevents scorching and ensures even cooking of the toffee, which is fundamental to this recipe.
- Don’t Rush the Boil: Allow the toffee to boil for the full 3-5 minutes without stirring. This time is crucial for the sugar to properly caramelize and achieve the desired texture and flavor.
- Good Quality Chocolate Matters: While basic chips work, using a slightly higher quality chocolate for your top layer can make a noticeable difference in flavor and mouthfeel.
- Get Creative with Toppings: This is “Halloween Crack,” after all! Beyond sprinkles and candies, consider crushed Oreos for “dirt,” mini pretzel pieces for a salty crunch, or even edible googly eyes for extra spookiness!
- Work Quickly with Toffee and Chocolate: Both the toffee and chocolate set fairly fast, especially once off the heat. Have everything prepped and ready to go for pouring and spreading.
Fun Variations to Try:
Once you’ve mastered the classic Halloween Crack, don’t hesitate to experiment! This recipe is incredibly versatile.
- Different Cracker Bases: While saltines are my go-to, you could try using graham crackers for a sweeter, s’mores-like base, or even pretzels for an extra salty, pretzel-bark vibe.
- Nutty Additions: Sprinkle a layer of chopped nuts (pecans, almonds, walnuts) over the chocolate before it sets. The nuts add a wonderful texture and another layer of flavor that complements the toffee beautifully.
- Alternative Chocolates: Instead of semi-sweet, try dark chocolate for a richer, less sweet profile, or a mix of milk and dark. You could even use specialty flavored chips like peanut butter or butterscotch.
- Seasonal Themes: This recipe isn’t just for Halloween! Swap out the sprinkles and candies for red and green for Christmas “Christmas Crack,” pastel colors for Easter, or red, white, and blue for patriotic holidays. The possibilities for delicious “holiday crack” are endless!
- Spices: A pinch of sea salt or a dash of cinnamon stirred into the toffee can add an intriguing layer of flavor. Just a small amount can make a big impact.
Conclusion:
And there you have it, my friends! We’ve journeyed through the simple, magical steps to creating what I genuinely believe will become your new favorite holiday treat. This isn’t just another dessert; it’s an experience, a symphony of sweet and salty, crunchy and chewy that dances on your palate with every single bite. It’s incredibly easy to make, deceptively simple in its ingredients, yet delivers a gourmet-level satisfaction that will have everyone asking for your secret recipe. The sheer joy of watching these humble ingredients transform into something so utterly addictive is a reward in itself. What truly sets this recipe apart is its universal appeal – it’s a crowd-pleaser for all ages, from the pickiest little goblins to the most discerning adult palates. Its quick preparation time also makes it an absolute lifesaver when you need a show-stopping treat without spending hours slaving away in the kitchen. Trust me, once you taste that perfect balance of buttery richness, chocolatey goodness, and that irresistible snap, you’ll understand why this particular confection holds such a special place in my heart.
Now, let’s talk about how to truly make this recipe shine and adapt it to your preferences. While delicious on its own, this treat is also incredibly versatile. For serving, I love arranging individual pieces on a rustic platter, perhaps alongside a bowl of fresh berries to cut through the richness, or a scoop of vanilla bean ice cream for an extra decadent touch. Imagine a cozy evening by the fire, a cup of hot cocoa, and a piece of this delightful treat – pure bliss! Don’t be afraid to experiment with variations. For a different twist, try using white chocolate chips instead of milk or dark, and then sprinkle with crushed candy canes for a festive peppermint bark vibe during the winter holidays. Or, for a truly elevated experience, drizzle a contrasting chocolate over the top once the initial chocolate layer has set, creating beautiful, intricate patterns. Think about adding a pinch of sea salt flakes after the chocolate sets to enhance the sweet-salty dynamic even further. You could also incorporate different mix-ins – perhaps chopped pretzels for an even greater crunch, or mini marshmallows gently pressed into the warm chocolate. The possibilities are truly endless, allowing you to personalize each batch to suit any occasion or dietary preference (within reason, of course!). This recipe isn’t just for one holiday; it’s a year-round contender for your dessert table, easily adaptable to any theme or season.
Share Your Sweet Success!
So, what are you waiting for? I wholeheartedly encourage you to roll up your sleeves, gather your ingredients, and give this incredible recipe a try this season. Whether you’re preparing for a spooky celebration, a cozy family gathering, or simply craving something extraordinarily delicious, this is the recipe you’ve been searching for. I promise you, the moment you pull that tray from the fridge and break off that first perfect piece, you’ll be hooked. This is more than just a recipe; it’s an invitation to create delightful memories and share pure joy. And speaking of sharing, I absolutely cannot wait to hear about your experience! Did you stick to the classic version, or did you get creative with your own unique toppings and variations? I’d love for you to share your triumphs, your photos, and your feedback in the comments section below. Tell me how your family and friends reacted to this amazing treat. Did it disappear as quickly in your house as it does in mine? Your insights and creations inspire me, and I genuinely believe that sharing our culinary adventures makes the experience even richer. So, go forth, bake some incredible Halloween Crack, and let’s spread the sweet magic together!
Halloween Crack Recipe: Spooky, Sweet, & Super Easy Treat!
Halloween Crack is an undeniably addictive, dangerously delicious, and incredibly simple treat perfect for the spooky season. This no-fuss recipe combines a crunchy saltine base with buttery toffee, a decadent chocolate layer, and festive Halloween candies and sprinkles, creating a sweet and salty indulgence that’s a guaranteed crowd-pleaser for any gathering.
Ingredients
-
35 saltine crackers (approx. 1 sleeve)
-
1 cup unsalted butter
-
1 cup light brown sugar, firmly packed
-
10 oz bag of semi-sweet chocolate chips
-
Eye candies
-
Candy corn
-
Reese’s Pieces
-
Halloween sprinkles
Instructions
-
Step 1
Preheat oven to 325°F (160°C). Line a 13×18 inch baking sheet with parchment paper, extending up the sides slightly. -
Step 2
Arrange 35 saltine crackers in a single layer on the prepared baking sheet, fitting them as snugly as possible without overlapping. -
Step 3
In a heavy-bottomed saucepan, combine 1 cup unsalted butter and 1 cup firmly packed light brown sugar. Melt over medium heat, stirring constantly with a whisk until the sugar dissolves and the mixture comes to a full, rolling boil. -
Step 4
Once boiling, stop stirring and let the mixture boil undisturbed for precisely 3 to 5 minutes, until it turns a slightly darker amber color. -
Step 5
Working quickly, carefully pour the hot toffee mixture evenly over the cracker layer. Use a heatproof spatula to gently spread it, ensuring all crackers are coated. -
Step 6
Transfer the baking sheet to your preheated oven and bake for 12 to 15 minutes. The toffee will bubble vigorously, and cracker edges might turn deeper golden brown. Remove from oven and place on a wire rack. -
Step 7
Immediately and generously sprinkle the 10 oz bag of semi-sweet chocolate chips over the hot toffee layer. Let sit undisturbed for about 5 minutes to allow the chips to soften and melt from the residual heat. -
Step 8
After 5 minutes, use an offset spatula or the back of a spoon to gently and evenly spread the melted chocolate over the entire surface of the toffee-coated crackers, creating a smooth, consistent layer. -
Step 9
While the chocolate is still warm and melted, generously shower your Halloween Crack with assorted Halloween sprinkles. Then, artfully arrange eye candies, candy corn, and Reese’s Pieces on top for maximum festive effect. -
Step 10
Allow the Halloween Crack to cool and set completely. This can take 1 to 2 hours at room temperature, or you can speed up the process by placing the baking sheet in the refrigerator for about 30-60 minutes, ensuring the chocolate is firm to the touch. -
Step 11
Once fully cooled and set, gently lift the parchment paper (with the crack on it) from the baking sheet and transfer it to a clean surface. Break the large slab into irregular, bite-sized pieces using your hands or a sharp knife.
Important Information
Nutrition Facts (Per Serving)
It is important to consider this information as approximate and not to use it as definitive health advice.
Allergy Information
Please check ingredients for potential allergens and consult a health professional if in doubt.