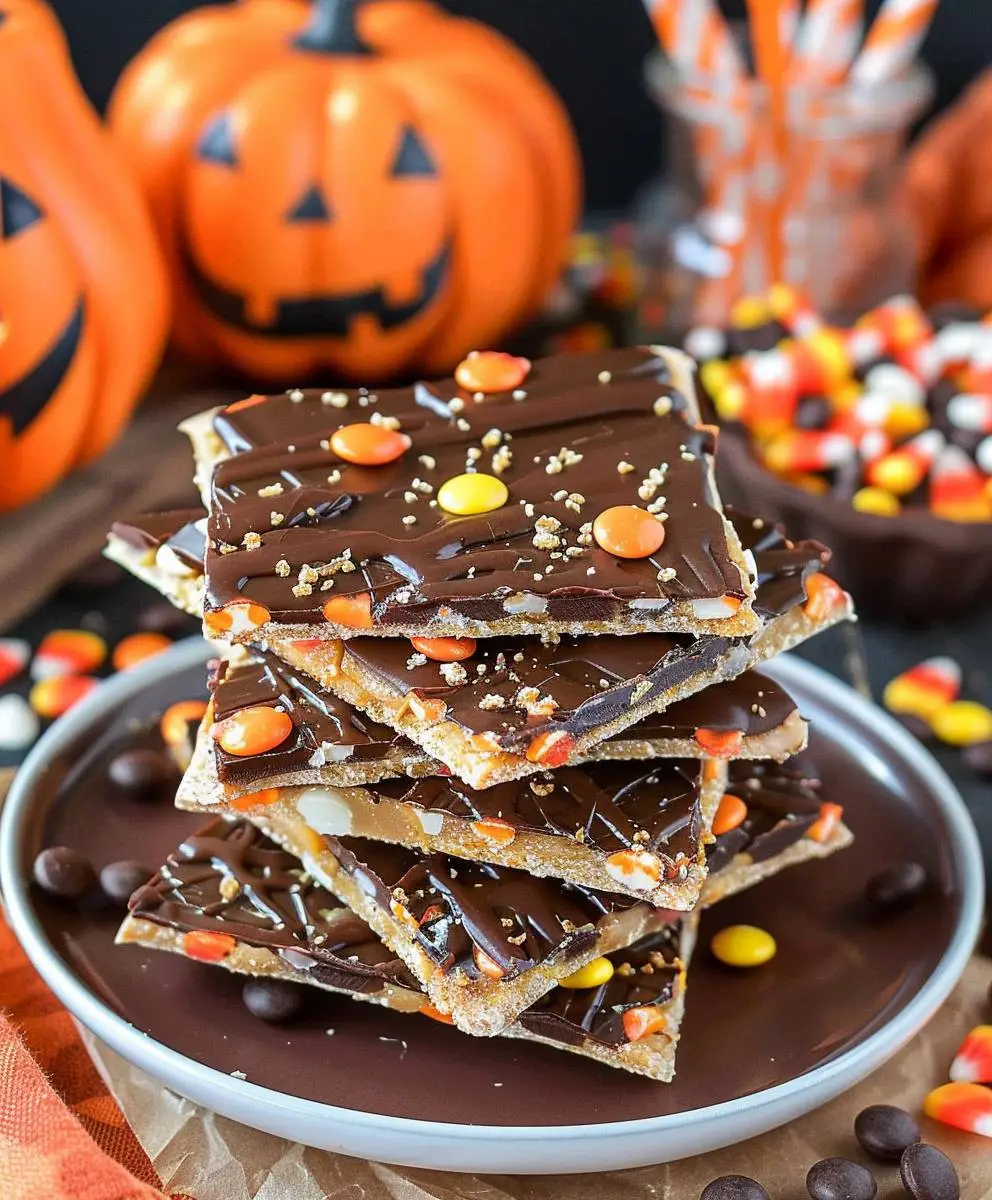
Halloween Candy Crack
Halloween Candy Crack: Just the name conjures up images of sweet, crunchy deliciousness, doesn’t it? And it’s true! This incredibly addictive treat is the perfect way to use up all that leftover Halloween candy, transforming a potential sugar-induced nightmare into a delightful culinary masterpiece. I’ve been making this recipe for years, and it’s always a huge hit with family and friends – especially around Halloween!
While the precise origins of Halloween Candy Crack are a bit murky, its popularity exploded in recent years thanks to the internet and the ever-growing desire for easy, no-bake desserts. It’s essentially a sweet and salty take on a classic toffee, but with a fun, festive twist. The beauty of this recipe lies in its adaptability; you can use virtually any type of Halloween candy you have on hand – from chocolate bars to gummy bears, even those oddly shaped peanut butter candies that always seem to be left over.
Why You’ll Love Halloween Candy Crack
This recipe isn’t just about using up leftover candy; it’s about creating a truly unforgettable taste experience. The combination of creamy peanut butter (or other nut butters!), the sweetness of the melted candy, and the satisfying crunch of pretzels or crackers creates a symphony of textures and flavors that’s simply irresistible. It’s the perfect balance of sweet and salty, crunchy and chewy, making it a crowd-pleaser for all ages. Plus, it’s incredibly easy to make, requiring minimal baking skills and even less cleanup – a huge bonus after a busy day of trick-or-treating or party preparations. So, if you’re looking for a fun, festive, and incredibly delicious way to enjoy your leftover Halloween candy, look no further than this amazing Halloween Candy Crack recipe.

Ingredients:
- 1 cup (2 sticks) unsalted butter, softened
- 1 cup granulated sugar
- 1 cup packed light brown sugar
- 2 large eggs
- 1 teaspoon vanilla extract
- 2 1/4 cups all-purpose flour
- 1 teaspoon baking soda
- 1 teaspoon salt
- 1 cup milk chocolate chips
- 1 cup butterscotch chips
- 1 cup peanut butter chips
- 1 cup your favorite Halloween candy, coarsely chopped (I used a mix of mini Snickers, Reese’s Pieces, and M&Ms)
- Optional: 1/2 cup chopped nuts (pecans or walnuts work well)
Preparing the Batter:
- Preheat your oven to 375°F (190°C). Grease and flour two 9×13 inch baking pans. I find using baking spray with flour works best for easy cleanup.
- In a large bowl, cream together the softened butter, granulated sugar, and brown sugar until the mixture is light and fluffy. This is where a stand mixer really shines, but a good old-fashioned hand mixer will do the trick too. Make sure you scrape down the sides of the bowl a few times to ensure everything is well combined.
- Beat in the eggs one at a time, then stir in the vanilla. I like to add a little extra vanilla – it really enhances the flavor of the cookies.
- In a separate bowl, whisk together the flour, baking soda, and salt. Gradually add the dry ingredients to the wet ingredients, mixing until just combined. Be careful not to overmix; a few lumps are okay. Overmixing can lead to tough cookies.
- Stir in the milk chocolate chips, butterscotch chips, peanut butter chips, and chopped Halloween candy. If using, add the nuts now as well. I like to gently fold in the candy to avoid crushing it too much, but a little bit of crushing adds to the fun, textural experience!
Baking Process:
- Divide the batter evenly between the two prepared baking pans. Use a spatula to spread the batter out evenly in each pan. This ensures even baking and prevents some parts from being undercooked or overcooked.
- Bake for 25-30 minutes, or until a toothpick inserted into the center comes out with just a few moist crumbs attached. Every oven is a little different, so keep an eye on your cookies and check for doneness a little early. You don’t want them to be dry and crumbly.
- Let the bars cool in the pans for at least 10 minutes before cutting and serving. This allows the bars to set up and makes them easier to cut into neat squares. Resist the urge to cut them too soon!
Cooling and Serving:
- Once the bars have cooled slightly in the pans, carefully lift them out and place them on a wire rack to cool completely. This prevents them from getting soggy on the bottom.
- Once completely cool, cut the bars into squares. I usually cut them into about 24 squares, but you can adjust the size to your liking. A sharp knife is essential for clean cuts.
- Store the cooled Halloween Candy Crack bars in an airtight container at room temperature for up to 3 days. They’re best enjoyed fresh, but they’ll still be delicious for a couple of days.
Tips and Variations:
- For a richer flavor, use dark chocolate chips instead of milk chocolate chips, or a combination of both.
- Feel free to experiment with different types of Halloween candy. Pretzel M&Ms, Snickers, and even some crushed candy corn would be delicious additions.
- If you don’t have butterscotch chips, you can substitute caramel chips or even chopped caramel candies.
- Add a sprinkle of sea salt on top of the bars before baking for a sweet and salty contrast. This is a surprisingly delicious addition!
- For a festive touch, use Halloween-themed sprinkles or colored sugar on top of the bars before baking. Just be mindful that the sprinkles might burn slightly if you bake them for too long.
- To make individual cookies, drop rounded tablespoons of batter onto ungreased baking sheets and bake for 10-12 minutes. This is a great option if you prefer smaller portions.
-
Make it ahead:
The batter can be made ahead of time and stored in the refrigerator for up to 2 days. Just let it come to room temperature before baking.
-
Freezing:
Baked bars can be frozen for up to 2 months. Wrap them tightly in plastic wrap and then foil to prevent freezer burn.
Conclusion:
So there you have it – my recipe for Halloween Candy Crack! I know, I know, the name alone is enough to make your mouth water. But trust me, the taste is even better than the name suggests. This recipe is a must-try for several reasons. First, it’s incredibly easy to make. Even if you’re a beginner in the kitchen, you’ll be able to whip up a batch of this delicious treat in no time. Second, it’s incredibly customizable. Love peanut butter? Add some! Prefer a different type of chocolate? Go for it! The possibilities are truly endless, making it perfect for experimenting and finding your own perfect combination of flavors.
Third, and perhaps most importantly, it’s unbelievably delicious. The perfect blend of sweet, salty, and crunchy textures creates a truly addictive snack that’s perfect for any occasion, especially Halloween! The combination of melted chocolate, buttery pretzels, and your favorite Halloween candies creates a symphony of flavors that will leave you wanting more. It’s the kind of treat that disappears quickly, so be prepared to make a double batch (or even triple!) if you’re expecting a crowd.
Serving Suggestions:
This Halloween Candy Crack is fantastic on its own, but it can also be elevated to the next level with a few simple additions. I love serving it with a scoop of vanilla ice cream for a decadent dessert. The cold ice cream perfectly complements the warm, gooey candy crack, creating a delightful temperature contrast. You can also serve it alongside a cup of hot cocoa or coffee for a cozy autumnal treat. For a more sophisticated presentation, you can break the candy crack into smaller pieces and arrange them on a platter garnished with fresh berries or a dusting of powdered sugar. The possibilities are truly endless!
Variations to Try:
While the basic recipe is already amazing, there are countless ways to personalize your Halloween Candy Crack to match your preferences. For a richer, more intense chocolate flavor, try using dark chocolate instead of milk chocolate. If you’re a fan of nuts, add chopped pecans, walnuts, or almonds for extra crunch and flavor. For a festive touch, use Halloween-themed sprinkles or candy melts to decorate the top. You could even experiment with different types of pretzels – perhaps using mini pretzels for a smaller, more bite-sized treat, or using different shapes and sizes for visual appeal.
Feeling adventurous? Try incorporating different types of candy! Instead of just using your standard Halloween candy mix, try using specific candies like Rolos, Reese’s Pieces, or even gummy bears for a unique twist. The possibilities are truly endless, allowing you to create a custom Halloween Candy Crack that perfectly reflects your taste preferences.
Don’t Forget to Share!
I truly hope you enjoy making this Halloween Candy Crack as much as I do. It’s a recipe that’s become a staple in my household, and I’m so excited to share it with you. Once you’ve tried it, I’d love to hear about your experience! Share your photos and feedback on social media using the hashtag #HalloweenCandyCrack. Let’s create a community of Halloween Candy Crack lovers and inspire others to try this amazing recipe. So, what are you waiting for? Get baking and prepare to be amazed by this incredibly delicious and easy-to-make Halloween Candy Crack!
Halloween Candy Crack: The Ultimate Guide to Spooky Sweets
Chewy bars brimming with milk chocolate, butterscotch, peanut butter chips, and your favorite Halloween candy.
Ingredients
Instructions
Recipe Notes
- For richer flavor, use dark chocolate chips or a combination of milk and dark chocolate.
- Experiment with different Halloween candies.
- Substitute caramel chips for butterscotch chips.
- Add a sprinkle of sea salt for a sweet and salty contrast.
- Use Halloween sprinkles or colored sugar for a festive touch (be mindful of burning).
- For individual cookies, drop rounded tablespoons of batter onto ungreased baking sheets and bake for 10-12 minutes.
- Batter can be refrigerated for up to 2 days before baking.
- Baked bars can be frozen for up to 2 months. Wrap tightly in plastic wrap and foil.