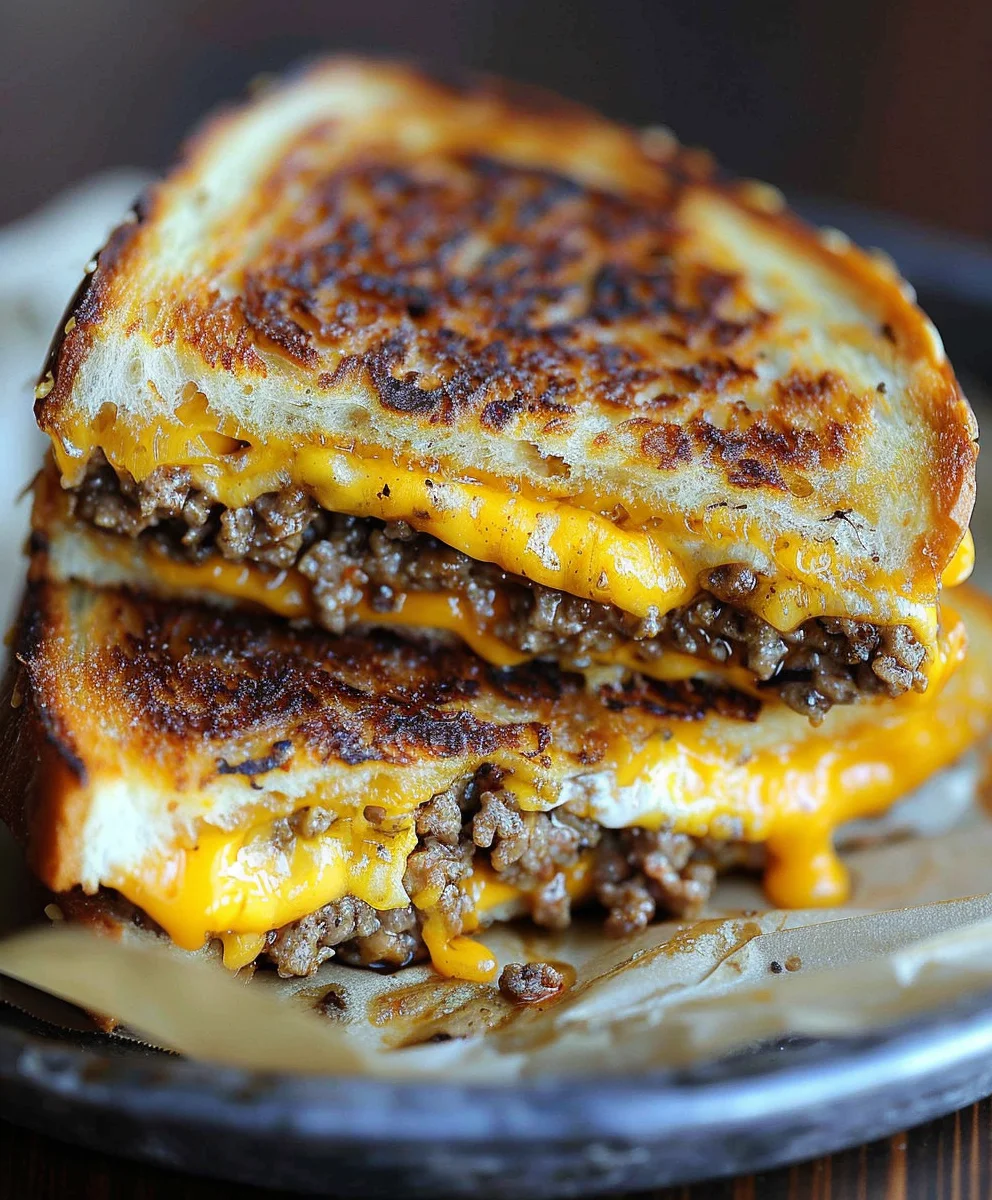
Grilled Cheese Patty Melts are more than just a sandwich; they are an experience, a symphony of flavors and textures that evoke warmth, comfort, and pure satisfaction. I often find myself craving this diner classic, a brilliant fusion that elevates the humble grilled cheese into something truly extraordinary. Originating from the bustling diners of America, the patty melt quickly secured its place as a beloved staple, offering a heartier, more sophisticated alternative to its simpler counterparts. It’s a testament to how simple ingredients, when perfectly combined, can create an iconic dish that stands the test of time.
What makes the Grilled Cheese Patty Melts so universally adored?
It’s the masterful combination of ingredients: the perfectly toasted, buttery bread, typically rye, providing a sturdy, flavorful base; the generously melted cheese, oozing with creamy goodness; and of course, the juicy, savory hamburger patty, seasoned to perfection. But perhaps the true magic lies in the addition of sweet, caramelized onions, which add a depth of flavor and a touch of sweetness that balances the richness of the meat and cheese. This isn’t just lunch; it’s a moment of culinary bliss, convenient enough for a weeknight but special enough for a weekend treat. I am thrilled to share my approach to perfecting this timeless dish with you.

Ingredients:
-
For the Ground Beef Patties:
- 1.5 pounds (approximately 680g) ground beef, ideally 80/20 lean-to-fat ratio. This fat content is crucial for a juicy and flavorful burger, preventing it from drying out on the griddle.
- 1 teaspoon kosher salt, or to taste. We want to season these patties well!
- 0.5 teaspoon freshly ground black pepper, or to taste.
- 1 tablespoon Worcestershire sauce (optional, but highly recommended for an extra layer of savory depth). It really boosts that umami flavor.
- 1 tablespoon neutral oil (like canola, vegetable, or grapeseed) for cooking the patties.
-
For the Caramelized Onions:
- 2 large yellow onions, thinly sliced. Yellow onions are fantastic for caramelizing because of their higher sugar content, which contributes to that beautiful golden-brown color and sweet flavor. Make sure they’re sliced uniformly for even cooking.
- 2 tablespoons unsalted butter. Butter adds richness and helps with the browning process.
- 1 tablespoon olive oil. Combining butter and olive oil helps prevent the butter from burning at higher temperatures.
- 0.5 teaspoon kosher salt. Salt helps draw moisture out of the onions, aiding in the caramelization process.
- A pinch of granulated sugar (optional, but can speed up the caramelization slightly).
- 2 tablespoons water or beef broth (for deglazing, if needed).
-
For the Grilled Cheese Element:
- 12 slices rye bread, or a hearty sourdough/brioche. Rye is traditional for a Patty Melt, offering a fantastic tang that complements the rich beef and sweet onions. Sourdough provides a similar zest, while brioche offers a sweeter, softer contrast. Choose a bread that can stand up to grilling without becoming too soggy or falling apart.
- 8-12 slices cheese, a mix of good melting cheeses is key. I love using a combination of Swiss (for its nutty flavor and classic Patty Melt vibe) and cheddar (for sharp tang and excellent meltability). Provolone or Gruyere would also be fantastic. You’ll need two slices per Patty Melt.
- 4-6 tablespoons unsalted butter, softened. This is for buttering the bread for the perfect golden-brown, crispy grilled cheese exterior.
-
For the Special Sauce:
- 0.5 cup mayonnaise.
- 2 tablespoons ketchup.
- 1 tablespoon finely minced dill pickle or sweet pickle relish. Pickles are essential for that classic tang and crunch!
- 1 teaspoon Dijon mustard.
- 0.5 teaspoon smoked paprika (for a subtle smoky kick).
- 0.25 teaspoon garlic powder.
- A dash of hot sauce (optional, for a little heat).
- Salt and freshly ground black pepper to taste.
Preparing the Caramelized Onions: A Labor of Love
- Slice the Onions: First things first, let’s get those onions ready. Peel your large yellow onions and slice them as thinly and uniformly as you can. A mandoline slicer works wonders here if you have one, but a sharp knife and a steady hand will do just fine. Uniform slices are important because they ensure all the onions cook evenly, preventing some from burning while others are still raw. We’re aiming for consistency for the best “Grilled Cheese Patty Melts” experience.
- Heat the Pan: In a large, heavy-bottomed skillet or Dutch oven, melt the 2 tablespoons of unsalted butter with 1 tablespoon of olive oil over medium-low heat. The combination of butter and olive oil is ideal because the olive oil helps raise the smoke point, preventing the butter from burning too quickly while still imparting its rich flavor. A heavy-bottomed pan will distribute heat more evenly, which is crucial for slow cooking.
- Add the Onions and Salt: Once the butter has melted and the oils are shimmering, add all your thinly sliced onions to the pan. It might look like an enormous pile, but trust me, they will cook down significantly. Sprinkle in the 0.5 teaspoon of kosher salt. The salt helps to draw out moisture from the onions, which is a key step in softening them and initiating the caramelization process. Stir the onions frequently to ensure they are evenly coated in the butter and oil.
- Cook Low and Slow: This is where patience becomes a virtue! Reduce the heat to low and continue to cook the onions, stirring every 5-10 minutes. The goal here is not to brown them quickly, but to gently soften them and allow their natural sugars to develop. This process can take anywhere from 30 minutes to an hour, or even longer, depending on your stovetop and the moisture content of the onions. Don’t rush it; truly caramelized onions are worth the wait and are a signature component of a delicious “Grilled Cheese Patty Melt.”
- Monitor and Stir: As the onions cook, they will gradually soften, shrink in volume, and begin to turn a translucent golden color. Continue stirring, scraping the bottom of the pan to prevent any sticking or burning. If you notice any bits sticking and browning too quickly, you can add a tablespoon or two of water or beef broth to deglaze the pan. This will loosen up any flavorful browned bits from the bottom and reincorporate them into the onions, intensifying their flavor.
- Achieve Deep Golden Brown: Keep cooking until the onions are deeply golden brown, incredibly tender, and sweet. They should have a jam-like consistency. This is the stage where the Maillard reaction has worked its magic, transforming the humble onion into a complex, sweet, and savory delight. Once they reach this perfect state, remove them from the heat and set them aside. They can be made in advance and stored in the fridge for a few days, making prep for your “Grilled Cheese Patty Melts” even easier!
Crafting the Special Sauce: The Zesty Complement
- Gather Ingredients: In a small bowl, combine the 0.5 cup mayonnaise, 2 tablespoons ketchup, 1 tablespoon finely minced dill pickle (or relish), 1 teaspoon Dijon mustard, 0.5 teaspoon smoked paprika, and 0.25 teaspoon garlic powder.
- Mix Thoroughly: Stir all the ingredients together until they are completely combined and smooth. The sauce should have a uniform color and no visible lumps.
- Season to Taste: Taste the sauce and adjust the seasonings as needed. Add a pinch of salt and freshly ground black pepper. If you like a little kick, now’s the time to add a dash of your favorite hot sauce. For more tang, a tiny bit more pickle juice or Dijon mustard can be added. This sauce is designed to cut through the richness of the beef and cheese, so don’t be shy with the zesty elements.
- Chill (Optional but Recommended): For the best flavor, cover the bowl and refrigerate the special sauce for at least 30 minutes to allow the flavors to meld. You can even make this sauce a day or two in advance. Chilling also thickens it slightly, making it easier to spread on your “Grilled Cheese Patty Melts.”
Forming and Seasoning the Patties: The Heart of the Melt
- Prepare the Ground Beef: In a large mixing bowl, gently break up the 1.5 pounds of 80/20 ground beef. It’s important to handle the meat minimally; overworking it can lead to tough burgers. We want tender, juicy patties for our “Grilled Cheese Patty Melts.”
- Season the Meat: Sprinkle the ground beef with 1 teaspoon of kosher salt, 0.5 teaspoon of freshly ground black pepper, and if using, 1 tablespoon of Worcestershire sauce. The Worcestershire sauce adds an incredible depth of umami, truly elevating the beef’s flavor.
- Mix Gently: Using your hands, gently mix the seasonings into the ground beef until just combined. Again, avoid overmixing. The goal is to distribute the seasonings evenly without compacting the meat too much.
- Form the Patties: Divide the seasoned ground beef into 4 equal portions. For each portion, gently form it into a round patty that is slightly wider than your bread slices and about 0.5 to 0.75 inches thick. Remember that burgers tend to shrink in diameter as they cook.
- Create a Dimple: For each patty, use your thumb to create a shallow indentation in the center. This little trick helps prevent the burger from bulging into a ball shape while cooking, ensuring it remains flat and evenly cooked, perfect for a “Grilled Cheese Patty Melt.”
- Chill the Patties (Recommended): Place the formed patties on a plate, cover them loosely, and refrigerate for at least 15-20 minutes. Chilling the patties helps them hold their shape better during cooking and contributes to a juicier burger by allowing the fat to solidify slightly before hitting the hot pan. This also gives the salt a little more time to penetrate the meat.
Cooking the Burger Patties: Achieving the Perfect Sear
- Preheat the Skillet: Heat a large, heavy-bottomed skillet or cast-iron pan over medium-high heat. Add 1 tablespoon of neutral oil to the pan. Allow the pan and oil to get very hot – you should see a slight shimmer from the oil, and it might even begin to smoke very lightly. A hot pan is crucial for achieving that beautiful, savory crust on your burger patties, which is a key element for a standout “Grilled Cheese Patty Melt.”
- Cook the Patties: Carefully place the chilled burger patties into the hot skillet. Don’t overcrowd the pan; cook in batches if necessary to maintain consistent pan temperature. You should hear a satisfying sizzle immediately upon placing the patties in the pan.
- Sear and Flip: Cook the patties for about 3-4 minutes on the first side for a medium-rare to medium doneness, or longer if you prefer them more well-done. Resist the urge to press down on the patties with your spatula, as this squeezes out all those delicious juices! Once a nice brown crust has formed on the bottom, carefully flip the patties.
- Finish Cooking: Cook for another 3-5 minutes on the second side, or until they reach your desired level of doneness. You can use an instant-read thermometer to check internal temperature if you wish: 130-135°F (54-57°C) for medium-rare, 135-140°F (57-60°C) for medium. Remember, the patties will continue to cook slightly after being removed from the heat.
- Rest the Patties: Once cooked, transfer the burger patties to a plate and loosely tent them with foil. Let them rest for at least 5 minutes. Resting allows the juices to redistribute throughout the meat, ensuring a more tender and flavorful burger. This is a critical step that many people skip, but it makes a huge difference in the final texture of your “Grilled Cheese Patty Melts.” While the patties rest, you can proceed with setting up your grilled cheese station.
Assembling and Grilling the Patty Melts: The Grand Finale
- Prepare the Bread: Take your softened unsalted butter and generously spread it on one side of each slice of rye bread. This buttered side will be the exterior of your “Grilled Cheese Patty Melt,” providing that irresistible crispy, golden-brown crust. You’ll need two slices of bread per patty melt.
- Preheat the Griddle/Skillet: Return your large, heavy-bottomed skillet or griddle to medium-low heat. We want a moderate heat for grilling the sandwiches; too high, and the bread will burn before the cheese has a chance to fully melt and the sandwich heats through.
- First Layer of Cheese: Place a slice of buttered bread, butter-side down, onto the preheated skillet. Immediately top it with one slice of your chosen melting cheese (e.g., Swiss or cheddar). The heat from the pan will start warming the bread and softening the cheese right away.
- Add the Patty and Onions: Gently place one of your rested burger patties on top of the cheese-covered bread. Spoon a generous helping of the warm caramelized onions over the burger patty. The onions are a signature element of these “Grilled Cheese Patty Melts,” so don’t be shy!
- Second Layer of Cheese and Bread: Place another slice of cheese on top of the caramelized onions. This sandwiching of the patty and onions between two layers of cheese is key to holding everything together and creating a wonderfully gooey interior. Finally, top with the second slice of buttered bread, butter-side up.
- Grill to Golden Perfection: Cook the “Grilled Cheese Patty Melt” for about 4-6 minutes on the first side, or until the bread is beautifully golden brown and crispy, and the bottom layer of cheese has started to melt. You might need to press down gently on the sandwich with a spatula to ensure even contact with the pan and help the cheese melt, creating a cohesive sandwich.
- Flip and Finish: Carefully flip the sandwich over to the second side. Continue to cook for another 3-5 minutes, or until that side is also golden brown and crispy, and all the cheese inside is completely melted and gooey. The goal is a perfectly browned exterior and a fully melted, warm interior. If your bread is browning too quickly, lower the heat slightly. Patience is key for the perfect melt.
- Repeat for Remaining Melts: Remove the finished “Grilled Cheese Patty Melt” from the skillet and set it aside. Repeat the assembly and grilling process for the remaining patties and bread slices. If cooking multiple melts, you might need to adjust the heat slightly between batches.
Serving Your Ultimate Grilled Cheese Patty Melts:
- Slice and Serve: Once all your “Grilled Cheese Patty Melts” are cooked, transfer them to a cutting board. I find that cutting them diagonally from corner to corner not only looks great but also makes them easier to handle and eat. The cross-section reveals all those delightful layers of beef, caramelized onions, and melted cheese, truly a sight to behold.
- Generously Apply Sauce: Now for the grand finale! Serve the hot “Grilled Cheese Patty Melts” immediately with a generous dollop of your homemade special sauce on the side for dipping, or if you prefer, spread it directly inside the sandwich before you close it up. The zesty, tangy sauce is the perfect counterpoint to the rich, savory flavors of the patty melt.
- Pairing Suggestions: These incredible “Grilled Cheese Patty Melts” are hearty enough to be a meal on their own, but they also pair wonderfully with classic diner sides. Think crispy French fries, a simple green salad to cut through the richness, or even a cup of tomato soup for a truly comforting experience. Enjoy every single bite of this absolute classic! The combination of flavors and textures in these “Grilled Cheese Patty Melts” is simply unbeatable.
Conclusion:
Well, my friends, we’ve reached the exciting culmination of our culinary adventure, and I truly hope you’re as enthused as I am about what we’ve just created. If there’s one recipe I implore you to bring into your kitchen this week, it’s this one. What makes these particular Grilled Cheese Patty Melts an absolute must-try isn’t just their incredible flavor, but the way they transform simple, humble ingredients into something truly extraordinary. We’re talking about an unparalleled symphony of textures and tastes: the golden, perfectly toasted bread with its slight crunch giving way to a rich, savory burger patty, all harmonizing with the luscious, molten rivers of cheese that stretch and pull with every single bite. It’s comfort food elevated, a familiar favorite given a gourmet makeover without any of the fuss or complexity you might expect.
I designed this recipe to ensure that every element contributes to a cohesive and deeply satisfying experience. From the carefully chosen bread that holds up beautifully under the grill, to the seasoned patty that brings a juicy, umami-packed punch, and of course, the melt-in-your-mouth cheese that brings it all together – each component plays a vital role. You’ll find that these aren’t just any sandwiches; they are a testament to how incredible a well-executed classic can be. There’s a magic in the way the ingredients meld together under heat, creating a flavor profile that is both nostalgic and wonderfully fresh. It’s the kind of meal that brings a smile to your face, whether you’re enjoying it as a quick lunch or a comforting dinner after a long day. This recipe isn’t just about feeding your hunger; it’s about nourishing your soul with pure, unadulterated deliciousness.
Perfect Pairings and Creative Twists:
Now that you’ve mastered the art of creating these magnificent sandwiches, let’s talk about how to make the meal truly unforgettable or how to put your own unique spin on them. For classicists, nothing beats a bowl of warm, creamy tomato soup for dipping. The sweet tang of the soup cuts through the richness of the sandwich beautifully, creating that quintessential comfort food combination. Another fantastic side is a crisp, cool dill pickle spear, offering a refreshing burst of acidity that cleanses the palate. Or, for a more substantial plate, a side of perfectly golden, seasoned fries or a vibrant, fresh side salad with a zesty vinaigrette would be absolutely delightful.
But don’t stop there! The beauty of this recipe lies in its versatility. You can easily adapt it to suit your personal preferences or whatever you have on hand. Craving a different cheese? Go for it! Provolone will give you a milder, more Italian-American deli vibe, while a sharp cheddar will add a powerful, tangy kick. If you’re feeling adventurous, try a smoked gouda for a complex, smoky undertone, or pepper jack for a spicy surprise. You could also experiment with different breads – a hearty sourdough would add a wonderful chewiness and tang, while a rich brioche would lend a touch of sweetness and extra decadence. Don’t be afraid to mix and match!
For those who love to customize their patties, consider adding some finely minced onions, garlic powder, or a dash of Worcestershire sauce directly into your ground beef mixture before forming the patties. This can deepen the savory flavor even further. And if you’re looking to elevate the toppings, try adding some caramelized onions (a true game-changer!), sautéed mushrooms, or even a few slices of crispy bacon. A dollop of your favorite special sauce, be it a tangy aioli or a smoky BBQ sauce, could also take your sandwich to the next level. For my plant-based friends, a high-quality vegetarian patty works just as wonderfully, ensuring everyone can enjoy this incredible creation.
Your Culinary Adventure Awaits!
I genuinely believe that once you’ve experienced the joy of making and tasting these perfectly crafted sandwiches, you’ll find yourself returning to this recipe again and again. It’s more than just a meal; it’s an experience – a moment of pure culinary bliss that’s accessible to everyone, regardless of your skill level in the kitchen. So, please, don’t just read about it. Take the plunge! Gather your ingredients, fire up your griddle, and embark on this delicious journey. I promise you, the reward is utterly worth it.
And when you do, I would absolutely love to hear about it! What did you think? Did you try any of the variations? Did you discover a new favorite pairing? Your feedback is incredibly valuable, not just to me, but to other aspiring home cooks who might be looking for inspiration. So, once you’ve savored every last bite, come back and share your experience. Let me know in the comments how your Grilled Cheese Patty Melts turned out, what clever twists you added, or who you shared this delightful meal with. Your insights and culinary adventures inspire me, and I can’t wait to hear all about your delicious successes. Happy cooking, and prepare for a taste sensation you won’t soon forget!
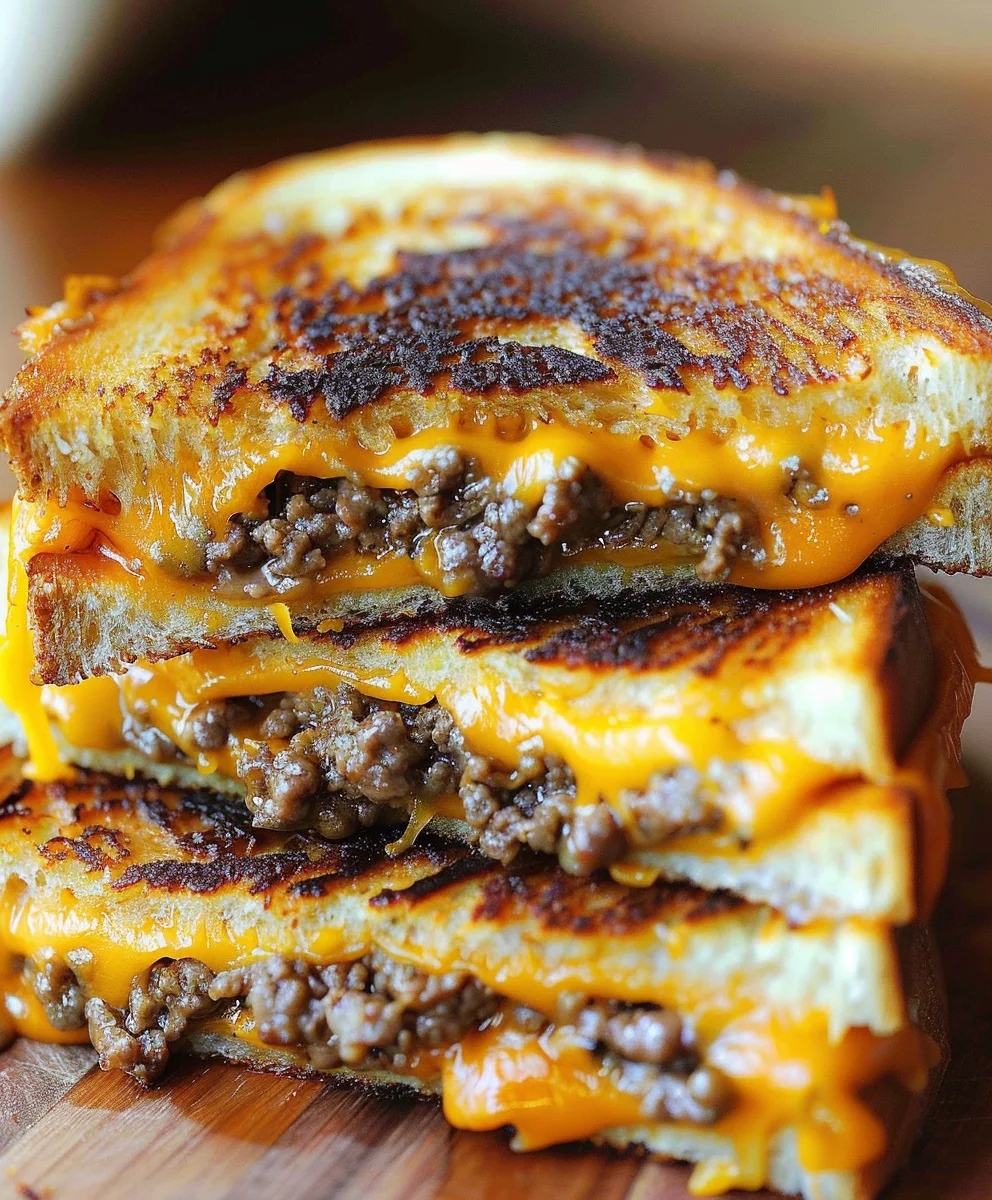
Grilled Cheese Patty Melts
Grilled Cheese Patty Melts are more than just a sandwich; they are an experience, a symphony of flavors and textures that evoke warmth, comfort, and pure satisfaction. This diner classic is a brilliant fusion that elevates the humble grilled cheese into something truly extraordinary, offering a heartier, more sophisticated alternative to its simpler counterparts.
Ingredients
-
For the Ground Beef Patties:
-
1.5 lbs (680g) 80/20 ground beef
-
1 tsp kosher salt
-
0.5 tsp freshly ground black pepper
-
1 tbsp Worcestershire sauce (optional)
-
1 tbsp neutral oil (e.g., canola) for cooking
-
For the Caramelized Onions:
-
2 large yellow onions, thinly sliced
-
2 tbsp unsalted butter
-
1 tbsp olive oil
-
0.5 tsp kosher salt
-
Pinch of granulated sugar (optional)
-
2 tbsp water or beef broth (for deglazing, if needed)
-
For the Grilled Cheese Element:
-
12 slices rye bread (or sourdough/brioche)
-
8-12 slices cheese (e.g., Swiss & cheddar)
-
4-6 tbsp unsalted butter, softened (for bread)
-
For the Special Sauce:
-
0.5 cup mayonnaise
-
2 tbsp ketchup
-
1 tbsp finely minced dill pickle or sweet pickle relish
-
1 tsp Dijon mustard
-
0.5 tsp smoked paprika
-
0.25 tsp garlic powder
-
Dash of hot sauce (optional)
-
Salt and freshly ground black pepper to taste
Instructions
-
Step 1
Thinly slice 2 large yellow onions. In a large skillet, melt 2 tbsp unsalted butter with 1 tbsp olive oil over medium-low heat. Add sliced onions and 0.5 tsp kosher salt. Cook over low heat for 30-60 minutes, stirring frequently, until deeply golden brown, tender, and sweet. Deglaze with 2 tbsp water or beef broth if needed. Set aside. -
Step 2
In a small bowl, combine 0.5 cup mayonnaise, 2 tbsp ketchup, 1 tbsp minced dill pickle/relish, 1 tsp Dijon mustard, 0.5 tsp smoked paprika, 0.25 tsp garlic powder, and an optional dash of hot sauce. Mix well and season with salt and pepper to taste. Refrigerate for at least 30 minutes to meld flavors. -
Step 3
Gently mix 1.5 lbs 80/20 ground beef with 1 tsp kosher salt, 0.5 tsp black pepper, and 1 tbsp Worcestershire sauce (if using). Divide into 4 portions and form into patties slightly wider than your bread, about 0.5-0.75 inches thick. Create a shallow indentation in the center of each patty. Chill patties for 15-20 minutes. -
Step 4
Heat 1 tbsp neutral oil in a large, heavy-bottomed skillet over medium-high heat until shimmering. Place chilled patties in the hot skillet, cooking in batches if necessary. Sear for 3-4 minutes per side for medium-rare to medium doneness. Do not press down on patties. Transfer to a plate, tent with foil, and let rest for 5 minutes. -
Step 5
Generously butter one side of each rye bread slice. Heat a large skillet or griddle over medium-low heat. Place a buttered bread slice (butter-side down) in the skillet, top with a slice of cheese, then a cooked burger patty, a generous helping of caramelized onions, another slice of cheese, and finally, a second buttered bread slice (butter-side up). Grill for 4-6 minutes per side, pressing gently, until bread is golden brown and crispy, and cheese is fully melted and gooey. Repeat for remaining melts. -
Step 6
Transfer finished Patty Melts to a cutting board and slice diagonally. Serve immediately with a generous dollop of the special sauce on the side for dipping, or spread inside the sandwich. Enjoy with classic sides like French fries or a green salad.
Important Information
Nutrition Facts (Per Serving)
It is important to consider this information as approximate and not to use it as definitive health advice.
Allergy Information
Please check ingredients for potential allergens and consult a health professional if in doubt.