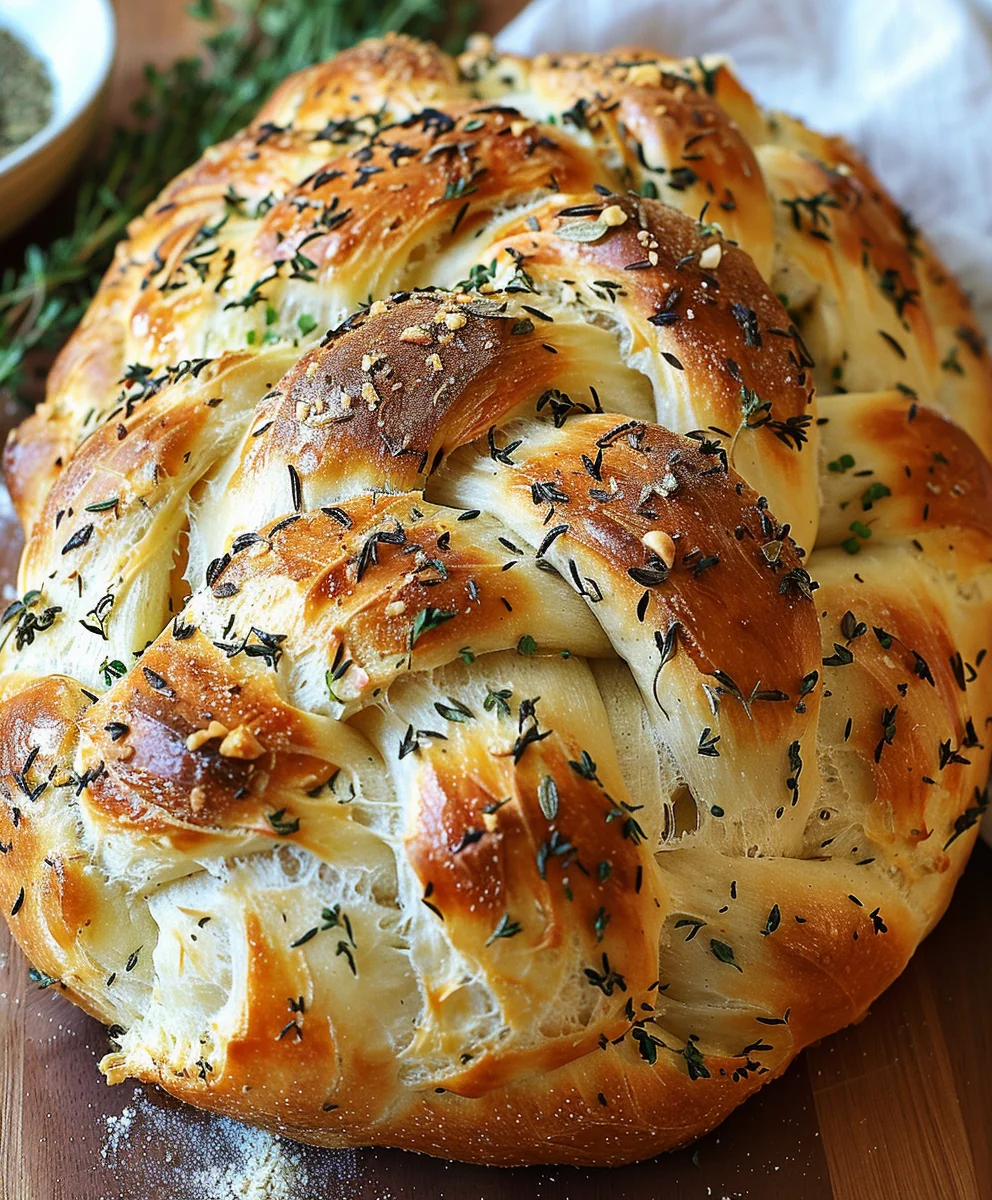
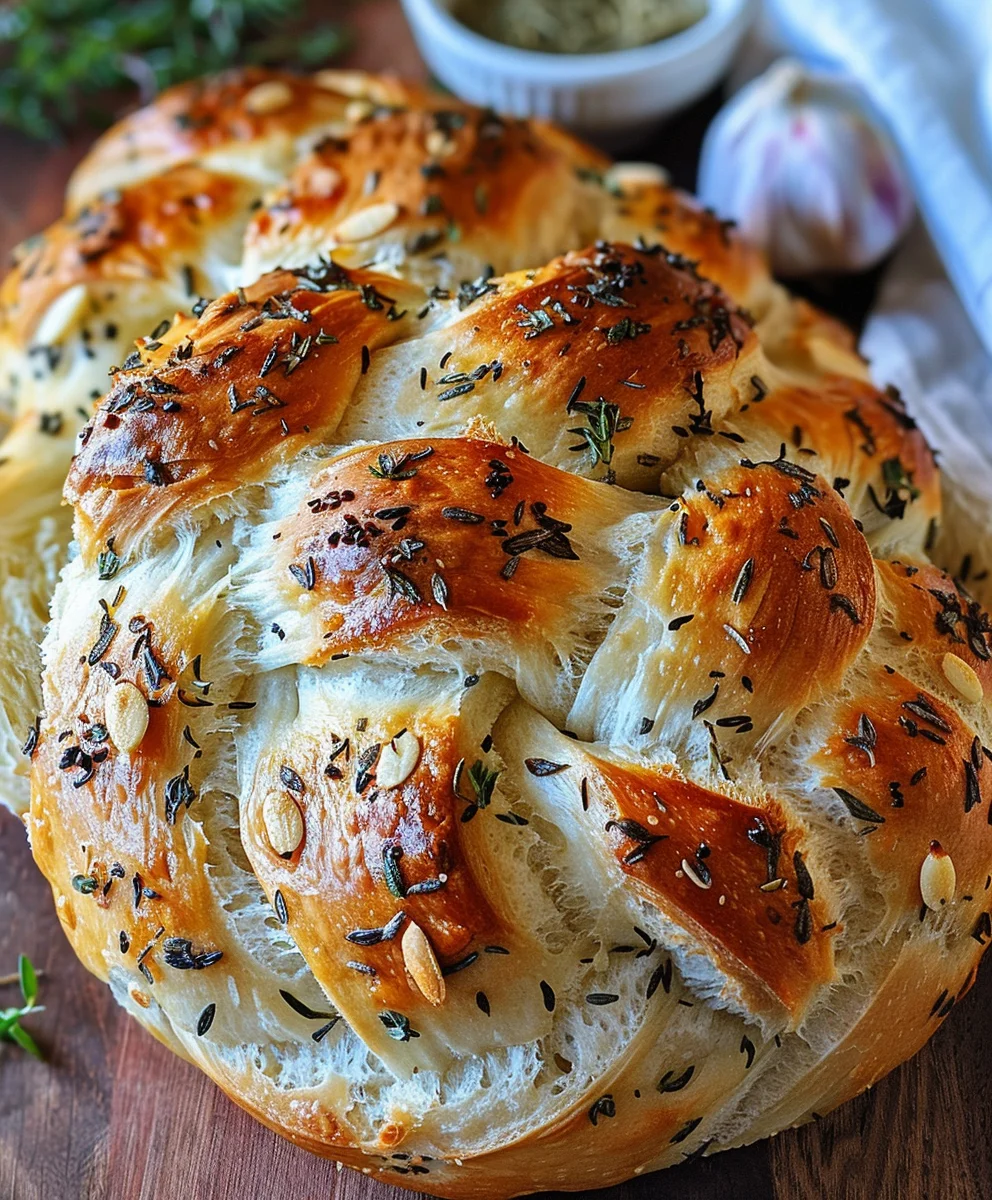
Garlic Herb Braided Bread is more than just a recipe; it’s an invitation to fill your home with an aroma that truly captivates. Picture this: a stunning, golden-brown loaf, intricately braided, emerging from your oven, its warmth permeating every corner of your kitchen. The visual appeal alone is enough to impress, but it’s the irresistible scent of fresh garlic and fragrant herbs that truly sets the stage for an extraordinary culinary experience.
A Timeless Tradition, Reimagined for Your Table
Braided breads hold a special place in culinary traditions across the globe, often symbolizing unity, celebration, and the simple joy of sharing. While many might associate intricate braiding with advanced baking skills, I am here to assure you that creating this beautiful loaf is an incredibly rewarding and surprisingly accessible endeavor. People absolutely adore this dish not only for its breathtaking presentation but for the symphony of flavors and textures it delivers. Each bite offers a delightful journey, from the crisp, herb-infused crust to the incredibly soft, airy interior, bursting with savory garlic and aromatic herbs. This homemade Garlic Herb Braided Bread transforms any meal into a special occasion, serving as a perfect accompaniment to soups, stews, or simply enjoyed on its own with a smear of butter. Get ready to bake a loaf that looks as good as it tastes!

Ingredients:
For the Dough:
- 3 ½ cups (approximately 420g) all-purpose flour, plus extra for dusting
- 2 ¼ teaspoons (one standard packet) active dry yeast
- 1 teaspoon granulated sugar
- 1 teaspoon fine sea salt
- 1 cup (240ml) warm water (about 105-115°F or 40-46°C)
- ½ cup (120ml) warm milk (whole milk preferred, about 105-115°F or 40-46°C)
- ¼ cup (56g) unsalted butter, melted and slightly cooled, plus extra for greasing the bowl
For the Garlic Herb Filling:
- ½ cup (113g) unsalted butter, softened
- 6-8 cloves garlic, minced very finely (adjust to your garlic preference, I love a lot!)
- ¼ cup fresh parsley, finely chopped
- 2 tablespoons fresh chives, finely chopped
- 1 tablespoon fresh rosemary, finely chopped
- 1 tablespoon fresh thyme leaves, finely chopped
- ½ teaspoon fine sea salt
- ¼ teaspoon freshly ground black pepper
- Optional: ¼ cup grated Parmesan cheese for extra savoriness
For the Egg Wash:
- 1 large egg
- 1 tablespoon milk or water
Instructions:
Phase 1: Preparing the Dough for Your Garlic Herb Braided Bread
- Activate the Yeast: In a large mixing bowl, or the bowl of your stand mixer, combine the warm water and warm milk. Ensure the temperature is just right – too hot will kill the yeast, too cold won’t activate it. Sprinkle the granulated sugar and active dry yeast over the liquid. Give it a gentle stir and let it sit for 5-10 minutes. You’ll know your yeast is alive and well when it becomes frothy and bubbly on the surface. If it doesn’t foam, your yeast might be old or your water temperature was off, and you’ll need to start this step again. This is a crucial first step for a light and airy Garlic Herb Braided Bread.
- Combine Wet and Dry Ingredients: Once your yeast is active, add the melted and slightly cooled butter to the yeast mixture. In a separate bowl, whisk together the all-purpose flour and salt. Gradually add the flour mixture to the wet ingredients, mixing with a wooden spoon or using the dough hook attachment of your stand mixer on low speed.
- Knead the Dough: Continue mixing until a shaggy dough forms. Then, increase the speed to medium-low (if using a stand mixer) and knead for about 8-10 minutes. If kneading by hand, turn the dough out onto a lightly floured surface and knead vigorously for 10-12 minutes. The dough should become smooth, elastic, and no longer sticky. You can perform the “windowpane test” to check for proper gluten development: gently stretch a small piece of dough; if you can stretch it thin enough to see light through it without tearing, it’s ready. If it tears easily, keep kneading.
- First Rise (Bulk Fermentation): Lightly grease a clean large bowl with a little butter or oil. Transfer the kneaded dough to the bowl, turning it once to coat all sides. Cover the bowl tightly with plastic wrap or a clean kitchen towel. Place the bowl in a warm, draft-free spot for 1 to 1 ½ hours, or until the dough has doubled in size. A slightly warm oven (turned off, with just the light on) can be a perfect environment. Patience here is key for the wonderful texture of your Garlic Herb Braided Bread.
Phase 2: Crafting the Aromatic Garlic Herb Filling
- Prepare the Herbs and Garlic: While your dough is on its first rise, prepare the aromatic filling. Finely mince the garlic cloves. Chop all the fresh herbs (parsley, chives, rosemary, thyme). I find that fresh herbs make all the difference, providing a vibrant flavor and beautiful specks of green throughout the bread.
- Combine Filling Ingredients: In a small bowl, combine the softened unsalted butter with the minced garlic, chopped fresh parsley, chives, rosemary, thyme, salt, and black pepper. If you’re using Parmesan cheese, add it now. Use a fork or a small spatula to thoroughly mix everything until well combined and fragrant. The butter should be soft enough to mix easily, but not melted. If it’s too firm, let it sit at room temperature for a bit longer. This fragrant mixture is what will infuse every bite of your Garlic Herb Braided Bread with incredible flavor.
Phase 3: Shaping the Braided Bread – The Art of the Braid
- Punch Down and Prepare: Once your dough has doubled in size, gently punch it down to release the air. This helps create a finer, more even crumb. Lightly flour your work surface. Turn the dough out onto the floured surface and gently shape it into a rough rectangle.
- Roll Out the Dough: Using a rolling pin, roll the dough into a large rectangle, approximately 12×18 inches (30×45 cm). Try to make the edges as straight as possible, as this will help immensely with the final look of your braid. The dough should be about ¼ inch thick.
- Spread the Garlic Herb Filling: Evenly spread the entire garlic herb butter mixture over the rolled-out dough rectangle, leaving about a ½ inch border clear along one of the longer edges. This border will help seal the dough later. Make sure the butter is spread from edge to edge on the other three sides.
- Roll into a Log: Starting from one of the longer edges (the one without the clear border), carefully roll the dough up tightly into a log. As you roll, try to keep it as snug as possible to avoid air pockets. Once rolled, pinch the seam along the bottom to seal it completely. Gently stretch the log slightly if needed to ensure even thickness.
- Cut and Prepare for Braiding: Using a sharp knife or a bench scraper, carefully slice the log lengthwise down the middle, from one end to the other. You will now have two long, separate halves, each revealing the beautiful layers of dough and garlic herb filling. This step is where the magic of the “braided” appearance for your Garlic Herb Braided Bread truly begins.
-
Twist/Braid the Loaf:
- For a simple, stunning two-strand twist: Lay the two cut halves next to each other, with the cut sides facing up. Carefully crisscross one strip over the other, keeping the cut sides exposed on the outside of the twist. Continue twisting the two strands together, gently pressing the ends together at the bottom to seal. Aim for a gentle, loose twist rather than a super tight braid to prevent tearing.
- For a more intricate three-strand braid (if you prefer): Instead of just two strips, you can cut the log into three strips, ensuring they remain connected at one end. Then, proceed to braid them as you would hair, keeping the cut sides facing upwards as much as possible. Secure the ends by pinching them together.
For this recipe, I find the two-strand twist gives the most dramatic visual appeal with less effort, truly showcasing the gorgeous layers of butter and herbs.
- Transfer and Second Rise: Carefully transfer your twisted or braided dough to a baking sheet lined with parchment paper. Cover it loosely with plastic wrap or a clean kitchen towel. Let it rise again in a warm, draft-free spot for another 30-45 minutes, or until visibly puffy. It won’t quite double in size again, but it should look fuller. Towards the end of this rise, preheat your oven.
Phase 4: Baking Your Golden Garlic Herb Braided Bread
- Preheat the Oven: Preheat your oven to 375°F (190°C). Make sure your oven rack is in the middle position.
- Prepare the Egg Wash: In a small bowl, whisk together the large egg and 1 tablespoon of milk or water. This egg wash will give your Garlic Herb Braided Bread a beautiful golden-brown crust and a lovely sheen.
- Apply Egg Wash: Once the bread has had its second rise, gently brush the entire surface of the braided loaf with the egg wash. Be thorough but gentle to avoid deflating the dough.
- Bake the Bread: Place the baking sheet with your beautiful Garlic Herb Braided Bread into the preheated oven. Bake for 25-35 minutes, or until the bread is deeply golden brown on top and sounds hollow when tapped on the bottom. If you notice it browning too quickly, you can loosely tent it with aluminum foil for the last 10-15 minutes of baking. An internal temperature of 200-210°F (93-99°C) indicates it is fully baked.
- Cooling: Once baked, immediately transfer the bread from the baking sheet to a wire rack. Allow it to cool for at least 15-20 minutes before slicing. Resisting the urge to slice immediately is the hardest part, but it allows the internal structure of your Garlic Herb Braided Bread to set.
Phase 5: Serving and Enjoying Your Homemade Garlic Herb Braided Bread
- Slice and Serve: Once cooled enough to handle, use a serrated knife to slice your Garlic Herb Braided Bread into generous pieces. The aroma filling your kitchen right now will be absolutely irresistible!
- Serving Suggestions: This bread is fantastic on its own, still warm from the oven. It pairs wonderfully with pasta dishes, soups, stews, or as an accompaniment to a cheese board. It’s also perfect for dipping into olive oil or your favorite marinara sauce. I often serve it as a star side dish for family dinners, and it’s always a crowd-pleaser.
- Storage: Store any leftover Garlic Herb Braided Bread at room temperature in an airtight container or wrapped tightly in plastic wrap for up to 2-3 days. For longer storage, you can wrap it well and freeze for up to 1 month; thaw at room temperature and warm gently in the oven before serving for that “freshly baked” experience.
There you have it! A truly magnificent and incredibly flavorful Garlic Herb Braided Bread that will impress anyone who tries it. Enjoy the process and the delicious results!
Conclusion:
Well, my friends, we’ve journeyed together through the wonderful process of creating something truly spectacular, and I genuinely hope you’re feeling inspired and excited to roll up your sleeves and get baking. This isn’t just any bread; it’s an experience, a masterpiece you’ve crafted with your own hands. The moment that beautiful aroma of garlic and fresh herbs begins to waft through your kitchen, swirling around every corner and filling your home with an inviting warmth, you’ll understand exactly why this recipe is an absolute must-try. I promise you, the visual appeal alone, with its elegant braided form and golden-brown crust, will make jaws drop, but it’s the taste – oh, the taste! – that truly seals the deal. Each bite offers a delightful chewiness, bursting with savory flavors that dance on your palate, a testament to the simple yet profound power of fresh ingredients and a little bit of baking love.
Why You Absolutely Need To Bake This Bread
You might be thinking, “A braided bread? That sounds complicated!” But trust me, once you follow the steps, you’ll find that the process is incredibly rewarding and surprisingly straightforward. The magic of creating something so visually stunning from basic ingredients is a joy in itself. This bread isn’t just food; it’s a conversation starter, a centerpiece, and a testament to your burgeoning baking skills. Imagine the pride you’ll feel as you present your very own Garlic Herb Braided Bread to family and friends. It’s the kind of recipe that makes people think you’ve been to culinary school, all while being achievable right in your home kitchen. The texture is phenomenal, the flavor profile is robust and satisfying, and frankly, it just makes everything else on your table taste better. It’s comforting, it’s impressive, and it’s utterly delicious – a triple threat in the best possible way. This bread truly embodies the heart of homemade goodness, offering a warmth and authenticity that store-bought simply cannot replicate.
Serving Suggestions and Creative Variations
Now that you’ve got this magnificent loaf, let’s talk about how to enjoy it. The possibilities are truly endless! This Garlic Herb Braided Bread is an ideal companion for a wide array of dishes. Picture it torn into chunks and dipped into a rich, simmering bowl of homemade tomato soup or a creamy mushroom bisque on a chilly evening. It’s perfect for soaking up the delicious juices from a slow-cooked stew or the vibrant sauces of your favorite pasta dish, like a robust Bolognese or a simple Aglio e Olio. For a more sophisticated pairing, serve slices alongside roasted chicken, grilled fish, or a juicy steak, allowing its savory notes to complement the main course beautifully.
But don’t limit yourself to just meals! This bread is so good, it can easily shine on its own. Enjoy it simply with a pat of good quality butter, allowing the subtle sweetness of the butter to enhance the herby garlic flavors. A drizzle of your finest extra virgin olive oil and a sprinkle of flaky sea salt also makes for a divine snack. For a cheese lover, a slice with some aged cheddar or a creamy brie would be absolute heaven.
Feeling adventurous with variations? I encourage you to experiment! Try incorporating different cheeses directly into the dough or the filling – a handful of finely grated Parmesan, sharp cheddar, or even a crumbly feta could add a wonderful dimension. If you’re a fan of a little heat, a pinch of red pepper flakes in the herb mixture will give it a fantastic kick. Consider swapping out some of the herbs; rosemary or thyme would be delightful additions, or even a mix of all your favorites. For a slightly different twist, you could sprinkle some everything bagel seasoning on top before baking for an extra crunch and flavor boost. And for those with a sweet tooth, why not try a sweet version next time? Imagine a braided bread filled with cinnamon sugar, apples, or even a chocolate hazelnut spread – the braiding technique is so versatile!
Storing your leftover bread, if there is any, is simple. Keep it in an airtight container at room temperature for up to two days, or freeze it for longer storage. To refresh, simply warm slices in the oven or toaster oven until fragrant and soft again.
Share Your Baking Triumphs!
More than anything, I genuinely can’t wait for you to experience the sheer joy of baking and sharing this incredible bread. There’s something deeply satisfying about pulling a warm, fragrant loaf from the oven, knowing you’ve created something so beautiful and delicious. It’s a small act of love, for yourself and for those you share it with. When you do try your hand at it, please, please share your creations with me! I absolutely adore seeing what you come up with. Tag me in your photos, tell me about your family’s reaction, or any ingenious twists you came up with. Did you add a special cheese? Did you use different herbs? Every unique touch you add makes the recipe even more your own. Your feedback and creativity inspire not just me, but other bakers in our community. Let’s celebrate the simple, profound pleasure of baking together! Happy baking, everyone!
Garlic Herb Braided Bread
A stunning, golden-brown loaf, intricately braided, with the irresistible scent of fresh garlic and fragrant herbs. This homemade bread transforms any meal into a special occasion, offering a crisp, herb-infused crust and an incredibly soft, airy interior.
Ingredients
-
3 cups all-purpose or bread flour
-
2¼ tsp active dry yeast (1 packet)
-
1 cup warm water (110°F)
-
2 tbsp olive oil
-
1 tsp salt
-
1 tbsp sugar
-
3–4 cloves garlic, minced or roasted
-
1 tbsp dried mixed herbs (oregano, thyme, basil) or 2 tbsp fresh
-
½ cup grated parmesan cheese
-
1 tbsp melted butter (for brushing)
-
¼ tsp red pepper flakes
-
2 tbsp shredded mozzarella
-
1 tbsp fresh parsley for garnish
Instructions
-
Step 1
In a large bowl, combine warm water (110°F), sugar, and active dry yeast. Stir gently and let sit 5-10 minutes until frothy. -
Step 2
Add olive oil and salt to the yeast mixture. Gradually add flour, mixing until a shaggy dough forms. Knead on a lightly floured surface for 10-12 minutes until smooth and elastic (or 8-10 minutes with a stand mixer). -
Step 3
Lightly grease a bowl, place dough in it, turning to coat. Cover and let rise in a warm, draft-free spot for 1 to 1.5 hours, or until doubled in size. -
Step 4
While dough rises, combine minced garlic, dried/fresh mixed herbs, grated Parmesan cheese, red pepper flakes, and shredded mozzarella in a small bowl. Set aside. -
Step 5
Punch down risen dough and roll it into a 12×18 inch rectangle on a lightly floured surface. Evenly spread the garlic herb mixture over the dough, leaving a ½ inch border on one long edge. -
Step 6
Roll the dough tightly into a log from the long edge without the border, pinching the seam to seal. Slice the log lengthwise down the middle. Twist the two halves together, keeping the cut sides exposed. Pinch ends to seal. For a simpler twist, omit separating into three strands. -
Step 7
Carefully transfer the braided dough to a parchment-lined baking sheet. Cover loosely and let rise again for 30-45 minutes in a warm spot, until visibly puffy. -
Step 8
Preheat oven to 375°F (190°C). Whisk 1 tbsp melted butter and brush over the dough. Bake for 25-35 minutes, or until deeply golden brown and hollow when tapped (internal temp 200-210°F). Tent with foil if browning too fast. -
Step 9
Transfer bread to a wire rack and cool for at least 15-20 minutes before slicing with a serrated knife. Garnish with fresh parsley. Serve warm and enjoy! -
Step 10
Store leftovers in an airtight container at room temperature for 2-3 days, or freeze for up to 1 month. Reheat gently in the oven.
Important Information
Nutrition Facts (Per Serving)
It is important to consider this information as approximate and not to use it as definitive health advice.
Allergy Information
Please check ingredients for potential allergens and consult a health professional if in doubt.