Rice Krispie Treat Pumpkins are more than just a seasonal dessert; they are a delightful invitation to embrace the charm of autumn and the playful spirit of holidays like Halloween. As someone who cherishes both ease in the kitchen and festive celebrations, I am always thrilled to share recipes that bring smiles with minimal fuss. These adorable, no-bake confections capture the nostalgic essence of the classic Rice Krispie Treat, a beloved American staple since the 1930s, and transform it into a vibrant, thematic masterpiece perfect for any fall gathering or school event.
People absolutely adore these treats for their undeniable charm and simplicity. The combination of crispy texture, sweet marshmallow chewiness, and the fun, edible pumpkin shape makes them an irresistible delight for all ages. There’s a wonderful satisfaction in creating something so visually appealing with ingredients you likely already have on hand, requiring no oven time whatsoever. Whether you’re looking for a quick activity with children or a charming dessert to complete your holiday spread, these Rice Krispie Treat Pumpkins offer both convenience and a guaranteed burst of joy, embodying everything we love about homemade goodness during the coziest time of year.

Ingredients:
- ½ cup (1 stick) unsalted butter, plus extra for greasing your hands and equipment
- 1 bag (16 ounces) mini marshmallows, about 9 cups loosely packed, plus a few extra for decoration or minor adjustments
- 1 teaspoon pure vanilla extract (optional, but I think it adds a lovely depth of flavor)
- 6 cups Rice Krispies cereal
- Orange gel food coloring (I prefer gel for vibrant colors without adding too much liquid)
- Green gel food coloring, for leaf/vine details if you’re feeling extra artistic
- ¼ cup powdered sugar, for dusting hands (optional, but super helpful!)
For Decoration:
- Pretzel sticks, broken into 1-inch pieces, or green sour candy ropes (like Sour Punch Straws), cut into ½-inch pieces for stems
- Green licorice laces or green pull-apart licorice candy, for vines and leaves
- Mini chocolate chips, regular chocolate chips (melted for drawing), candy melts (green, brown, or black), or black gel food coloring for faces and details
- Small candies like mini M&M’s, candy corn, or sprinkles for additional embellishments
Oh, I’m so excited for you to make these adorable Rice Krispie Treat Pumpkins! They are such a festive and fun twist on a classic treat, perfect for any autumn gathering or just a cozy evening in. Let’s get started on creating some delicious, cute edible art!
Preparing the Orange Rice Krispie Treat Mixture
This is where the magic begins! Getting the base mixture right is crucial for perfectly textured Rice Krispie Treat Pumpkins.
- Melt the Butter: First, I’ll grab a very large, non-stick pot or a sturdy Dutch oven. We need plenty of space for stirring. I place it over medium-low heat and add my ½ cup of unsalted butter. I like to let it melt slowly and completely. It’s important to watch it carefully so it doesn’t brown too quickly or burn, as that can affect the flavor of our delicious Rice Krispie Treat Pumpkins later on. Once it’s fully melted and looks like liquid gold, it’s time for the next step.
- Add the Marshmallows: Now, I’ll gently pour in the entire bag of mini marshmallows. I find mini marshmallows melt more evenly and quickly than larger ones, making the process smoother. With a heat-resistant spatula, I stir continuously until the marshmallows are completely melted and smooth. This takes a few minutes, so be patient and keep stirring to prevent any scorching at the bottom of the pot. We’re looking for a thick, gooey, uniform marshmallow cloud.
- Introduce Flavor and Color: Once the marshmallows are perfectly melted, I’ll remove the pot from the heat. This is a critical step for vibrant color and fresh vanilla flavor. I immediately stir in my 1 teaspoon of pure vanilla extract. Then, it’s time to add the star color for our Rice Krispie Treat Pumpkins! I start with about ½ teaspoon of orange gel food coloring. I mix it thoroughly until the marshmallow mixture is a beautiful, even shade of orange. If I want a deeper, more vibrant pumpkin hue, I add a tiny bit more, drop by drop, mixing well after each addition until I achieve my desired shade. Remember, a little gel goes a long way!
- Incorporate the Cereal: This is the final step for the base mixture. I pour all 6 cups of Rice Krispies cereal into the orange marshmallow mixture. Working quickly but gently, I use my spatula to fold the cereal into the marshmallow. I aim to coat every single piece of cereal evenly. It’s a bit of an arm workout, but trust me, it’s worth it for that perfect sticky, crunchy texture. Make sure no dry pockets of cereal remain. The mixture will be very sticky and warm, so be prepared to move on to shaping relatively soon.
Forming the Pumpkin Shapes
This is the fun, hands-on part where our Rice Krispie Treat Pumpkins truly come to life! It requires a little bit of prep and quick work, but it’s incredibly rewarding.
- Prepare for Shaping: Before I even think about touching that warm, sticky mixture, I thoroughly grease my hands. I mean really grease them! I rub a generous amount of butter all over my palms, fingers, and even between my fingers. Alternatively, I sometimes dust my hands with powdered sugar, which also helps prevent sticking and adds a very slight sweetness. You might need to re-grease or re-dust your hands periodically as you work, especially if the mixture starts to cool and become less pliable. I also make sure I have a large piece of parchment paper or a greased baking sheet ready where I can place my finished pumpkins to cool.
- Scoop and Form Balls: Using a buttered ½-cup measuring cup or a large ice cream scoop, I scoop out portions of the Rice Krispie mixture. The size of your scoop will determine the size of your Rice Krispie Treat Pumpkins. For a variety of sizes, I sometimes use different scoop sizes. Once I have a portion, I gently, but firmly, press and roll it between my buttered hands to form a compact, round ball. Don’t press too hard, or you’ll crush the cereal, but firm enough so they hold their shape well.
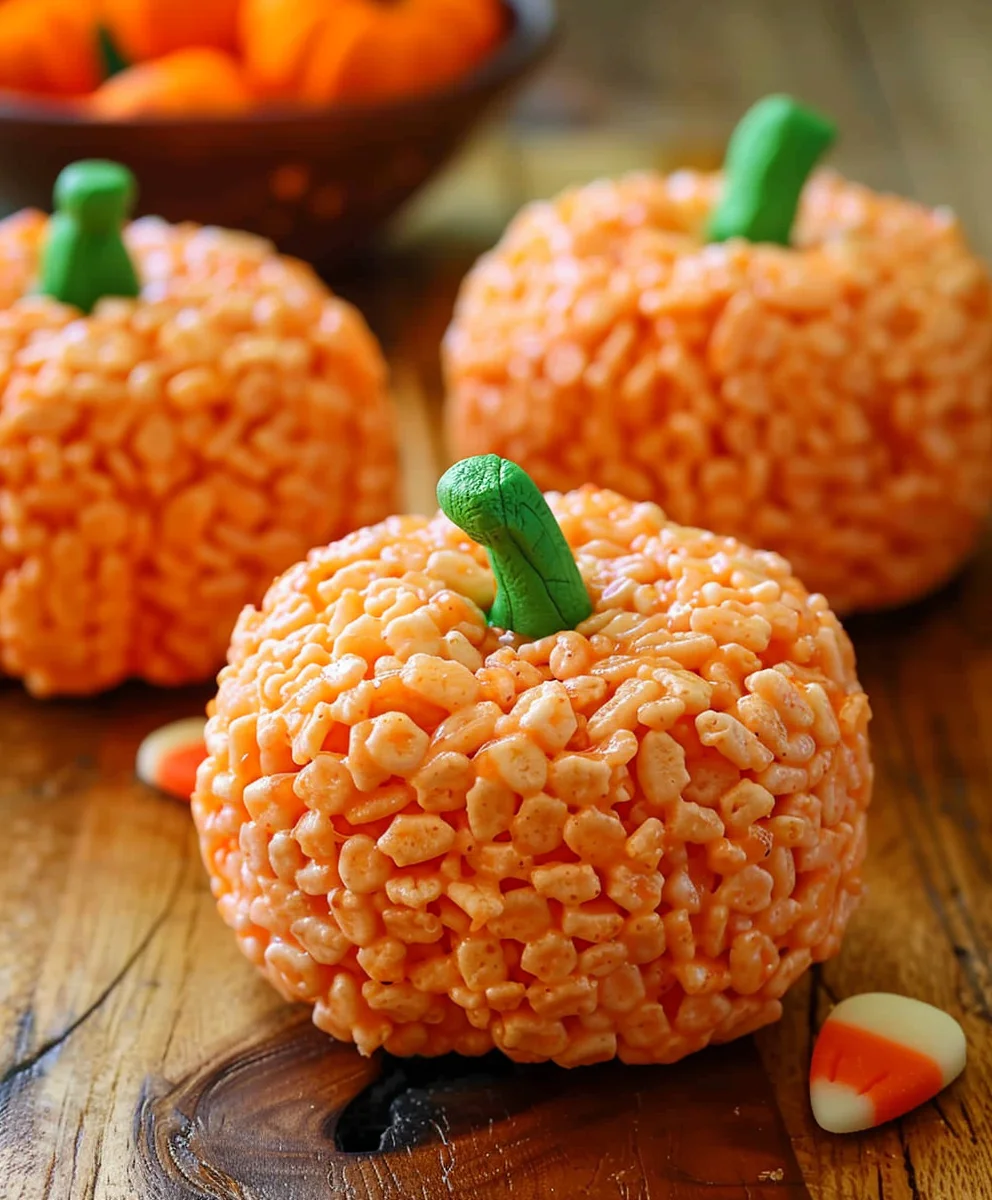
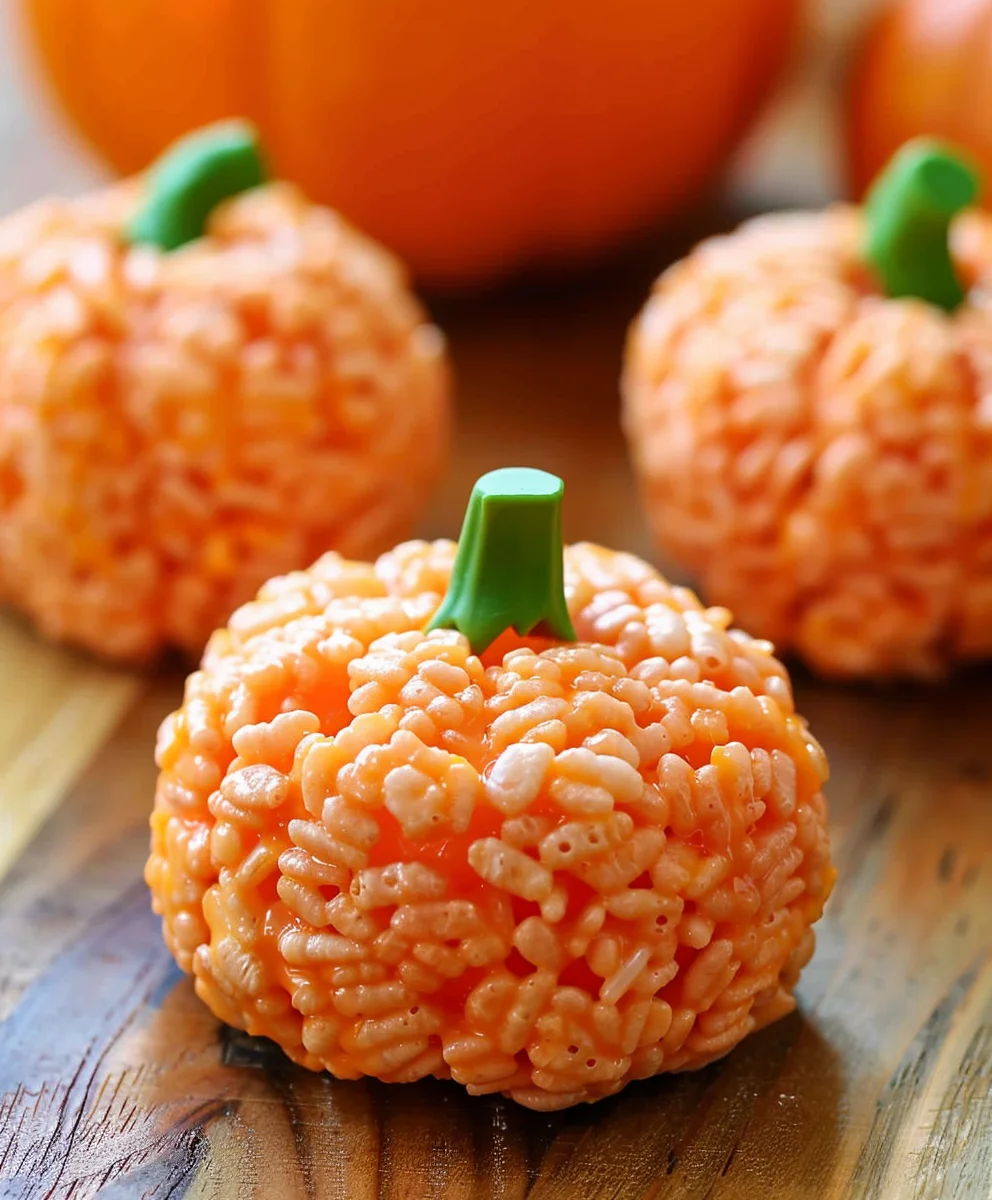
- Create the Pumpkin Indentations: Now for the signature pumpkin shape! After I’ve formed a round ball, I use my thumb and index finger, or even the side of my hand, to gently press indentations into the sides of the ball. I typically create 4-6 ridges around each pumpkin to give it that classic segmented look. It’s like gently squeezing the sides in a few places to define the sections. Don’t worry if they’re not perfectly symmetrical; homemade charm is part of the appeal of these Rice Krispie Treat Pumpkins!
- Set Aside to Cool: As I finish shaping each Rice Krispie Treat Pumpkin, I place it onto my prepared parchment paper or greased baking sheet. I make sure to leave a little space between each one to allow them to cool and firm up. This also prevents them from sticking together. I continue this process until all of the mixture has been used. This recipe typically yields about 12-18 medium-sized pumpkins, depending on how large I make them. Let them cool completely at room temperature for at least 30 minutes before moving on to decorating. This ensures they are firm enough to handle without losing their shape.
Decorating Your Rice Krispie Treat Pumpkins
This is truly where the creativity comes in! Each Rice Krispie Treat Pumpkin becomes its own little masterpiece. Have fun with it!
- Adding the Stems: Once my Rice Krispie Treat Pumpkins are nicely cooled and firm, it’s time for the stems. I find that pretzel sticks work wonderfully, as do small pieces of green sour candy ropes. I gently push a 1-inch piece of pretzel stick or a ½-inch piece of green sour candy rope into the top center of each pumpkin. If I’m using pretzels, sometimes I’ll break them into slightly shorter pieces to get the perfect stem length. The mixture should be pliable enough to accept the stem without crumbling. If you’re going for a more realistic look, the brown of the pretzel works perfectly!
- Creating Vines and Leaves (Optional, but highly recommended!): This step really elevates the look of your Rice Krispie Treat Pumpkins.
- Option 1 (Licorice Vines): I love using thin green licorice laces for vines. I simply cut small pieces, sometimes curling them gently around my finger or a skewer to create a spiral effect, and then press them gently onto the top or side of the pumpkin, near the stem. For leaves, I might cut small leaf shapes from green pull-apart licorice candy or even use tiny green sprinkles.
- Option 2 (Green Candy Melts or Frosting): If I have green candy melts, I’ll melt a small amount according to package directions. Then, using a small piping bag with a very fine tip (or even just a ziptop bag with a tiny corner snipped off), I can pipe little curly vines and small leaf shapes directly onto the pumpkins. You could also use green royal icing or buttercream if you prefer. This gives a more polished look.
- Option 3 (DIY Green Paste): For a simple, edible paste, I sometimes mix a teaspoon of mini marshmallows (melted for a few seconds in the microwave) with a tiny amount of powdered sugar and a drop of green gel food coloring. I mix until it forms a thick paste, then I can use a toothpick to draw small vines and leaves.
- Designing Spooky or Silly Faces (Optional, but makes them extra cute!): This is the most expressive part of decorating your Rice Krispie Treat Pumpkins!
- Melted Chocolate/Candy Melts: I often melt a small handful of chocolate chips or black candy melts in a microwave-safe bowl (in 15-second intervals, stirring in between, until smooth). Then, using a toothpick, a small food-safe paint brush, or a very small piping bag, I carefully draw eyes, noses, and mouths onto the pumpkins. You can make classic jack-o’-lantern faces, or give them funny, sleepy, or surprised expressions.
- Gel Food Coloring: Black gel food coloring applied directly with a fine brush or a toothpick also works wonderfully for creating faces. It’s great for intricate details.
- Candy Features: For easy faces, I sometimes use mini chocolate chips for eyes, or cut small triangles from candy corn for teeth. Small pieces of other candies like M&M’s or sprinkles can also be used to create unique facial features. Just press them gently into the slightly sticky surface.
- Adding Embellishments: Don’t be afraid to get creative! Sprinkles, a dusting of edible glitter, or small colorful candies can add an extra touch of whimsy to your Rice Krispie Treat Pumpkins.
Finishing Touches and Storage
Almost done! Just a few final considerations to ensure your Rice Krispie Treat Pumpkins stay fresh and delicious.
- Allow Decorations to Set: After all the decorating is complete, especially if you’ve used melted chocolate, candy melts, or a wet frosting, it’s important to allow your Rice Krispie Treat Pumpkins to sit undisturbed. This gives the decorations time to firm up and set. Depending on what you’ve used, this could take anywhere from 15 minutes to an hour. Sometimes, I pop them into the refrigerator for 10-15 minutes to speed up the setting process, especially if I’m in a hurry, but generally, room temperature is fine.
- Proper Storage for Freshness: To keep your Rice Krispie Treat Pumpkins at their best, I recommend storing them in an airtight container at room temperature. They tend to get hard if refrigerated for too long, losing that wonderful chewy texture we all love. Layering them between sheets of parchment paper can help prevent sticking, especially if you have elaborate decorations.
- Enjoying Your Creation: These delightful Rice Krispie Treat Pumpkins are best enjoyed within 2-3 days of making them. The texture is usually ideal on the first day, but they remain perfectly delicious for a couple of days after. They are absolutely perfect for sharing at parties, packing in lunchboxes for a fun surprise, or simply enjoying as a festive snack.
- A Note on Firmness: If you find your pumpkins are a bit too soft and don’t hold their shape well, next time try adding a tiny bit more cereal. Conversely, if they’re too hard, a few more marshmallows might be needed in the base mixture. It’s all about finding that perfect balance for your environment and ingredients. But honestly, no matter what, these Rice Krispie Treat Pumpkins are always a hit! I just love seeing everyone’s faces light up when they see them.
Conclusion:
So there you have it! We’ve journeyed through the simple, delightful process of creating a treat that brings smiles to every face and a touch of festive cheer to any occasion. I truly believe this recipe isn’t just about mixing ingredients; it’s about crafting moments, celebrating the seasons, and sharing joy. This isn’t just another dessert; it’s an experience in itself, a perfect blend of nostalgia and creativity that promises to be a hit with both young and old. It’s incredibly forgiving, spectacularly versatile, and always, always delicious, making it an absolute must-try in your kitchen repertoire.
Why is this recipe a must-try, you ask? Because it delivers on so many fronts! First and foremost, it’s incredibly easy to make, requiring minimal ingredients and no special skills, which means even the most novice baker can achieve spectacular results. Imagine whipping up a batch of these vibrant, adorable delights in under an hour – that’s the kind of kitchen magic we’re talking about! The satisfaction of seeing those golden, marshmallowy spheres come to life, ready to be decorated, is truly rewarding. They are perfect for last-minute gatherings, school bake sales, or simply as a fun weekend activity with the kids. Beyond their ease, their sheer adorableness is undeniable. They add a whimsical touch to any dessert table, making them a fantastic conversation starter and a feast for the eyes before they even reach your palate. They’re also incredibly portable, making them ideal for picnics, potlucks, or packing into lunchboxes for a delightful midday surprise. The texture is that classic, irresistible chewy, gooey goodness we all adore from our childhood favorites, but with an elevated, festive twist that makes them feel extra special. Seriously, once you taste the soft, chewy interior with just the right hint of crunch, you’ll understand why these are more than just a snack; they’re a celebration of flavor and fun. This recipe specifically for the Rice Krispie Treat Pumpkins takes that beloved classic and transforms it into something truly special for the autumn season, making it indispensable for your fall festivities.
Now, let’s talk about how to make these delightful treats even more spectacular. While they are utterly charming on their own, a few serving suggestions and variations can truly elevate your creation. For serving, I love arranging them on a large platter with some fresh cranberries or a scattering of autumnal leaves (non-toxic, of course!) for a beautiful fall display. They pair wonderfully with a warm mug of apple cider or a festive pumpkin spice latte, creating the ultimate cozy autumn treat spread. You could also serve smaller versions as edible place settings at a Thanksgiving dinner, adding a personal, charming touch to your table. Consider placing individual Rice Krispie Treat Pumpkins in clear cellophane bags tied with a festive ribbon as party favors or as part of a Halloween trick-or-treat bounty for a homemade touch that everyone will appreciate.
But don’t stop there with just the basic pumpkin shape! The beauty of this recipe lies in its adaptability. For variations, consider experimenting with different flavors. A pinch of cinnamon or pumpkin spice mixed into the melted marshmallow can add an extra layer of seasonal warmth that is absolutely divine. A tiny drop of orange extract could enhance the pumpkin illusion even further, or a touch of vanilla bean paste for a more sophisticated flavor profile. You could also dip the bottoms in melted dark chocolate for a rich contrast, or drizzle them with white chocolate and a sprinkle of sea salt for a gourmet touch. Instead of candy corn, try using mini chocolate chips or M&M’s for the eyes and mouth to create different facial expressions on your pumpkins, or even use edible glitter for an extra sparkle. For an adult-friendly version, a splash of bourbon or rum in the marshmallow mixture (before adding the cereal, of course!) can introduce a subtle, sophisticated kick that is surprisingly delicious. And while the pumpkin shape is perfect for fall, imagine transforming these into other holiday shapes! With different cookie cutters or molding techniques, you could easily create stars for Christmas, hearts for Valentine’s Day, or even little eggs for Easter, making this a truly year-round favorite. You could even swap out the classic Rice Krispies for a different crispy cereal, like Chex or fruity O’s, to completely change the texture and flavor profile, opening up a world of possibilities.
Your Turn to Create and Share!
I am so incredibly excited for you to try this recipe. There’s a special kind of magic that happens when you bring these to life in your own kitchen. Don’t just read about it; experience the joy of making these yourself! Whether you’re a seasoned pro or just starting your culinary adventures, I promise you’ll find this recipe to be a delightful success. So, gather your ingredients, put on some festive music, and let your creativity flow. Once you’ve crafted your own batch of these adorable Rice Krispie Treat Pumpkins, I would absolutely love to hear about your experience. Did you add any unique twists? What kind of fun decorations did you come up with? Who did you share them with? Please don’t hesitate to share your stories, photos, and any brilliant variations you discover. Your kitchen is about to become the happiest place on earth, filled with the aroma of gooey marshmallows and the promise of delicious, festive fun. Happy baking, and happy sharing!
Fun Rice Krispie Treat Pumpkins: Easy No-Bake Recipe
Rice Krispie Treat Pumpkins are a delightful invitation to embrace the charm of autumn and the playful spirit of holidays like Halloween. These adorable, no-bake confections capture the nostalgic essence of the classic Rice Krispie Treat and transform it into a vibrant, thematic masterpiece perfect for any fall gathering or school event. People absolutely adore these treats for their undeniable charm and simplicity, offering a combination of crispy texture, sweet marshmallow chewiness, and fun, edible pumpkin shapes.
Ingredients
-
1/4 cup butter
-
1 bag large marshmallows (approx. 40)
-
6 cups Rice Krispies
-
Red & Yellow Liquid Food Coloring
-
Mini Rolos
-
Green M&M’s
-
1/4 cup cooking oil or melted butter, for hands
Instructions
-
Step 1
Melt 1/4 cup butter in a very large, non-stick pot over medium-low heat. -
Step 2
Add 1 bag large marshmallows (approx. 40 marshmallows); stir continuously with a heat-resistant spatula until completely melted and smooth. -
Step 3
Remove the pot from heat. Immediately stir in red and yellow liquid food coloring until the mixture reaches a beautiful, even orange shade. Add more drops as needed for desired vibrancy. -
Step 4
Pour in 6 cups Rice Krispies cereal. Quickly but gently fold the cereal into the orange marshmallow mixture until every piece is evenly coated. The mixture will be very sticky and warm. -
Step 5
Thoroughly grease your hands with 1/4 cup cooking oil or melted butter. Prepare a large piece of parchment paper or a greased baking sheet for cooling. -
Step 6
Using a buttered 1/2-cup measuring cup, scoop out portions of the Rice Krispie mixture. Gently but firmly press and roll each portion between your greased hands to form a compact, round ball. -
Step 7
After forming each ball, use your thumb and index finger or the side of your hand to gently press 4-6 indentations into the sides of the ball, creating the classic segmented pumpkin look. -
Step 8
Place each shaped pumpkin onto the prepared parchment paper, leaving space between them. Allow them to cool completely at room temperature for at least 30 minutes until firm. -
Step 9
Once cooled and firm, gently push a Mini Rolo into the top center of each pumpkin to serve as the stem. -
Step 10
Use Green M&M’s to create small leaves or other decorative details by gently pressing them onto the pumpkin near the stem. -
Step 11
Allow any added decorations to set completely. Store your Rice Krispie Treat Pumpkins in an airtight container at room temperature. Best enjoyed within 2-3 days.
Important Information
Nutrition Facts (Per Serving)
It is important to consider this information as approximate and not to use it as definitive health advice.
Allergy Information
Please check ingredients for potential allergens and consult a health professional if in doubt.