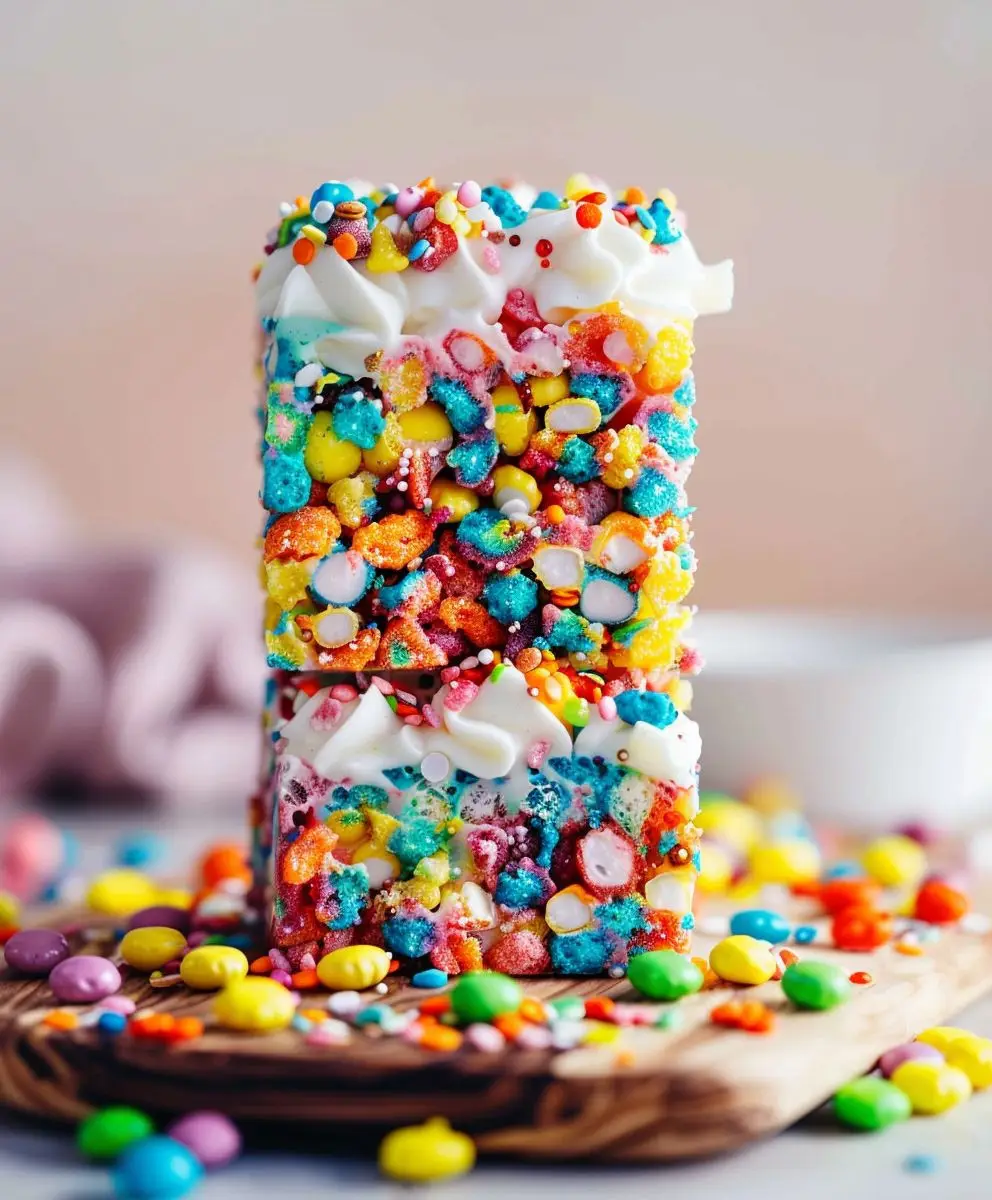
Fruity Pebbles Treats: A Nostalgic Delight
Fruity Pebbles Treats aren’t just a recipe; they’re a trip down memory lane, a vibrant explosion of childhood joy in every bite. I remember the first time I tasted these – the sugary crunch, the burst of fruity flavors, the undeniable satisfaction of a perfectly balanced sweet treat. This recipe isn’t just about recreating a classic; it’s about capturing that feeling, that pure, unadulterated happiness associated with a beloved cereal.
While the exact origins of Fruity Pebbles Treats are a bit hazy, lost somewhere in the annals of home baking and internet recipe sharing, their popularity is undeniable. They’ve become a staple at potlucks, bake sales, and countless childhood birthday parties. The beauty of Fruity Pebbles Treats lies in their simplicity and adaptability. You can easily customize them to your liking – add chocolate chips, nuts, or even different types of cereal for a unique twist.
What makes these treats so universally loved? It’s the perfect combination of textures, I believe. The chewy, marshmallowy base provides a delightful contrast to the satisfying crunch of the Fruity Pebbles. The vibrant colors and sweet, fruity flavors evoke a sense of fun and whimsy, making them a perfect dessert for any occasion, from casual gatherings to special celebrations. And let’s be honest, the ease of preparation is a major bonus! This recipe requires minimal ingredients and simple steps, making it accessible to even the most novice bakers.
So, are you ready to embark on a nostalgic culinary adventure? Let’s dive into the recipe and create some unforgettable Fruity Pebbles Treats together!

Ingredients:
- 1 cup (2 sticks) unsalted butter, softened
- 1 ¾ cups granulated sugar
- 2 large eggs
- 1 teaspoon vanilla extract
- 3 cups all-purpose flour
- 1 teaspoon baking soda
- ½ teaspoon salt
- 1 cup milk
- 2 cups Fruity Pebbles cereal
- ½ cup white chocolate chips (optional)
- ½ cup milk chocolate chips (optional)
- Additional Fruity Pebbles cereal, for garnish (optional)
Preparing the Batter:
- Preheat your oven to 350°F (175°C). Grease and flour two 9×13 inch baking pans. I find that using baking spray with flour works best for even coating and easy cleanup. You can also line the pans with parchment paper for extra insurance against sticking.
- In a large bowl, cream together the softened butter and granulated sugar until the mixture is light and fluffy. This is where a stand mixer really shines, but a good old-fashioned hand mixer will work just fine too. Make sure the butter is truly softened; this will ensure a smooth batter.
- Beat in the eggs one at a time, then stir in the vanilla extract. Scrape down the sides of the bowl to ensure everything is well combined.
- In a separate bowl, whisk together the flour, baking soda, and salt. This helps to evenly distribute the leavening agents and prevents lumps in your batter.
- Gradually add the dry ingredients to the wet ingredients, alternating with the milk, beginning and ending with the dry ingredients. Mix until just combined. Don’t overmix! Overmixing can lead to tough cookies.
- Stir in 2 cups of Fruity Pebbles cereal. I like to gently fold them in to avoid crushing too many of the colorful pieces. Reserve some for garnish if you’d like.
- If using, gently fold in the white and milk chocolate chips. Again, be gentle to avoid breaking up the chips too much.
Baking Process:
- Divide the batter evenly between the two prepared baking pans. Use a spatula to spread the batter out evenly in each pan. This ensures even baking and consistent thickness.
- Bake for 25-30 minutes, or until a wooden skewer inserted into the center comes out clean. Keep a close eye on them during the last 5-10 minutes, as ovens can vary. If the edges are browning too quickly, you can tent the pans loosely with aluminum foil.
- Let the bars cool in the pans for at least 10 minutes before inverting them onto a wire rack to cool completely. This prevents them from breaking apart and allows them to cool evenly.
Finishing Touches and Serving:
- Once the bars are completely cool, you can cut them into squares. I find a sharp knife works best for clean cuts. If you’re feeling fancy, you can use a cookie cutter to create fun shapes.
- Garnish with additional Fruity Pebbles cereal, if desired. A light sprinkle adds a nice pop of color and texture.
- Store the Fruity Pebbles bars in an airtight container at room temperature for up to 3 days. They’re best enjoyed fresh, but they’ll still be delicious for a couple of days.
- Enjoy your delicious homemade Fruity Pebbles treats! They’re perfect for parties, potlucks, or a sweet treat any time.
Tips and Variations:
- For a richer flavor, use brown butter instead of regular butter.
- Feel free to experiment with other types of cereal. Cocoa Puffs or other colorful cereals would be a fun alternative.
- Add a swirl of peanut butter or Nutella to the batter for an extra layer of flavor.
- For a more intense Fruity Pebbles flavor, you can pulse some of the cereal in a food processor before adding it to the batter.
- If you want a less sweet treat, reduce the sugar by ¼ cup.
- To make individual muffins, fill greased muffin tins about ¾ full and bake for 18-20 minutes.
Conclusion:
So there you have it – my recipe for the ultimate Fruity Pebbles Treats! I truly believe this recipe is a must-try for several reasons. First, it’s incredibly easy. The simple steps mean even beginner bakers can achieve perfectly delicious results, and the minimal cleanup is a huge bonus. Second, the flavor combination is simply irresistible. That nostalgic crunch of Fruity Pebbles combined with the creamy, chewy marshmallow base creates a textural and flavor experience that’s hard to beat. It’s the perfect balance of sweet and slightly salty, making it a crowd-pleaser for all ages.
Third, and perhaps most importantly, these Fruity Pebbles Treats are incredibly versatile. You can easily customize them to your liking. Want a more intense fruity flavor? Add a splash of fruit juice to the marshmallow mixture. Prefer a different cereal? Experiment with other colorful cereals like Cocoa Puffs or Lucky Charms – though I must admit, the Fruity Pebbles are truly the star of the show! Feeling adventurous? Try adding in some chopped nuts, chocolate chips, or even dried fruit for an extra layer of texture and flavor. The possibilities are truly endless!
I’ve personally enjoyed serving these treats at various gatherings, from casual family movie nights to more elaborate birthday parties. They’re always a hit! They’re perfect for potlucks, bake sales, or simply as a delightful afternoon snack. They also travel well, making them ideal for picnics or outdoor events. Imagine enjoying these delightful squares while basking in the summer sun – pure bliss!
Serving Suggestions:
For a truly special presentation, consider cutting the Fruity Pebbles Treats into small squares and arranging them on a decorative platter. Garnish with extra sprinkles or a drizzle of melted white chocolate for an extra touch of elegance. You can also serve them alongside a scoop of vanilla ice cream for a cool and refreshing contrast to the warm, chewy treat. A dollop of whipped cream is another fantastic addition, adding a light and airy element to the overall experience.
Variations to Explore:
Beyond the suggestions above, I encourage you to get creative and experiment with different flavor combinations. Consider adding a layer of peanut butter for a richer, more decadent treat. Or, for a festive twist, use holiday-themed sprinkles during the appropriate seasons. You could even incorporate different types of marshmallows, such as mini marshmallows or even gourmet flavored marshmallows, to elevate the flavor profile.
Ultimately, the beauty of this recipe lies in its adaptability. It’s a blank canvas for your culinary creativity, allowing you to personalize it to perfectly suit your taste preferences and the occasion. Don’t be afraid to experiment and make it your own!
Give it a Try and Share Your Experience!
I sincerely hope you give my Fruity Pebbles Treats recipe a try. I’m confident you’ll love the results as much as I do. Once you’ve made them, I’d love to hear about your experience! Share your photos and feedback on social media using the hashtag #FruityPebblesTreats. I can’t wait to see your delicious creations and hear about your own variations on this classic recipe. Happy baking!
Fruity Pebbles Treats: Delicious Recipes and Ideas
Chewy Fruity Pebbles bars loaded with cereal and chocolate chips. An easy, fun treat!
Ingredients
Instructions
Recipe Notes
- For richer flavor, use brown butter.
- Experiment with other cereals (Cocoa Puffs, etc.).
- Add a swirl of peanut butter or Nutella.
- Pulse some cereal in a food processor for more intense flavor.
- Reduce sugar by ¼ cup for a less sweet treat.
- Make individual muffins: fill greased muffin tins ¾ full and bake for 18-20 minutes.