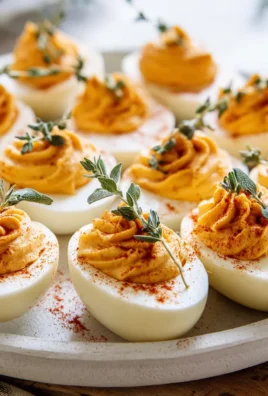
Thanksgiving Deviled Eggs might just be the unexpected star of your holiday appetizer spread this year. Forget the predictable cheese boards; imagine a platter of these creamy, savory bites, infused with the comforting flavors of autumn, disappearing before the turkey even hits the table! I’ve always found that the most memorable holiday dishes are often the ones that blend cherished traditions with a delightful, fresh perspective.
While deviled eggs themselves boast a rich history dating back to Roman times, evolving into the beloved party staple we know today, giving them a seasonal twist for Thanksgiving elevates them to a whole new level of deliciousness. People adore this dish not only for its irresistible creamy texture and perfectly balanced savory taste but also because it’s a fantastic make-ahead option that effortlessly pleases every palate. I believe that creating dishes that are both familiar and exciting is key to a truly unforgettable holiday meal. Trust me, once you experience the delightful surprise of these Thanksgiving Deviled Eggs, you’ll wonder how your holiday table ever managed without them.

Ingredients:
- 12 large eggs: The star of our show! I find that eggs that are a few days old (not super fresh, but not expired, of course) tend to peel much easier than those straight from the chicken or the grocery store shelf on the day they were laid. This is a little trick that saves so much frustration!
- 1/2 cup good quality mayonnaise: When it comes to deviled eggs, I always reach for a full-fat, creamy mayonnaise. It truly makes all the difference in achieving that luxurious, smooth, and utterly decadent filling we’re aiming for. It’s the base that binds all our wonderful flavors together.
- 2 tablespoons Dijon mustard: This isn’t just any mustard; Dijon adds a sophisticated tang and a subtle, warm spiciness that beautifully cuts through the richness of the mayonnaise and egg yolks. It’s a key player in balancing the flavors and giving our deviled eggs that classic, irresistible kick.
- 1 tablespoon apple cider vinegar: A small splash of apple cider vinegar might seem minor, but trust me, it’s a game-changer! It brightens everything up, adding a delightful acidity that balances the creaminess and truly makes all the other flavors sing. It’s like a secret weapon for a perfectly seasoned filling.
- 1/2 teaspoon salt: We’ll start with this amount, but remember, seasoning is a deeply personal journey. I always encourage you to taste as you go and adjust to your specific preference. A well-seasoned deviled egg is a happy deviled egg!
- 1/4 teaspoon freshly ground black pepper: If you have a pepper grinder, now is the time to use it! Freshly ground black pepper offers a much more vibrant aroma and a nuanced flavor compared to pre-ground varieties. It adds just the right amount of subtle bite.
- 1 tablespoon fresh sage, very finely minced: This is where the “Thanksgiving” magic truly begins to unfold! Sage offers that unmistakable warm, earthy, and slightly peppery autumnal note that is synonymous with holiday meals. Make sure it’s minced as finely as possible so it blends seamlessly into the filling without creating chunky bits.
- 1 teaspoon fresh thyme leaves, finely chopped: Another essential aromatic herb for our festive twist. Thyme contributes a delicate, slightly lemony, and subtly peppery undertone that complements the sage wonderfully. It adds another layer of sophisticated flavor to our Thanksgiving Deviled Eggs.
- Pinch of nutmeg (freshly grated if possible): Just a tiny whisper of nutmeg is all it takes! This often-overlooked spice adds a surprising depth, a hint of warmth, and a cozy, almost savory sweetness that really elevates the holiday theme. If you have whole nutmeg and a grater, grating it fresh will give you the most intense aroma and flavor.
- For Garnish and Texture:
- 1/2 cup crispy fried onions: Oh, these are an absolute game-changer for our Thanksgiving theme! They provide an incredible savory crunch and a familiar holiday flavor, instantly reminiscent of those beloved green bean casseroles we all adore during the festive season. They add both texture and a delicious umami burst.
- Small fresh sage leaves or sprigs: For a truly beautiful and aromatic presentation, a few small fresh sage leaves or delicate sprigs placed strategically atop each deviled egg make them look incredibly elegant, thoughtful, and perfectly holiday-ready. It’s a visual cue that these are no ordinary deviled eggs!
- Optional: A sprinkle of paprika for color: While our other garnishes provide plenty of visual appeal, a light dusting of sweet or smoked paprika can add an extra pop of reddish-orange color if you desire. It also offers a very subtle smoky or sweet note, depending on the type you choose.
Phase 1: Preparing the Eggs for the Thanksgiving Deviled Eggs
-
Boiling Your Eggs to Perfection: The Foundation of Great Deviled Eggs
This is arguably the most crucial step, as perfectly cooked eggs are the secret to creamy yolks and easy peeling. I have two preferred methods, and I’ll share both so you can choose what works best for you!
- Method A: Classic Stovetop Boil:
- Gently place your 12 large eggs in a single layer at the bottom of a large saucepan. I always make sure they’re not crowded; we want them to cook evenly.
- Cover the eggs with cold water by about one inch. Adding a splash of white vinegar to the water can sometimes help prevent cracks, though it’s not strictly necessary.
- Bring the water to a rolling boil over high heat. As soon as the water reaches a vigorous boil, immediately turn off the heat, cover the pot tightly with a lid, and let the eggs sit in the hot water for exactly 12-14 minutes. I prefer 12 minutes for a slightly creamier yolk, but 14 minutes ensures they are fully set.
- Method B: The Steaming Method (My Favorite for Easy Peeling!):
- Place a steamer basket in a large pot with about an inch of water at the bottom. Make sure the water doesn’t touch the basket.
- Carefully arrange your eggs in a single layer in the steamer basket.
- Bring the water to a full, rolling boil over high heat, then cover the pot with a tight-fitting lid.
- Reduce the heat to medium-high and steam the eggs for 12-14 minutes. I find this method consistently yields eggs that are much easier to peel, almost like magic!
- Method A: Classic Stovetop Boil:
-
The Ice Bath Ritual: Stopping the Cook and Aiding Peeling
Regardless of your chosen cooking method, as soon as the cooking time is up, immediately transfer the eggs to a large bowl filled with ice water. I mean immediately! This “ice bath” serves two critical purposes:
- It stops the cooking process dead in its tracks, preventing that unsightly green ring from forming around the yolk (a sign of overcooked eggs).
- The rapid temperature change helps the egg whites contract, separating them from the shell membrane, which makes peeling significantly easier. Let them cool in the ice bath for at least 10-15 minutes, or until they are completely cold to the touch.
-
Careful Peeling: A Gentle Touch for Smooth Whites
Once the eggs are thoroughly chilled, it’s time for peeling. This step can sometimes be tricky, but with cold eggs and a gentle hand, you’ll be fine.
- Gently tap each egg on a hard surface (like your countertop) to create small cracks all over the shell.
- Roll the egg between your hands to further shatter the shell, but still keeping it mostly intact.
- Starting from the wider end of the egg (where the air pocket usually is), carefully peel away the shell under cool running water. The water helps to wash away small bits of shell and makes it easier to separate the shell from the egg white. Take your time here; we want those beautiful, smooth egg whites for our Thanksgiving Deviled Eggs.
- Once peeled, gently pat each egg dry with a paper towel.
Phase 2: Crafting the Creamy Filling
-
Halving and Scooping: The Beginning of the Filling
Now that your eggs are perfectly peeled, it’s time to transform them! Carefully slice each egg lengthwise in half, from top to bottom. You’ll see those lovely, bright yellow yolks nestled in their white beds. Using a small spoon, gently scoop all the yolks out of the egg white halves and place them into a medium-sized mixing bowl. Try to get as much of the yolk as possible, leaving the egg white halves clean and intact, ready to be filled later. Arrange the empty egg white halves on a serving platter or a clean baking sheet for easy access.
-
Mashing to Perfection: No Lumps Allowed!
Using a fork or a potato masher, thoroughly mash the egg yolks until they are completely smooth and free of any large lumps. This step is crucial for achieving that silky, luxurious texture we’re aiming for in our Thanksgiving Deviled Eggs. I like to really get in there and make sure there are no chunky bits left behind. It should almost resemble fine crumbs when you’re done.
-
Infusing the Thanksgiving Flavors: Mixing It All In
Now for the exciting part – adding all those wonderful flavors! To your mashed yolks, add the mayonnaise, Dijon mustard, apple cider vinegar, salt, black pepper, finely minced fresh sage, finely chopped fresh thyme, and that delicate pinch of nutmeg. These ingredients are going to come together to create a symphony of holiday flavors that will make these deviled eggs truly special.
-
Creamy, Dreamy Blending: Whisking to Smoothness
Using a sturdy spoon or a rubber spatula, vigorously mix all the ingredients together. I really get in there, pressing against the sides of the bowl to ensure everything is thoroughly combined. You want the mixture to be completely smooth, creamy, and uniform in color and texture. Keep mixing until there are no streaks of individual ingredients left; it should look like a rich, pale yellow, herb-flecked paste. Don’t be shy with your mixing! The more you combine, the creamier your filling will be.
-
The All-Important Taste Test: Adjusting for Perfection
This is arguably the most important step for any recipe. Grab a small spoon and take a taste of your filling. Does it need more salt? A touch more pepper? Perhaps another tiny whisper of vinegar to brighten it up? Or maybe you want to amp up the sage or thyme a little more for a stronger holiday punch? Now is the time to adjust to your personal preference. I often find myself adding a tiny pinch more salt or a dash more pepper until it’s absolutely perfect for my palate. Don’t be afraid to trust your taste buds here!
Phase 3: Assembling Your Festive Deviled Eggs
-
Filling the Egg Whites: Spooning or Piping
Now we fill those waiting egg white halves! You have two main options, depending on how fancy you want your presentation to be:
- Method A: The Spoon Method (Simple and Rustic):
If you’re going for a more casual, rustic look, simply use two small spoons to generously scoop the creamy yolk mixture back into each egg white half. Create a small mound, ensuring each half is well-filled. This is quick and easy, and still absolutely delicious!
- Method B: The Piping Method (Elegant and Impressive):
For a more polished and professional look, I highly recommend using a piping bag fitted with a star tip (or any decorative tip you prefer, or even just a round tip for a classic look). Spoon all of the filling into the piping bag. Then, carefully pipe the mixture into each egg white half, creating a beautiful, swirled mound. This method truly elevates the visual appeal of your Thanksgiving Deviled Eggs, making them look even more inviting on your holiday table. If you don’t have a piping bag, a large Ziploc bag with one corner snipped off will work just as well!
- Method A: The Spoon Method (Simple and Rustic):
-
Arranging with Care: Presentation Matters
As you fill each deviled egg, carefully arrange them on your chosen serving platter. A beautiful presentation really makes a difference, especially for a holiday like Thanksgiving. I like to arrange them in concentric circles or neat rows, making them look abundant and appealing. Make sure they are stable and won’t roll around.
Phase 4: The Thanksgiving Touches and Garnish
-
Adding the Crispy Crunch: Crispy Fried Onions!
Here’s where we truly seal the deal on the “Thanksgiving” theme! Just before serving, generously sprinkle the crispy fried onions over the tops of all your deviled eggs. I like to press them ever so gently into the filling so they adhere well. These little gems not only add an incredible, satisfying crunch but also impart a savory, slightly sweet flavor that perfectly complements the sage and thyme within the filling. They are a delightful nod to classic holiday side dishes and truly elevate the texture profile of these deviled eggs.
-
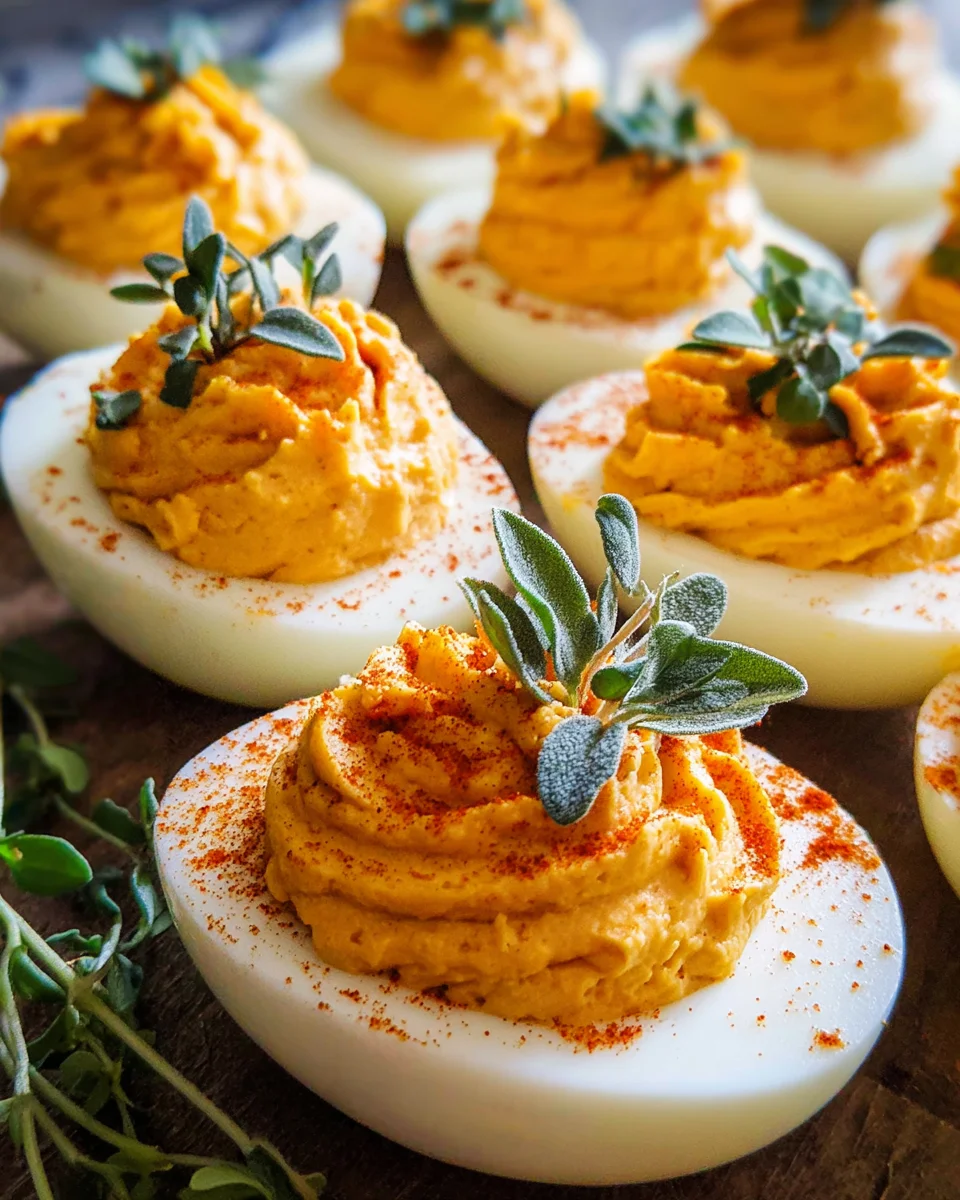
The Final Flourish: Fresh Sage Leaves
To complete the elegant holiday look, gently place one small, fresh sage leaf or a delicate sprig on top of each deviled egg. This is not just for decoration; the fresh sage adds a wonderful aromatic component and visually reinforces the festive theme. It’s a simple touch that makes a huge impact on presentation.
-
Chilling for Flavor Infusion: Patience is a Virtue
Once assembled and garnished, gently cover the platter with plastic wrap and refrigerate your Thanksgiving Deviled Eggs for at least 30 minutes. This chilling time isn’t just to keep them cool; it allows the flavors to meld and deepen, resulting in an even more delicious bite. Ideally, I like to chill them for at least an hour before serving to really let all those wonderful Thanksgiving spices infuse beautifully.
-
Serve and Enjoy!
Bring your beautifully crafted Thanksgiving Deviled Eggs to your holiday gathering and watch them disappear! They are an absolute showstopper and a fantastic appetizer that will have everyone asking for the recipe. Enjoy the compliments!
Chef’s Tips and Variations for Your Thanksgiving Deviled Eggs
Crafting the perfect deviled egg is both an art and a science, and with a few extra pointers, yours will be legendary. Here are some thoughts to elevate your “Thanksgiving Deviled Eggs” even further:
-
The Importance of Egg Freshness (or lack thereof!):
I mentioned this earlier, but it bears repeating: do not use super fresh eggs for deviled eggs! Fresher eggs have a membrane that adheres much more tightly to the shell, making them notoriously difficult to peel without tearing chunks out of the whites. Older eggs (ideally about a week to 10 days old, but still within their expiration date, of course) have had time for the pH to change and for a small air pocket to form, making the peeling process much smoother. Plan ahead and buy your eggs a little early!
-
Preventing the Green Ring of Doom:
That unsightly grayish-green ring around the yolk is a dead giveaway of an overcooked egg. It’s harmless, but not ideal for presentation. The key to avoiding it is precise cooking time and the immediate ice bath. Don’t let your eggs sit in hot water for too long after the heat is off, and always shock them in ice water right away. This stops the sulfur in the egg white from reacting with the iron in the yolk, which is what causes the discoloration.
-
Make-Ahead Magic:
Thanksgiving is busy enough, so anything you can prep in advance is a win! You can definitely prepare your deviled egg filling up to 24 hours in advance. Store the filling in an airtight container in the refrigerator. Keep the empty egg white halves covered on a plate in the fridge as well. When you’re ready to serve, simply pipe or spoon the filling into the whites, add your crispy fried onions and sage garnish, and chill for a final 30 minutes. This significantly cuts down on last-minute stress!
-
Storage Savvy:
Leftover deviled eggs (if there are any!) should be stored in an airtight container in the refrigerator. They are best enjoyed within 2-3 days. The crispy fried onions might lose a little of their crunch over time, so if you’re making a huge batch, consider adding the garnish just before serving each portion.
-
Flavor Variations to Explore:
- Bacon Bliss: Crumbled cooked bacon is always a welcome addition! You can mix it into the filling for a smoky flavor or sprinkle it on top as a garnish alongside or instead of the fried onions.
- Spicy Kick: If you like a little heat, a dash of hot sauce (like Tabasco or Sriracha) in the filling or a pinch of cayenne pepper can add a fantastic zing.
- Cranberry Swirl (Use Sparingly!): For an even more explicit Thanksgiving note, you could try a tiny dollop of whole berry cranberry sauce (just a ¼ teaspoon) swirled on top of the filling right before adding the crispy onions. Be careful not to use too much, as the texture can be overwhelming, but a small amount offers a beautiful color contrast and a sweet-tart surprise.
- Herb Exploration: While sage and thyme are perfect for Thanksgiving, feel free to experiment with other fresh herbs like rosemary (finely minced) or even chives for a different flavor profile.
-
Presentation Prowess:
Beyond the fresh sage leaves, think about your platter. A bed of fresh greens (like arugula or watercress) can create a lovely backdrop for your deviled eggs, making them pop. A small sprinkle of smoked paprika can add a final visual flair if you’re not using other colorful garnishes.
-
Why These are the Perfect Thanksgiving Appetizer:
Thanksgiving Deviled Eggs are truly the ideal starter for your holiday feast. They are universally loved, easy to eat while mingling, and can be largely prepared in advance, freeing up valuable oven and stove space. The warm, earthy flavors of sage, thyme, and nutmeg perfectly complement the traditional tastes of the holiday, offering a familiar yet elevated appetizer that will delight all your guests. They are a thoughtful, delicious, and beautiful way to kick off your Thanksgiving celebration!
Ingredients:
- 12 large eggs: The star of our show! I find that eggs that are a few days old (not super fresh, but not expired, of course) tend to peel much easier than those straight from the chicken or the grocery store shelf on the day they were laid. This is a little trick that saves so much frustration!
- 1/2 cup good quality mayonnaise: When it comes to deviled eggs, I always reach for a full-fat, creamy mayonnaise. It truly makes all the difference in achieving that luxurious, smooth, and utterly decadent filling we’re aiming for. It’s the base that binds all our wonderful flavors together.
- 2 tablespoons Dijon mustard: This isn’t just any mustard; Dijon adds a sophisticated tang and a subtle, warm spiciness that beautifully cuts through the richness of the mayonnaise and egg yolks. It’s a key player in balancing the flavors and giving our deviled eggs that classic, irresistible kick.
- 1 tablespoon apple cider vinegar: A small splash of apple cider vinegar might seem minor, but trust me, it’s a game-changer! It brightens everything up, adding a delightful acidity that balances the creaminess and truly makes all the other flavors sing. It’s like a secret weapon for a perfectly seasoned filling.
- 1/2 teaspoon salt: We’ll start with this amount, but remember, seasoning is a deeply personal journey. I always encourage you to taste as you go and adjust to your specific preference. A well-seasoned deviled egg is a happy deviled egg!
- 1/4 teaspoon freshly ground black pepper: If you have a pepper grinder, now is the time to use it! Freshly ground black pepper offers a much more vibrant aroma and a nuanced flavor compared to pre-ground varieties. It adds just the right amount of subtle bite.
- 1 tablespoon fresh sage, very finely minced: This is where the “Thanksgiving” magic truly begins to unfold! Sage offers that unmistakable warm, earthy, and slightly peppery autumnal note that is synonymous with holiday meals. Make sure it’s minced as finely as possible so it blends seamlessly into the filling without creating chunky bits.
- 1 teaspoon fresh thyme leaves, finely chopped: Another essential aromatic herb for our festive twist. Thyme contributes a delicate, slightly lemony, and subtly peppery undertone that complements the sage wonderfully. It adds another layer of sophisticated flavor to our Thanksgiving Deviled Eggs.
- Pinch of nutmeg (freshly grated if possible): Just a tiny whisper of nutmeg is all it takes! This often-overlooked spice adds a surprising depth, a hint of warmth, and a cozy, almost savory sweetness that really elevates the holiday theme. If you have whole nutmeg and a grater, grating it fresh will give you the most intense aroma and flavor.
- For Garnish and Texture:
- 1/2 cup crispy fried onions: Oh, these are an absolute game-changer for our Thanksgiving theme! They provide an incredible savory crunch and a familiar holiday flavor, instantly reminiscent of those beloved green bean casseroles we all adore during the festive season. They add both texture and a delicious umami burst.
- Small fresh sage leaves or sprigs: For a truly beautiful and aromatic presentation, a few small fresh sage leaves or delicate sprigs placed strategically atop each deviled egg make them look incredibly elegant, thoughtful, and perfectly holiday-ready. It’s a visual cue that these are no ordinary deviled eggs!
- Optional: A sprinkle of paprika for color: While our other garnishes provide plenty of visual appeal, a light dusting of sweet or smoked paprika can add an extra pop of reddish-orange color if you desire. It also offers a very subtle smoky or sweet note, depending on the type you choose.
Phase 1: Preparing the Eggs for the Thanksgiving Deviled Eggs
-
Boiling Your Eggs to Perfection: The Foundation of Great Deviled Eggs
This is arguably the most crucial step, as perfectly cooked eggs are the secret to creamy yolks and easy peeling. I have two preferred methods, and I’ll share both so you can choose what works best for you!
- Method A: Classic Stovetop Boil:
- Gently place your 12 large eggs in a single layer at the bottom of a large saucepan. I always make sure they’re not crowded; we want them to cook evenly.
- Cover the eggs with cold water by about one inch. Adding a splash of white vinegar to the water can sometimes help prevent cracks, though it’s not strictly necessary.
- Bring the water to a rolling boil over high heat. As soon as the water reaches a vigorous boil, immediately turn off the heat, cover the pot tightly with a lid, and let the eggs sit in the hot water for exactly 12-14 minutes. I prefer 12 minutes for a slightly creamier yolk, but 14 minutes ensures they are fully set.
- Method B: The Steaming Method (My Favorite for Easy Peeling!):
- Place a steamer basket in a large pot with about an inch of water at the bottom. Make sure the water doesn’t touch the basket.
- Carefully arrange your eggs in a single layer in the steamer basket.
- Bring the water to a full, rolling boil over high heat, then cover the pot with a tight-fitting lid.
- Reduce the heat to medium-high and steam the eggs for 12-14 minutes. I find this method consistently yields eggs that are much easier to peel, almost like magic!
- Method A: Classic Stovetop Boil:
-
The Ice Bath Ritual: Stopping the Cook and Aiding Peeling
Regardless of your chosen cooking method, as soon as the cooking time is up, immediately transfer the eggs to a large bowl filled with ice water. I mean immediately! This “ice bath” serves two critical purposes:
- It stops the cooking process dead in its tracks, preventing that unsightly green ring from forming around the yolk (a sign of overcooked eggs).
- The rapid temperature change helps the egg whites contract, separating them from the shell membrane, which makes peeling significantly easier. Let them cool in the ice bath for at least 10-15 minutes, or until they are completely cold to the touch.
-
Careful Peeling: A Gentle Touch for Smooth Whites
Once the eggs are thoroughly chilled, it’s time for peeling. This step can sometimes be tricky, but with cold eggs and a gentle hand, you’ll be fine.
- Gently tap each egg on a hard surface (like your countertop) to create small cracks all over the shell.
- Roll the egg between your hands to further shatter the shell, but still keeping it mostly intact.
- Starting from the wider end of the egg (where the air pocket usually is), carefully peel away the shell under cool running water. The water helps to wash away small bits of shell and makes it easier to separate the shell from the egg white. Take your time here; we want those beautiful, smooth egg whites for our Thanksgiving Deviled Eggs.
- Once peeled, gently pat each egg dry with a paper towel.
Phase 2: Crafting the Creamy Filling
-
Halving and Scooping: The Beginning of the Filling
Now that your eggs are perfectly peeled, it’s time to transform them! Carefully slice each egg lengthwise in half, from top to bottom. You’ll see those lovely, bright yellow yolks nestled in their white beds. Using a small spoon, gently scoop all the yolks out of the egg white halves and place them into a medium-sized mixing bowl. Try to get as much of the yolk as possible, leaving the egg white halves clean and intact, ready to be filled later. Arrange the empty egg white halves on a serving platter or a clean baking sheet for easy access.
-
Mashing to Perfection: No Lumps Allowed!
Using a fork or a potato masher, thoroughly mash the egg yolks until they are completely smooth and free of any large lumps. This step is crucial for achieving that silky, luxurious texture we’re aiming for in our Thanksgiving Deviled Eggs. I like to really get in there and make sure there are no chunky bits left behind. It should almost resemble fine crumbs when you’re done.
-
Infusing the Thanksgiving Flavors: Mixing It All In
Now for the exciting part – adding all those wonderful flavors! To your mashed yolks, add the mayonnaise, Dijon mustard, apple cider vinegar, salt, black pepper, finely minced fresh sage, finely chopped fresh thyme, and that delicate pinch of nutmeg. These ingredients are going to come together to create a symphony of holiday flavors that will make these deviled eggs truly special.
-
Creamy, Dreamy Blending: Whisking to Smoothness
Using a sturdy spoon or a rubber spatula, vigorously mix all the ingredients together. I really get in there, pressing against the sides of the bowl to ensure everything is thoroughly combined. You want the mixture to be completely smooth, creamy, and uniform in color and texture. Keep mixing until there are no streaks of individual ingredients left; it should look like a rich, pale yellow, herb-flecked paste. Don’t be shy with your mixing!
-
The All-Important Taste Test: Adjusting for Perfection
This is arguably the most important step for any recipe. Grab a small spoon and take a taste of your filling. Does it need more salt? A touch more pepper? Perhaps another tiny whisper of vinegar to brighten it up? Or maybe you want to amp up the sage or thyme a little more for a stronger holiday punch? Now is the time to adjust to your personal preference. I often find myself adding a tiny pinch more salt or a dash more pepper until it’s absolutely perfect for my palate. Don’t be afraid to trust your taste buds here!
Phase 3: Assembling Your Festive Deviled Eggs
-
Filling the Egg Whites: Spooning or Piping
Now we fill those waiting egg white halves! You have two main options, depending on how fancy you want your presentation to be:
- Method A: The Spoon Method (Simple and Rustic):
If you’re going for a more casual, rustic look, simply use two small spoons to generously scoop the creamy yolk mixture back into each egg white half. Create a small mound, ensuring each half is well-filled. This is quick and easy, and still absolutely delicious!
- Method B: The Piping Method (Elegant and Impressive):
For a more polished and professional look, I highly recommend using a piping bag fitted with a star tip (or any decorative tip you prefer, or even just a round tip for a classic look). Spoon all of the filling into the piping bag. Then, carefully pipe the mixture into each egg white half, creating a beautiful, swirled mound. This method truly elevates the visual appeal of your Thanksgiving Deviled Eggs, making them look even more inviting on your holiday table. If you don’t have a piping bag, a large Ziploc bag with one corner snipped off will work just as well!
- Method A: The Spoon Method (Simple and Rustic):
-
Arranging with Care: Presentation Matters
As you fill each deviled egg, carefully arrange them on your chosen serving platter. A beautiful presentation really makes a difference, especially for a holiday like Thanksgiving. I like to arrange them in concentric circles or neat rows, making them look abundant and appealing. Make sure they are stable and won’t roll around.
Phase 4: The Thanksgiving Touches and Garnish
-
Adding the Crispy Crunch: Crispy Fried Onions!
Here’s where we truly seal the deal on the “Thanksgiving” theme! Just before serving, generously sprinkle the crispy fried onions over the tops of all your deviled eggs. I like to press them ever so gently into the filling so they adhere well. These little gems not only add an incredible, satisfying crunch but also impart a savory, slightly sweet flavor that perfectly complements the sage and thyme within the filling. They are a delightful nod to classic holiday side dishes and truly elevate the texture profile of these deviled eggs.
-
The Final Flourish: Fresh Sage Leaves
To complete the elegant holiday look, gently place one small, fresh sage leaf or a delicate sprig on top of each deviled egg. This is not just for decoration; the fresh sage adds a wonderful aromatic component and visually reinforces the festive theme. It’s a simple touch that makes a huge impact on presentation.
-
Chilling for Flavor Infusion: Patience is a Virtue
Once assembled and garnished, gently cover the platter with plastic wrap and refrigerate your Thanksgiving Deviled Eggs for at least 30 minutes. This chilling time isn’t just to keep them cool; it allows the flavors to meld and deepen, resulting in an even more delicious bite. Ideally, I like to chill them for at least an hour before serving to really let all those wonderful Thanksgiving spices infuse beautifully.
-
Serve and Enjoy!
Bring your beautifully crafted Thanksgiving Deviled Eggs to your holiday gathering and watch them disappear! They are an absolute showstopper and a fantastic appetizer that will have everyone asking for the recipe. Enjoy the compliments!
Chef’s Tips and Variations for Your Thanksgiving Deviled Eggs
Crafting the perfect deviled egg is both an art and a science, and with a few extra pointers, yours will be legendary. Here are some thoughts to elevate your “Thanksgiving Deviled Eggs” even further:
-
The Importance of Egg Freshness (or lack thereof!):
I mentioned this earlier, but it bears repeating: do not use super fresh eggs for deviled eggs! Fresher eggs have a membrane that adheres much more tightly to the shell, making them notoriously difficult to peel without tearing chunks out of the whites. Older eggs (ideally about a week to 10 days old, but still within their expiration date, of course) have had time for the pH to change and for a small air pocket to form, making the peeling process much smoother. Plan ahead and buy your eggs a little early!
-
Preventing the Green Ring of Doom:
That unsightly grayish-green ring around the yolk is a dead giveaway of an overcooked egg. It’s harmless, but not ideal for presentation. The key to avoiding it is precise cooking time and the immediate ice bath. Don’t let your eggs sit in hot water for too long after the heat is off, and always shock them in ice water right away. This stops the sulfur in the egg white from reacting with the iron in the yolk, which is what causes the discoloration.
-
Make-Ahead Magic:
Thanksgiving is busy enough, so anything you can prep in advance is a win! You can definitely prepare your deviled egg filling up to 24 hours in advance. Store the filling in an airtight container in the refrigerator. Keep the empty egg white halves covered on a plate in the fridge as well. When you’re ready to serve, simply pipe or spoon the filling into the whites, add your crispy fried onions and sage garnish, and chill for a final 30 minutes. This significantly cuts down on last-minute stress!
-
Storage Savvy:
Leftover deviled eggs (if there are any!) should be stored in an airtight container in the refrigerator. They are best enjoyed within 2-3 days. The crispy fried onions might lose a little of their crunch over time, so if you’re making a huge batch, consider adding the garnish just before serving each portion.
-
Flavor Variations to Explore:
- Bacon Bliss: Crumbled cooked bacon is always a welcome addition! You can mix it into the filling for a smoky flavor or sprinkle it on top as a garnish alongside or instead of the fried onions.
- Spicy Kick: If you like a little heat, a dash of hot sauce (like Tabasco or Sriracha) in the filling or a pinch of cayenne pepper can add a fantastic zing.
- Cranberry Swirl (Use Sparingly!): For an even more explicit Thanksgiving note, you could try a tiny dollop of whole berry cranberry sauce (just a ¼ teaspoon) swirled on top of the filling right before adding the crispy onions. Be careful not to use too much, as the texture can be overwhelming, but a small amount offers a beautiful color contrast and a sweet-tart surprise.
- Herb Exploration: While sage and thyme are perfect for Thanksgiving, feel free to experiment with other fresh herbs like rosemary (finely minced) or even chives for a different flavor profile.
-
Presentation Prowess:
Beyond the fresh sage leaves, think about your platter. A bed of fresh greens (like arugula or watercress) can create a lovely backdrop for your deviled eggs, making them pop. A small sprinkle of smoked paprika can add a final visual flair if you’re not using other colorful garnishes.
-
Why These are the Perfect Thanksgiving Appetizer:
Thanksgiving Deviled Eggs are truly the ideal starter for your holiday feast. They are universally loved, easy to eat while mingling, and can be largely prepared in advance, freeing up valuable oven and stove space. The warm, earthy flavors of sage, thyme, and nutmeg perfectly complement the traditional tastes of the holiday, offering a familiar yet elevated appetizer that will delight all your guests. They are a thoughtful, delicious, and beautiful way to kick off your Thanksgiving celebration!
Conclusion:
And there you have it, my friends! We’ve reached the grand finale of our culinary journey, and I genuinely hope you’re as excited as I am about this incredible recipe. What makes this dish truly special, in my opinion, is its uncanny ability to be both effortlessly simple and incredibly sophisticated at the same time. It takes a beloved classic and elevates it, transforming a humble ingredient into something that consistently steals the show, no matter the occasion. Forget everything you thought you knew about traditional preparations; this recipe brings a freshness, a vibrant flavor profile, and a delightful texture that will have everyone reaching for seconds, and probably even thirds. It’s not just food; it’s an experience, a little moment of joy packed into every single bite, offering a perfect balance of creamy richness and a subtle, intriguing depth of flavor that is genuinely unforgettable. Trust me when I say, this isn’t just another recipe; it’s destined to become a staple in your kitchen, a reliable star that you’ll turn to time and time again.
So, why is this particular recipe an absolute must-try? Firstly, the flavor combination is nothing short of brilliant. We’ve meticulously balanced the creamy, savory egg yolk filling with just the right amount of tang and a whisper of unexpected deliciousness that sets it apart from any other version you might have encountered. It’s familiar enough to be comforting, yet exciting enough to pique curiosity and impress even the most discerning palates. Secondly, the sheer ease of preparation is a huge win. You don’t need to be a gourmet chef to whip up a batch that looks and tastes like it came straight from a five-star kitchen. The steps are straightforward, the ingredients are accessible, and the payoff is immense. It’s the kind of recipe that empowers you to create something truly spectacular without breaking a sweat, making it perfect for busy weeknights, impromptu gatherings, or grand holiday feasts alike. It’s a crowd-pleaser, a conversation starter, and quite frankly, often the very first dish to disappear from any buffet spread. If you’re looking for a dish that consistently delivers on taste, presentation, and ease, then your search truly ends here.
Serving Suggestions and Delightful Variations:
One of the many beauties of this recipe lies in its incredible versatility. While these gems are perfect served simply on a platter, allowing their inherent deliciousness to shine, I love exploring different ways to present and enhance them. For a brunch spread, arrange them artfully amongst other breakfast bites; their vibrant color and irresistible appeal will draw everyone in. They make a fantastic appetizer for any dinner party, offering a sophisticated start to your meal without being heavy. For special occasions like the upcoming holiday season, consider garnishing them with a sprinkle of smoked paprika for a rustic touch, or a finely chopped fresh herb like chives or dill for a burst of freshness and color. A tiny dollop of caviar on top can instantly elevate them to an incredibly luxurious treat, perfect for New Year’s Eve or an elegant cocktail party. These are, without a doubt, a fantastic addition to any holiday table, and I particularly love them as
Thanksgiving Deviled Eggs, adding a light, creamy contrast to richer, heavier dishes. They offer that perfect little bite of joy before the main event, and trust me, they disappear quickly!
But don’t stop there! The world of deviled eggs is ripe for creative exploration. Feel free to play with the seasoning in the yolk mixture. A tiny pinch of curry powder can introduce an intriguing warmth, while a dash of your favorite hot sauce will add a pleasant kick. For those who enjoy a little texture, consider folding in some finely diced cornichons, capers, or even a tablespoon of crispy bacon bits into the filling. You could also experiment with different mustards; a stone-ground mustard offers a more robust flavor than Dijon, for example. For a truly unique twist, try topping some with a sliver of smoked salmon or a tiny shrimp for a seafood-inspired bite. The possibilities are truly endless, allowing you to tailor this amazing recipe to your personal taste preferences and the specific occasion. Don’t be afraid to make it your own; that’s where the real magic happens in the kitchen.
So, what are you waiting for? I wholeheartedly encourage you to roll up your sleeves, gather your ingredients, and give this recipe a try. I promise you won’t be disappointed. There’s a profound satisfaction that comes from creating something delicious with your own hands, and this dish delivers that feeling in spades. Once you’ve experienced the sheer delight of these incredible bites, please, do me a favor: come back and share your experience! I’d absolutely love to hear how they turned out for you, what garnishes you chose, or any brilliant variations you came up with. Your culinary adventures inspire me, and I can’t wait to see how you make this recipe your own. Happy cooking, and prepare to be amazed!
Thanksgiving Deviled Eggs
Elevate your holiday appetizer spread with these Festive Thanksgiving Deviled Eggs. Creamy, savory bites infused with comforting autumn flavors like sage, thyme, and nutmeg, topped with crispy fried onions. A delightful, make-ahead dish that blends tradition with a fresh, seasonal twist, perfect for pleasing every palate before the main feast.
Ingredients
Instructions
Important Information
Nutrition Facts (Per Serving)
It is important to consider this information as approximate and not to use it as definitive health advice.
Allergy Information
Please check ingredients for potential allergens and consult a health professional if in doubt.